
“Let all your things have their places; let each part of your business have its time.”
Follow Max’s Holy Quad order: volume, EQ, compression, then space (reverb, delay and panning). Keep the master track empty while you mix, check the mix on other speakers, and export it as a 32-bit float WAV for mastering.
Every sound is fighting for space, you’ve been turning knobs for an hour, and the mix keeps getting worse. That usually isn’t a talent problem, it’s an order problem. Here’s how to mix a song with Max’s exact method, from setting up the mixer to the final export, using the same stock FL Studio plugins and settings he uses in his free lesson. It works for trap, house, pop or anything else, and in any DAW, which is just the program you make music in.
Table of Contents
What does it mean to mix a song?
Mixing is the step where you make all the separate sounds in your song work together. Every sound, from the kick to the vocal, sits on its own track. You decide how loud each one is, which part of the frequency range it fills (from deep bass to bright highs), how steady its volume is, and where it sits from left to right and from near to far. That’s the whole job.
It’s the fourth step of producing a song, after the idea, the production and the arrangement. Max calls it the most time-consuming and the most technical step. His estimate for a full mix: “It takes about 5 to 10 hours on average.” Mastering comes after that. It’s a final polish on one exported file of the whole song, mostly to make it loud and even, and it can only be as good as the mix you give it.
Two things make mixing much easier before you even start. First, pick good sounds, because, as Max says, “choosing better samples creates better mixes immediately.” Second, don’t stack too many parts. More sounds mean more problems. Max calls over-producing a common beginner mistake, and his test is simple: if a part doesn’t make the song better, it goes.
How to mix a song with the Holy Quad formula
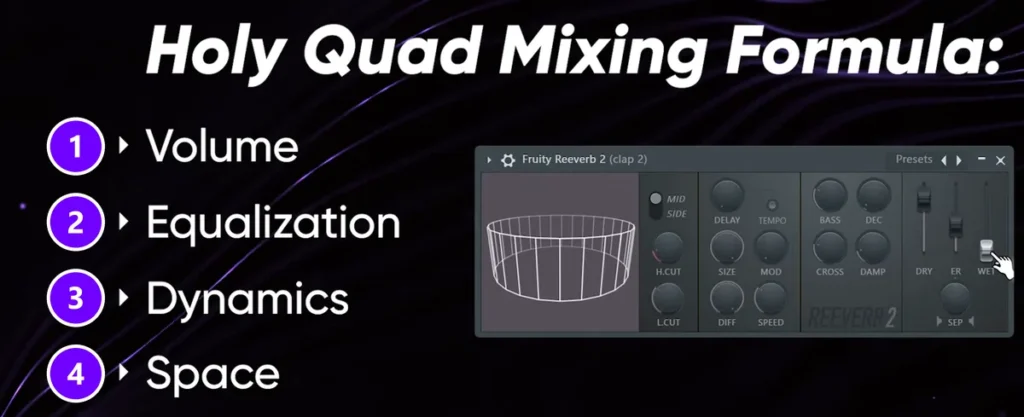
Max opens his mixing lesson with this slide. In Max’s words: “There are four sacred principles of mixing that I like to call the Holy Quad mixing formula. I want you to remember it and always follow it.”
- Volume (1): set how loud every sound is, so the most important parts lead.
- Equalization, or EQ (2): turn specific frequencies up or down, so each sound gets its own space from low to high.
- Dynamics (3): use a compressor to smooth out the jumps between loud and quiet moments.
- Space (4): add reverb for depth, and pan sounds left, right or center to make the mix feel wide.
The order matters. Each step changes the ones after it, so you work through them one by one and then circle back to volume at the end. Max mixes a simple EDM track in the lesson, but he says the process is always exactly the same, whatever style you make.
Before you mix: how do you set up your session?
A few minutes of setup saves an hour of confusion later. Do these four things once, before you touch a single knob.
Route every sound to its own mixer track
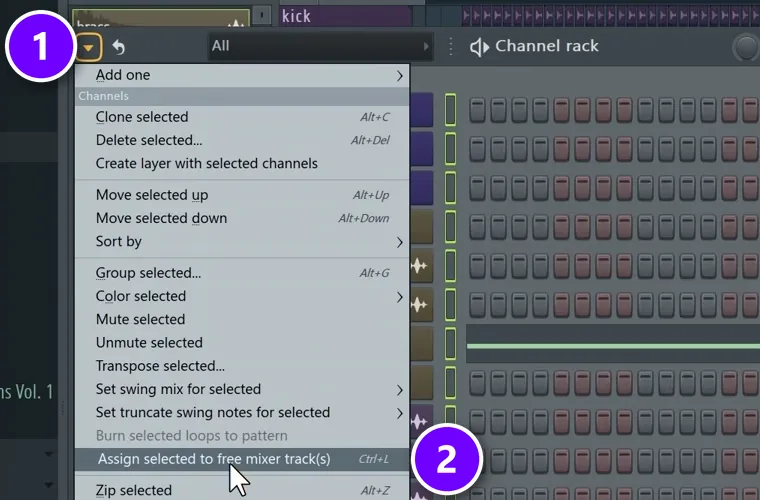
In a new project, your channels usually aren’t linked to mixer tracks yet. Fix that first. Double-click any channel’s select button in the Channel rack to select them all. Then open the Channel rack menu (1) and choose Assign selected to free mixer track(s) (2), or press Ctrl + L.
Every channel now shows a mixer track number, and the mixer copies your colors. That’s why Max asks you to color-code your tracks while you produce. At the top of the mixer, switch the view to a large size so the tracks are easy to tell apart, and hold Shift while you scroll over a track to move it.
Know your mixer strip
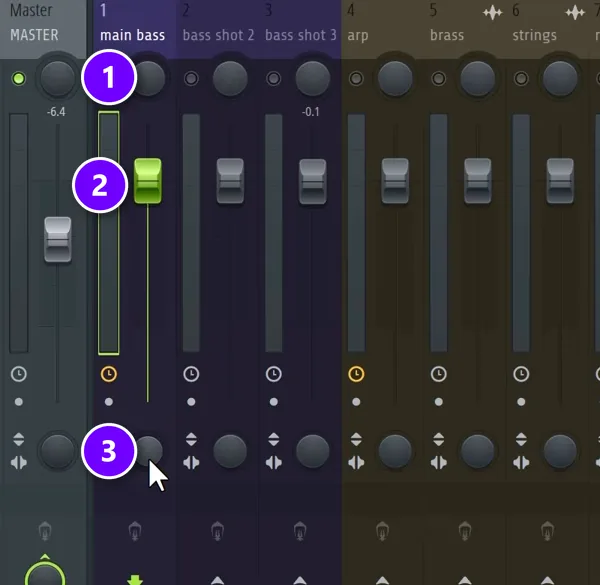
Every mixer track has the same controls. The pan knob (1) at the top places the sound left or right. The fader (2) sets its volume. The stereo separation knob (3) near the bottom makes a sound wider one way, or folds it toward mono (the same sound in both speakers) the other way. Max mostly uses it to narrow sounds down.
On the right side of the mixer, each track has ten effect slots, and the sound flows through them from top to bottom. Max’s plan follows the Holy Quad: an EQ in slot 1, a compressor in slot 2 and a reverb in slot 3, but only when the sound needs it. Max’s rule: “We never want to apply effects just for the sake of it. We always have intention behind it.” He skips the small EQ built into the bottom of the mixer, because a real EQ plugin gives him more control.
Empty the master and turn your speakers down
All your sounds end up on the master track, the last stop before your speakers. FL Studio puts a limiter (a plugin that stops anything from getting louder than a set level) on the master by default. While you mix, that limiter can squash the whole song whenever one sound gets too loud, so a big kick ruins everything and you can’t tell why. So take it off. Max’s rule: “When you’re mixing, make sure that your master track is completely empty, especially without any limiter at the end.”
Keep your speakers and headphones fairly quiet, too. Max asks you to keep the volume a little lower than you’d like, because you can easily damage your hearing over long sessions. Your ears also tire fast, which makes every decision harder.
Do you need gain staging?
Gain staging means setting the level that goes into each plugin, so the plugin can do its job. You may hear that every track should sit at −18 dBFS, which means 18 decibels below the digital ceiling of 0. Max explains in his gain staging video that this number comes from the days of analog gear. Inside FL Studio, which works in 32-bit float, a track that goes over 0 dB isn’t ruined, and you can turn it down later.
It still matters for compressors and distortion. They react to how loud a sound is, so a sound that comes in too quiet never reaches the point where they start working. Max’s fix keeps your balance the same: raise the volume on the channel, then lower its mixer fader by the same amount. The full story is in gain vs volume.
Step 1: How do you balance the volume of a mix?
Volume is the biggest part of a good mix, and it needs no plugins at all. Loop the busiest part of your song, the section where every sound plays at once, and set the levels there.
Turn down what’s too loud first
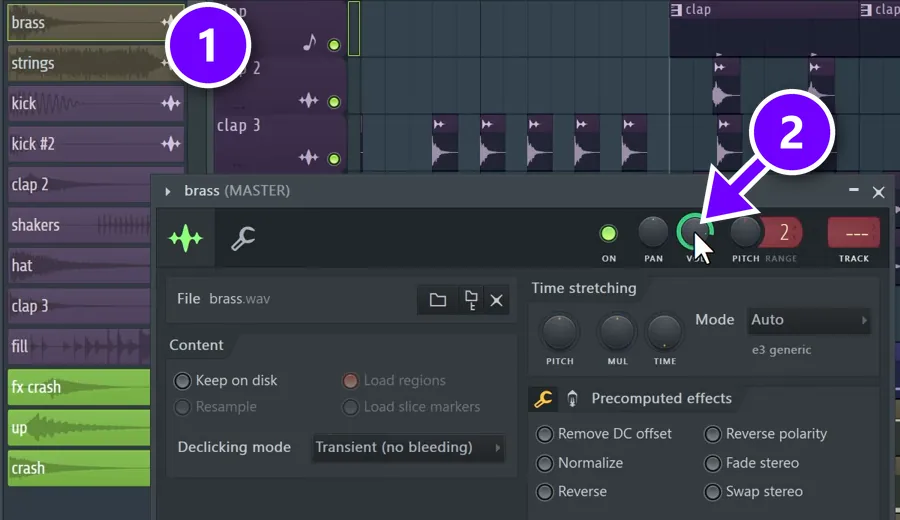
Max always starts by turning sounds down, not up. Double-click a sound’s clip (1) to open its channel window, then lower the VOL knob (2). Background parts like strings, brass hits, crashes and effects go down first, because they shouldn’t sit right in front of the listener.
The loudest parts should be the ones that define your song. In Max’s words: “The most important parts are always your drums and your main sound or like main lead, whatever makes your track your track.” In his demo that’s the kick and the bass, so he nudges the kick up a little until it stops getting lost.
Close your eyes and mute what you don’t need
As the mix gets better, it gets harder to hear what’s wrong. Close your eyes and listen for the one thing that bothers you most. Fix it, then listen again. When you can’t decide what to turn down next, mute your sounds one at a time.
If the song sounds better without a part, delete it. Max admits this is hard, because you get attached to a sound the moment you add it, but sometimes it has to go. For more on levels, read how to balance a mix, or try mixing with pink noise as a quick reference.
Max sets each sound’s volume on its channel while he produces, because he already has a level in his head. He saves the mixer faders for fine-tuning once the song is done.
Step 2: How do you EQ a mix?
EQ, short for equalizer, turns specific frequencies up or down. Low frequencies are deep sounds like bass, and high ones are bright sounds like cymbals. Max uses EQ for two jobs: finding and removing problems, and gently shaping a sound so it fits. Not every sound needs it.
Open Fruity Parametric EQ 2
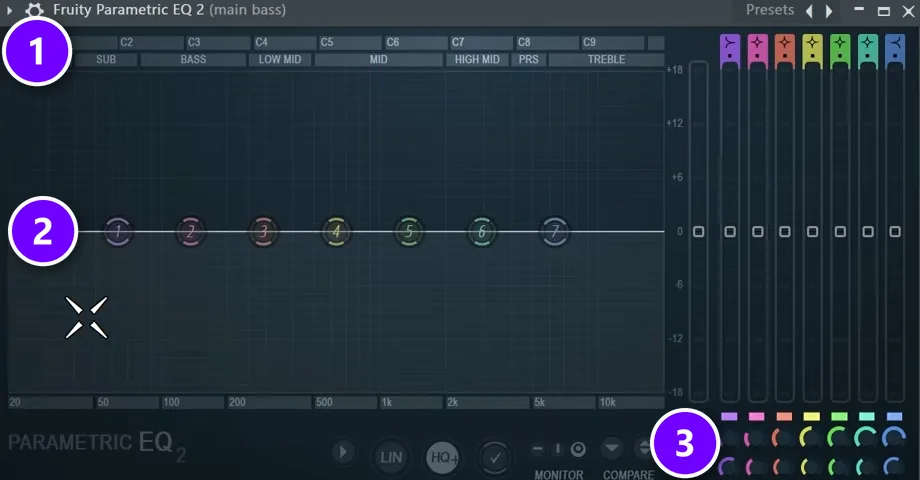
Right-click an empty slot on a mixer track, type EQ and pick Fruity Parametric EQ 2. The bar along the top (1) names each zone: sub, bass, low mids, mids, high mids, presence and treble. The seven numbered dots (2) are bands you drag up to boost or down to cut. Scroll over a band to make it narrower or wider. The knobs at the bottom right (3) set each band’s exact frequency and width.
Sub frequencies run from about 20 or 30 Hz up to 80 Hz, and Max says you “mostly feel rather than hear” them. Hover over the graph and the hint bar shows the exact Hz. He also turns on the heat map in the EQ’s options, which lights up where a sound is loudest. Work on the low end first, because it’s the most sensitive part of the mix, then the mids, then the treble.
Give the sub to one sound only
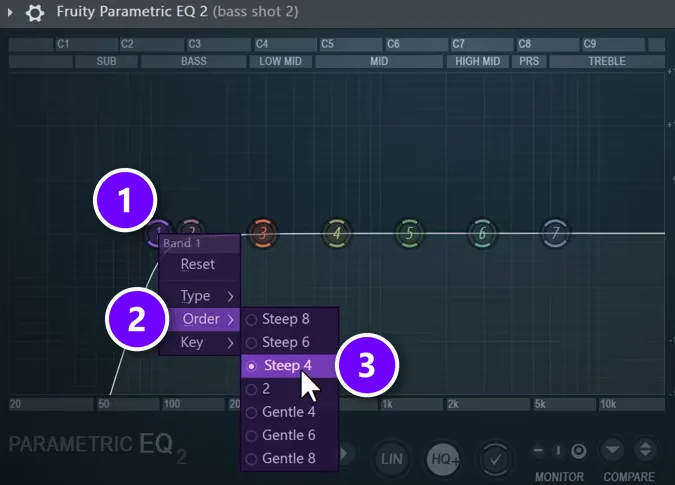
Max’s demo has three bass layers, and all three are full of sub. His rule: “We never want to layer the sub frequencies.” Pick one bass to keep the sub. Cut it from the others. Right-click band 1 (1), set its type to a low cut (also called a high pass, because it lets the highs pass), then open Order (2) and choose Steep 4 (3).
Steep 4 rolls off the lows quickly but still sounds natural. Max warns against the very steepest settings, because the steeper you go, the more artifacts (unwanted side effects) you add. Do the same on any other sound that carries sub it doesn’t need, like arps or a Reese bass. Read more about high-pass filters and how to make your low end clean and punchy.
Cut more than you boost, and check it in the full mix
Boosting adds level, and big boosts quickly make a mix harsh or muddy. Max never boosts more than about 6 dB. He would rather attenuate, which just means turn down, whatever is wrong than boost what’s good, because cutting leaves you with a cleaner mix.
Always judge your EQ with everything playing. Max’s strings sounded harsh on their own but fine in the mix, so he turned them down instead of cutting them. Nobody will ever hear your sounds soloed. They hear the whole song.
Shape the kick and find harsh spots on the hats
Never cut the sub from your kick. Sidechain compression, which comes in Step 3, handles the clash between kick and bass instead. Start with a great kick sample. Then shape it. Lift the high mids and presence for more click, or nudge the bass area for more punch. If the kick sounds muddy, which means everything fights and nothing is clear, cut a little of the low mids. Use a gentle bell, never a big low-shelf boost. If a kick needs a lot more sub, Max would rather pick a different sample than force it with EQ.
For harsh hi-hats, boost a narrow band and sweep it left and right until the harsh sound jumps out, then cut that spot a little. Leave sounds alone if they already fit, like a pre-made shaker loop or a short fill. Our guide to how to use EQ in mixing goes deeper, and how to mix a kick and 808 covers the low end of trap and hip-hop. For problems that come and go, try a dynamic EQ, and see our pick of the best EQ plugins.
Step 3: How do you use compression in a mix?
First, listen to your volumes again. EQ changes how loud things sound, so some parts will now be too quiet or too loud. Max’s reminder is to keep an eye on your volumes at all times, because they’re the biggest factor in how your mix sounds. In his demo, the arps and plucks were suddenly too loud once the bass layers were cleaned up.
A compressor turns a sound down only when it gets louder than a level you choose, so the loud and quiet moments end up closer together. Max calls it “a magic volume control that automatically works for you, making the loud sounds quieter and maybe even the quiet sounds louder.”
Two knobs matter for now, and for many weeks to come. The threshold is the level where the compressor steps in, and the ratio is how hard it turns things down. Max compares it to watching TV: when the sound gets louder than the threshold, your mom steps in and says “turn that down,” and the ratio is how much. At 2:1, a sound that goes 2 dB over the threshold comes out only 1 dB over.
Group your layers into a bus first
Max’s bass has three layers, and compressing each one on its own would be slow. So he groups them into a bus, which is one mixer track that several sounds feed into. Then they behave like one sound.
- Find an empty mixer track. Hold Shift and scroll to move it next to your bass tracks.
- Hold Ctrl and drag across the bass tracks to select them.
- Keep holding Ctrl and click the routing arrow at the bottom of the empty track. All the selected tracks now feed into it.
- Rename it Bass group and give it a darker color. Alt + click solos the group together with everything that feeds it.
Set the threshold, ratio and makeup gain
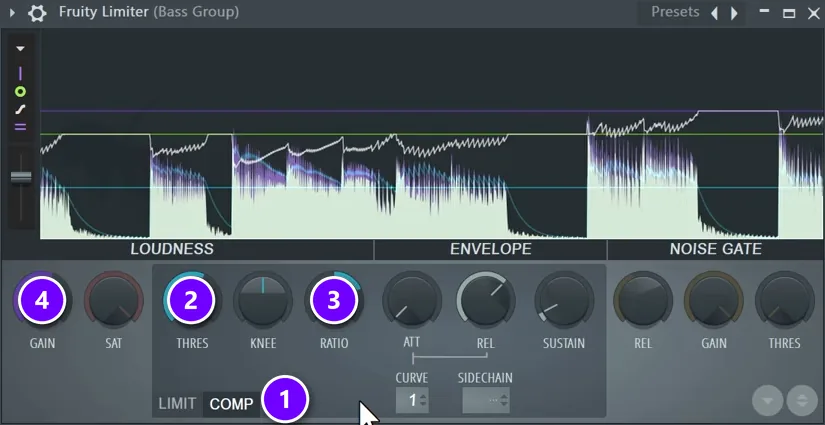
Max doesn’t use Fruity Compressor here, because it shows nothing about what’s happening. He loads Fruity Limiter instead and switches it to COMP (1), which turns it into a compressor that shows the waveform. Then he lowers THRES (2) and sets RATIO (3) anywhere between 2:1 and 4:1. That’s his starting range for beginners.
In the display, the purple shows what the compressor took away. Use GAIN (4) to make up the lost level. If the sound is turned down by about 3 dB, add about 3 dB of gain back. To learn what compression sounds like, exaggerate it with a high ratio and a low threshold, listen, then press Ctrl + Z to undo.
Max sees many beginners overdo compression, or skip it, because their channel volumes are set too low and the waveform never reaches the threshold. Raise the channel volume, lower the mixer fader by the same amount, and the compressor has room to work.
Some sounds don’t need compression at all. In Max’s demo, a brass hit that was already compressed got only a tiny touch at 1.5:1, and the soft strings and the long Reese were left alone. For more control, see how to use a compressor in FL Studio, the OTT compressor for an instantly bigger sound, multiband compression and saturation.
Compress the drums as one group
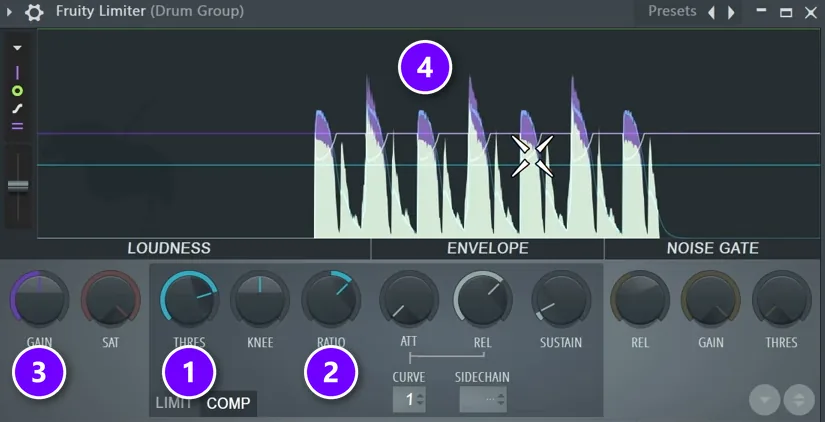
Don’t compress the kick, clap, snare, shaker or hats one by one. They’re short hits. Compressing them alone mostly just turns them down, so set their volume instead. Max’s reasoning: “We don’t want to over compress our drums or sometimes not compress our drums at all because we want them to keep the groove going.”
What works is a drum bus. Group all the drums the same way as the bass, add Fruity Limiter in COMP mode, and raise its ceiling so it only compresses. Lower THRES (1) and set RATIO (2). Max’s first try at 3:1 took off about 6 dB, which was too much. He settled on 2:1 with 3 to 4 dB of reduction and +3 dB on GAIN (3). The purple tips (4) show the loudest hits being tucked in.
The change is small on its own, but the kick and clap now sit closer to the hats, and the drums feel more controlled. The full drum chain is in our guide to mixing drums.
How do you sidechain the bass to the kick?
Sidechain compression finishes the dynamics step. A normal compressor reacts to its own sound. A sidechain compressor reacts to a different sound, here the kick, so the bass ducks, or dips in volume, every time the kick hits. That stops their low end from fighting, which is why you never had to cut the sub from your kick.
- Add a second Fruity Limiter on the bass group. Raise its ceiling so it doesn’t limit anything, and switch it to COMP.
- Select the kick’s mixer track, then click the routing arrow of the bass group. You can also right-click the arrow and choose Sidechain to this track.
- Turn the new send knob all the way down, so you don’t hear the kick twice. The signal still reaches the compressor.
- In the limiter, right-click SIDECHAIN and choose the kick.
- Lower the threshold and set the ratio to about 4:1. Max aims for 7 to 10 dB of ducking.
Max’s better setup: one sidechain group
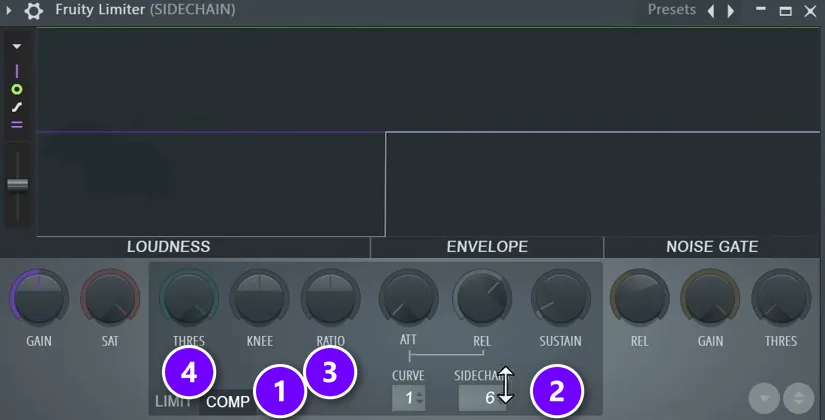
Max goes one step further. He makes a new group on insert 1, names it Sidechain, and routes everything that should duck into it: the bass group, the arps, the strings, the Reese and the pluck. He leaves the brass and the crashes out, because they’re impact sounds. Then he moves the kick’s send from the bass group to this new group.
On the group’s Fruity Limiter, switch on COMP (1) and pick the kick as the SIDECHAIN input (2). Set RATIO (3) to about 4:1 or higher, and lower THRES (4) until everything dips with each kick. Every method is in our guide to sidechaining in FL Studio.
Then circle back. After EQ, compression and sidechain, your levels will have moved a lot. In Max’s demo, the Reese now poked out, so he made it darker with a gentle high cut. The kick sounded a bit boomy, so he cut a little of the boxy low mids, and he did the same on the bass.
Step 4: How do you add space with reverb, delay and panning?
Space is the last step of the Holy Quad. Reverb adds the echo you’d hear if you sang in a cathedral or a bunker, so sounds feel close or far away. Panning places them left, right or in the center. Together they make the mix feel deep and wide instead of flat.
Reverb: low cut first, then size, decay and wet
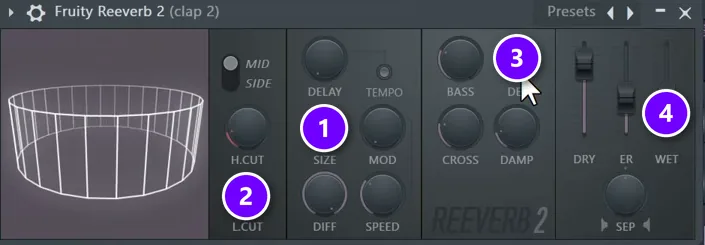
Load Fruity Reeverb 2 on the sound. Every reverb has the same core controls: size (1), the low cut (2), decay (3), and the dry and wet faders (4). Dry is your untouched sound and wet is the reverb. If a reverb has a single mix knob instead, 100% means all wet and 0% means all dry.
Max’s clap settings make a good starting point. Turn the size all the way up and raise the low cut to about 700 Hz, so the reverb never muddies the low end. Set the decay, which is how long the reverb lasts, to about 1 second (up to 1.5 seconds for percussion), and add only a little wet. On hats, go even shorter, and try a smaller size. For a pluck or arp that should fill the background, use a longer decay and more wet.
Many synth presets come with reverb and delay built in. Max turns those off inside the synth and adds his own on the mixer instead, so he can shape them along with the rest of the mix.
Panning: spread the small sounds, keep the big ones centered
Panning brings a lot of excitement to a mix. Max pans his two clap layers slightly left and right, the shaker about 10% left and the hats about 10% right, so the percussion surrounds you without crowding one ear. The kick, bass and lead usually stay in the center. Watch for samples that are already panned, because a clap that’s louder in one ear may not need any more.
The stereo separation knob on each mixer track helps too. Max mostly turns it toward mono, so a sound that’s too wide sits closer to the middle. Learn more in mono vs stereo mixing.
Delay: echoes that bounce left and right
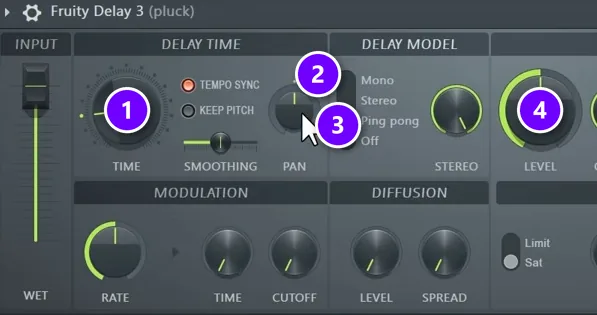
Delay repeats a sound as echoes. Max uses Fruity Delay 3, which he calls the most popular stock delay, and watches four things: time, delay model, feedback and wet. On his pluck, he sets TIME (1) to 3.0, turns the PAN knob (2) to one side and switches the model to Ping pong (3), so the echoes bounce between your ears. The feedback LEVEL (4) sets how many echoes you hear.
Add a little reverb on top and the pluck fills the background without getting louder. Our reverb vs delay guide explains when to use each one.
How do you use automation in a mix?
Automation makes a setting change over time, like a filter that slowly opens before the drop. You can automate almost every knob in FL Studio, and it’s one of the easiest ways to make a mix feel alive.
Automate a filter into the drop
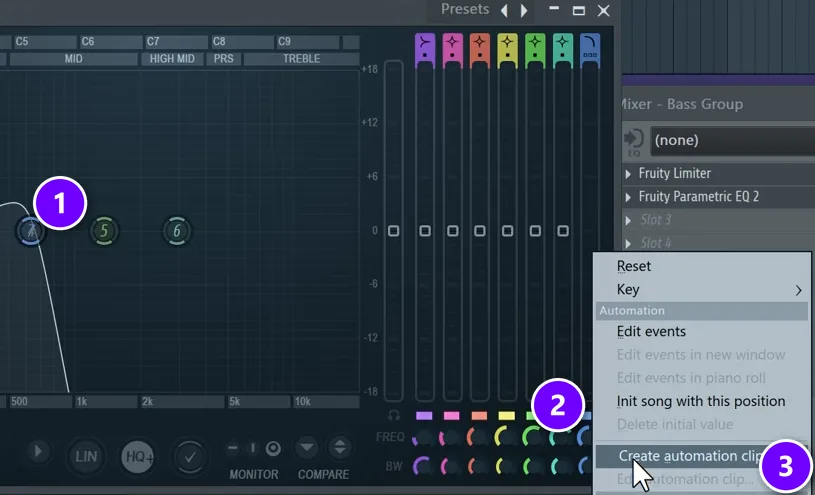
- Add Fruity Parametric EQ 2 after the other effects on your bass group. Set band 7 (1) to a high cut, which cuts the highs and lets the lows through. Make it a little steeper, and scroll on it to add some resonance.
- Right-click the knob that moves that band (2) and choose Create automation clip (3). You can also move the knob and pick Tools, then Last tweaked parameter.
- Find the new clip in the Playlist and move it under your bass. Right-click the line to add points.
- Draw it from about 20% up to fully open, so it finishes just before the drop, and keep it open after that.
Max uses the same trick for a reverb wash: a long decay on a clap, with the wet fader automated to about 70% in the build and off when the drop hits. One FL Studio quirk to know: you can hear the effect before the clip starts. The quick fix is to stretch the automation clip back to the very start of the song and draw the shape only where you want it.
How do you get your mix ready for mastering?
When all four steps are done, go over your volumes one last time. Levels always move. Then check two things before you export: how the mix sounds on other speakers, and that your master track is still empty.
Check the mix on other speakers

A mix that sounds great in your headphones can fall apart in a car. Play your song on everything you can find: earbuds, a laptop, a Bluetooth speaker and your car. Max tests his finished songs the same way. If something disappears or jumps out on one of them, go back and fix it in the mix. Only have one pair to work with? Read mixing on headphones vs studio monitors.
Export the mix for mastering
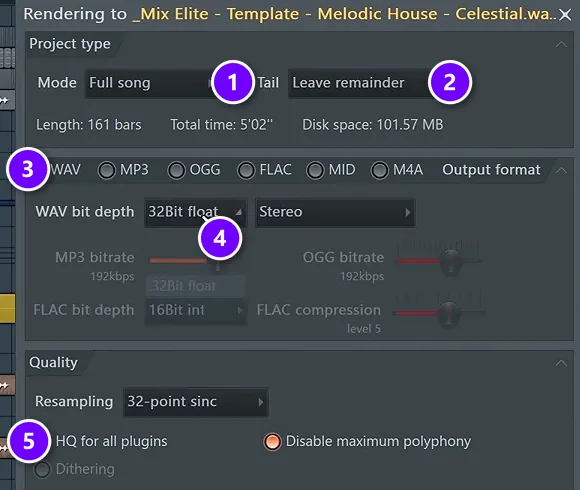
Keep the master track empty, with no limiter. Then go to File, Export and choose WAV. These are Max’s settings:
- Set Mode to Full song (1).
- Set Tail to Leave remainder (2), so the last reverb tail isn’t cut off.
- Pick WAV (3) at 32Bit float (4).
- Turn on HQ for all plugins (5), set resampling to at least 32-point, turn off maximum polyphony and keep insert effects on.
Why 32-bit float? Inside FL Studio, peaks above 0 dBFS, the digital ceiling, aren’t destroyed, and a 32-bit float file keeps them that way. Max drags the file into a new, empty project for mastering, and if the peaks go over 0 dB, he simply turns the clip down. From there, our guide to mastering in FL Studio takes over. To decide how loud the finished song should be, read LUFS vs RMS.
What are the most common mixing mistakes beginners make?
Most mixes that sound like a cheap demo break the same few rules. These all come from Max’s lesson:
- Too many parts. More sounds mean more problems.
- A limiter on the master while you mix.
- Big EQ boosts instead of small cuts.
- Judging sounds in solo instead of in the full mix.
- Effects on every track just because the slots are there.
- Channel volumes so low that the compressor never reacts.
- Compressing each drum hit on its own instead of the drum bus.
Our list of the top 10 newbie mixing mistakes shows how to fix each one. For genre tips, see mixing techniques for hip-hop producers.
Where can you learn each mixing step in more detail?
Every step of the Holy Quad has its own guide. Pick the one you’re stuck on:
- Volume and gain: how to balance a mix, gain vs volume and mixing with pink noise.
- EQ: how to use EQ, high-pass filters, dynamic EQ and the best EQ plugins.
- Dynamics: the FL Studio compressor, OTT, multiband compression, saturation and sidechain.
- Space: reverb vs delay and mono vs stereo.
- Low end and drums: a clean, punchy low end, kick and 808 and mixing drums.
- Vocals, mastering and gear: how to mix vocals, mastering in FL Studio, LUFS vs RMS and the best free mixing plugins.
Your next step is simple. Open your latest song tonight, loop the busiest part, and do Step 1. Volume is the biggest factor in how your mix sounds, so even that alone makes a real difference.
DAY 4 OF THE 7-DAY MUSIC PRODUCER COURSE
Day 4: learn the whole Holy-Quad mixing formula
Day 4 of the 7-Day course is all about mixing: the simple Holy-Quad formula, the “mix murdering” mistakes most beginners make, and the volume mistake in the first 5 minutes of every mix that caps how good your song can sound. You also download a Mixing Checklist and a premium mixing and production template. It’s taught in FL Studio (the free trial works), about 45 minutes a day, and on day 7 a pro gives you feedback on your finished track. It’s $27, and you get 60 days to decide if it was worth it.
Frequently asked questions
How long does it take to mix a song?
Max’s average for a full mix is about 5 to 10 hours, and more if the track is very complicated. A simple arrangement built from good sounds mixes faster, because better production leaves less to fix. Spread the work over a few sessions and take short breaks, so your ears stay fresh enough to judge volume and EQ.
What order should you mix a song in?
Follow Max’s Holy Quad order: volume first, then EQ, then dynamics (compression and sidechain), then space (reverb, delay and panning). Within EQ, start with the low end, then the mids, then the treble. Check your volumes again after every step, because each change shifts the balance, and finish with automation and a last level check before you export.
Should you put a limiter on the master while mixing?
No. Max keeps the master track completely empty while he mixes. FL Studio puts a limiter on the master by default, and it can squash the whole song whenever one sound, like a loud kick, gets too hot, which hides real level problems. Save loudness for mastering, and export the mix as a 32-bit float WAV.
Can you mix a song with only stock FL Studio plugins?
Yes. Every step in Max’s lesson uses plugins that come with FL Studio: Fruity Parametric EQ 2 for EQ, Fruity Limiter in COMP mode for compression and sidechain, Fruity Reeverb 2 for reverb and Fruity Delay 3 for delay. With good sounds and the right volumes, some tracks need almost no effects at all.
What is the difference between mixing and mastering?
Mixing happens inside your project, where you balance every separate track with volume, EQ, compression, reverb and panning. Mastering happens after you export the mix as one file. It’s the final polish, usually light EQ, compression and loudness, so the song sounds even and loud enough everywhere. A master can’t fix a bad mix, so get the mix right first.