


“…to do good or to do no harm.”
A regular compressor turns the whole sound down, while multiband compression splits it into frequency bands, usually low, mid and high, and compresses each one on its own. Use it when only one range is the problem, like a boomy low end, harsh S sounds or spiky hats, so you can tame that band and leave the rest alone. In FL Studio, the stock Maximus plugin does it.
You put one compressor on the whole beat to calm a booming 808, and the hats go dull and start to pump along with it. The compressor did its job. It just did it to everything.
That’s the moment a multiband compressor makes sense. Below you’ll see how it works in plain words, when it’s the right tool (and when a simple EQ is smarter), and the exact Maximus moves from Mix Elite’s tutorials for a master, a vocal and a kick and 808, with screenshots from the videos.
Table of Contents
What is multiband compression?
Multiband compression is compression that works on separate frequency bands. Filters called crossovers split the sound into low, mid and high bands. Each band gets its own compressor. Then the bands are added back together, so you can tame one range without touching the others.
A compressor turns a sound down when it gets louder than a level you choose, called the threshold. If that’s new to you, read our FL Studio compressor guide first, because this one builds on it.
A normal compressor listens to the whole sound at once. A multiband compressor listens to each band on its own. You get a low band (kick and bass), a mid band (vocals, snares and most instruments) and a high band (hats, cymbals and the S sounds of a voice).
Max, the founder of Mix Elite, keeps the idea simple in his Maximus tutorial: “multiband means that we just split the frequency range of your audio and compress each band.” In FL Studio that tool is Maximus. In Mix Elite’s free 4.5-hour FL Studio course, he describes it as three compressors in one: one for the lows, one for the mids and one for the highs. A fourth band, Master, works on everything at once like a normal compressor.
What’s the difference between regular compression and multiband compression?
A regular compressor turns the whole sound down whenever it gets too loud. A multiband compressor only turns down the band that’s too loud and leaves the other bands alone. Use regular compression to control the overall level. Use multiband when one range is the problem.
Picture a beat where the 808 is much louder than everything else. A normal compressor hears that 808 and turns the whole beat down every time it hits, so the hats and the vocal duck with it. That’s the pumping you hear in a lot of beginner mixes.
A multiband compressor only turns down the band where the 808 lives. The hats sit in the high band, so they don’t move at all. You get the control without the side effect, which is why mastering engineers reach for it so often.
The trade-off is more knobs. Three compressors means three times the settings to get wrong, so use it when you have a reason.
Multiband compression vs EQ and dynamic EQ
An EQ changes the tone all the time. If a vocal is a bit harsh on every word, a small EQ cut is the right fix. Multiband compression only acts when a band gets too loud. That makes it the better tool when the problem comes and goes: one bass note that booms while the others don’t, or an S that only stabs on some words.
A dynamic EQ works on the same idea, but with a narrow band you can place anywhere, while a multiband compressor works on wide bands. Our dynamic EQ guide covers that side. A simple rule: a narrow problem, like one harsh frequency, calls for a dynamic EQ. A wide one, like the whole low end, calls for multiband.
When should you use multiband compression?
Use it when one frequency range jumps out now and then while the rest of the sound is fine. Think of a boomy low end, a kick and bass that fight, harsh S sounds or spiky hats, plus gentle glue on the master. Is the problem there all the time? Use EQ. Does the whole sound jump? A normal compressor is simpler. These are the jobs multiband does best:
- A boomy low end. Some bass notes ring out louder than others. Compress only the low band and they even out.
- Kick and bass that fight. On a group or on the master, catch the kick’s peaks in the low band and leave the bass alone.
- Harsh S sounds. A narrow band around the S range works as a de-esser. That’s how Mix Elite’s free course de-esses vocals.
- Spiky hats and cymbals. A light touch on the high band takes the bite off without making them dull.
- A master that feels loose. A couple of dB on each band glues the mix and evens out its tone.
- Ducking one range only. A multiband sidechain turns down just the frequencies another sound needs, like the lows of the bass when the kick hits.
And no compressor fixes a bad balance. If the bass is just too loud, pull its fader down first.
How does a multiband compressor work?
Crossovers split the sound into bands. Each band has its own threshold, ratio, attack and release. Makeup gain brings each band’s level back, and then the bands are mixed together again. Every multiband compressor has these parts, whatever the brand. Here they are in Maximus, and the video below is Mix Elite’s full walkthrough of the plugin.
Bands and crossover points
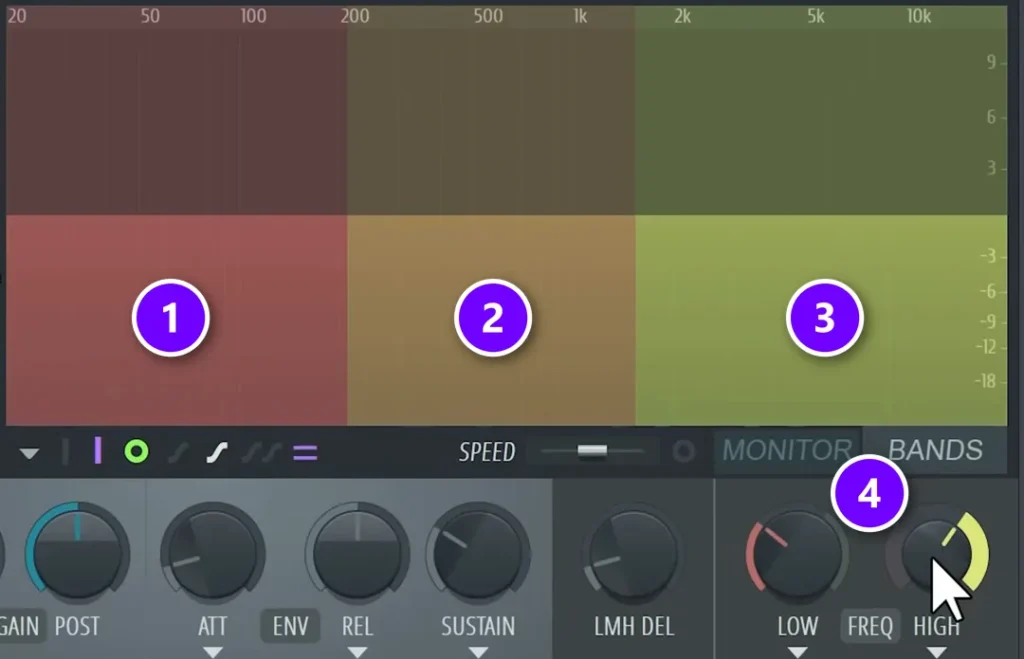
Click BANDS to see the split: the low band (1), the mid band (2) and the high band (3). The LOW and HIGH FREQ knobs (4) move the crossovers, the points where one band ends and the next one starts.
Don’t trust the default split. Solo each band and listen to where it really starts. Keep the kick and the bass inside the low band, and move the crossover if the body of the snare leaks into it.
Threshold, ratio and knee
Instead of knobs, Maximus shows each band’s compressor as a line on a graph. A straight line means nothing happens. The point where the line bends is the threshold, and how flat the line gets after the bend is the ratio, how hard it squeezes.
The Maximus walkthrough calls this graph much easier to learn compression from than reading threshold, knee and ratio off a row of knobs. Hold Alt while you drag a point so it doesn’t snap to the grid. Bend the corner into a curve and you get a soft knee, which starts the compression more gently.
Attack, release and the RMS switch
Attack is how fast a band grabs a peak. Release is how fast it lets go. A slower attack lets the first hit of a kick through before the compressor reacts, which keeps the punch.
Maximus also has a PEAK/RMS switch. On RMS it reacts to the average level of roughly the last 100 to 300 milliseconds instead of every single peak, so the compression gets much smoother. In the walkthrough, a vocal that sounds harsh in Peak mode turns smooth in RMS mode.
Pre gain and makeup gain
Compression makes a band quieter, so you add the level back afterward. That’s makeup gain, the POST knob on each band. If a band is turned down by 3 dB, add about 3 dB back, so you hear the control and not just a quieter sound.
PRE works the other way: it turns the band up before the compressor, which helps when the sound coming in is quiet. In Mix Elite’s loud master video, Max raises the pre gain of each band by about 7 to 10 dB to give the compressors more room to work with.
How to use multiband compression in FL Studio, step by step
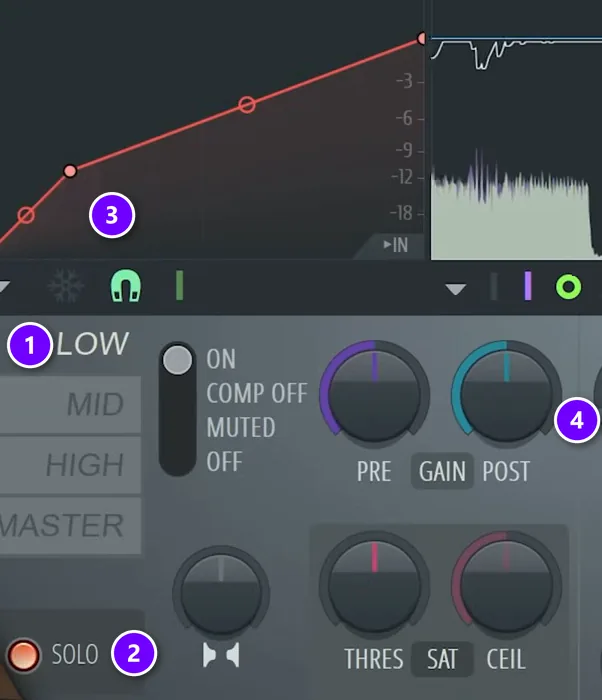
Load Maximus, solo the band with the problem and lower its threshold until the loudest hits drop about 2 to 3 dB. Then add the same amount back with POST. Compare at equal volume. It works the same on the master, a group or a single sound. Set it while the loudest part of the song plays, like the drop or the chorus, because that’s where the compressor works hardest.
- Open the Mixer with F9, select the track and load Maximus into an empty slot.
- Click BANDS and check where each band starts. Move the FREQ knobs until each band holds the sounds you want to control.
- Pick the band with the problem, for example LOW (1), and turn on SOLO (2) so you only hear that band.
- Hold Alt and drag the threshold point (3) down until the loudest hits are turned down about 2 to 3 dB.
- If it grabs too much, raise the threshold a step and lower the ratio.
- Turn SOLO off and use POST (4) to add back what you took away.
- Switch Maximus off and on to compare, at the same volume.
Max’s limit is worth remembering: “Don’t go higher than three or four dBs of reduction,” he says in the mastering lesson of Mix Elite’s free course. Past that, a band starts to sound squashed instead of controlled.
Always compare at the same volume. A louder version almost always sounds better for a few seconds, so if you skip the makeup gain or boost it too far, your ears will lie to you.
How do you use multiband compression in mastering?
Gently, and before the limiter. Its job on the master is to even out the tone of the mix, not to make it loud. Aim for about 2 to 3 dB of reduction on each band, never more than 3 to 4 dB, then add the same amount back with makeup gain.
That’s how the mastering lesson in Mix Elite’s free course uses it: each band gets a small, gentle squeeze, and then the level is made up. These are its numbers:
- Lows: about 2 to 3 dB of reduction, then about +3 dB of POST gain.
- Mids: a little less than the lows. Lower the threshold and raise the ratio so it catches the clicky peaks, then add about 2 to 2.5 dB back.
- Highs: the same light touch, with about 2.4 dB of makeup gain in his example.
- A very quiet mix? Normalize it first, or raise the PRE gain, so the compressors have something to grab.
The Maximus walkthrough adds three master settings. Raise the low cut to about 30 Hz for a little more headroom. Switch on linear phase, so inter-sample peaks can’t slip past the ceiling. Set the ceiling to -1 dB.
In the course, the before and after is clear: the mix sounds more glued together, and nothing jumps out. For the rest of the chain, from the EQ to the limiter and the export, follow our guide to mastering in FL Studio. If the goal is a louder track, our guide on making your mix louder without losing dynamics starts one step earlier, in the mix.
How to use multiband compression on vocals (de-essing)
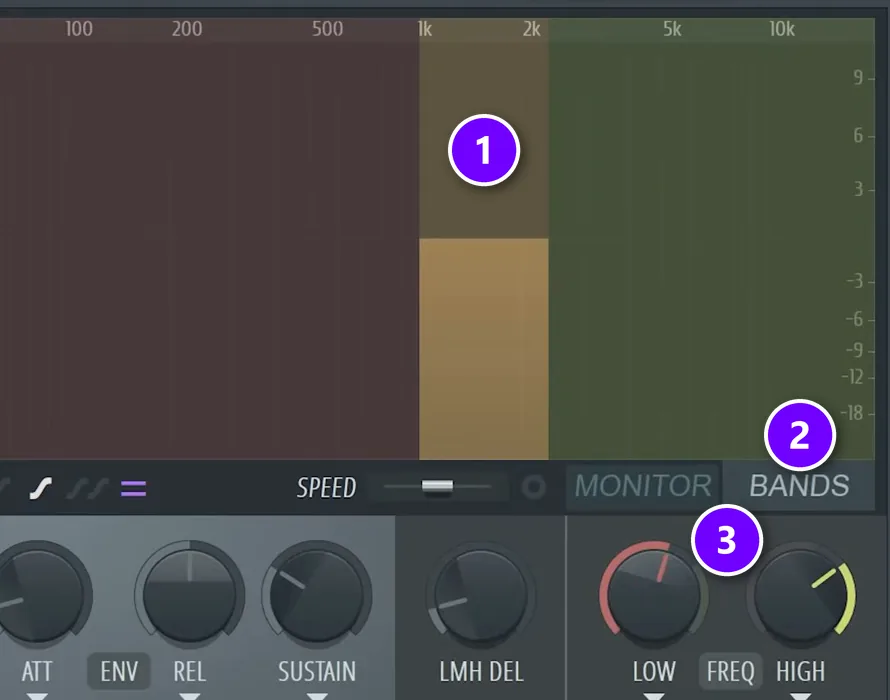
Start from the de-esser presets in Maximus. The split-band one works on everything above about 3.5 kHz, and the narrow-band one from about 2.5 to 9.5 kHz. Harsh S sounds usually sit around 4 to 6 kHz, sometimes up to 10 kHz, depending on the singer, so that’s where the band should end up.
- Load Maximus on the vocal, open Presets and pick De-esser narrow-band or De-esser split-band. Mix Elite’s free course says to take whichever sounds better on your vocal.
- Click BANDS (2) to see the band that catches the S (1).
- Solo it and turn the FREQ knobs (3) until you hear mostly the S sounds.
- Hold Alt and lower the threshold until the S calms down. The course example ends up around a 4:1 ratio.
- Unsolo and listen with the beat. The S should sound softer, never like a lisp.
These presets use one more trick. The narrow band only decides when to compress, and the whole vocal is turned down for that split second. As the walkthrough puts it, the S sound triggers the compressor, but the whole signal gets turned down. In the screenshot the band is narrowed to about 1 to 2 kHz to show the idea; for S sounds you’d move it higher.
What crossover settings should you use on a lead vocal?
Keep it simple: one band around the problem and nothing else. Leave the lows to your EQ, since Mix Elite’s stock vocal chain cuts them around 100 Hz before any compression. Put the de-essing band where your singer’s S sounds are, roughly 4 to 6 kHz. Then switch Maximus to RMS so the vocal is compressed smoothly.
Then judge it with the beat playing. Do words sound dull or lispy? Raise the threshold or narrow the band.
How do you fix a muddy low end without losing punch?
Mud usually comes from other instruments’ lows piling onto the kick and bass, so cut those first. Then compress only the low band. Give it a slower attack, so the kick’s first hit gets through, and turn just the kick’s peaks down a few dB before you add the level back.
- Clear the space first. Mix Elite’s EQ video cuts everything below about 200 to 250 Hz on every sound except the kick and the bass-focused parts. Skip that, and those lows blend into the kick and bass as mud.
- Solo the low band. Load the multiband on the kick and 808 group or the master, solo the low band and move its crossover, depending on whether you want to catch more of the bass or only the deep sub.
- Catch only the kick. Turn just the kick’s peaks down a few dB and add the level back. The next section shows the exact Maximus moves.
- Slow the attack. A slower attack lets the first hit through before the band clamps down. In Mix Elite’s kick masterclass, a compressor’s attack around 20 to 40 ms is where the kick’s transient starts coming back.
- Duck only the bass’s lows. If the bass still masks the kick, sidechain just the bass’s low band to the kick. A normal sidechain also squashes the bass’s own attack, the masterclass shows, while a low-band sidechain keeps it.
On a kick by itself, the same masterclass splits the sound into two bands: the very low end up to about 150 Hz, depending on the kick, and the click above it. Now you can lift the transient and flatten the boom separately. It works like a transient shaper, only more precise.
How to use multiband compression on kick and bass
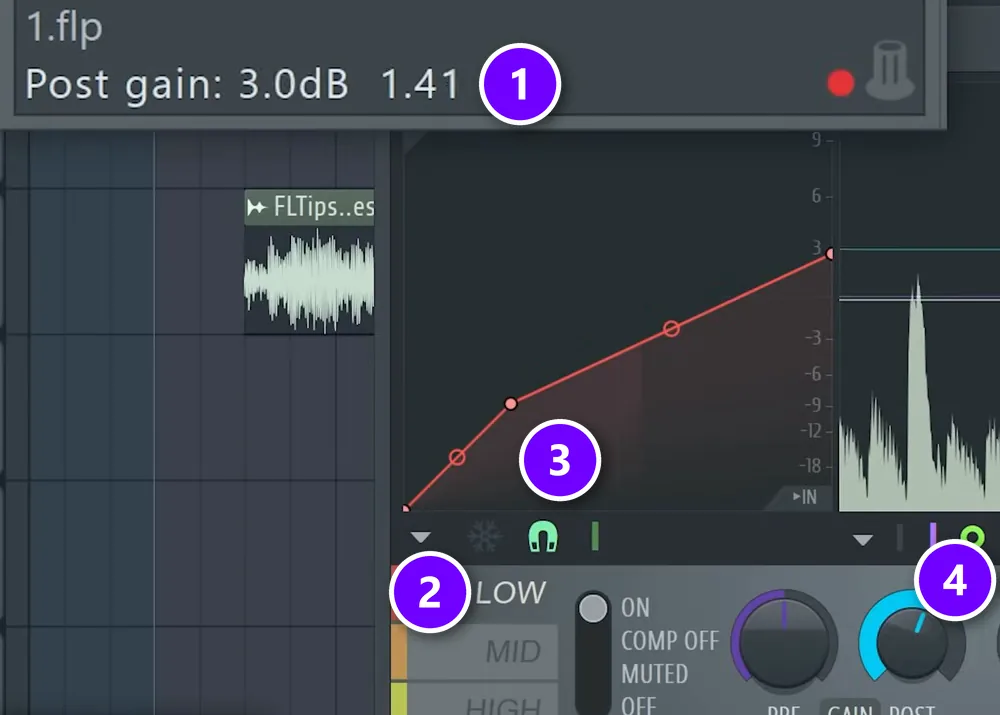
The low end is where multiband earns its place. On a kick and 808 group, or on the master, draw a subtle curve in the low band that catches the kick but not the bass. The goal is a smaller jump in level between the kick and the bass.
- Select LOW (2) and solo it.
- Drag the threshold point (3) until only the kick’s peaks are turned down. In the walkthrough they dip about 4 dB.
- Add the level back with POST (4). The walkthrough uses +3 dB (1).
The low end ends up tighter and more even, and the limiter at the end of the chain has less to fight. If the kick and the 808 still clash after this, a sidechain or a shorter 808 is usually the real fix, not more compression.
Can you do parallel compression inside Maximus?
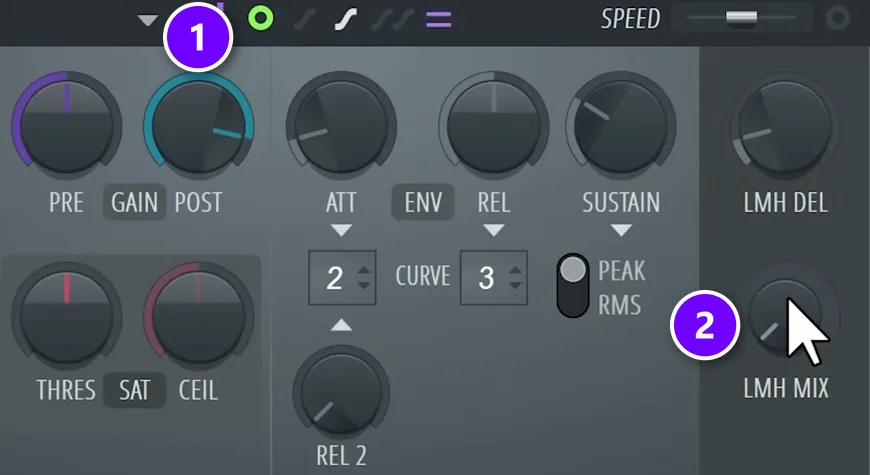
Yes, with one knob most people never touch. Parallel compression blends a hard-compressed copy with the untouched sound, so you get thickness without losing the hits. Maximus does it inside the plugin:
- Compress each band hard.
- Bring up POST (1) on each band to make up the level.
- Turn LMH MIX (2) down to blend the dry sound back in.
Do it here and not with two mixer tracks. The walkthrough warns that splitting it across the mixer can cause phasing, a hollow, thin sound, while inside Maximus everything stays in phase.
Is OTT a multiband compressor?
Yes. Xfer’s free OTT is a three-band compressor with most settings fixed, and Mix Elite’s free course calls it a one-click multiband compressor with preset settings. It’s great when you’re in a rush, and our OTT guide shows the settings.
For a master, though, Max still prefers doing it by hand: “it is always better to do it manually with Maximus.” Manual bands let you decide exactly how much each range moves. If you do use OTT on a master, the course keeps its Depth around 15% (anything from 7 to 20%) and switches off the upward compression, which is what gives OTT its very recognizable sound.
What are the best multiband compressor plugins?
You don’t need to buy anything to start. These are the usual picks, linked to their makers:
- Maximus (Image-Line): FL Studio’s own three-band compressor and maximizer. Every example in this guide uses it.
- OTT (Xfer Records): free, and one Depth knob does most of the work.
- FabFilter Pro-MB: a paid multiband compressor where you place bands right on the spectrum. Mix Elite’s loud master video names it as the alternative to Maximus.
- Waves C6: a paid multiband compressor with extra bands you can move anywhere.
- TDR Nova (Tokyo Dawn Labs): a free dynamic EQ that can work like a multiband compressor.
Multiband compression mistakes to avoid
- Using every band because it’s there. If a band has no problem, leave it alone.
- Too much reduction. Past 3 to 4 dB on a band, it sounds squashed instead of controlled.
- No makeup gain. The quieter version sounds worse, so you undo a good move.
- Crossovers in the wrong place. A kick split across two bands gets compressed in two different ways.
- Fixing balance with compression. Set the faders first, then compress.
- Parallel compression across two mixer tracks. Use LMH MIX inside Maximus instead.
- Judging in solo only. Solo is for setting a band. The full mix is where you decide.
Multiband compression is one step of a mix, not the whole thing. To see where it fits with balance, EQ, reverb and the rest, follow our step-by-step guide to mixing a song.
DAY 4 OF THE 7-DAY MUSIC PRODUCER COURSE
Multiband is one tool. Day 4 teaches the whole mix.
Knowing one plugin is a start. Day 4 of the 7-Day course is all about mixing: the simple Holy-Quad mixing formula, the “Mix Murdering” mistakes most beginners make, and the volume mistake people make in the first 5 minutes of every mix. You also get a mixing checklist and a mixing and production template. It’s taught in FL Studio (the free trial works), about 45 minutes a day, and on day 7 a pro gives you feedback on your finished track. It’s $27, and you get 60 days to decide if it was worth it.
Frequently asked questions
What’s the difference between compression and multiband compression?
A regular compressor reacts to the whole sound and turns all of it down when it gets too loud. A multiband compressor splits the sound into frequency bands, usually low, mid and high, and gives each band its own compressor. That lets you tame a boomy low end or harsh highs without changing the rest of the sound, which a normal compressor can’t do.
When should you use multiband compression?
When one frequency range jumps out now and then while the rest is fine: bass notes that boom, a kick and bass that fight, harsh S sounds or spiky hats, and gentle glue on the master. If the problem is there all the time, an EQ cut is simpler, and if the whole sound jumps in level, use a normal compressor.
Should you use multiband compression when mastering?
It can help, if you keep it gentle. Mix Elite’s free course uses it on the master to even out the tone before the limiter: about 2 to 3 dB of reduction on each band, never more than 3 to 4 dB, then the same amount of makeup gain. If your mix already sounds balanced, you can skip it.
What multiband settings work on a lead vocal?
Start from a de-esser preset. In FL Studio’s Maximus, the split-band preset works above about 3.5 kHz and the narrow-band one from about 2.5 to 9.5 kHz. Solo the band, move it to where your singer’s S sounds are, often 4 to 6 kHz, use about a 4:1 ratio and switch to RMS for smoother compression. Leave the low end to your EQ.
Does FL Studio have a multiband compressor?
Yes. Maximus is FL Studio’s own multiband compressor, with low, mid and high bands plus a master band. It also has de-esser presets and an LMH MIX knob for parallel compression. If you want a free one-click option, Xfer’s OTT is a multiband compressor too.