

“With six layers, I had achieved Density, but at the expense of Clarity.”
To make beats sound professional, fix the mix before you chase loudness. Pick fewer sounds that fill the range from deep sub to bright highs, balance the volumes so the drums and your main sound lead, and cut the lows out of everything except the kick and 808. Then add movement, check the beat in mono and next to a reference track, and make it loud last.
You finish a beat, play it right after a song you love, and the difference hits at once. Yours sounds smaller and muddier, a bit like a cheap demo, even though you picked decent sounds and spent hours on it.
That gap rarely comes down to talent or gear. It’s a few small decisions. Max, the founder of Mix Elite, walks through them one by one in a video on this exact problem, using only FL Studio’s own plugins. Here they are in the order he works, with screenshots from his screen.
Table of Contents
Why do my beats sound flat and thin compared to professional tracks?
Beats usually sound flat, thin and amateur because small mixing problems stack up, not because of your gear: a gap in the sub or the mids, volumes out of balance, low rumble in every sound, nothing that leads, a narrow stereo picture and a quiet or over-limited master. Balancing the volumes and cleaning up the low end fix most of it.
Most bedroom beats have at least three of these:
- Too many sounds in the same space. Three synths fight over the middle while the deep sub and the bright top sit empty.
- Volumes all over the place. A pad or a crash ends up louder than the kick.
- A muddy low end. Every sound carries a little rumble, and together it turns to mud.
- Nothing leads. Every part plays at the same level for three minutes, so the ear has nothing to follow.
- A flat or fragile stereo picture. The beat feels narrow, or it sounds wide in headphones and hollow on a phone.
- No reference. You only ever compare the beat with itself.
- Loudness from one limiter pushed hard. It gets louder, but the punch is gone.
Notice what isn’t on the list: expensive plugins. You won’t need any. Every fix below uses tools that come with FL Studio, so you can start tonight with what you already have.
How to make beats sound professional: 7 fixes
Work through the fixes in this order. Each one makes the next one easier, and the first two do most of the heavy lifting. Each clip below jumps to its fix.
1. Pick sounds that fill the whole spectrum
Every sound sits somewhere on the frequency spectrum, the range that runs from the deep sub you feel in your chest to the thin sizzle of a hi-hat. A beat sounds full when every part of that range has something in it. It sounds cheap when three sounds pile into the middle and the bottom or the top stays empty.
The first fix is to check that the whole spectrum is filled. In the video’s example, the drop sounds thin until the bass comes back in, and the top only feels finished once crashes and noise sweeps fill it. Max’s rule is simple: “every instrument should have its own place in the mix.” He also warns about the opposite mistake, packing in so many sounds that the mix gets messy. Both sound amateur.
Check the spectrum on your Master track
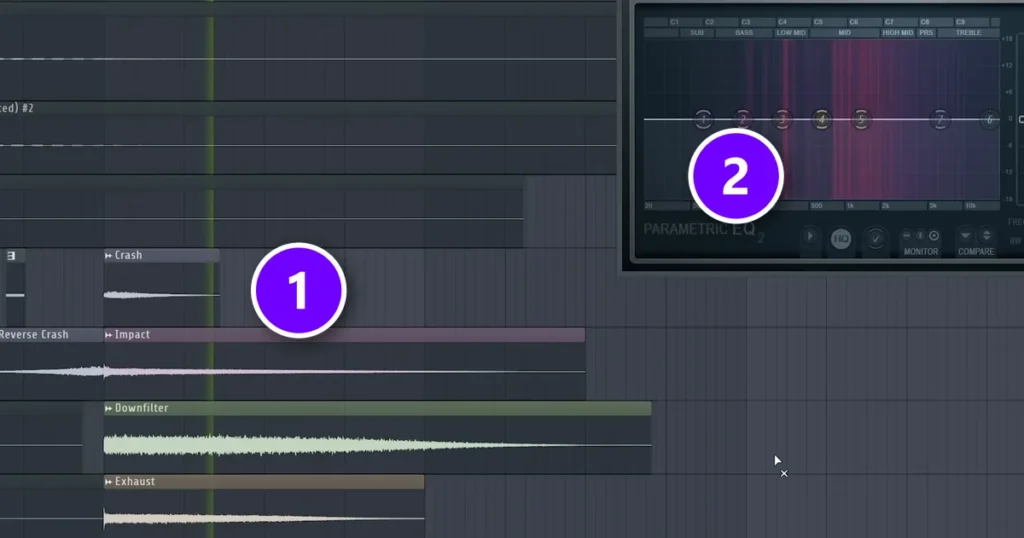
In this frame from the video, crash, impact and noise-sweep clips (1) cover the very top of the spectrum. On the Master track, Fruity Parametric EQ 2 (2) shows where the energy sits, with its bands labeled from SUB to TREBLE. Here’s how to run the same check:
- Open the Mixer with F9, click the Master track and load Parametric EQ 2 into an empty slot. You don’t change any band. You only use it to look.
- Play the busiest part of the beat, like the hook. The colors behind the curve show where your sound has energy.
- Look for gaps. Nothing on the far left means no sub, so check that your 808 or bass reaches down there. A dark right side means nothing gives the beat air, which hats, a crash or a quiet noise sweep can fix.
- Mute one sound at a time. If the beat sounds the same without it, that sound isn’t earning its place. Delete it.
Good sound choice starts before the mix. Drums that already sound finished save you hours of fixing, which is why picking drum samples that hit hard is the first step in our drums guide. If you’re still learning the basics, the step-by-step guide to making your first beat covers choosing sounds from scratch.
How do I make my beats sound thicker?
Fill the mids, not just the lows and highs, and reach for saturation instead of big EQ boosts. Soloed sounds always seem better with extra bass and treble, but thirty of them together leave a hole in the middle. Saturation, a gentle kind of distortion, adds new harmonics, while EQ can only boost what’s already there.
Max calls this a smiley-face tonal balance, after the shape of the EQ curve, and admits he made the same mistake for years. The fix is to shape each sound while the whole beat plays, not in solo, and to listen for the mids, where the chords, melodies and vocals live. For richness, the EQ video skips the boost and turns up Mix Elite’s free multiband distortion for Patcher (FL Studio’s tool for chaining plugins) on the mids and highs. Go easy on drums, though. Saturation shaves off the loudest peaks, so too much of it trades their punch for warmth.
2. Balance the volumes before anything else
Max calls volume balance the most important trick of all. It also costs nothing. In the video he plays the same beat twice, once as it was and once with only the levels changed. The second one sounds like a different production. “If your sounds are balanced, your mix is halfway done,” Max says.
How to balance the volumes in a beat
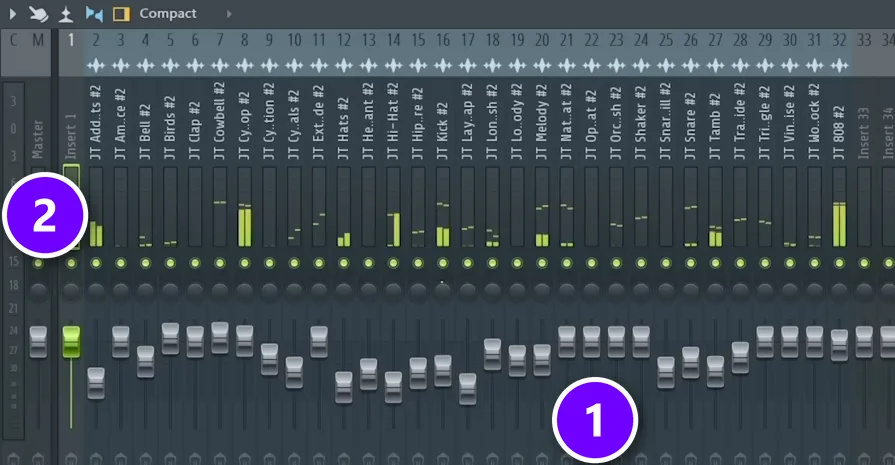
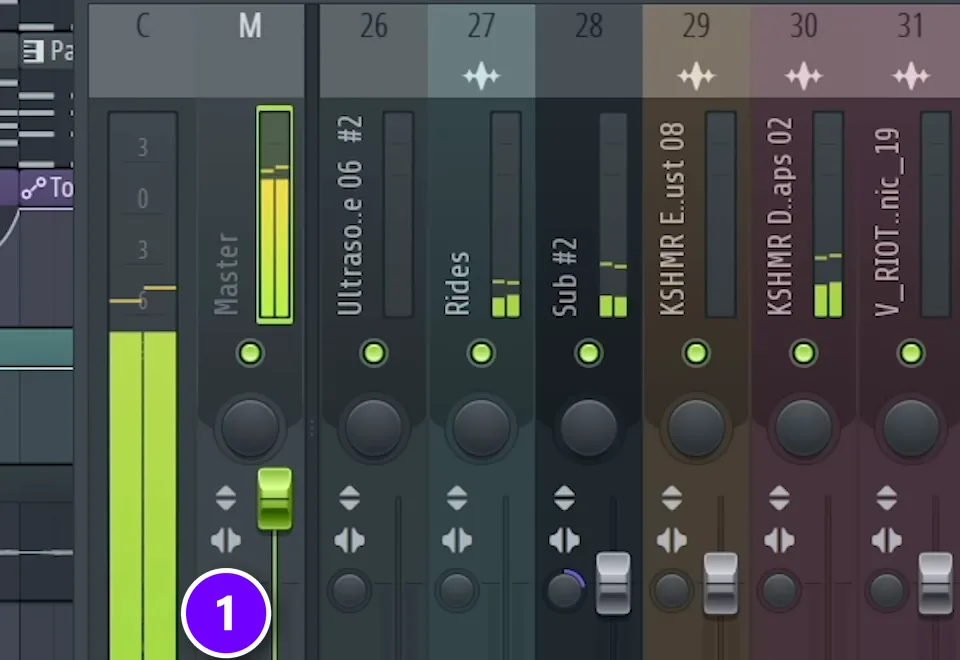
This is the mixer from the video after balancing. The faders (1) end up at very different heights, and the Master track (2) is where the whole beat comes together. Here’s the method from Mix Elite’s free 1-hour mixing course:
- Loop the busiest part, so every sound plays at once.
- Decide what leads. That’s always the drums, with the kick first, plus the one sound that makes the beat yours: the melody, the 808 or a vocal. Those should be the loudest things in the mix.
- Don’t push the leaders up. Pull everything else down instead, starting with whatever is clearly too loud. Pads, strings, crashes and effects are background parts, and they can usually come down a lot.
- Make small moves and ask one question each time: better or worse? Then take a short break and listen again, because your ears get used to a mix fast.
Why is my melody buried behind the drums?
Usually the melody isn’t too quiet. The parts around it are too loud, or it fights the drums for the same range. Treat it as a lead next to the drums, turn the background parts down instead of pushing the melody up, cut the low body it doesn’t need, and add presence with a small boost in the high mids.
- Loop the busiest part and pull the pads, chords, arps and effects down until the drums and the melody clearly lead.
- Put a low cut on the melody (the steps are in Fix 3). Max’s example in his frequency masking video is a flute: give it a lot of body and it fights the drums for the same space.
- Boost the melody’s high mids a little for presence and leave the treble alone. It comes forward without muddying the mix or getting too bright.
- Still hiding? Boost a narrow EQ band and sweep it to find the melody’s strongest frequencies, then cut a small dip at the same spot in whatever is covering it.
What about gain staging?
Gain staging means setting the level of each sound so the effects after it work well. It scares a lot of beginners. Mix Elite’s video Gain Staging is a lie explains why most of that worry is out of date.
Here’s the point. FL Studio’s mixer works in 32-bit floating point, so a track that goes over 0 dB inside the mixer isn’t damaged by that alone, and you can turn it down later. The old -18 dB rule comes from the days of analog gear. What still matters is the level going into effects that react to loudness, like compressors, limiters and distortion. Feed a limiter a sound that’s too quiet and it does nothing at all.
So keep it simple. Balance by ear, watch the level going into compressors and distortion, and make sure the Master track isn’t clipping when you export.
3. Clean up the low end
Almost every sound carries some low rumble, even ones you’d never call bass: chords, leads, pads, even claps. You often can’t hear it on its own, especially on small speakers, but it adds up. Only two sounds in a beat really need that range: the kick and the 808 or bass.
That’s why the fix is to high-pass everything else, which means cutting the lows and letting the highs pass. One sound with a little extra low end won’t hurt. “If you have one instrument with that amount of spare low, it’s all right, but if we have 10 of them, it’s going to destroy your mix,” Max says.
Add a low cut with Parametric EQ 2
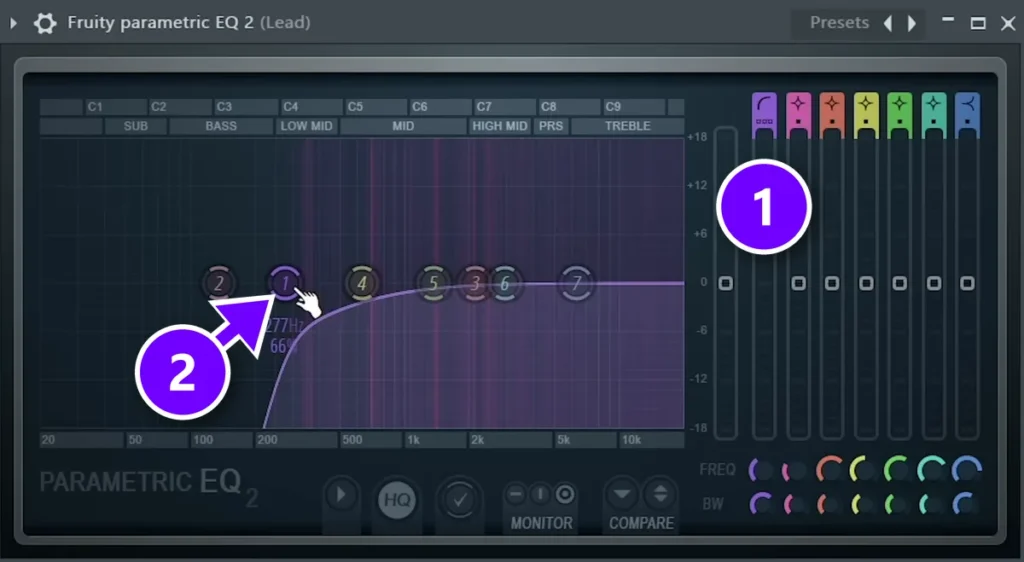
- Press F9 to open the Mixer, select the lead’s mixer track and load Fruity Parametric EQ 2 into an empty slot.
- Turn band 1 into a low cut (1). Drag up or down on its shape icon until it shows a high pass, then drag the dots under it down for a steeper slope.
- Play the beat and drag band 1 to the right (2) until the sound starts to get thin, then back off a little. The lead in the video didn’t need anything below 200 Hz, and its cut ends up at 277 Hz.
- Do the same on chords, pads, plucks, hats, percussion and effects. Leave the kick and the 808 or bass alone.
The right cut point changes from sound to sound, so always set it with the whole beat playing. Don’t cut on autopilot, either. In his mixing mistakes video, Max keeps the 100 to 250 Hz range on a sound when it sounds good there, and pushes the cut up to about 250 Hz when that range only adds mud.
A challenge from the video: if you haven’t done this yet, do it now. Open your last beat, put a low cut on everything except the kick and the bass, and hear how much cleaner it gets.
How do I make my kick and 808 hit hard without sounding muddy?
Let only two sounds own the sub: the kick and one bass, such as the 808. Low-cut every other bass layer at 100 Hz, make the 808 duck for a split second each time the kick hits, and keep everything below about 100 Hz in mono. Mud almost always means too many sounds share that range.
That ducking is called sidechaining. In FL Studio, click the kick’s mixer track, right-click the small arrow at the bottom of the 808’s track and choose Sidechain to this track. Then put a ducking effect on the 808. In the mixing mistakes video it’s a multiband sidechain preset in Patcher with its low band turned up, so only the 808’s lows duck under each kick. For levels, saturation and the full setup, follow how to mix kick and 808 so both hit hard.
4. Give the beat a focus and some movement
Not every sound can be equally loud. Your listener needs one thing to focus on at a time. Max compares a mix to a photo: when everything is in focus, nothing is the subject. A beat that keeps everything at full level for three minutes gives the ear nothing to hold. The fix has two parts: push the background back, and pass the spotlight from one part to the next as the beat goes on.
Push background parts back
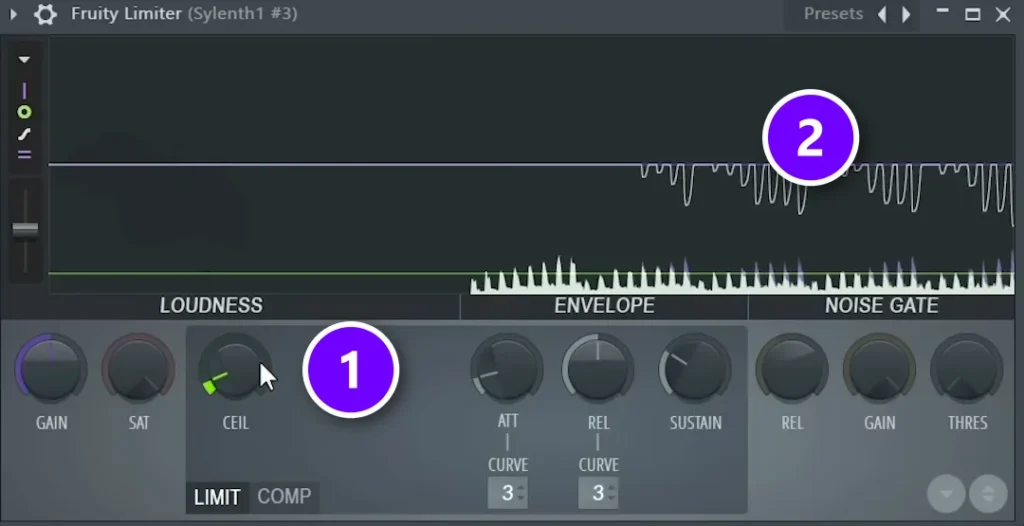
The obvious move is to turn a background sound down, but that often makes it vanish. In the video, an arp (a synth playing quick broken chords) adds sparkle but steals the focus. So Fruity Limiter goes on the arp’s mixer track, and its ceiling, the CEIL knob (1), comes down. The loudest peaks get squashed (2), and the arp settles behind the main parts while it still adds its shimmer.
It works on chords, pianos and drums too. In the video’s piano example, a piano that’s too loud would make it really hard to fit a vocal over it later. EQ can push a sound back as well: cut a little of its lows and a little of its highs, and it sits further back.
Hand the spotlight from part to part
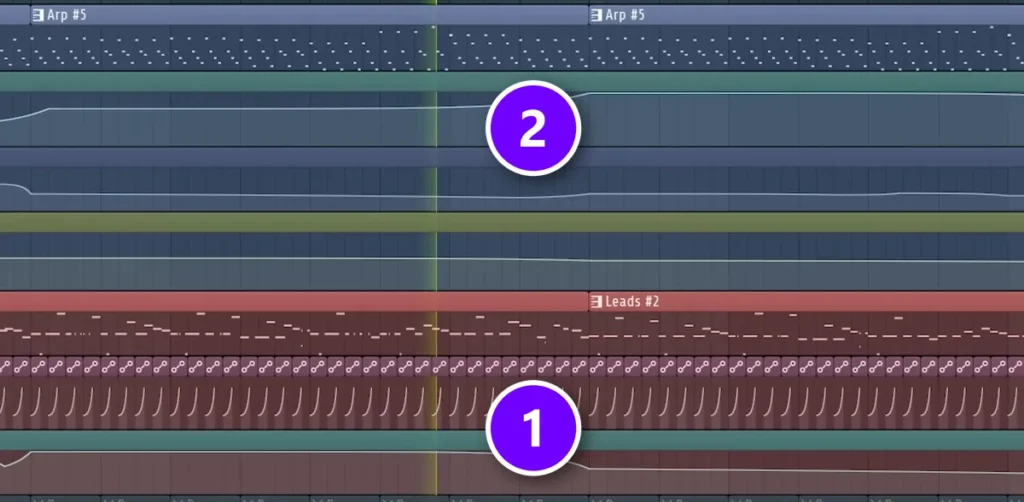
Movement is what stops a loop from feeling like a loop. In this part of the video, the lead’s low-pass filter closes (1), and right as it fades back, the arp’s filter opens (2). The listener’s attention moves to a new sound the moment the old one steps away. That’s the whole trick.
To do this in FL Studio, right-click the knob you want to move, such as a synth’s filter cutoff, choose Create automation clip, and draw the curve in the Playlist. Small changes add up: a filter that opens, a hi-hat pattern that switches, a part that drops out just before the hook.
How do I keep a beat from sounding repetitive?
Change something every 4 to 8 bars, and give the beat sections with different energy: a lighter intro, a hook where everything plays, a verse with fewer parts, then the hook again. Bring a part in, take one out, switch the hi-hat pattern or open a filter, and let the outro ease out instead of stopping dead.
Mix Elite’s free 4.5-hour FL Studio course lays a beat out this way. The course marks a 16-bar intro, a 16-bar hook and a 16-bar verse, then brings the hook back. In the intro, something new arrives every four or eight bars: the piano starts, a pluck joins at bar 8 and the bass at bar 13. The outro keeps only the pluck and the bass, so the beat eases out.
For the bigger picture, the beat-making guide shows how to lay a loop out into intro, hook and verse. Our trap production techniques guide shows how a full trap arrangement builds.
5. Make it wide, but make sure it works in mono

A professional beat feels wide in headphones and still holds together on a phone or in the car. There are two sides to it: spreading sounds out across the stereo field, then checking that nothing important disappears when it all collapses into one speaker.
Widen sounds with panning and stereo delay
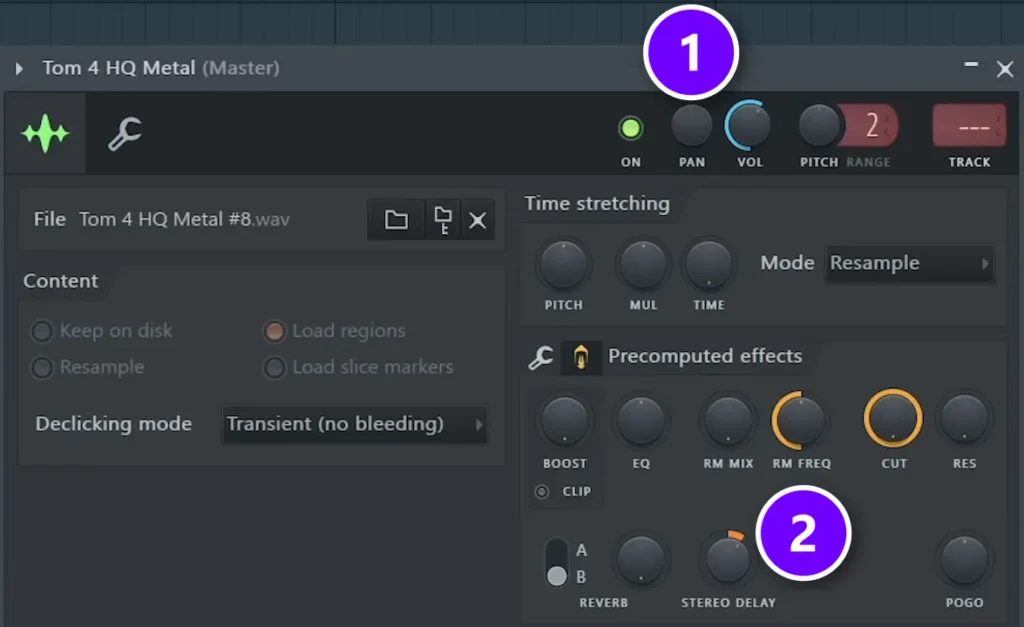
Don’t be afraid of the panning knob. Panning, placing a sound to the left or right, is a big part of why a mix feels wide. Claps, tambourines and percussion are great places to start.
One-shot samples hide an extra trick. Click the sample in the Channel Rack to open its Channel settings, turn PAN (1) to place it, then find Precomputed effects and raise STEREO DELAY (2) a little. It adds a tiny delay between the left and right sides, and it makes the sound a ton wider. For sounds that aren’t samples, Fruity Stereo Enhancer does the same job on the mixer with its phase offset knob.
Add quiet ear candy in the background
This extra tip fills in the stereo picture with details you’ll barely notice, but would miss if they were gone. The video does it with a crash:
- Open the crash’s Channel settings and turn up the IN knob under Precomputed effects, so the hit fades in softly.
- Pan it to the left, lower its volume and pitch it up.
- Duplicate the clip in the Playlist and choose Make unique, so the copy can change on its own. Pitch the copy even higher and pan it to the other side.
- Tuck both copies under the main crash. You should feel them more than hear them.
It’s subtle on one sound. Spread details like this through a whole song, though, and they change how big the track feels.
Check your beat in mono
Many phone speakers play in mono, a single channel, so plenty of people will hear your beat that way. Few producers bother with this check. That’s exactly why it’s worth doing. It’s also the reason producers run phone tests and car tests.
- Open the Mixer with F9 and find the Master track.
- Turn its stereo separation knob (1) all the way to the right. That sums left and right into mono.
- Play the beat and listen for anything that drops away. In the video’s mix, the lead sounds almost vanish because they were fully stereo.
- Fix the sound that vanished until it comes through in mono. Then set the knob back to the middle, which turns it off.
One more rule from Mix Elite’s loudness video: keep the lowest frequencies, below about 100 Hz, in mono. Wide bass can cancel itself out on mono speakers and leave dead spots in a club.
6. Compare your beat with a reference track
This one comes last in the video, and it’s the tip people don’t appreciate until they try it. A reference track is a finished song in your style that you load into your project and compare against. It shows you exactly what your beat is missing, whether that’s low end, brightness, width, loudness or energy.
How to set up a reference track in FL Studio
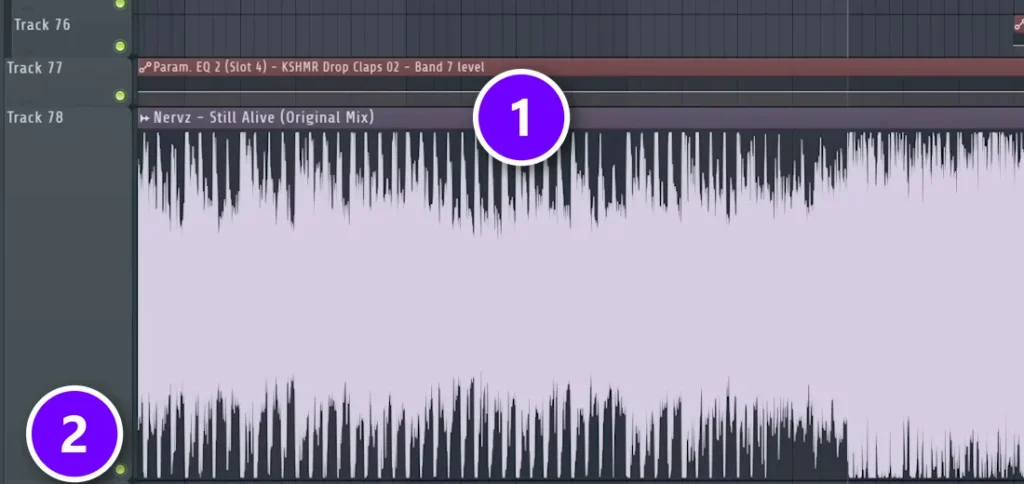
- Pick a finished song close to your style. The same key helps but isn’t required. A mixed but unmastered version is ideal, since your beat isn’t mastered yet either. If you can’t find one, use the normal release.
- Drag it onto an empty Playlist track (1).
- Match the volumes first. A finished song is usually much louder, and louder tends to sound better, so turn the reference down until both feel equally loud.
- Mute the reference. Solo it with Ctrl + left-click on its mute switch (2) whenever you want to hear it, then compare the same section of both songs.
- Listen for one thing at a time: the low end, the highs, the width, the loudness, how often things change.
It also tells you when to stop. Once your beat holds up next to it at the same volume, the mix is doing its job.
7. Make it loud without crushing it
Louder sounds better to our ears, which is why every song you compare against seems bigger. But loudness is the last step. It won’t fix the other six. Mix Elite’s loudness video makes the point that a loud, clean master comes mostly from the mix: fewer sounds fighting, a clean low end, mono lows. Slam a limiter on a messy mix and you just get a louder mess.
Measure loudness in LUFS, not peaks
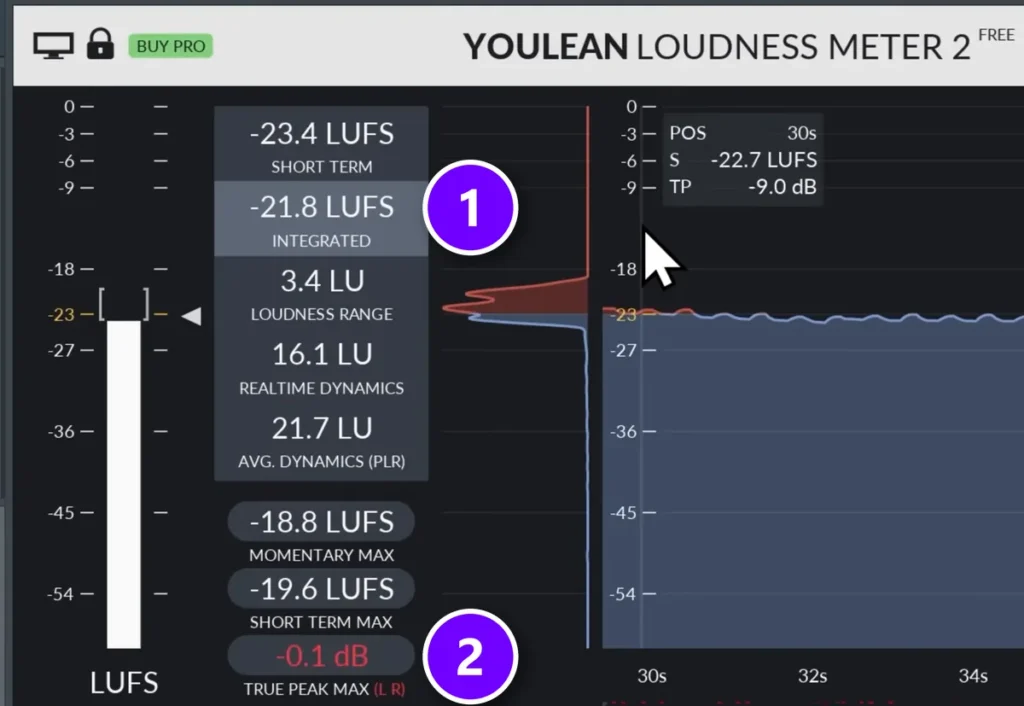
The peak meter in FL Studio shows the highest points of the waveform, not how loud the beat feels. For that you need a LUFS meter (LUFS means loudness units relative to full scale), such as the free Youlean Loudness Meter on your Master track. In this frame from the loudness video, the integrated loudness of the song (1) reads -21.8 LUFS while its true peak (2) hits -0.1 dB. The peaks touch the top, yet the song is still quiet.
Don’t let -14 LUFS fool you. Spotify turns loud songs down to about that level when it plays them. It only lowers the volume and doesn’t squash your track, so you don’t have to master that quietly. The rule from the video: master as loud as you can before it starts to sound worse, and stop there.
Which effects should go on the master channel?
Keep the master chain short: an EQ low cut just under your lowest note (never lower than 30 Hz), a clipper to shave off the sharpest peaks, a limiter last with true peak on and the ceiling at -0.3 dB, and a LUFS meter to check. The master chain polishes a good mix. It can’t fix a messy one.
- Cut the very bottom with Parametric EQ 2, starting just under the lowest note your beat plays and never lower than 30 Hz.
- Make the lows mono. The loudness video cuts the side signal with a free mid-side EQ preset for Patcher, so everything below about 120 Hz plays in mono.
- Catch the sharpest peaks with a clipper. Max uses the free GClip: push it until you just barely hear the knock of your drums change, then back it off 10%.
- Optional: even out the lows, mids and highs separately with multiband compression, in Maximus or a plugin like FabFilter Pro-MB.
- Put a limiter last. Turn on true peak if it has it, start the ceiling at -0.3 dB, and raise the gain until you hear distortion. Then back off a touch.
- Check the LUFS meter, then compare with your reference track at matched volume.
The full walkthrough is in Mix Elite’s video How to Get a Loud, Clean Master in Under 10 Minutes.
Why does my beat distort when I make it loud?
Because one limiter is doing all the work on a mix that isn’t ready. Heavy low end and sharp drum peaks make it squash the whole beat until it crunches. Clean up the lows, shave the sharpest peaks with a clipper first, turn on true peak, and stop raising the gain the moment you hear distortion.
Some distortion only shows up after export. Streaming apps turn your WAV into formats like AAC or MP3, and that can push peaks back over 0 dB even with true peak on. That’s why Spotify suggests a true-peak ceiling of -1 dB, or -2 dB if your master is louder than -14 LUFS.
Don’t mix into a limiter. With a limiter on the Master while you mix, a kick that’s a bit too loud ducks the volume of the whole song. Max calls it the mistake of mistakes. To preview loudness, use a hard clipper instead, and turn it off before the final export.
Keep the last word from the loudness video in mind, too. The surest way to a loud beat is a beat people want to turn up.
Do you need expensive plugins to make beats sound professional?
No. Every trick in the seven-trick video uses FL Studio’s own tools: Parametric EQ 2, Fruity Limiter, the Sampler’s precomputed effects, Fruity Stereo Enhancer and the mixer’s knobs. For loudness, the only extras you’ll want are free: a loudness meter and, if you like, a clipper. Paid plugins can save time later, but they won’t fix a beat with too many sounds or unbalanced volumes.
To see how far the stock plugins go, our guide to making beats with only FL Studio stock plugins builds and mixes a full beat with nothing else.
Which fix should you start with?
Start with volume balance. It’s the most important fix, and it’s free and fast. Then add the low cuts, because a clean low end makes every other fix easier to hear. Those two alone take most beats a long way, and the step-by-step mixing guide shows where they fit in a full mix.
Here’s a plan for tonight. Open your last beat, pull down everything except the drums and the main sound, and add low cuts to everything but the kick and 808. Then play it in mono and next to a reference. It’s the quickest way to hear what these fixes do.
DAY 4 OF THE 7-DAY MUSIC PRODUCER COURSE
Want the whole mixing method? Day 4 walks you through it.
Day 4 of the 7-Day course is all about mixing: the simple Holy-Quad mixing formula, the “Mix Murdering” mistakes most beginner producers make, a one-click setting that makes your song wider, and the volume mistake people make in the first 5 minutes of every mix. You also get a Mixing Checklist built to help your songs sound professional every time, and Day 3 covers drums and arranging. It’s taught in FL Studio (the free trial works), about 45 minutes a day, and on day 7 a pro gives you feedback on your finished track. It’s $27, and you get 60 days to decide if it was worth it.
Frequently asked questions
Why do my beats sound flat and thin compared to professional tracks?
Usually because of the mix, not your gear. The common causes are a gap in the sub or the mids, volumes out of balance, low rumble in every sound and nothing that clearly leads. Balance the volumes first, low-cut everything except the kick and 808, and add saturation where a sound needs richness instead of boosting it with EQ.
How do I get my kick and 808 to hit hard without sounding muddy?
Let only the kick and one bass sound play in the sub. Low-cut any other bass layers at 100 Hz and everything else even higher, sidechain the 808 so it ducks each time the kick hits, and keep everything below about 100 Hz in mono. Mud usually means too many sounds share the low end.
Why is my melody getting buried behind the drums?
The parts around it are usually too loud, or the melody has low body that fights the drums. Turn the background parts down rather than pushing the melody up, low-cut the melody, and add a small high-mid boost for presence. If it still hides, cut a small dip at its main frequencies in the sound covering it.
Why does my track distort when I try to make it as loud as commercial songs?
Commercial loudness comes mostly from the mix, not from one limiter pushed hard. Clean up the low end, shave the sharpest peaks with a clipper, then raise the limiter’s gain only until you hear distortion and back off. Turn on true peak and keep the ceiling at -0.3 dB or lower, since streaming conversion can add peaks.
How do I structure a beat so it doesn’t feel repetitive?
Split it into sections with different energy, such as a 16-bar intro, a 16-bar hook, a 16-bar verse and the hook again, and change something every 4 to 8 bars. Bring a part in, take one out, switch the hi-hat pattern or open a filter, and save the fullest sound for the hook.