
“To be able to have another point of view, which I find is very valuable when trying to tell a story.”
To make vocal effects in FL Studio with stock plugins, double-click the vocal, set Mode to Stretch pro and move the formant slider for a trippy voice. Use Vocodex and a synth for a robot voice, a 15 to 30 ms left-right offset for wide vocals, Newtone for harmonies, and Fruity Peak Controller to duck a delay.
Your vocal is in tune, the mix is fine, and the hook still feels flat. Then you hear a song where the singer drops into a dark, strange tone, or splits into a choir of robots, and you wonder what expensive plugin did that.
Usually, none did. Most vocal FX in modern songs come down to a pitch move, a tiny timing trick, or a delay that knows when to get out of the way. FL Studio already has the tools for all of it.
Table of Contents
The 8 vocal effects FL Studio can make with stock plugins

Vocal effects, often written vocal FX, are any process that changes a voice after it’s recorded. Some are quiet helpers, like reverb and delay. Others are loud and obvious, like a robot voice or a vocal pitched so low it sounds like a different person. FL Studio can make all eight below with tools it already includes, and most of them take a few minutes.
Each one comes from a short Mix Elite video, so you can watch the move and then copy the clicks. No vocal to practice on yet? Our guide on how to record vocals in FL Studio gets you a clean take first.
Which edition do you need?
- No extra plugin: the Sampler tricks, like Stretch pro and its formant slider, work on any sample.
- Producer Edition or higher: Edison and Vocodex.
- Signature Bundle or higher: Pitcher.
- All Plugins Edition, or bought on its own: Newtone.
FL Studio’s free trial includes every feature, so you can try all of them before you buy anything. It just can’t reopen a project once you close it.
What is formant shifting, and how do you do it in FL Studio?
Formant shifting changes the tone of a voice without changing the note it sings. Formants are the natural peaks of sound that your throat and mouth add to your voice, and they’re the reason a child and a grown man sound so different on the same note. Move them down and the singer sounds bigger and darker. Move them up and it gets smaller.
Plain pitch shifting moves the note and the formants together. That’s where the chipmunk sound comes from. FL Studio can move them apart, and there are three good places to do it.
How do you shift formants in Edison?
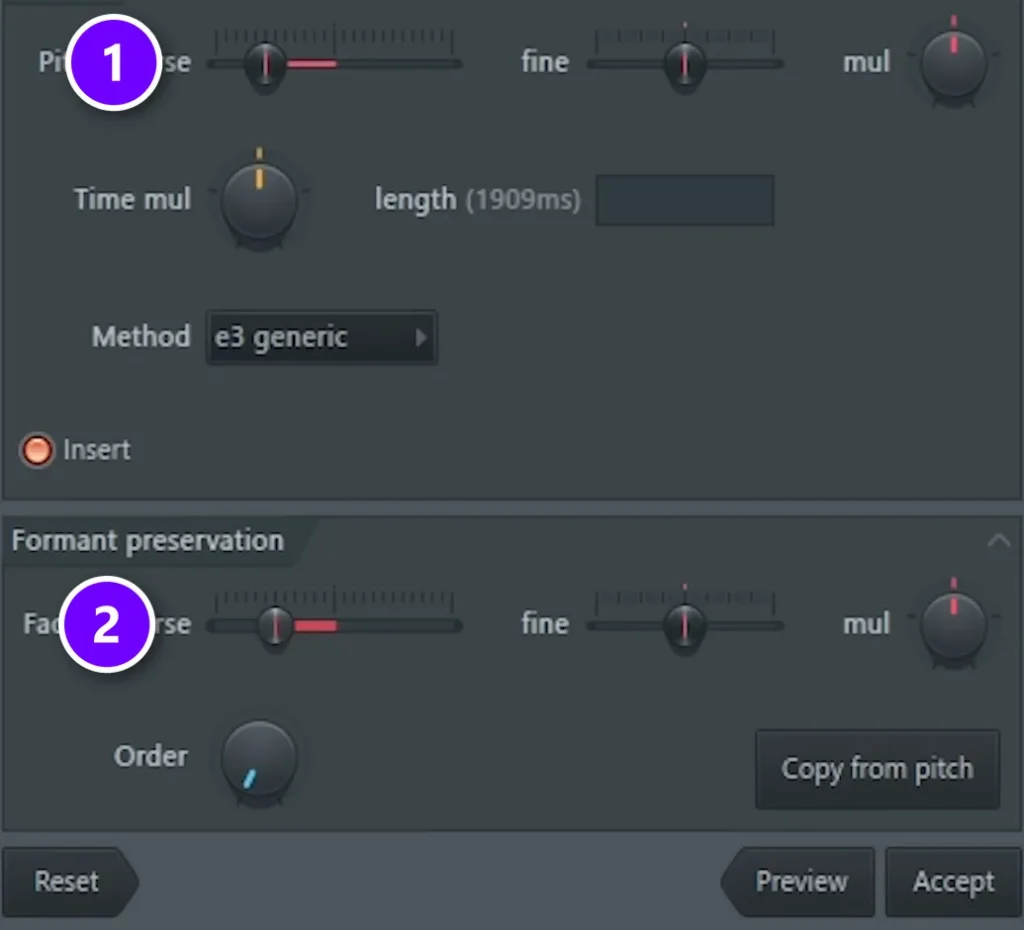
- Double-click the vocal to open it in the Sampler, right-click the waveform and choose Edit in audio editor. Edison opens with your vocal inside.
- Press Alt + T to open the pitch tool. The long way is the wrench icon, then Time, then Time stretch / Pitch shift.
- Turn Factor coarse (2) to the right for a deeper tone, or to the left for a higher one. Leave Pitch coarse (1) alone if the note should stay put.
- Click Preview to hear it, then Accept to apply it.
Edison writes the change into the audio. Keep a copy of the raw vocal. You can also use this window the other way around. To pitch a vocal and keep its natural tone, Image-Line’s manual says to set Factor coarse to the same value as Pitch coarse, and the Copy from pitch button does that in one click.
This Mix Elite short shows formant shifting with stock plugins only:
How do you shift formants in the Sampler?
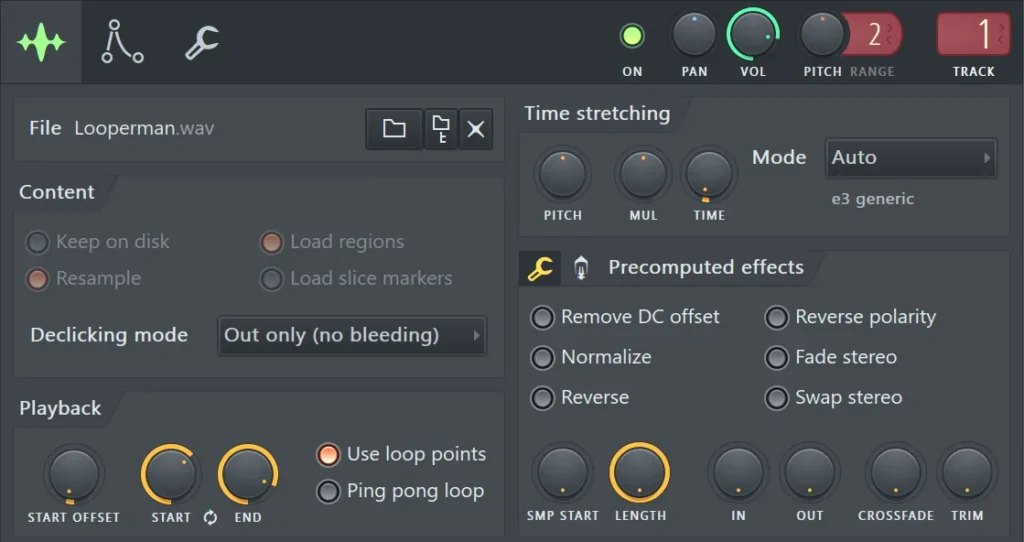
Double-click the vocal, set Mode to Stretch pro, and move the slider that appears underneath it. Image-Line’s Sampler manual calls it F.Shift, and on screen it reads FORMANT. Nothing gets printed to the audio. You can change your mind later. You can even automate the slider, which the manual suggests for adding motion to a sound.
How do you shift formants on single words in Newtone?
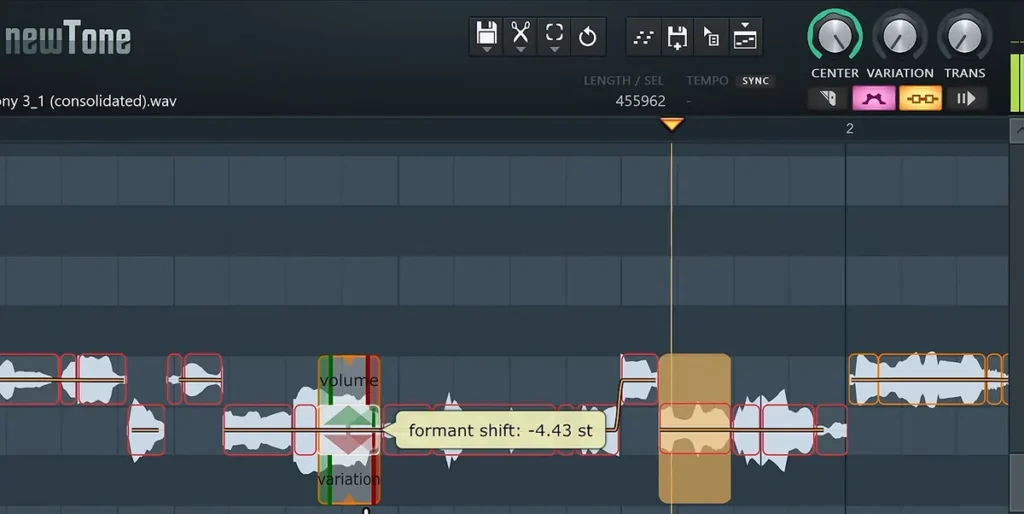
Newtone lets you work note by note. Click the Advanced edit button, hover over the right edge of a note, and drag the formant down. Max, the founder of Mix Elite, uses this to make a copied vocal sound like a second singer. “If you would make the harmonies using just a copy, you might get into some troubles,” Max says in his harmony video. Drop the formant on that copy, and it stops sounding like the same person twice. Our Newtone guide covers the rest of the plugin.
Pitcher works in real time and has a Gender control that overrides the formants, which is handy while you’re still writing.
Try this on a double. In Mix Elite’s video on free plugins, Max duplicates a vocal and changes the formant a little up or down. “That works really good when you blend both of them,” Max says.
How do you make a trippy vocal effect in FL Studio?
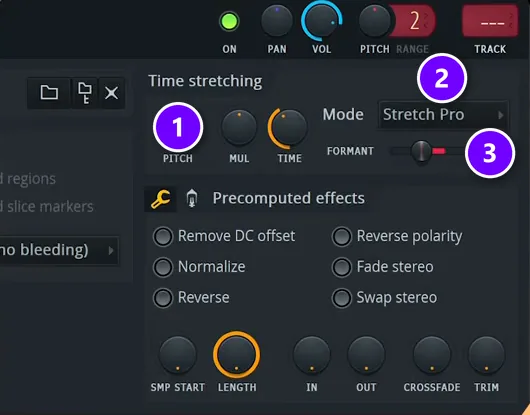
Pitch the whole vocal down, switch the Sampler to Stretch pro, and move the formant slider on its own. It takes three clicks. An ordinary line turns strange and dreamy.
- Click the vocal to open its Sampler channel.
- Turn the PITCH knob (1) down to lower the whole vocal.
- Open the Mode menu (2) and choose Stretch pro.
- Move the FORMANT slider (3) until the voice sounds as odd as you want it.
The video doesn’t give a fixed number, so trust your ears. A related Mix Elite short moves a vocal by 700 cents, which is 7 semitones, and that’s a useful place to start.
How do you make psychedelic vocal FX with a reversed delay?
Reverse the vocal, run it through a ping-pong delay, render the result, and reverse the new clip. Now the echoes arrive before each word, so the voice seems to swell out of nowhere and bounce from side to side.
- Double-click the vocal, stay on the wrench tab of Precomputed effects and click Reverse.
- Route the vocal to its own mixer track and load Fruity Delay 3. Set Delay Model to Ping pong. On a mono vocal, move Pan so you can hear the echoes jump sides.
- Raise the feedback Level until you get several echoes.
- Click the mixer track’s record button to arm it, then press Alt + R to render it. Leave room at the end so the last echoes can fade out.
- Reverse the new audio clip the same way, and mute the original vocal.
The Mix Elite short does this in under 30 seconds. It works best on one line or a single phrase. Run it across a whole verse, and nobody can follow the words.
How do you make a robot voice in FL Studio?
Put Vocodex on the vocal, pick its Sidechained carrier preset, and feed it a synth from a second mixer track. Then play chords. The synth now sings your words, which is called vocoding.
- Load Vocodex on the vocal’s mixer track.
- Open its preset list and choose Sidechained carrier.
- Load any synth on a second mixer track.
- Select the synth’s track, right-click the small arrow at the bottom of the vocal’s track and choose Sidechain to this track only.
- Play chords on the synth while the vocal runs. You’ll hear the robot straight away.
Want a harder, stepped robot sound with no synth? Max calls Newtone’s flattened pitch a “very simple robotic kind of effect” in the same harmony video. Turn Center all the way up, take Variation to zero and pull Trans all the way down. Our guide on how to tune vocals shows where to stop if you want natural tuning instead.
How do you make vocals sound wider in FL Studio?
Make the left and right sides of the vocal arrive a few milliseconds apart. Your brain reads that tiny gap as width, and engineers call it the Haas effect. FL Studio has three easy ways.
Offset two mixer tracks
- Route the vocal to two other mixer tracks.
- Pan one hard left and the other hard right.
- Click the small clock icon on each track and choose Set in ms. Type -15 on one and -30 on the other.
Image-Line’s mixer manual calls that icon manual delay compensation. The short uses it because shifting one side against the other is all this effect needs.
Use the Sampler’s Stereo Delay
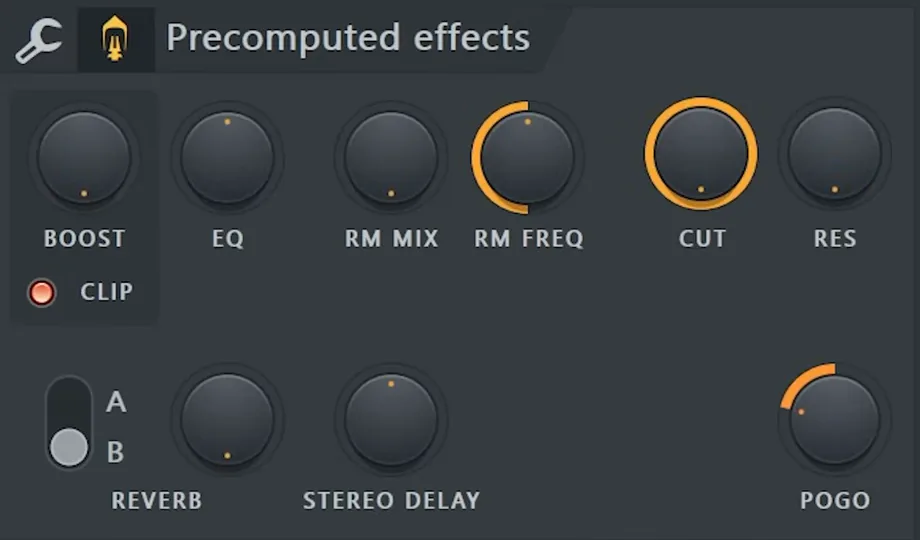
Duplicate the vocal, click the waveform icon on the clip and choose Make unique. Double-click it, switch Precomputed effects to the valve tab and raise Stereo Delay. It’s a short delay between the left and right sides, as this short shows.
Use one plugin on a layer
Another Mix Elite short loads Patcher with a preset called Signal Delay, which comes from the plugin maker Youlean. If it isn’t in your list, Fruity Stereo Shaper has a Delay knob that does the same job, and its manual suggests 20 to 40 ms.
Width can cause phase problems on mono speakers, where parts of the sound cancel out. Use these tricks on a separate layer of your vocal, and keep the main vocal in mono.
How do you make vocal harmonies from one recording?
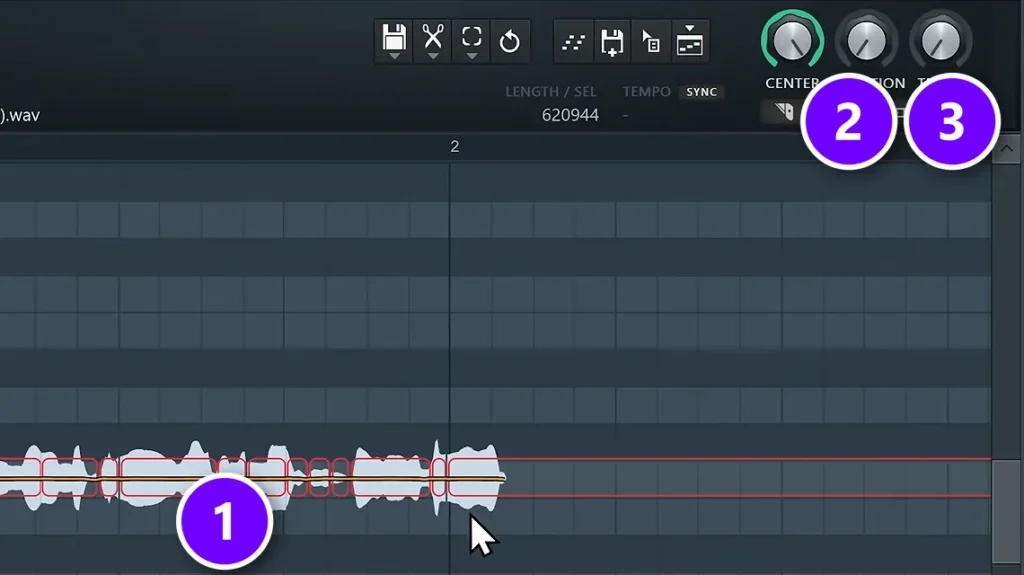
Duplicate the vocal, open the copy in Newtone, snap it to your song’s scale, and flatten the notes. Layered with the lead, that copy becomes a harmony. No second singer needed. Because the scale snap stays on, you can drag words to new notes and they’ll stay in key.
- Duplicate the vocal and Make unique, so your edits only touch the copy.
- Double-click it, right-click the waveform and choose Edit in pitch corrector.
- Open the Edit menu, go to Scale, pick the key of your song and turn on Snap to scale.
- Turn Center up and take Variation (2) down. Press Ctrl + A and drag everything onto one note (1).
- Drag single words or phrases to other notes to give the line some shape.
- Too stiff? Lower Center a little and raise Variation.
If your Newtone is still in trial mode, this short has a simple way around it: record the result into Edison. To sit the harmony behind the lead, read how to mix background vocals.
There’s a faster route for a big, wide hook. This short duplicates the vocal and sets it to Stretch pro, shifts the formant down 700 cents, adds Stereo Delay, then pitches the copy up 700 cents. That’s a perfect fifth above the lead, so the harmony sounds huge without any notes to draw.
Does FL Studio have a vocal harmonizer?
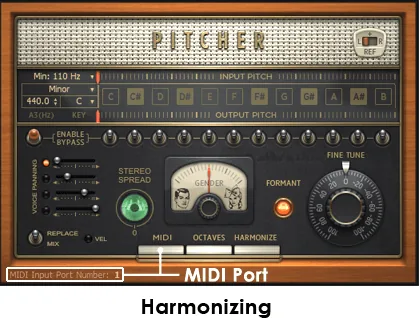
Yes, if you own Pitcher. Click its MIDI switch, load the MIDI Out generator on a channel, give both the same port number, and put the Octaves & Harmonize switch in its down position. Up to 4 notes from your keyboard or the piano roll now pitch the vocal into a chord.
How do you make a clean vocal delay in FL Studio?
Put a Fruity Peak Controller before the delay and link the delay’s mix level to it, inverted. The delay now ducks while the singer sings and comes back in the gaps, so the words stay clear and the echoes only show up where there’s room. That’s the whole trick.
- Load Fruity Peak Controller in the slot above your delay. Switch its Mute button off so the vocal can pass through.
- Load your delay in the next slot down.
- Right-click the delay’s mix level, the Wet control in Fruity Delay 3, and choose Link to controller.
- Pick Peak ctrl – Peak, set the mapping formula to Inverted and click Accept.
- Raise VOL on the Peak Controller until the vocal pushes the delay down as far as you like.
For more control, give the delay its own mixer track and send the vocal to it. “Take the dry out of the delay since we only want the pure effect,” Max says in his vocal reverb video. Then turn on Tempo Sync and start with a quarter note or an eighth note, so the echoes land on your beat. An EQ before the delay keeps the low end out of the repeats.
How do you make deep house vocal FX in FL Studio?

Open the vocal in Edison and raise the formant Factor a little, or lower the formant slider in the Sampler. Either way the note stays where it is while the voice gets darker and larger, and that’s the classic deep house vocal sound.
- Right-click the vocal sample and choose Edit in audio editor.
- Press Alt + T, or click the wrench icon and go to the pitch shift tool.
- Raise Factor coarse a little and press Preview.
- Click Accept once it sounds right.
This Mix Elite short runs through it, and this one uses the same move to get vocals like Meduza’s. Prefer to keep things editable? A third short skips the pitch knob and uses Stretch pro’s formant slider instead. A little goes a long way here. Push too far and the voice starts to sound like a cartoon.
How do you make a vocal uplifter in FL Studio?
A vocal uplifter is a word or phrase that rises in pitch and brightness to build energy into a drop. Mix Elite has a short on it, and you can build one from stock tools with some automation.
- Copy a word or short phrase into the last few bars before your drop, and give it its own mixer track.
- Double-click the clip and set Mode to Stretch, so the pitch can move without changing the timing.
- Right-click the PITCH knob and choose Create automation clip. Draw it rising across the build.
- Load Fruity Reeverb 2 on the track, raise WET and set a long DEC.
- Automate its L.CUT knob upward, so the sound thins out as it climbs.
- Automate the track’s volume up, and end every curve exactly on the first beat of the drop.
What order should vocal effects go in?
Clean the vocal first, then add the effects. Sound moves down FL Studio’s mixer slots from top to bottom, so tune first, then EQ, compress and remove harsh S sounds, and save reverb and delay for the end. Our how to mix vocals guide walks through that whole chain.
Keep loud effects off the main vocal. Put them on a copy, or on their own send tracks, so you can set their level and EQ without touching the lead. Sends also let you duck the wet sound. That matters more than you’d think.
Max is blunt on that last point. “You should always, always apply sidechain reverb and delay to your vocals,” Max says in his reverb tricks video. It’s the same Peak Controller move from the delay section.
Why do vocals get muddy when you add reverb?
The reverb tail sits on top of the next word and fills the low mids. Put it on a send, cut the lows, and duck it under the dry vocal. Our guide to vocal reverb has the settings.
How do you make vocals sound more spacious?
Delay the reverb itself. Send the dry vocal to an empty mixer track and load a reverb at 100% wet, with the dry signal off. Find its delay section, sync it to the tempo and raise the time, as this Mix Elite short shows. In Fruity Reeverb 2 that’s the DELAY knob and its TEMPO switch. The first reflections now arrive late, which leaves the start of each word clean.
Can you get vocal effects as one-click presets?

Yes, and it’s the quick way in if you want a good sound tonight and the details later. A mixer preset loads a whole effect chain onto a track in one click, and you can open it up to see how it was built.
Mix Elite’s Spirits vocal presets are 51 one-click presets for rap, singing, adlibs and FX, in FL Studio, Ableton Live and Logic Pro, for $17. For something to practice on, Mix Elite’s Grand Vocals pack has 327 royalty-free vocals plus 9 FL Studio vocal presets, for $27.
Pick one effect tonight and put it on one word of your hook. Start with the trippy one, since it only takes three clicks. Once you’ve heard what a formant slider does to a voice, you’ll start hearing it in the songs you love.
DAY 5 OF THE 7-DAY MUSIC PRODUCER COURSE
Get the main vocal right, then add the fun stuff
Day 5 of Mix Elite’s 7-Day Music Producer Course is about vocals: how to record great vocals at home on any budget, the V.O.C.A.L. formula that turns rough vocals into head-turners, and the vocal mistakes even advanced producers make. You also download 10 copy-and-paste vocal chains and practice acapellas. It’s taught in FL Studio, and FL Studio’s free trial works. On Day 7 a pro gives you personal feedback on your track. It’s $27, with 60-day refunds.
Frequently asked questions
What is the difference between pitch shifting and formant shifting?
Pitch shifting changes the note a voice sings, and by default it moves the voice’s tone along with it. Formant shifting leaves the note alone and changes only the tone, so the singer sounds bigger, smaller, darker or brighter. In FL Studio, use the Sampler’s PITCH knob for pitch and the formant slider in Stretch pro mode for formants.
What vocal effects does FL Studio have built in?
FL Studio includes Fruity Delay 3 and Fruity Reeverb 2 for echo and space, Vocodex for robot voices, Newtone and Pitcher for tuning and harmonies, and Edison for formant and pitch edits. The Sampler adds Stretch pro and Stereo Delay. Some of these depend on your edition, so check before you buy.
Do wide vocal tricks cause phase problems?
They can. Delaying one side of a vocal makes it sound wide on headphones, but on a mono speaker the two sides add together and parts of the sound can cancel out. The safe way is to use the trick on a separate layer of your vocal and keep the main vocal in mono.
How do you make a vocal sound deeper in FL Studio without changing the note?
Lower the formants and leave the pitch alone. Open the vocal in Edison, press Alt+T and raise Factor coarse, or set the Sampler’s Mode to Stretch pro and pull the formant slider down. The voice gets darker and bigger while the melody stays exactly where it was.
Do I need a paid plugin for vocal FX in FL Studio?
No. Every effect on this page uses tools from FL Studio, apart from one optional Patcher preset that has a stock replacement. Newtone and Pitcher come with the higher editions or can be bought separately, and the Sampler’s formant slider and Stereo Delay need no extra plugin.