

“It’s a poor sort of memory that only works backwards.”
Reverse reverb is a reverb tail played backwards, so a sound swells up and leads into a note instead of fading after it. To make it in FL Studio, put a long, fully wet reverb on a copy of the sound, render it to audio with Ctrl + Alt + C, switch on Reverse in the clip’s settings and place it so it ends right where the dry sound starts.
Think of the vocal that seems to breathe in right before the first word of a chorus, or the ghostly wash that rushes up just before a drop. It sounds expensive. It can also make you wonder which plugin you’re missing.
You aren’t missing one. Reverse reverb is a stock-tools job in FL Studio, and it takes a few minutes once you know the order. Below are the exact clicks for vocals, melodies, 808s and transitions, the short Mix Elite videos that show each move, and the fixes for when the effect sounds late or muddy.
Table of Contents
What is reverse reverb?
Reverse reverb is a reverb tail played backwards. Normal reverb comes after a sound and fades away. Reverse reverb starts quiet, grows, and stops right as the sound begins, so you hear the echo of a note before the note itself.
Nothing in a real room does that, which is why your ear notices it. Producers also call it reverse echo or a reverse swell. Guitarist Jimmy Page says he came up with it in 1967 while recording “Ten Little Indians” with the Yardbirds, by turning the tape over, adding echo and turning it back. He used it again on Led Zeppelin’s “Whole Lotta Love.” Today the same flip takes two clicks.
Is reverse reverb the same as reversing a sound?
No. Reversing a sound flips all of it, so a word turns into gibberish. Reverse reverb flips only the echo. The dry sound still plays forward, and the backwards part is just a wash of reflections that leads into it.
Why do producers use reverse reverb, and where does it go?
It builds tension. A sound that rises tells the listener that something is about to land, and it lets a new part enter without a hard edge. These are the spots where it works best:
- Before the first word of a vocal. The classic pop and R&B lead-in, where the voice seems to come out of a cloud.
- Into a chorus or drop. Swell the last word or chord over the final bar, so beat 1 of the new section hits harder.
- Before a melody comes in. A soft rise on the first note stops a new part from feeling pasted on.
- Before a snare or crash. Keep this one short, about a quarter or an eighth note.
- At the very start of a song. The first sound fades up out of silence and sets the mood right away.
Still getting comfortable with normal reverb? Read our guides on reverb on vocals and reverb vs delay first. This trick makes more sense once you can hear what a tail is doing.
How do you make a reverse reverb on a vocal, step by step?
Put a long, fully wet reverb on the vocal, render the first word with its tail, reverse the new clip and place it so it ends where the word starts. That’s the method Max, the founder of Mix Elite, uses on a spoken producer tag in this video.
- Give the vocal its own mixer track and load Fruity Reeverb 2. It comes with every edition of FL Studio.
- Build a long tail. Bring the size up, raise the low cut a little and set the decay to about 4 seconds. Max’s next move: “set wet to maximum amount and dry to minimal amount.” You only want the echo here.
- Mark just the first word in the Playlist and press Ctrl + Alt + C. In the render window, set Tail to Leave remainder, then start the render.
- Double-click the new clip and switch on Reverse under Precomputed effects.
- Shorten the clip and move it into place. “Place it just before the first word starts,” Max says.
- Bring back the original vocal, turn its reverb back to a normal amount and lower the volume of the swell until it sits behind the voice.
Which render setting keeps the reverb tail?
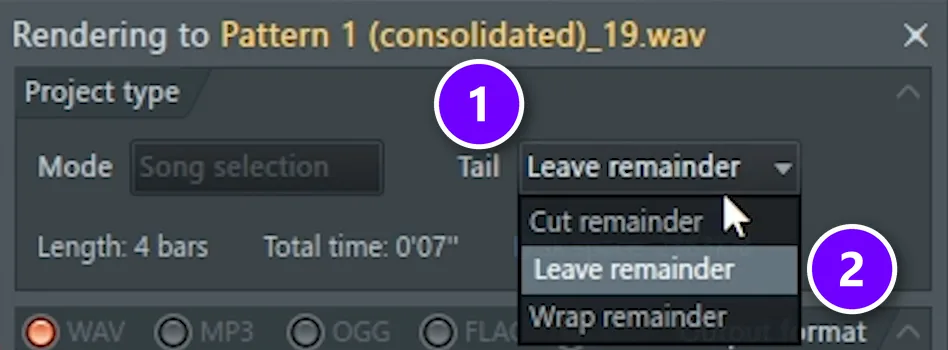
The render window decides what happens to sound that rings on after your selection ends. That choice is called Tail (1). Leave remainder (2) keeps the whole echo, and it’s the one you need here, because the echo is the entire effect. Cut remainder would chop it off at the end of the word.
Where is the Reverse button in FL Studio?
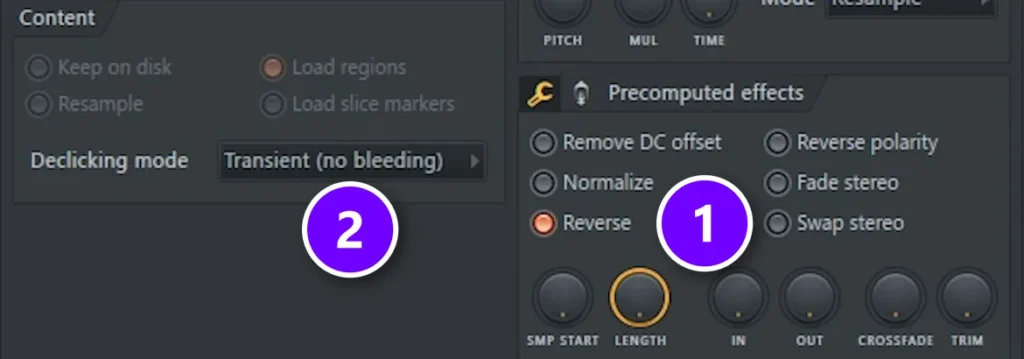
Double-click any audio clip to open its Channel settings. Reverse (1) sits in the Precomputed effects section. If the end of the swell clicks, open Declicking mode (2) and pick Smooth or Crossfade, which is what Max does before he trims the clip right up to the word.
Want more drama from the swell?
Send the reversed clip to its own mixer track, so you can treat it without touching the voice. On his tag, Max loads Fruity Panomatic there, sets its LFO to volume, turns speed and amount to the maximum, then automates the speed with two points going down. The swell now shudders as it rises. A little distortion makes it louder, and an EQ takes out the lows.
The double-reverse version
Many guides reverse twice, and it’s worth knowing why. The reverb then grows out of the first syllable, so the swell leads straight into the word, and you never hear the backwards word at the end. Use it when the single flip above leaves a bit of gibberish you can’t trim away.
- Copy the first word to a new clip and reverse it.
- Play it through the same fully wet reverb and render it with Leave remainder.
- Reverse the new clip again, so the word faces forward and the echo comes first.
- Slide it so the end of the swell meets the start of the real word.
Can you make reverse reverb in real time without bouncing?
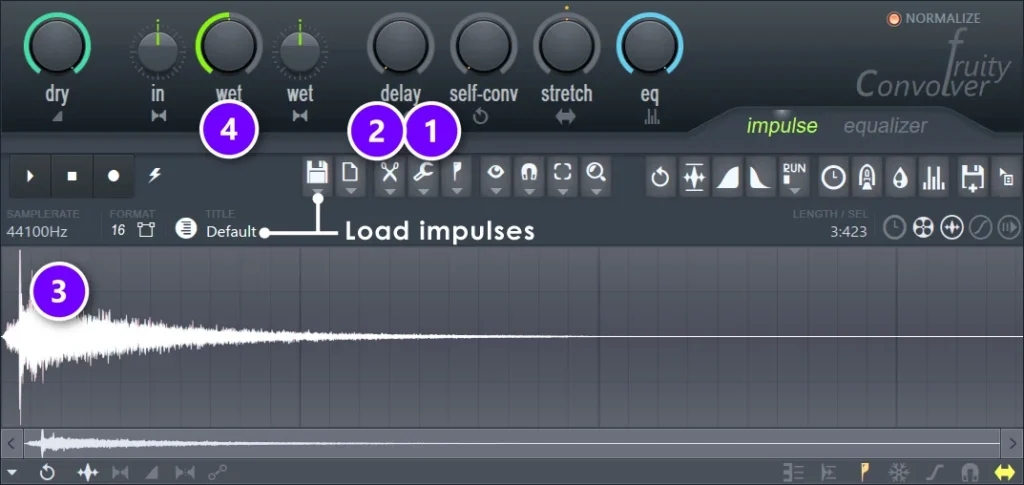
Yes. Load Fruity Convolver on a mixer track, reverse its impulse response and cut off the beginning, and the effect reacts live to whatever you play. An impulse response is a short recording of a space, and Convolver uses it as the sound of the reverb. Flip that recording and every note gets a rising wash.
- Load Fruity Convolver on the mixer track of your vocal or synth. The default preset works, and so does any other impulse response.
- Open the wrench icon (1), go to Time and click Reverse.
- Left-click and drag from the start of the waveform (3) to select the part you want to remove. The longer the piece you remove, the sooner the swell begins.
- Open the Edit menu under the scissors (2) and click Cut.
- Set the balance with the Dry knob and the Wet knob (4).
This Mix Elite short runs the same clicks on a live synth, and another one cuts the tail first and reverses it after. Both orders work.
Convolver can only react to sound that has already arrived, so the swell rises after a note starts, not before it. A Mix Elite short calls this “the fake reverse effect,” and it sounds great on held notes and pads. For a swell that lands exactly before a word, use the render method above.
What are the best reverb settings for a dramatic reverse swell?
Go long on decay, fully wet, with almost no pre-delay. Most producers land between 2 and 5 seconds of decay, and the rest of the settings follow from that.
- Decay: about 4 seconds is Max’s choice. At 120 BPM a bar lasts 2 seconds, so that gives you plenty to trim from.
- Wet and Dry: Wet all the way up and Dry all the way down while you render.
- Pre-delay: at or near zero, on the DELAY knob in Fruity Reeverb 2. Any pre-delay turns into a gap between the swell and the word once you flip it.
- Size: large. Big rooms smear into one smooth wash.
- Low cut: higher than usual. Try 150 to 250 Hz on a vocal, with the L.CUT knob in Fruity Reeverb 2.
- High cut: leave it mostly open, and pull it down only if the esses turn harsh.
Any reverb can do this, and each one gives the swell a different color. See our list of the best reverb plugins if you want to try something beyond the stock ones.
Why does my reverse reverb sound out of time?
Usually the swell is ending in the wrong place. It has to finish right where the word begins, and your eyes can trick you, because the loudest part of the waveform isn’t always the true end. Pre-delay is the other common cause.
- Zoom in on the Playlist until you can see where the first consonant of the word starts.
- Hold Alt while you drag the clip, so it moves freely and ignores the grid.
- Line up the end of the swell a hair before the word, then play it in context and trust your ears.
- Trim the swell to a musical length, like one beat, two beats or a full bar, so the rise feels tied to the tempo.
- Still feels loose? Render it again with pre-delay at zero.
How do you stop reverse reverb from making the mix muddy?
Keep it thin, quiet and short. A swell sits on top of whatever is already playing, so it can blur the end of the last phrase if you let it.
- Cut the lows with an EQ on the swell’s own mixer track. Max does this on the swell in his tag.
- Turn it down until you feel it more than you hear it, then bring it up a touch.
- Stop it clean at the word. A swell that runs past the first syllable just sounds like a mistake.
- Draw a volume fade-in if the start pokes out of the mix.
Effects like this only shine when the rest of the mix has room for them. Our guide on how to mix a song covers the basics. If you’d rather watch it happen, Mix Elite’s Full Mixing from Start to Finish course mixes a Trap song and a House song from scratch, vocals included, in 44 lessons for any DAW.
Practicing on a vocal? Mix Elite’s Aria Vol. 1 vocal runs pack gives you 101 runs, 31 hooks and 19 sustains, each dry and wet, plus 21 FL Studio reverb presets.
How do you use reverse reverb as a transition into a section?

Take the last word or chord before the new section, make a reverse swell from it, and let it rise over the final bar so it stops on beat 1. Because it’s made from the song’s own sound, it joins the two parts better than a stock riser can.
- Render the last chord or word with the wet reverb, using the steps above.
- Reverse the clip and trim it to one bar, or half a bar for a quicker lift.
- Line up its end with beat 1 of the new section.
- Cut the drums for that last bar if you want the swell alone in the spotlight.
Where the big moments belong is a separate skill. Our guide to EDM song structure maps them out bar by bar, and Mix Elite’s Arrangements & Music Storytelling course shows how to turn loops into full songs across genres in 30 lessons.
What about a reverb impact on the drop?
A swell needs something to land on. This Mix Elite short builds a huge impact with a stock reverb. Draw one long bass note in any synth. Load a reverb, raise its size, decay and wet level, and set Dry to 0%. Right-click the wet level, create an automation clip, open that clip and enable its LFO. Then turn up the speed and amount, right-click speed and automate that too.
How do you reverse a melody in FL Studio?
There are three ways, and the first one is the trick worth learning. Flip the MIDI horizontally, render it, then reverse the audio. The notes end up back in their original order, but each one plays backwards.
The MIDI flip way
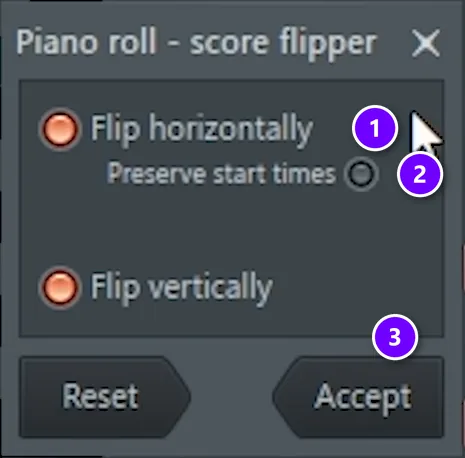
- Open your melody in the Piano roll, press Ctrl + A to select every note, then press Alt + Y.
- Switch on Flip horizontally only (1). Max also turns on Preserve start times (2). Then click Accept (3).
- Go to the Playlist, mark the pattern and press Ctrl + Alt + C. Max sets Tail to Cut here.
- Double-click the new clip and switch on Reverse.
The payoff is what Max says when he plays the result: “we preserved our notes that we had earlier but we got the reverse effect.” Your hook stays singable, and it just sounds strange and new.
Two shortcuts give you the same audio. Right-click the pattern and choose quick render as audio clip, as this short shows. Or arm the mixer track’s record button and press Alt + R, the route in this short, then open the new clip and enable Reverse. The trick also works on stacked chords. One short runs it on a harmony, and Mix Elite’s Genesis MIDI chord pack has 205 chord progressions and harmonies to try it on.
The fake reverse way
Route the instrument to a mixer track and load Fruity Convolver. Reverse it from the Tools menu, drag across the start of the file and cut that part away, just like the real-time method above.
The Gross Beat way
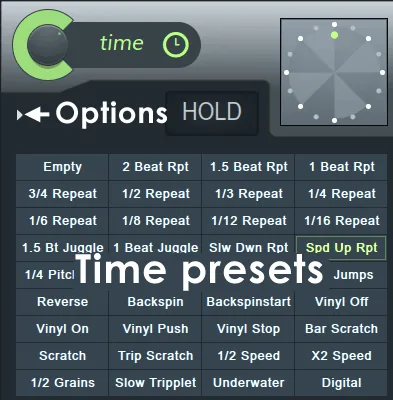
Load Gross Beat on the mixer track, open its presets, go to Momentary and choose a reverse preset. It flips the sound live as it plays. Gross Beat comes with Signature Bundle and higher, so skip this one on the cheaper editions.
Can you reverse only some chops?
Yes, in Slicex. Double-click a note in the piano roll, go to its color setting and select reverse, as this short shows. Only the chops you pick play backwards. New to chopping? Start with how to sample in FL Studio.
How do you make a reverse 808?
You fake it, and nobody can tell. Chop the note into tiny repeats and draw a velocity curve that climbs, or slide a quiet low note up into the real one. Either way the 808 seems to suck in before it hits.
The chop and velocity way
- Select the 808 note in the Piano roll.
- Press Alt + U to open the Chop tool and turn the time knob all the way to the left.
- Open the Control menu at the bottom of the Piano roll, choose Note velocity, and draw a curve that climbs toward the end.
Another short gets a similar result with the arpeggiator. Hold Ctrl and left-click to select the note, press Alt + A, set range to 1, turn the time knob down and draw the same curve.
The slide way
Move the note one octave down and lower its velocity. Add another note after it, double-click that one and enable Slide, then change the note length until it fits your track. This short shows the whole move.
Pick one word from your current song and run the vocal steps on it. Keep the swell quiet, end it right on the syllable, and play the section back. That one move is usually enough to make a plain hook feel produced.
DAY 4 OF THE 7-DAY MUSIC PRODUCER COURSE
Make effects like this sit in a finished mix
Day 4 of Mix Elite’s 7-Day Music Producer Course is all about mixing: the ‘Holy-Quad’ formula, the ‘Mix Murdering’ mistakes most beginners make, a mixing checklist and the Premium Mixing Template. It’s taught in FL Studio, and you can follow along in the trial. On Day 7 a pro gives you personal feedback on your track. It’s $27, with 60-day refunds.
Frequently asked questions
Is there a reverse reverb plugin in FL Studio?
Not one with that name, but Fruity Convolver does the job and comes with every edition. Load it, open the wrench menu, go to Time and click Reverse. It works live, though the swell rises after the note starts. For a swell that lands before a word, render a wet copy and reverse the clip instead.
How long should a reverse reverb be?
Most swells last from one beat to one full bar. Render about 4 seconds of tail so you have room, then trim it to a length that fits the tempo. Short swells work before snares and single words. A full bar suits the lift into a chorus or a drop, where you want the tension to build.
What is the difference between reverse reverb and reverse delay?
Reverse reverb flips a smooth wash of reflections, so you hear one soft rise into the note. Reverse delay flips separate echoes, so you hear distinct repeats that get louder as they approach the note. You make both the same way: render the wet effect only, reverse the clip and line up its end with the dry sound.
Do I need a paid edition of FL Studio for reverse reverb?
No special edition is needed. Fruity Reeverb 2 and Fruity Convolver come with every edition, and the Reverse button is part of the Channel settings. Only the Gross Beat method needs Signature Bundle or higher, and only Slicex chops need Producer Edition or higher. The FL Studio trial lets you try all of it first.