
“By necessity, by proclivity, and by delight, we all quote.”
To sample in FL Studio, drag the sample from the Browser onto the Channel Rack. Match it to your song by right-clicking the TIME knob, choosing Autodetect and typing the sample’s BPM. To chop it, right-click the waveform and pick Open in new Fruity Slicer channel or Open in new Slicex channel. Each slice lands on its own piano roll key, so you can play the pieces in a new order.
You found it. Four seconds of an old soul record, a dusty piano loop, or a vocal line that gives you chills. You drag it into FL Studio, hit play, and it sounds wrong: too fast, out of key, and clicking at every cut.
That’s normal, and it’s fixable. Sampling is a short chain of small jobs, and FL Studio has a stock tool for each one. Below is how to sample in FL Studio from the first drag to a finished flip, with the exact clicks, real screenshots and short Mix Elite videos that show each move.
Table of Contents
What does sampling mean in FL Studio?
Sampling means taking a piece of recorded audio, like a loop, a vocal, a drum hit or a few bars of a song, and using it as raw material in your own track. In FL Studio you load the sample, fit it to your tempo and key, cut it into slices and play those slices in a new order. That last part is called flipping.
Why chop at all, when you could just loop it? A loop keeps the original chords, melody and groove, so your beat sounds like their song with new drums on top. Chopping keeps the sound but lets you change everything else. You pick the best moments, play them in your own rhythm, and the part starts to belong to your track.
What do you need to sample in FL Studio?
Any recent version of FL Studio and a sample. Fruity Slicer, the quickest chopping tool, comes with every edition. Slicex and Edison, FL Studio’s audio editor, need Producer Edition or higher, as Image-Line’s Slicex manual notes. The free trial includes every feature, so you can follow along before you buy. It just can’t reopen projects once you close them.
New to the program? Start with our beginner guide to FL Studio. For bigger ideas, like layering, resampling and where to find good material, read our guide to sampling techniques. This page is the click-by-click part.
How to sample in FL Studio: the 7 steps
Sampling in FL Studio follows the same order every time. You load the sample, find its BPM, match it to your tempo and key, chop it, flip the slices into a new pattern and save the result. Each step takes a few minutes once you know where the buttons are.
How do you put a sample in FL Studio?
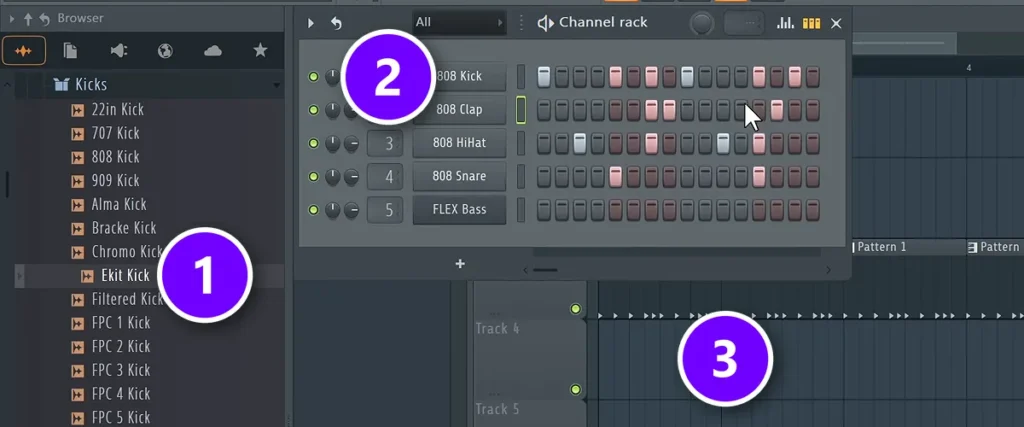
Drag the audio file from FL Studio’s Browser, or straight from File Explorer or Finder, and drop it on the Channel Rack. That loads it into a Sampler channel you can chop and play from the piano roll. Drop it on an empty Playlist track instead, and FL Studio makes it an Audio Clip, which suits long loops and full songs.
- Open the Browser on the left. FL Studio’s own sounds live in Packs, and any folder you’ve added shows up in the same list.
- Click a sample once to hear it.
- Drag it from the Browser (1) onto the Channel Rack (2). FL Studio adds a new Sampler channel with your sound.
- Or drop it on an empty Playlist track (3) to get an Audio Clip you can move and cut on the timeline.
- Double-click the channel or the clip to open its Channel settings, where most sampling controls live.
Sampler channel or Audio Clip: which one should you use?
- Sampler channel for short sounds and loops you want to chop, pitch or play from a keyboard.
- Audio Clip for long loops, vocals and whole songs that should sit on the timeline.
- Either one opens the same Channel settings, so tempo and pitch work the same way.
Got a whole folder of sounds to add? Our guide on how to install sample packs in FL Studio shows how to put it in the Browser so it’s always one click away.
How do you find the BPM of a sample?
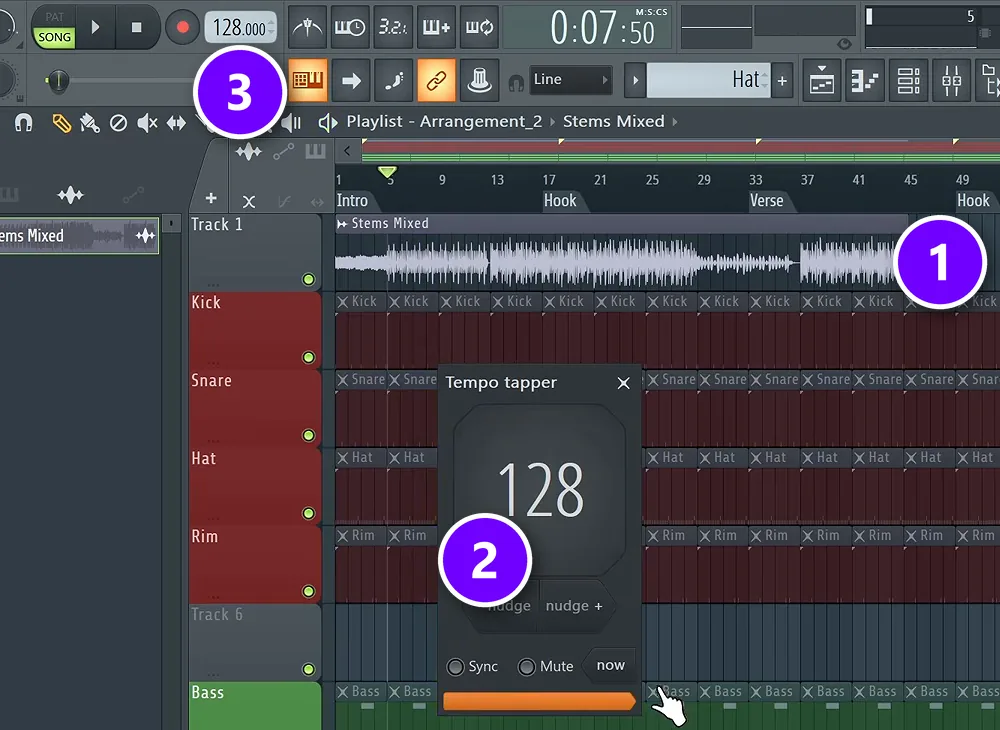
Check the file name first, because most loops from sample packs include the BPM. If it’s missing, right-click the waveform in the sampler, choose Detect tempo and pick the BPM range the sample is most likely in. Or open the Tempo tapper and click along with the beat.
“First we need to make sure that this track is in the same BPM as our track,” says Max, the founder of Mix Elite, in Mix Elite’s free 4.5-hour FL Studio course. He drags a finished song into the Playlist (1), opens the Tempo tapper, plays the song and taps along on the pad (2). The project tempo at the top (3) follows his taps, and he checks the result against the metronome.
Edison can guess the tempo too. Open the file in Edison, right-click the tempo readout and choose Autodetect, as a Mix Elite short shows. Image-Line’s sampler manual warns that any automatic guess depends on the material, so always check it against the metronome.
How do you match a sample to your project tempo?
Double-click the sample to open its Channel settings, right-click the TIME knob and choose Autodetect. Then pick Type in (BPM) and enter the sample’s real tempo. FL Studio stretches it to fit your project. Set Mode to Stretch first if the pitch should stay the same.
- Double-click the sample’s channel in the Channel Rack, or the Audio Clip in the Playlist.
- In the Time stretching section, open the Mode menu and pick Stretch to keep the original pitch. Leave it on Resample if you want the pitch to rise and fall with the speed.
- Right-click the TIME knob and choose Autodetect.
- Pick Type in (BPM) and type the loop’s tempo. Don’t know it? Pick the range it’s most likely in.
- Press play. The loop now locks to your project, and it stays locked when you change the tempo later.
In this Mix Elite short, a 150 BPM drum loop goes into a 123 BPM project and lines up on the first try. The same steps work for melody loops.
How do you fit an Audio Clip to the tempo?
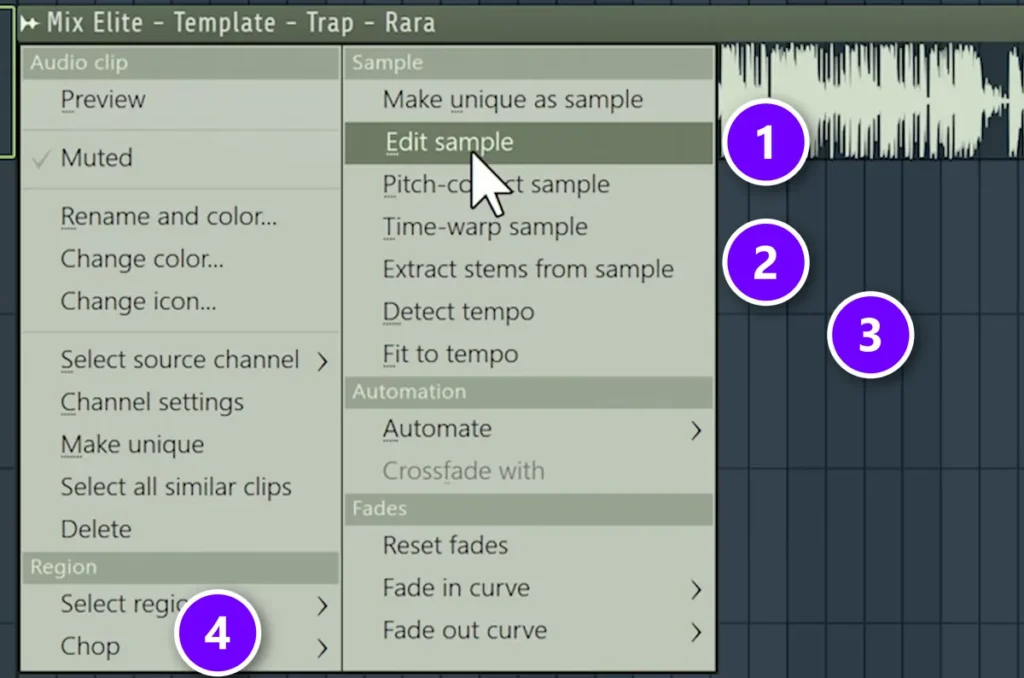
Click the small icon in the top-left corner of the clip to open its menu. Under Sample you’ll find Edit sample (1), Extract stems from sample (2), and Detect tempo and Fit to tempo (3). Choose Fit to tempo, pick the tempo marked (project), and the clip locks to your song. Chop (4) sits at the bottom of the same menu.
Three more tempo tricks
- Know the length? If a loop is exactly 4 bars, right-click TIME and pick 4 bars. FL Studio stretches or squeezes it to fill 4 bars at your tempo.
- Let Fruity Slicer do it. Its AUTO-FIT switch fits a loop to the project tempo the moment you load it.
- Changing the tempo later? If your Audio Clips drift or warble, open the Playlist options menu, choose Switch all audio clips to and pick Stretch pro, as another short shows. Pick Resample there instead if they should pitch up and down with the tempo.
Why does my sample speed up when I change the pitch?
Because FL Studio’s Resample mode works like a tape machine. Higher pitch means faster playback, and lower pitch means slower and darker. To move the pitch and keep the speed, open the sampler’s Mode menu and choose Stretch or Stretch pro. Now the PITCH knob changes the key while the tempo stays put.
Resample isn’t wrong, though. A soul sample sped up until the voice sounds higher is a classic hip-hop sound, and Resample gives it to you for free. Just make it a choice, not an accident. This Mix Elite short shows the Stretch switch in a few seconds.
For vocals to try this on, Mix Elite’s Grand Vocals pack has 327 royalty-free vocals: 118 phrases, 154 adlibs, 28 hooks and 27 chops.
How do you match a sample to your song’s key?
Find the sample’s key, count the half steps (semitones) to your song’s key, and move the sample by that much. In Mix Elite’s free FL Studio course, Max finds keys with the free Tunebat analyzer. You can also play notes on a keyboard along with the sample until one sounds like home.
Say the loop is in F minor and your song is in G minor. That’s 2 semitones up. With Mode on Stretch, turn PITCH up by 2 and read the value in the hint bar at the top of FL Studio. Fruity Slicer’s PS slider moves all its slices at once, up to 12 semitones either way.
How to chop samples in FL Studio
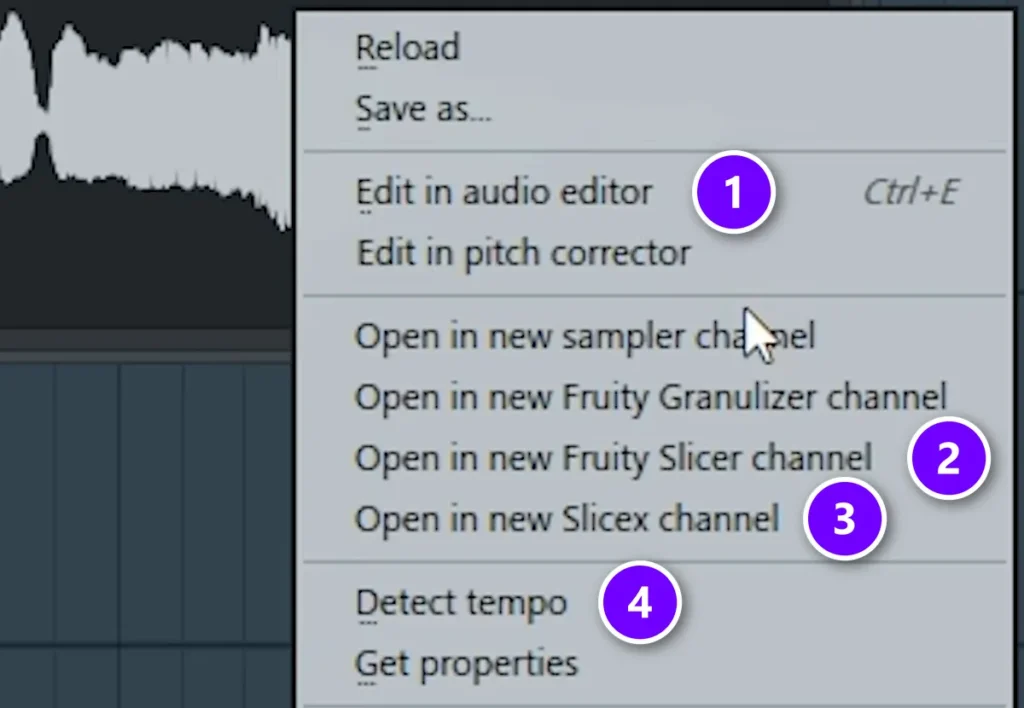
Double-click the sampler channel, right-click the waveform and choose Open in new Fruity Slicer channel or Open in new Slicex channel. FL Studio cuts the sample at its hits and puts one slice on each piano roll key. For quick cuts on the timeline, use the Playlist’s Slice tool or Chop menu.
This right-click menu holds every option. Edit in audio editor (1) opens Edison. Open in new Fruity Slicer channel (2) and Open in new Slicex channel (3) send a copy of the sample to a slicer. Detect tempo (4) is the BPM finder from earlier.
Fruity Slicer: the fastest way to chop
- Open the sample in a new Fruity Slicer channel, as above.
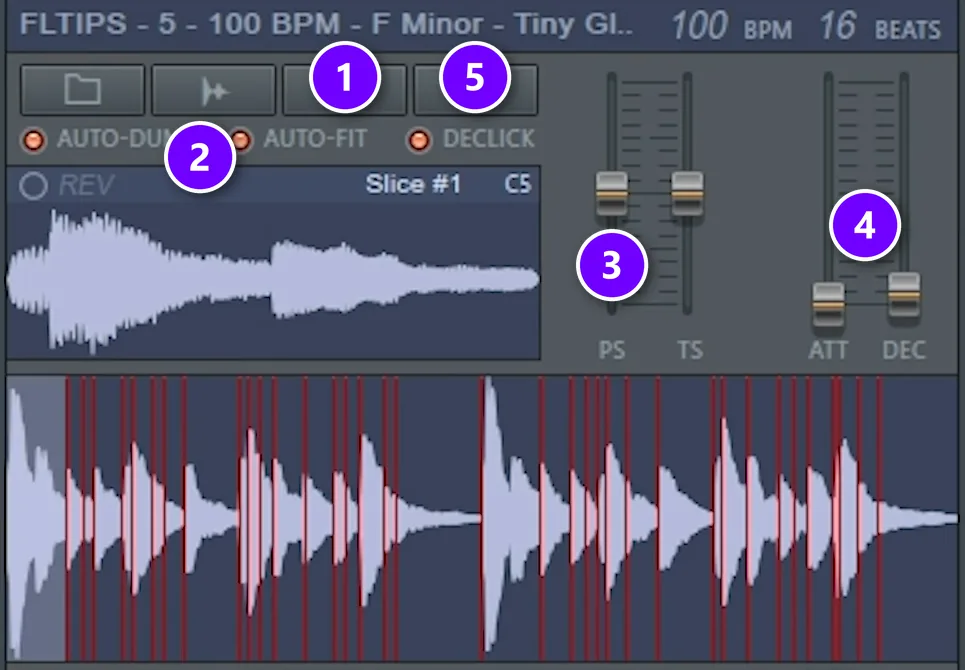
- Click the knife button (1) and pick a slicing mode. Medium auto-slicing is a good start, and Sharp makes more, smaller slices.
- Leave AUTO-DUMP on (2). Fruity Slicer then writes the slices into the piano roll in their original order, so the loop plays as before. AUTO-FIT, right next to it, matches the loop to your tempo.
- Raise ATT and DEC (4) a little, so each slice fades in and out without a click. PS (3) moves every slice up or down in pitch.
- Press F7 to open the piano roll. Each key now plays one slice, with the first slice on C5.
A short Mix Elite video runs through these exact clicks in under a minute:
Slicex: more control over every slice
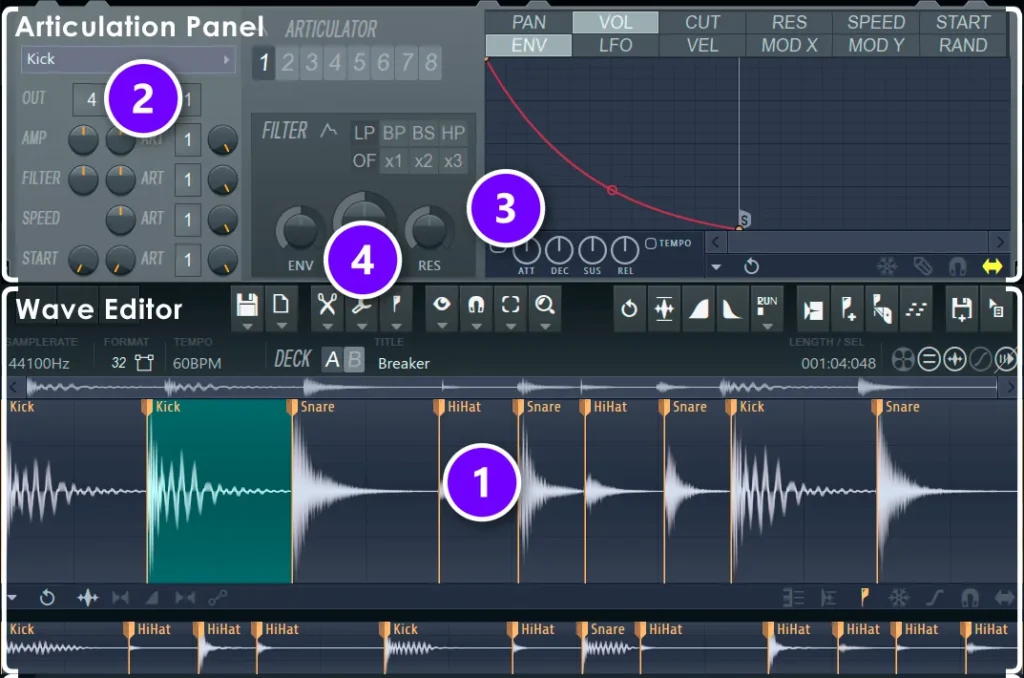
Slicex does the same job with a full editor built in. Drag a sample onto it and it slices the sample by itself. You can then move each marker (1), rename it or delete it. The OUT number (2) sends a slice to its own mixer track, so one chop can get effects the others don’t.
Press Alt + S for Medium auto-slicing. If the shortcut does nothing, turn on Typing Keyboard Priority first, as the Slicex manual explains. The envelope’s ATT knob (3) and the Tools menu under the wrench (4) handle clicks, which the next section covers. This Mix Elite short shows the marker and mixer tricks.
How do you chop a sample in the Playlist without a plugin?
Press C for the Slice tool, then click and drag down through an Audio Clip to cut it. To let FL Studio find the hits, open the clip menu and choose Chop, then Dull, Medium or Sharp auto-slicing. Now you can drag, copy and delete the pieces right on the timeline. It’s the quickest route for long samples, where a slicer would spread the sound over too many keys.
Chopping drums? Our guide on how to make breakbeats cuts a drum break hit by hit and rebuilds the groove with your own sounds.
Why do my sample chops click, and how do I stop it?
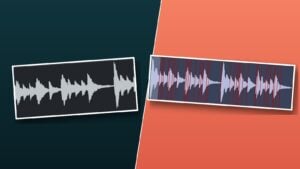
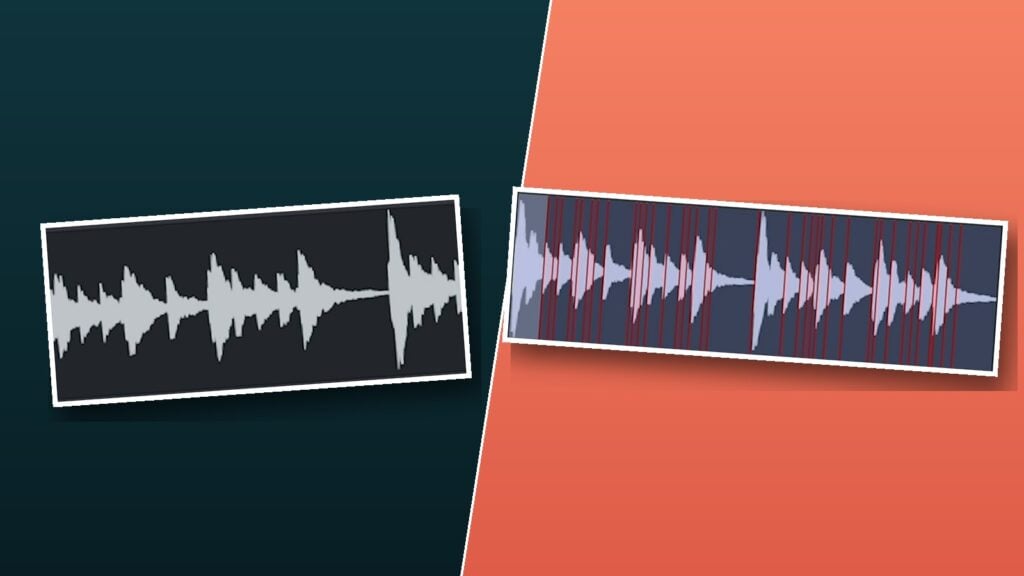
A click happens when a cut lands in the middle of a sound wave, so the level jumps from loud to silent in an instant. The fix is a tiny fade at the start and end of every slice, and every chopping tool in FL Studio has one.
- Fruity Slicer: raise ATT and DEC, or turn on DECLICK.
- Slicex: in the envelope section, select Volume, open Options and choose the ADSR preset, then add a little attack. Or run Tools, Regions, Declick out all regions.
- Playlist clips: drag the small triangles on the top edge of a clip to fade it in and out. The dot inside the fade bends its curve.
- Channel settings: the Declicking mode menu. The default, Out only, adds a 10 ms fade at the end. Smooth adds 100 ms fades at both ends, and it’s the mode Max picks in his sample extraction video.
Mix Elite’s short on smooth sampling shows the fixes for the Playlist, Slicex and Fruity Slicer one after another:
On drums, pick the Transient declicking mode instead. Image-Line built it for drum samples: it keeps the hit at the start untouched and only smooths the end, so your kicks and snares keep their punch.
How do you flip a sample into a new melody?
Open the slicer’s piano roll, delete the notes it wrote, and draw the slices back in a new order. Each key plays one slice, so every note you draw picks a moment from the old sample. A few strong slices in a new rhythm can carry a whole beat.
Stuck? Fruity Slicer’s dump button (5 in the screenshot above) has presets that rearrange the slices for you. Random gives a new pattern every time you click it, Reverse runs the slice order backwards, and Stutter breaks each slice into quick repeats. Click Random a few times, keep the one that grabs you, and fix the rest by hand.
You can also play the slices live. Plug in a MIDI keyboard or a pad controller, record while you tap the keys, and the timing comes out human. For more ways to flip, like turning one sound into an instrument or keeping only the groove, see our sampling techniques guide. To turn a sampled melody into notes, read how to convert audio to MIDI in FL Studio.
Want melodies you’re free to flip? Mix Elite’s Gold Kit melody loops are 40 royalty-free loops, each with its FL Studio project and MIDI file.
How do you use Edison to cut and record samples?
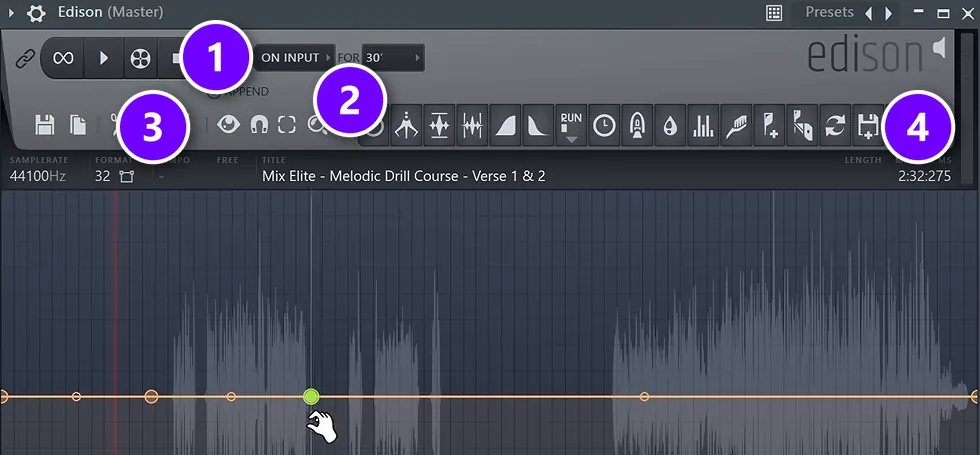
Select a mixer track and press Ctrl + E to open Edison in its first empty effect slot, or Shift + E to open it ready to record. Select the part of the sound you want, then drag it out with the drag button or send it to the Playlist as an Audio Clip.
Edison is FL Studio’s audio editor and recorder, and the Edison manual lists both shortcuts. Press record (1) to capture anything that plays through that mixer track. Set the trigger to ON INPUT (2), and Edison starts recording the moment sound comes in, as this Mix Elite short shows. The wrench (3) opens the Tools menu with Send to Playlist as audio clip (Shift + C). The last two buttons on the right (4) drag the selection anywhere in FL Studio or send it straight to the Playlist.
From a sampler channel, press Ctrl + E to open that sample in Edison. On an Audio Clip, choose Edit sample in the clip menu. Inside Edison, Alt + T opens the time stretch and pitch shift tool.
How do you sample a song in FL Studio?
Drop the song on the Playlist, open the clip menu and choose Extract stems from sample. FL Studio splits it into drums, bass, instruments and vocals, so you can chop just the part you want. Without stem extraction, you can still pull a single hit out with EQ bands and Edison.
Max shows that second way in his video on extracting samples from any track, and it teaches a lot about where each sound lives in a mix.
Here are his steps for pulling a clean kick out of a finished song:
- Drag the song into the Playlist and find a hit you like, such as a kick that plays on its own for a moment.
- Raise the time base in Project settings, so you can zoom in far enough to cut exactly on the bar. Max warns that CPU use goes way up while it’s set high.
- Cut the hit out with the Slice tool and mute everything else.
- Load Maximus on the mixer track, solo its low band, press Shift + E and play the hit to record it into Edison. Do the same with the mid and high bands.
- Drop the recordings in the Playlist, line them up exactly, set the declicking mode to Smooth and trim them short.
- Press Ctrl + Alt + C to render the pieces into one new clip.
“Although we had a lot of stuff going on in the track, we have a really clear kick,” Max says after the first pass. For a clap, he skips the low band and records only the mids and highs, so the kick never comes along.
There’s a second use that’s easy to miss. “That’s a great technique that you should definitely know, which can be used on your own tracks for which you lost projects already,” Max says. Lost the project file of an old beat? Pull the drums back out of the bounce.
How do you save a chopped sample in FL Studio?
Select the Playlist track with your chopped pieces and press Ctrl + Alt + C. FL Studio renders everything on that track into one new Audio Clip and mutes the originals. To save a sampler’s sound as a file, right-click its waveform and choose Save as.
Edison has its own save button too. Keep your best chops in one folder, add it to the Browser, and over a few months it turns into a sample pack that nobody else has.
Do you need permission to use a sample?
Yes, if you release a song with part of someone else’s recording in it. You need a license from whoever owns the recording, often a label, and from whoever owns the song itself, usually the writers or their publisher. Royalty-free sample packs come with a license to use their sounds in your music.
Rules differ from country to country, and a short sample isn’t automatically safe. Read each pack’s license before you release anything, and for parts taken from a record, follow our guide on how to clear a sample. Many producers also replay the part themselves or chop their own old bounces, which is exactly the use Max points to above.
Your first flip doesn’t need to be clever. Load one loop tonight, match its tempo, chop it in Fruity Slicer and draw a new 2-bar pattern. That’s the whole skill, and it gets faster every time you do it.
DAY 3 OF THE 7-DAY MUSIC PRODUCER COURSE
Turn your flipped sample into a finished beat
Day 3 of Mix Elite’s 7-Day Music Producer Course is about hard-hitting drums and easy arrangements: how to pick sounds that hit, how to build drum patterns in seconds, and one simple trick that turns a loop into a full song in minutes. You also download the ‘2025 Producer Toolkit’. It’s taught in FL Studio, and the free trial works. On Day 7 a pro gives you personal feedback on your track. It’s $27, with 60-day refunds.
Frequently asked questions
What is the easiest way to chop a sample in FL Studio?
Fruity Slicer. Right-click the sample’s waveform in the sampler and choose Open in new Fruity Slicer channel. It cuts the sample at its hits and puts one slice on each piano roll key. Raise ATT and DEC a little to stop clicks, press F7 and draw the slices in a new order. It comes with every edition of FL Studio.
How do I put sample chops on my MIDI keyboard in FL Studio?
Load the sample into Fruity Slicer or Slicex. Both put each slice on its own key, starting at C5 in Fruity Slicer, so a connected MIDI keyboard or pad controller plays the slices right away. Record while you play, and FL Studio writes your performance into the piano roll, where you can fix the timing.
Why does my sample sound sped up or chipmunk-like in FL Studio?
Either FL Studio is stretching it to the wrong tempo, or the Mode is set to Resample, which ties pitch to speed. Double-click the sample, set Mode to Stretch, right-click TIME, choose Autodetect and type the sample’s real BPM. The pitch then stays where it was.
Does every FL Studio edition have Slicex and Edison?
No. Image-Line lists Slicex and Edison for Producer Edition and higher. Fruity Slicer, the Playlist’s Slice tool and the Chop menu cover the basics in every edition. The free trial includes every feature, so you can try Slicex and Edison before you buy, as long as you keep the project open.