
“What then is time? If no one asks me, I know: if I wish to explain it to one that asketh, I know not.”
Gross Beat is FL Studio’s time and volume effect. Load it on a mixer track and click a slot: the green Time slots change speed, pitch and position, and the orange Volume slots chop the sound into gates and stutters. For a tape stop, draw a falling curve in an empty Time slot, then automate the Time knob for one bar.
You’ve heard this sound a thousand times, even if you never knew its name. The melody groans down to nothing, like someone pulled the plug on a record player, and then the drop slams in. Or a vocal breaks into a stutter that lands perfectly on the beat, and you wonder how anyone times that by hand.
Nobody does. One plugin does most of it, and the first time you open it, it looks like a page of graph paper. Below is what that grid means, how to get each of those sounds with exact clicks, and a few short Mix Elite tricks that need no plugin at all.
Table of Contents
What is Gross Beat in FL Studio?
Gross Beat is an FL Studio effect that plays with time and volume. It keeps the last 2 bars of whatever passes through it in a rolling memory called a buffer, then plays that audio back faster, slower, backward or chopped up, all locked to your tempo. Image-Line’s Gross Beat manual lists it for glitch, stutter, repeat, scratching and gating effects.
Because it works on live audio, you don’t need a special clip or a sample. Load it on a mixer track and it changes whatever plays on that track, whether that’s one vocal, a melody loop or your whole beat. If FL Studio is still new to you, our beginner guide to FL Studio explains the Mixer and the Playlist first.
Which FL Studio editions include Gross Beat?
Gross Beat comes with the Signature Bundle and up. On smaller editions it installs as a demo, and the manual says you have to buy it separately to remove the demo limits. No Gross Beat? The tricks further down that use only stock tools still work.
How do you load Gross Beat on a track?
Open the Mixer, click the track your sound plays on, and add Gross Beat to an empty effect slot. That’s the whole setup.
- Press F9 to open the Mixer.
- Click the mixer track your sound goes to. If it has no track of its own, select its channel in the Channel Rack, click a free mixer track and press Ctrl + L.
- Click an empty slot in the effect rack on the right side of the Mixer and choose Gross Beat.
- Open the presets menu at the top of the plugin and pick Momentary, which fills the slots with ready-made effects.
Want more key combos like these? Keep our list of FL Studio shortcuts open while you work.
What does each part of the Gross Beat window do?
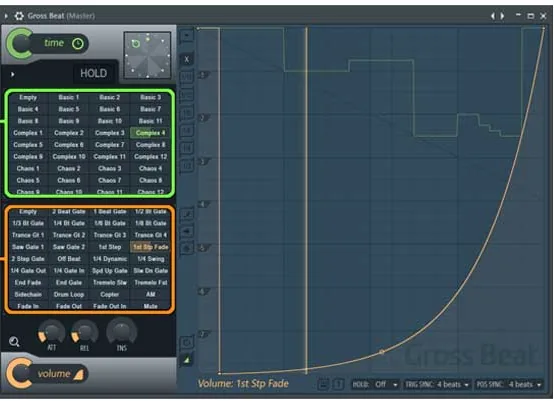
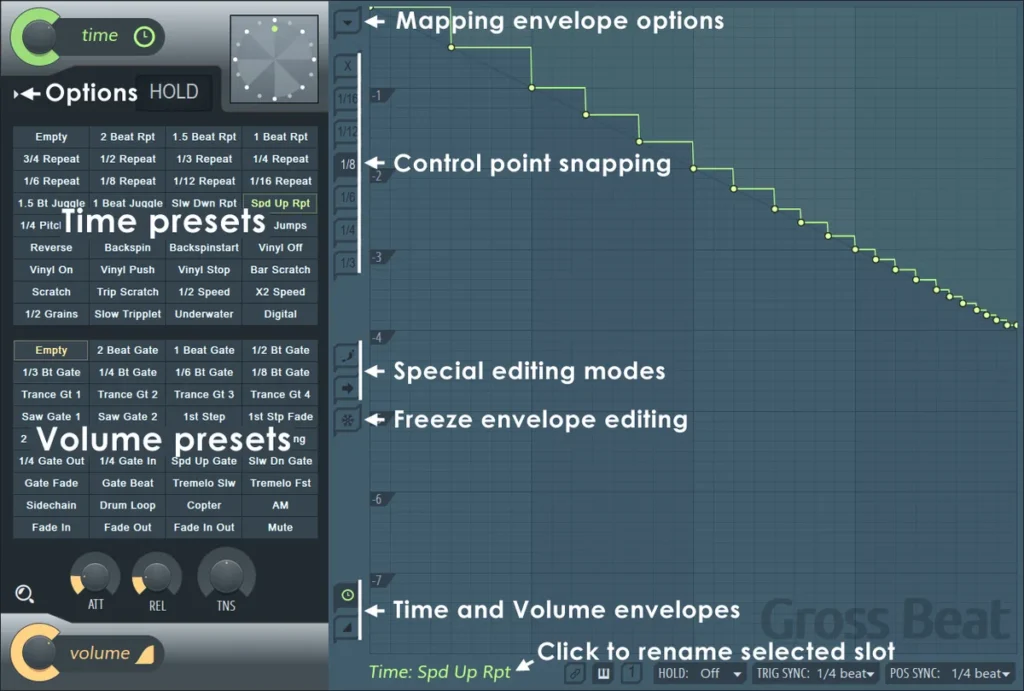
The slots live on the left. The green block holds the Time presets, which change speed, pitch and playback position. The orange block holds the Volume presets, which turn the sound up and down in rhythm. The big grid on the right shows the shape of whichever slot you clicked last, and that shape is what you’ll edit.
- Time knob: how much of the time effect you hear, from 0% to 100%. Image-Line says to use this instead of a mixer wet/dry control, because that avoids phasing.
- Volume knob: the same job for the volume effect.
- ATT, REL and TNS: soften the start and end of each volume cut.
- HOLD: repeats the bar for as long as you hold the button down.
- Snap buttons: the 1/16 to 1/3 buttons set how dots lock to the grid.
How do you use Gross Beat presets?
Loop a sound, press play and click through the slots. Nothing you click is permanent, and this is the fastest way to learn what the plugin can do. Here are six good first stops:
- 1/4 Repeat, 1/8 Repeat: instant stutters. The smaller the number, the faster the repeat.
- Vinyl Stop: a ready-made tape stop.
- 1/2 Speed: half-time in one click.
- Backspin and Scratch: DJ moves. Our guide on how to make scratches in FL Studio goes deeper.
- Trance Gt 1 to 4 (Volume side): chopped trance rhythms.
- Sidechain (Volume side): a pump that follows the grid. For the other ways to get it, see how to sidechain in FL Studio.
How do you make a tape stop with Gross Beat?
Draw a curve that starts flat and falls away late, then use an automation clip so the effect only plays for one bar. The Vinyl Stop preset gets you close, but drawing it yourself lets you decide exactly how long the stop takes. This Mix Elite short shows the whole move in under a minute:
- On the mixer track of the sound you want to stop, load Gross Beat and click an empty Time slot.
- Right-click the dot in the top right corner of the grid and choose Single curve.
- Move that dot so the line falls from the top left to a lower point on the right side of the grid.
- Grab the small dot in the middle of the line, called the tension handle, and drag it up. The line now stays flat at first and bends down late.
- Turn the Time knob all the way down, right-click it and choose Create automation clip. FL Studio remembers that knob position, so the rest of your song stays clean.
- In the Playlist, make the clip one bar long and put it on the bar where the sound should stop. Raise its line to the top for the whole bar, then bring it back to zero at the very end.
That last point catches a lot of people, because a knob stays wherever an automation clip leaves it. To change how long the stop takes, reshape the curve: the later the line starts to bend, the quicker and harder the stop. Try a few lengths. A second Mix Elite short builds the same effect, if you’d like to see it twice.
How do you read the green line in Gross Beat?
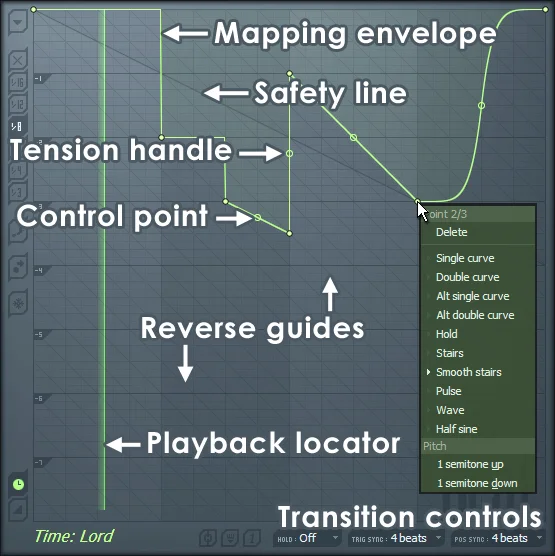
The grid is 4 beats (1 bar) wide and 8 beats (2 bars) tall. The top edge is the audio playing right now, and lower down means audio from further back in time. Once you know that, every shape makes sense:
- Flat line: normal speed.
- Line sloping down: slower and lower in pitch.
- Line at the same angle as the dark diagonal Safety line: the sound freezes.
- Line steeper than that: the audio plays backward.
- Line rising from left to right: faster and higher in pitch.
So a tape stop is just a flat line that bends down until it matches the angle of the Safety line, which is the moment the music stops dead. Go steeper than that and you’ve drawn a rewind instead. Right-click any dot to swap its curve type, as the menu in the picture shows.
Where should you use a tape stop?
Use it where the song needs to catch its breath, most often the last bar before a drop or a chorus. Our guide to EDM song structure shows where those moments fall. To keep the beat steady, put Gross Beat on the melody’s own mixer track instead of the Master, so the melody slows to a stop while your drums keep running.
How do you make a stutter effect in FL Studio?
With Gross Beat, click a Repeat slot such as 1/4 Repeat, then automate the Time knob the same way you did for the tape stop. To draw your own, open an empty Time slot, set the snap to 1/8, right-click to add dots, and change them to the Hold curve type. Each step down makes the audio jump back and replay that moment. That’s all a stutter is.
Prefer to chop the sample itself? Our guide on how to sample in FL Studio covers Fruity Slicer and Slicex. And if you don’t own Gross Beat, these next three stutters need nothing but FL Studio’s stock tools.
How do you make a vocal stutter without Gross Beat?
This Mix Elite short builds one with the Sampler’s LFO, a slow wave that moves a setting up and down for you. Grab a vocal one-shot first.
- Open the vocal in a Sampler channel and go to the Envelope settings tab.
- Choose Mod X and find the LFO section.
- Set Attack to 0% and Amount to 100%, turn on tempo sync and set the LFO speed.
- Turn the Mod X knob down for a stronger effect.
- For more depth, open the Miscellaneous functions tab. Under Echo delay, raise Feed, set the Pan, lower Mod X to filter the echoes, and turn on Ping Pong.
Need a vocal to try it on? Mix Elite’s Grand Vocals pack has 327 royalty-free vocals, 27 of them chops.
How do you make a precise stutter with automation?
This short turns a volume automation clip into a stutter that fits your track exactly.
- In the Playlist, click the waveform icon on the Audio Clip, go to Automate and pick Volume.
- Place the new automation clip where the stutter should go and shorten it.
- Click the automation clip’s icon, open Articulator tools and choose Create sequence.
- Set everything to zero except Sustain, which goes to 100%.
- Use Time, Attack, Decay and Gate to shape the stutter until it sits right.
How do you make a reverb stutter?
For the reverb stutter intro, load a reverb on your sound, right-click its mix level and create an automation clip. Double-click that clip, turn on its LFO and raise the speed. Then right-click the speed to automate it too, and draw a curve across the intro so the stutters change speed as it plays.
The rising vocal version swaps the clip for Fruity Peak Controller:
- Load a reverb and Fruity Peak Controller on the same mixer track.
- In the reverb, add a low cut and set a medium decay, 0% dry and 100% wet.
- Right-click the reverb’s mix level, link it to the controller and select its LFO.
- In Peak Controller, raise the Volume and create an automation clip for the Speed.
If the sound suddenly drops out, check the Mute switch on Peak Controller. The Peak Controller manual says it’s on by default, and it stops audio from passing through.
How do you get a half-time effect in FL Studio?
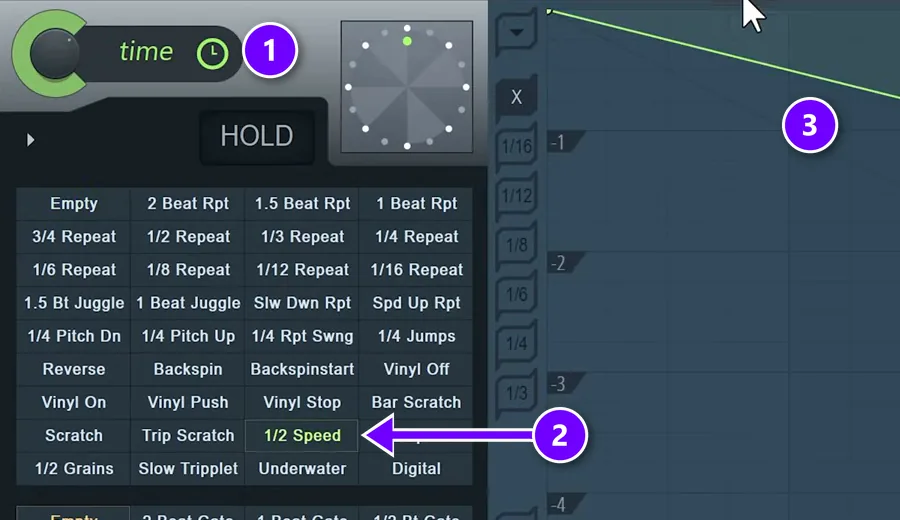
Load Gross Beat, click 1/2 Speed in the time section (1 and 2), and automate the Time knob if you only want it in one part of the song. The falling line (3) is the envelope that slows the audio down.
Max, the founder of Mix Elite, calls it “the half time effect that you will pretty much hear on most of the tracks” in his drill melody tutorial. He uses it on more than piano, too: “don’t forget about the halftime effect not only on the piano but also on instrument like this one to add some more body into it.” And in a trap mixing video, he says, “imagine when you’d like to make something darker you apply half time.”
Why does half-time sound muddy?
Because everything slides down. “Half time will just pitch down one octave and that’s it,” as Max puts it, so sounds that used to sit in the low mids land right where your bass and 808 live. His fix on a drill piano is an EQ after Gross Beat: “we don’t want anything below 200,” he says, and he cuts the very low frequencies away. That leaves room for the bass, and the half-time layer stops fighting it.
How do you make half-time without a plugin?
This Mix Elite short does it with audio stretching alone, so it works on any edition that can place audio clips in the Playlist.
- Right-click the pattern selector and render the pattern as an audio clip.
- In the Playlist, turn on Stretch mode (Shift + M).
- Drag the edge of the clip until it’s double the length of your pattern.
- If you don’t want the pitch to change, set the time-stretching mode to Auto.
How do you slow down a melody or a whole beat?
It depends on what you want to slow. Stretching the notes changes one part, and automating the tempo moves the entire project.
Slow a melody without changing the pitch
- Open the melody in the Piano roll and select every note. Ctrl + A does it, or hold Ctrl and drag a box.
- Drag the small arrow that appears after you select, called the Stretch Handle, until the notes are twice as long.
Pitch and project tempo stay the same, but the melody moves at half the speed. Here is that trick in a Mix Elite short.
Slow the whole song with a tempo ramp
- Right-click the tempo display (the BPM number) and choose Create automation clip.
- Hold Shift to lock to the grid and drag the dot to where the slowdown should start.
- Create a new dot where it should end, right-click it and enter the BPM you want.
This short shows those clicks. Remember that a tempo ramp drags your drums down with everything else, so use it when the whole track should slow together. Audio clips set to Resample will also drop in pitch as the tempo falls, and Image-Line suggests the Stretch mode if you want them to hold their pitch.
How do you make a volume gate with Gross Beat?
Click a slot in the orange Volume block and press play. A gate turns the sound on and off in rhythm, so a long chord or vocal becomes a pattern. The top of the grid is full volume and the bottom is silence.
- 1/4 Bt Gate and 1/8 Bt Gate: straight, even chops.
- Trance Gt 1 to 4: the classic trance patterns.
- Tremelo Slw and Tremelo Fst: a wobble instead of a hard cut (that’s the plugin’s own spelling).
To draw your own, click an empty Volume slot, pick a snap value, right-click to add dots and switch them to the Hold curve type for hard on and off steps. Then raise ATT and REL a little, because a cut with no fade at all clicks. ATT runs from 0 to 500 ms and REL from 0 to 1,000 ms, and a tiny amount of each is usually enough. Too strong? Turn the Volume knob down to around 50% and some of the untouched sound comes back in.
How do you control Gross Beat with a MIDI keyboard?
Click the Gross Beat window, then play notes on your controller. This Mix Elite short calls it an insane hack, and it’s a fun one: C5 selects the first Time slot, and each semitone up or down moves one slot. Volume slots start at C2 on the manual’s slot map.
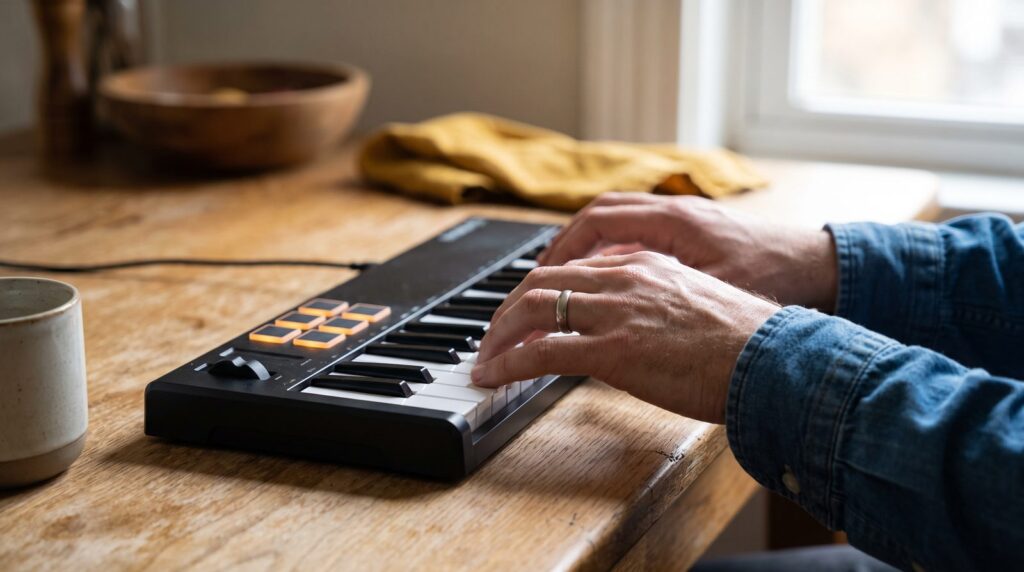
- Click an empty Time slot, so C5 means no effect.
- Right-click the record button and choose Automation.
- Press record and play the keys. Each note switches slots in time with the music, so you can record drum chops in real time.
Try it on a drum loop first.
How do you switch Gross Beat slots with automation?
Right-click any slot and choose Create automation clip. In the clip, set the dots to the Hold type. Then right-click the slot you want, pick Copy value, and use Paste value on a dot in the clip. Each dot now calls up its own slot at that point in your song.
Why does Gross Beat click, go silent or sound out of sync?
Nearly every Gross Beat problem comes down to how its buffer works. The fixes are quick.
- Clicks when it jumps: open the Options menu just under the Time knob and turn on Click reduction. For the cleanest result, the manual suggests dipping the volume envelope to zero right at the jump and bringing it back just after.
- Silence at the start of a song: Gross Beat needs audio in its buffer before it can reach back. If the line goes below the Safety line in the first bar, you’ll hear nothing. Keep the curve above it, or add two bars before the song starts.
- Old audio after a new section starts: the buffer still holds the last 2 bars, so a verse can leak into your chorus for up to 2 bars.
- A slot starts late or at the wrong moment: set TRIG SYNC under the grid. At 4 beats, a slot always waits for the next bar line.
- The effect never turns off: your automation clip didn’t end at zero, so the knob stayed up.
Tonight, put Gross Beat on one melody, draw that tape stop and drop it on the last bar before your chorus. If you’d rather learn the whole program in the right order, Mix Elite’s FL Studio Beginner Accelerator takes you from zero to one finished song, vocals included, in 52 lessons and 16 quizzes for $47, with a 60-day guarantee.
DAY 3 OF THE 7-DAY MUSIC PRODUCER COURSE
Turn these effects into a finished beat
Day 3 of Mix Elite’s 7-Day Music Producer Course is about hard-hitting drums and easy arrangements: how to pick sounds that hit, how to build drum patterns in seconds, and one simple trick that turns a loop into a full song in minutes. You also download the ‘2025 Producer Toolkit’. It’s taught in FL Studio, and FL Studio’s free trial works. On Day 7 a pro gives you personal feedback on your track. It’s $27, with 60-day refunds.
Frequently asked questions
Is Gross Beat free with FL Studio?
It’s included in the Signature Bundle and higher editions of FL Studio. On smaller editions it installs as a demo, and Image-Line’s manual says you have to buy it separately to remove the demo limits. The tape stop steps need Gross Beat, but the stutter tricks that use the Sampler or automation clips work with stock tools.
What is the difference between the Time and Volume sections in Gross Beat?
The green Time slots change how the audio plays back: speed, pitch, direction and jumps. The orange Volume slots only change how loud the sound is at each moment, which is how you make gates and pumping effects. You can run one of each at the same time, and each section has its own mix knob.
Does Gross Beat change my song’s BPM?
No. Gross Beat only changes the audio on the mixer track it’s loaded on, and your project tempo stays where it is. That’s why a tape stop on the melody can play while the drums keep their timing. To slow the whole song, right-click the tempo display and automate the BPM instead.
Why can’t I hear any change when I click a Gross Beat slot?
Check three things. The Time or Volume knob might be turned down to 0%, the slot might be empty, or the plugin might sit on a mixer track your sound isn’t routed to. Also make sure the song is playing, since Gross Beat needs audio moving through it before it can do anything.