

“Making the simple complicated is commonplace; making the complicated simple, awesomely simple — that’s creativity.”
To make a beat, set a tempo (around 140 BPM for trap), write a 4-chord loop, program a kick, snare and hi-hats, and add an 808 that follows the chord roots and the kick. Then copy the loop into a song about 2 minutes long, balance the levels and export it. In FL Studio, that’s the Piano Roll, the Channel Rack and the Playlist.
Learning how to make beats starts with an empty screen, and that blank project can feel scarier than it is. Every beat you love started there. Below is the way Max, the founder of Mix Elite, teaches it, with real screenshots from his videos. You’ll see where every drum goes, which settings to use and the beginner mistakes to avoid.
Table of Contents
What is a beat?
A beat is the instrumental part of a song, the music a rapper or singer performs over. Producers also call it an instrumental. Most beats are built from the same four parts:
- Drums: the kick, the snare or clap, and the hi-hats, which keep the rhythm.
- 808 or bass: the low notes. An 808 is a deep bass sound played from a sample, named after an old drum machine.
- Chords: three or more notes played together, which set the mood.
- Melody: the catchy line on top, the part people remember.
A few words you’ll see in every step. A loop is a short section that repeats. A bar is one count of four beats. BPM (beats per minute) is the tempo. And in FL Studio, a pattern is one block of notes or drums that you can repeat across the song.
What do you need to make beats?
Less than you think. You need a computer, a pair of headphones and a DAW, the program you make beats in. Everything else, from a MIDI keyboard to studio speakers, is optional at the start, and the computer you already have will likely do for the first few months.
- A computer: Windows or Mac. The one you have is fine to start.
- Headphones: ideally a flat-sounding pair, so you hear the bass the way it really is.
- A DAW (digital audio workstation, the program you make beats in): this guide uses FL Studio. Its free trial has every feature and no time limit.
- Sounds: FL Studio comes with drums and instruments, and its stock plugins are enough to make whole beats. A good sample pack still makes a big difference, as you’ll see in step 4.
FL Studio’s free trial can’t reopen saved projects, so finish a beat in one sitting or buy it later.
You don’t need to play an instrument, either. Is FL Studio good for making beats? Yes. It’s easy to start, hard to master, and popular with beginners and pros, especially for hip-hop and trap. If you’d rather start on another program, our guide to the best DAW for beginners compares the options, free ones included. For a tour of FL Studio, read what FL Studio is and how it works, and if you’re setting up a desk, see how to set up your first home studio.
Which sounds should you pick first for a hip-hop beat?
Start with six sounds: a kick, a snare or clap, a closed hi-hat, an 808 for the bass, one melodic sound such as a soft piano or a pluck, and one extra percussion sound for bounce. Pick each one with care. A simple pattern with great sounds beats a busy one with okay sounds.
“It’s much better to have a few great sounds than lots of okay ones,” Max says. There’s no shortcut here. A good sample pack helps, and so does comparing your beat with professional tracks. It’s also fine to reuse your favorite drum samples from beat to beat.
- Kick: the low thump that marks the start of each bar. It should already sound punchy on its own.
- Snare or clap: the crack that answers the kick. Claps are brighter, and snares are punchier.
- Closed hi-hat: the short tick that keeps time between them.
- 808: the deep bass note. Pick one that sounds good with your kick.
- One melodic sound: a soft piano is the easiest way to hear your chords, and a pluck works well for a melody. Mix Elite’s free course plays its chords on a free soft piano and its melody on a pluck preset in the free Vital synth.
- One extra: a perc, a rim or an open hat, added later to make the loop bounce.
How to make beats in FL Studio, step by step
Make a beat in four parts: chords and a melody first, then the drums, then the 808, then the arrangement. Most of the work happens in three FL Studio windows: the Piano Roll for notes, the Channel Rack for drums and the Playlist for the song. Here’s the whole process, and each step below shows exactly where to click:
- Set the tempo.
- Write a 4-chord loop, plus a simple melody.
- Program the drums in the Channel Rack.
- Swap in better drum sounds.
- Add hi-hat rolls and velocity.
- Add the 808.
- Arrange the loop into a 2-minute beat.
- Balance the levels and export.
The drum steps follow Mix Elite’s trap drums tutorial, which you can watch below. The rest comes from Mix Elite’s free 4.5-hour FL Studio course on YouTube.
Mix Elite’s free 4.5-hour FL Studio course builds a trap beat from the first chords to a 2-minute arrangement, then moves on to mixing and mastering.
Step 1: Set the tempo

The tempo box sits in the toolbar at the top of FL Studio (1). Click it and drag up or down to change the BPM, and the hint bar on the left shows the exact number (2). As a rule of thumb, every style sits somewhere between 90 and 160 BPM.
For trap, set it to 140. Trap usually sits around 140, not 130. Slower hip-hop and R&B beats sit lower in that range.
Step 2: Write a 4-chord loop
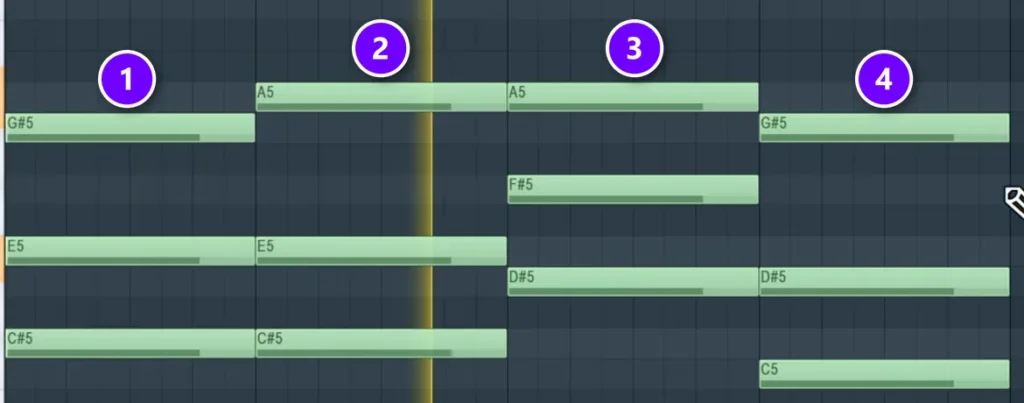
In the free course, the chords come first and the drums go on top, because the 808 will follow the chord roots later. Here’s how to write them:
- Open the Piano Roll on a piano sound.
- Set the scale helper to a minor scale.
- Place four chords, one per bar. Each chord is a root note with every other note of the scale stacked on top.
The loop in the screenshot uses four chords in C# harmonic minor, numbered 1 to 4, a progression that suits melodic trap or any emotional song. To build your own from scratch, our guide to music theory for producers explains scales and chords, and how to make chords in FL Studio walks through every click.
Add a simple melody on top
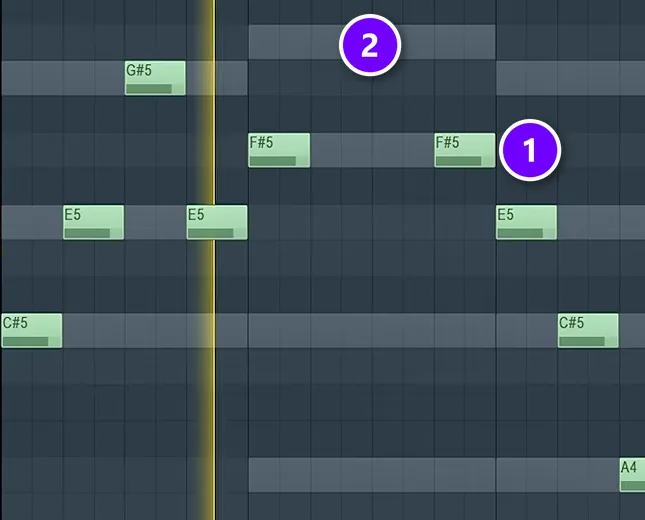
A rap beat can live without a melody, but a simple one helps. Open the melody’s Piano Roll and show your chords as ghost notes with Alt + V. The gray bars are the chord notes (2), and melody notes placed on top of them (1) always fit. Then give every bar a slightly different rhythm, so the melody never repeats the same rhythm all the way through.
Step 3: Program trap drums in the Channel Rack
The Channel Rack is FL Studio’s drum grid. Each row is one sound, and each button is a step. One bar has 16 steps, and every group of four steps, shown as a block of color, is one beat. Make a new pattern for the drums, so they stay separate from the chords.
Here’s where each drum goes in one bar of trap:
- Hi-hat: steps 1, 3, 5, 7, 9, 11, 13 and 15, every half beat.
- Snare: step 9, which is beat 3.
- Kick: step 1, which is beat 1, plus a few more where it feels good.
Hi-hats: fill every second step
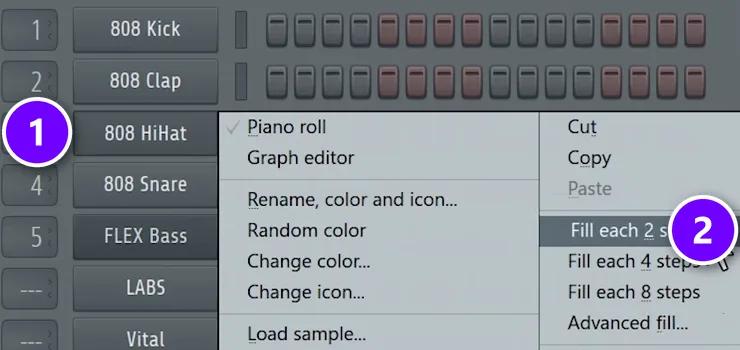
Right-click the hi-hat channel (1) and choose Fill each 2 steps (2). FL Studio lights up every second step for you, eight hits per bar. It’s the fastest way to start, and you’ll add rolls in step 5.
Snare on beat 3, kick on beat 1
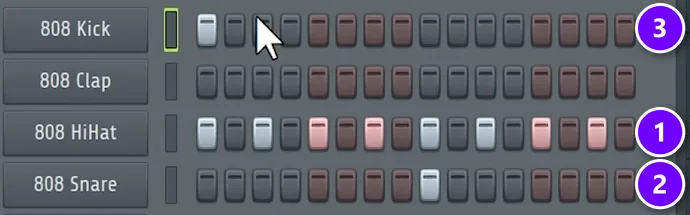
With the hats in place (1), click step 9 on the snare row (2). That’s beat 3, the first step of the third color block. At 140 BPM, a snare on beat 3 gives trap its slow, heavy, half-time feel.
Then put the kick on step 1 (3). The kick is the foundation of the whole drum pattern, and a kick on beat 1 shows the listener where each bar starts. You can add more kicks on the start or the middle of any beat, wherever it feels good.
Make it 2 bars and add a kick variation
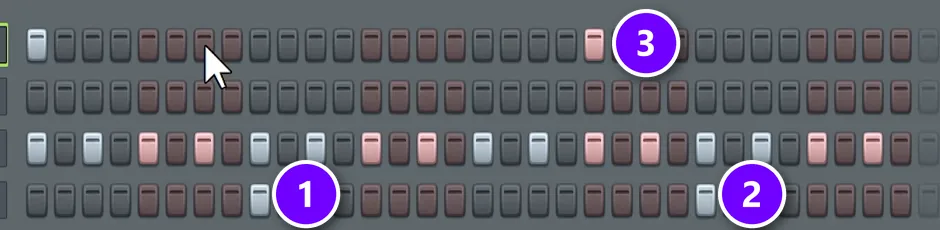
One bar gets stiff on repeat, so make the drum pattern, and especially the kick, at least two bars long. Make the pattern twice as long (32 steps), carry the hats across, and put the second snare on step 25, which is beat 7 of the two bars. Here the snares sit on beat 3 (1) and beat 7 (2), and a new kick on beat 6 (3) makes the second bar different.
Keep it simple. In trap, the drums are there to keep the rhythm going, not to steal the spotlight from the 808 and the melody. For a longer variation, click the pattern clip in the Playlist, choose Make unique, and change only the kick in the copy.
Step 4: Swap in better drum sounds
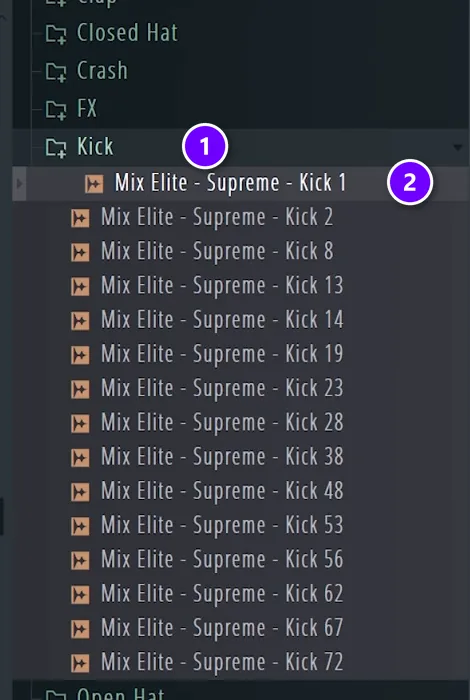
This is the step most beginners skip. Many tracks use a drum pattern as simple as this one; they just use amazing sounds. FL Studio’s stock drums are fine for learning the pattern, but a good sample pack (a folder of ready-made drum sounds) makes the same pattern sound much better.
If your snare still sounds flat in the mix, see how to mix a snare that cuts through.
Keep your packs in one folder you won’t move, and drag that folder into FL Studio’s Browser. Then load each drum:
- Open the pack’s Kick folder (1) and press the Down arrow to play through the kicks.
- Drag the one you like (2) onto the kick channel in the Channel Rack.
- Do the same with a snare or clap (claps are brighter, snares punchier) and a closed hi-hat.
While the beat plays, Shift + Up or Down in the Browser swaps a sound for the next sample, so you can audition sounds in the loop.
Our guide on how to install sample packs in FL Studio covers the setup. If you’d rather use plugins, see the best drum VST plugins and these free trap VSTs.
Step 5: Add hi-hat rolls and velocity
Two small touches make a stiff loop sound like a real trap beat: rolls and velocity.
Hi-hat rolls with the graph editor
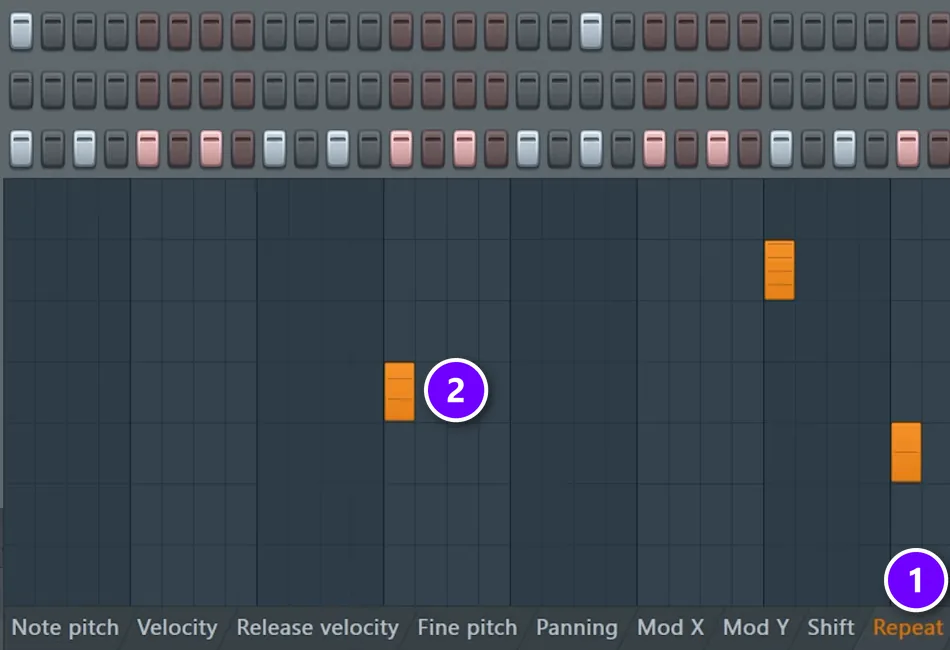
Hi-hat rolls are the fast stutters you hear in most trap songs. Select the hi-hat channel and open the graph editor with the bar-graph icon at the top right of the Channel Rack. Then:
- Click Repeat (1).
- Raise one step (2) to turn that single hit into a roll. Try different heights until it sounds right.
Where should rolls go? There are no fixed rules, but Max shares his go-to: “one framework that I like to use is change something every four beats.” Keep the hats steady for two or three beats, then roll. It works because of contrast: the ear gets used to the pattern, and then you surprise it. Don’t cram rolls everywhere, and if you have a second drum pattern, copy the hi-hat steps over with Ctrl + C and Ctrl + V.
Vary the hi-hat velocity
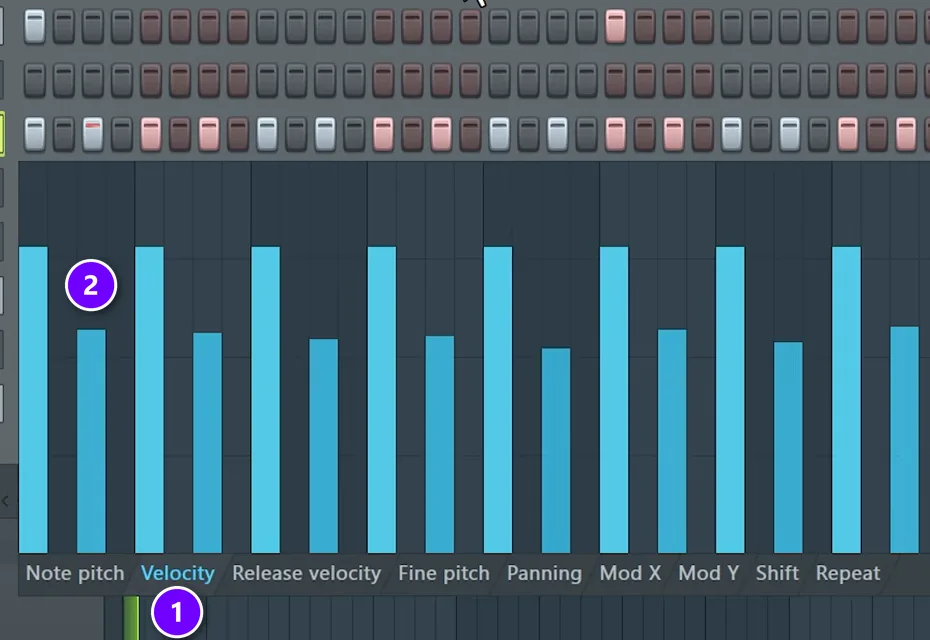
Velocity is how hard each hit plays. In the same graph editor, click Velocity (1) and pull every other bar down a little (2). The change is very subtle, but it stops the hats from sounding robotic. It doesn’t have to be perfect. It just has to sound more human. There are more ways to do this in our guide to humanizing MIDI drums.
Then add one extra sound to spice up the loop, a perc, a rim or another clap. Put it near the fourth beat, the same place you’d change the hats, so the loop keeps moving.
Step 6: Add the 808
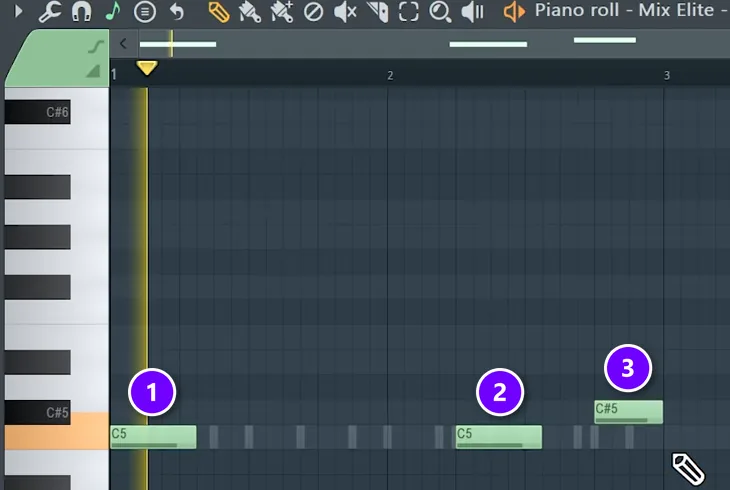
An 808 is the deep bass that trap is built on. It’s very similar to a regular bass, but producers play it from a sample instead of a synth. Pick an 808 sample, drag it into the Playlist, and open its Piano Roll.
Now place the notes by two rules: follow the root of each chord, and follow the rhythm of the kick. Max’s tip: “An 808 usually behaves similar to a kick drum.” In the example the kick hits on beat 6, so the 808 does too. Here the notes land on beat 1 (1) and beat 6 (2), with one higher note at the end of the second bar (3). Some producers even leave the kick out when they use an 808.
Why does my bass sound muddy and clash with my kick?
Your bass and kick sound muddy because they fight for the same low frequencies at the same moment, so they blur into one boomy sound. Keep the 808 about 3 dB quieter than the kick, let only one bass sound fill the deep sub, and make the 808’s lows dip each time the kick hits.
- Balance the levels first. Set the 808 about 3 dB quieter than the kick, then trust your ears.
- Keep one deep bass. If you layer bass sounds, low-cut all but one, so only one sound fills the sub. Leave the kick’s sub alone; the next fix makes room for it.
- Duck the 808 under the kick. Sidechain the kick into the 808, ideally with a multiband sidechain that dips only the 808’s lowest frequencies for a moment on every kick.
- Clear the boom. If it still sounds muddy, make a small cut in the boxy low mids of the kick, and the same on the bass. Then send both to one group track with a little saturation to glue them together.
The kick and the 808 always need a little mixing. Our guide on how to mix kick and 808 walks through every click.
Step 7: Arrange the loop into a 2-minute beat
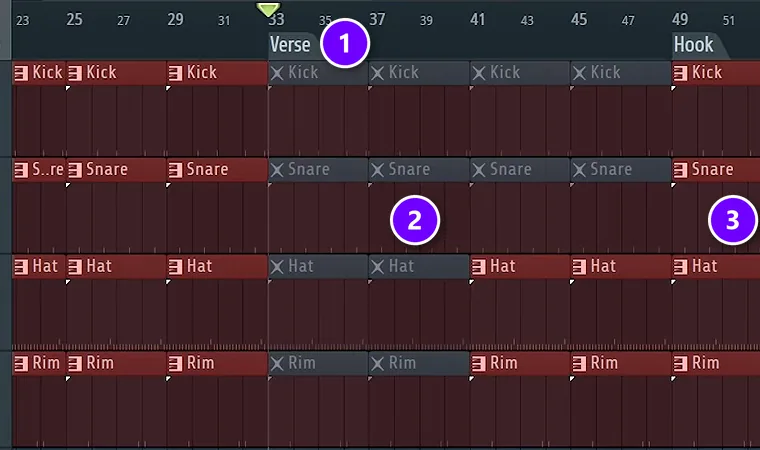
A loop isn’t a beat yet. Aim for about 2 minutes, which is plenty for a first beat. The method is called additive arrangement, and it’s simple:
- Put each instrument and drum sound in its own pattern (in the pattern menu, Split by channel), then name and color them, for example instruments green and drums red.
- Select everything in the Playlist and press Ctrl + B until the song is about 2 minutes long.
- Mute everything with the mute tool, then unmute parts as you play it back.
- Add markers for the sections: an intro, hook, verse and hook of 16 bars each, then an outro.
- Bring in something new every 4 to 8 bars, and ease out at the end.
In the screenshot, the Verse marker (1) starts a section where the kick and snare drop out (2) and the hats return after 8 bars, and everything comes back for the Hook (3). Just before a hook, bring one drum in early to tease the listener. For the outro, keep only the pluck and the bass, so the song eases out instead of stopping dead.
A beat for a rapper or singer only needs this rough version, because the vocalist decides how long each part should be. For more ideas, read 7 tips to structure a beat and how to arrange loops into a full song.
Use a reference track for the layout
Not sure when parts should come in? Borrow the layout of a song you like. Drag a track in the same style into the Playlist, match your tempo to it, and drop a marker everywhere something changes, like new hats, a new sound or the full drums at the hook. Then remove the reference, set your tempo back, and follow your markers.
Transitions help too. Drag effect samples, like sweeps and crashes, into the Playlist where a new section starts. They usually come in too loud, so turn them down, and drag the corner of the clip to fade it in.
Step 8: Balance the levels and export
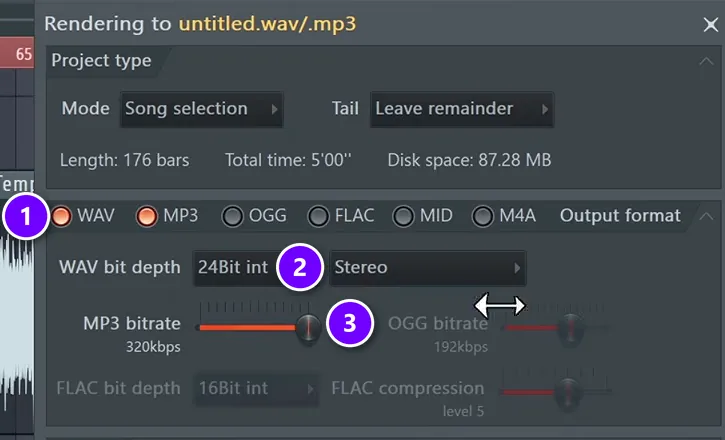
Before you export, play the beat and turn down anything that’s too loud. The drums and the lead should be the loudest parts. Keep an eye on the master meter too: 0 dB is the ceiling, and going past it clips the sound, which turns into an unpleasant, fuzzy distortion once you export. Our guide to mixing drums is the next step when you’re ready to go further.
To export, press Ctrl + R (or go to File, then Export) and use these settings for a finished track:
- Tick WAV (1).
- Set the bit depth to 24Bit int (2).
- Tick MP3 too and push the MP3 bitrate all the way up to 320kbps (3).
- Click Start.
Then play the file on a laptop, in the car and on a Bluetooth speaker, because that’s how people will hear it.
THE 7-DAY MUSIC PRODUCER COURSE
Build drums and arrange your track on Day 3
On Day 3, Mix Elite’s 7-Day course covers drums and arranging: how to choose sounds that work, how to build drum patterns fast even if you have no feel for rhythm, and one simple tactic to turn your ideas into a full song. You get the 2025 Producer Toolkit sound pack to work with. It’s $27 for all seven days, a pro gives you personal feedback on your finished track on Day 7, and you have 60 days to decide if it was worth it.
How to make drill and house beats
Once the trap pattern works, other styles are small changes to the same grid.
Drill beats
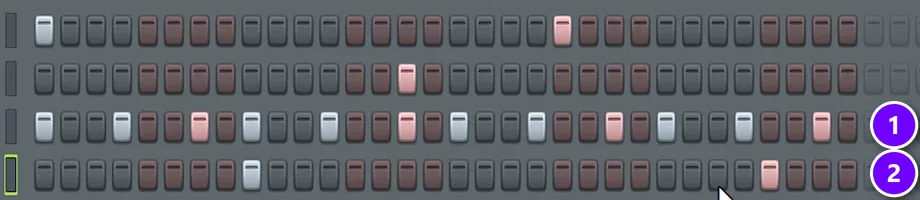
To turn the trap loop into drill, make three changes. Set the hi-hat to hit every third step, skipping two each time (1). Move the second snare from beat 7 to beat 8 (2). Then add an extra kick near the end, and you get drill vibes right away. For the melodic side, see how to make UK drill melodies.
House beats
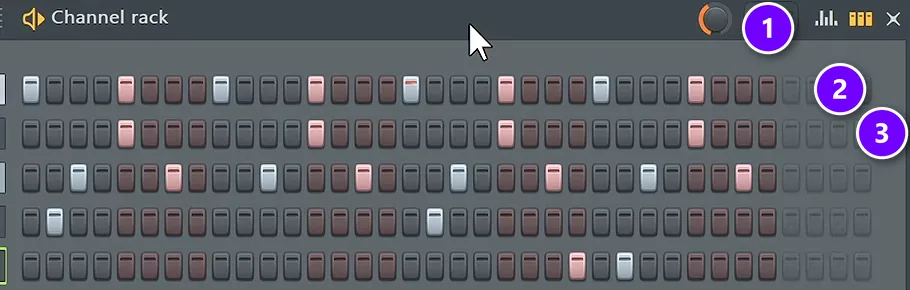
House is built differently. Put the kick on every beat, which is called four on the floor (2), claps on beats 2 and 4 (3), and an open hat on every off-beat. Then turn up the swing knob at the top of the Channel Rack (1) to about 40%. Swing pushes the notes between the beats a few milliseconds late, which makes the groove bounce. For the full song layout, see EDM song structure.
Beginner beat-making mistakes (and how to fix them)
These are the most common beginner traps, with a fix for each:
- Starting with weak sounds. Gold in equals gold out, so spend your time on a few great sounds.
- A one-bar loop. Make the drums at least 2 bars long, so they don’t sound stiff.
- Busy drums. In trap, the drums keep the rhythm. Let the 808 and the melody shine.
- Too many rolls. Change something every four beats, not every beat, and delete the extra rolls.
- Robotic hi-hats. Lower the velocity of every other hit.
- Layering kicks. Never layer kicks. Layer claps, open hats or percs instead if you want more punch.
- Everything at once. Bring parts in one by one, and ease out at the end.
For more punch and groove, read our secrets for hard-hitting drums in FL Studio and these production tricks for trap and hip-hop.
Where to go next

Your first beat won’t be perfect, and it doesn’t need to be. Finish it, export it, and make the next one a little better. When you want to go deeper on one part of the process, these guides pick up where this one stops:
- Trap production techniques, for trap drums, 808s and arrangement.
- How to make type beats, if you want to make beats in the style of an artist.
- How to program virtual drums, for realistic drum kits.
- How to make breakbeats, for chopped, old-school drum loops.
- How to finish a song, when your loop needs to become a real track.
Frequently asked questions
What’s the simplest way to make a beat as a beginner?
Work in one short loop. Set the tempo, write four chords, add a kick, snare and hi-hats, then an 808 that follows the chord roots and the kick. Copy that loop into a song about 2 minutes long, bringing parts in and out every 4 to 8 bars, then balance the levels and export it.
What do I need to start making beats?
A computer, a pair of headphones and a DAW, the music program you make beats in. That’s all the hardware you need, and everything else is optional, including a MIDI keyboard. FL Studio’s free trial has every feature with no time limit, but it can’t reopen saved projects, so finish a beat in one session or buy it later.
Which drum sounds should I pick first for a hip-hop beat?
A kick, a snare or clap and a closed hi-hat, plus an 808 for the bass and one melodic sound like a soft piano. Add a perc or an open hat later for bounce. Choose them carefully: a few great sounds beat lots of okay ones, and a simple pattern sounds pro with good samples.
Why does my 808 sound muddy with my kick?
Because both fight for the same low frequencies at the same time. Keep the 808 about 3 dB quieter than the kick, let only one sound fill the deep sub, and sidechain the 808 so its lows dip each time the kick hits. A small cut in the boxy low mids of both clears the rest.
What BPM should a beat be?
Most styles sit somewhere between 90 and 160 BPM. Trap is usually around 140, not 130, and putting the snare on beat 3 at that tempo gives trap its heavy, half-time feel. Slower hip-hop and R&B sit lower in the range. Set the tempo in the box at the top of FL Studio before you program the drums.