

“I didn’t know I was going to create this bass.”
To make a heavy, moving reese bass, stack detuned saw waves (in Serum, one saw with 6 unison voices), play them in mono with a short glide, darken them with a low-pass filter, add distortion and multiband compression, then move the filter with an LFO. Keep the low end clean by cutting the reese below about 120 Hz and layering a mono sine sub under it. In FL Studio, 3x Osc and GMS make the same sound from detuned saws.
You know the sound, even if you don’t know its name. It’s the dark, rolling bass under a drum and bass drop that seems to growl and breathe while it holds one note. Then you open a synth, stack two saw waves, and get a thin buzz, or a muddy wall that eats your kick drum.
Max, the founder of Mix Elite, builds this sound in levels in a video, first in Serum and then with the synths that come with FL Studio. Below is how to make reese bass his way, with his exact settings and screenshots from the video, plus the trick he uses to keep the low end clean when the reese gets wide.
Table of Contents
What is a reese bass?
A reese bass is a bass sound built from two or more saw waves tuned a tiny bit apart. Because they’re slightly out of tune, they drift in and out of step with each other, so the sound swells, thins out and swells again. That rolling, phasing growl is the reese.
Three words you’ll see a lot. A saw wave is the bright, buzzy wave most synths start with. To detune means to pull copies of a sound slightly sharp or flat. Unison is a synth feature that stacks many detuned copies of one oscillator for you. If oscillators, filters and LFOs are new to you, read our sound design basics first, because this guide assumes you know where those knobs live.
Max is a big fan: “I love [Reese] basses because they’re one of the most, if not most, powerful instruments you can think of,” he says in the video. A good one, he explains, fills your mix from the sub through the mids and even the highs. It fills the stereo field too, as long as you build it right.
You’ll hear reese basses all over jungle and drum and bass, in dubstep and neuro, in UK garage, and in house and techno, where it started. If you make house, it slots right into the steps of our guide to making house music.
Why does detuning saw waves create the rolling reese sound?
Two saws tuned slightly apart keep drifting in and out of phase. When their peaks line up they add up and the sound swells; when they’re opposite they cancel and it thins out. That pulsing, called beating, runs at the difference between their frequencies, and every harmonic beats at its own speed, which is what makes the reese roll and growl.
Here’s the math in plain numbers. If one saw plays 100 Hz and the other 101 Hz, the sound swells once a second. Their second harmonics, 200 and 202 Hz, swell twice a second, and the tenth harmonics ten times a second, so the whole sound seems to sweep and phase. More detune makes the beating faster, and unison adds more copies, each drifting at its own rate.
Where does the reese bass come from?
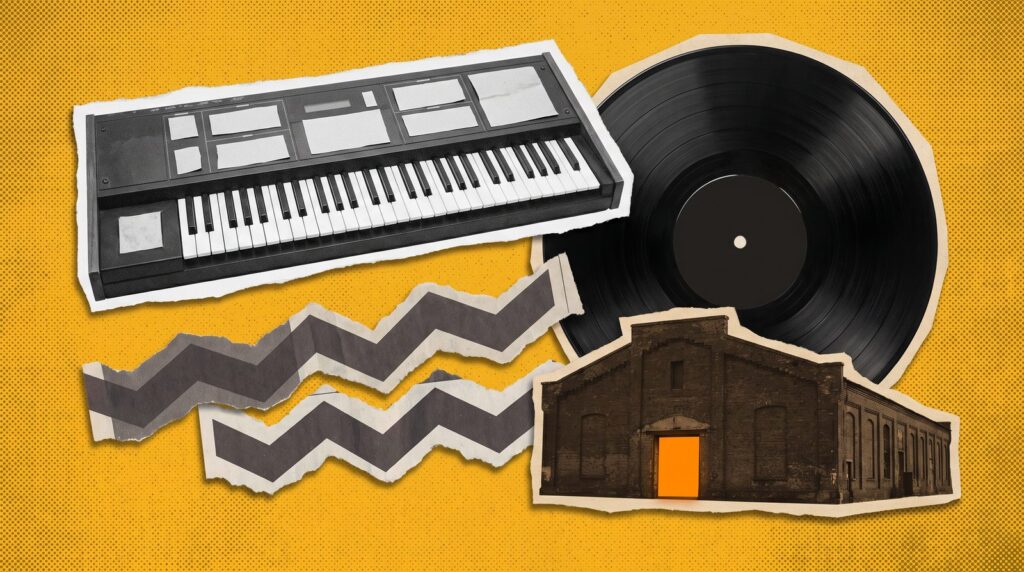
The name comes from Kevin Saunderson, one of Detroit techno’s Belleville Three. In 1988 he released Just Want Another Chance under his alias Reese, and its deep, warbling bassline gave the sound its name.
In a 2024 MusicTech interview, Saunderson said he made it on a Casio CZ-1000 (he has named the CZ-5000 in other interviews), and that he wrote the track with New York’s Paradise Garage club in mind. It wasn’t planned, either. The quote at the top of this page is his.
UK jungle producers picked it up in the early 1990s. Ray Keith, recording as Renegade, sampled it for the jungle track Terrorist, and the reese became a staple of jungle and drum and bass, then of dubstep and neuro. Splice’s history of the reese follows the whole line.
Nobody needs a Casio today. Two detuned saws in almost any synth get you most of the way there, and the method below gets you the rest.
How to make reese bass in Serum, step by step
Build it in three levels. Level 1 is the core: one saw with 6 unison voices, the MG Low 18 filter with some drive, and Mono with a 70-80 ms glide. Level 2 adds weight with distortion, multiband compression, a ping-pong delay and a filtered reverb. Level 3 adds movement: a morphing wavetable and LFOs on the filter cutoff.
The patch is built in Serum, the wavetable synth from Xfer Records. Level 1 starts from Serum’s default patch, which plays a plain saw. Play your bassline low, in the second octave (around C2).
Step 1: Stack 6 unison voices on one saw
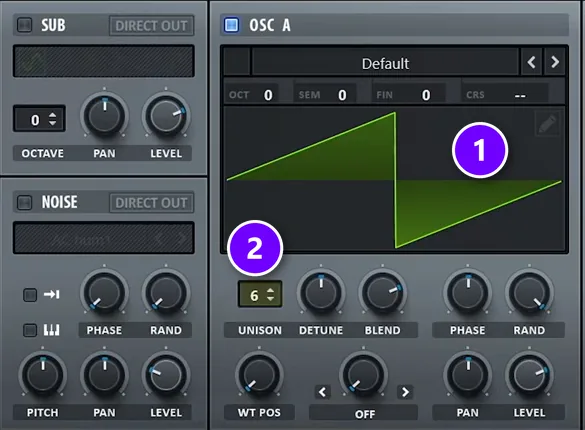
OSC A already plays a saw (1). Click the UNISON box (2) and drag it up to 6 voices. Stop at six. At seven, Max says, it starts to sound weird and the phasing problems start to hit.
A little phasing is part of the sound, though. A reese isn’t supposed to be squeaky clean, and later you’ll fix the low end with a separate sub instead of fighting the unison.
Step 2: Darken it with the MG Low 18 filter
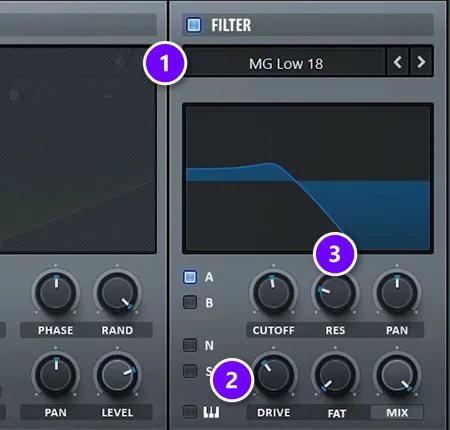
Switch the FILTER on and pick MG Low 18 (1), the low-pass type Max prefers. A low-pass filter cuts the highs and keeps the lows, so the buzz turns into a growl. Turn DRIVE (2) up, to about 40% in the video, to make it louder and dirtier. Then add a little RES (3), the resonance, which makes the filter whistle at its cutoff point.
Step 3: Turn on Mono and a 70-80 ms glide
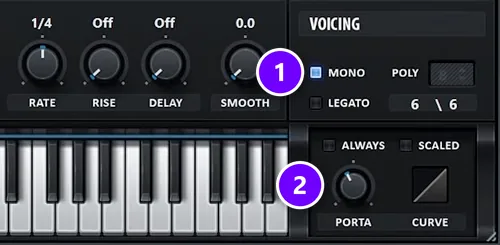
In the VOICING panel, tick MONO (1) so only one note plays at a time. Then turn PORTA (2) up to about 70 or 80 milliseconds. Portamento is the glide from one note to the next, and it’s what lets a reese slide and slur instead of jumping.
That’s level 1. Play a few long notes and it already sounds like a reese.
Which effects make a reese bass sound wide and modern?
Four effects do most of the work: distortion for grit, multiband compression (the OTT idea) for punch and detail, a fast ping-pong delay for movement and width, and a reverb with its lows and highs cut for space. Keep the delay and reverb out of the low end, and let the unison supply the width above a mono sub.
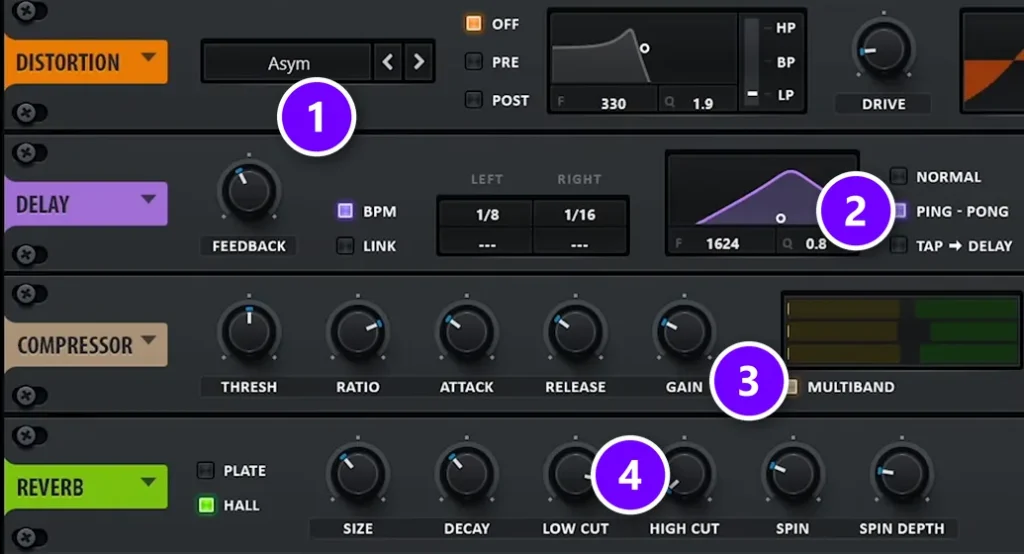
This is level 2. Open Serum’s FX tab and stack the four effects, each with its own job:
- Distortion for grit. Try the Asym mode (1). Max likes it, although he admits it can sound a bit like a fart. If it does, pull the distortion’s MIX knob down.
- Delay for movement. Try PING-PONG mode (2) with fast times, 1/8 and 1/16 in the video, and set the delay’s filter so it only repeats the upper part of the sound. It’s fine as long as it doesn’t touch the lows.
- Compressor for punch and detail. Switch on MULTIBAND (3). Now it squashes the low, mid and high bands separately, the same multiband idea as OTT. Our OTT compression guide explains how that kind of squash works.
- Reverb for space. Yes, on a bass. Reverb usually stays off the bass so the mix stays clean, so first raise the reverb’s LOW CUT and lower its HIGH CUT (4). Now you barely hear the reverb while a note plays, and the space opens up after you let go.
After level 2, Max is happy with it: “This kind of [Reese] is already very nice. I use it in like 90[%] of my tracks.”
Pro tip: want more of that space? Drag the reverb above the compressor in the FX list. The compressor then pumps the reverb up. The video shows the trick but doesn’t keep it in this patch.
Level 3: Make the reese move
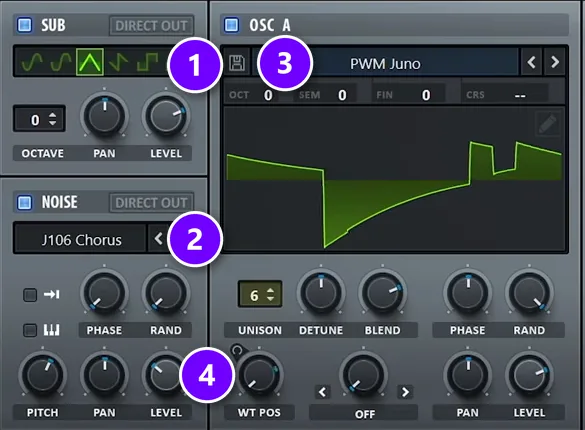
Level 3 gets advanced. The goal is movement, so the reese keeps changing while it holds a note. Here are the moves, in order:
- Once the distortion is on, play with the filter’s RES. Max says it can make really creepy effects, and you can’t go wrong with about 50%.
- Swap the saw for a pulse wavetable. Open OSC A’s wavetable menu, go to the Analog folder and pick one of the PWM tables. The video uses PWM Juno (3).
- Drag LFO 1 onto the WT POS knob (4) and slow its rate down, so the wave slowly morphs.
- Switch on the NOISE oscillator and pick an analog noise (the video uses J106 Chorus (2)). Turn it up and send it through the filter with the N button in the filter section.
- Switch on the SUB oscillator in triangle mode (1) for more weight under the saws.
- Fine-tune. Switch the filter to MG Low 12 and bring back some highs and resonance. If the multiband compressor starts to feel like too much, change the distortion to Tube.
Make the wobble follow the note
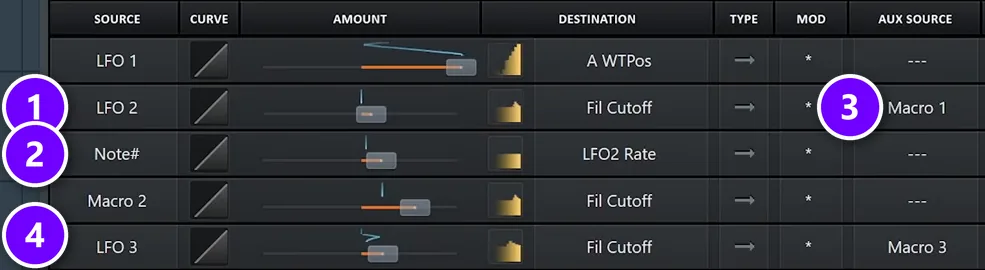
This is the move Max calls one of his favorites. Drag LFO 2 onto the filter’s CUTOFF, so it wobbles the filter. On LFO 2, turn BPM off, then drag the NOTE source onto LFO 2’s RATE knob. Now the speed of the wobble follows the key you play.
In the NOTE panel, bend the curve and put its dot about where your lowest note is, around C2 in the video. Play higher and the wobble gets faster. Drag that dot further and it gets harsher. The MATRIX tab shows the routing: LFO 2 to the cutoff (1) and the note number to LFO 2’s rate (2).
To turn the trick into a knob, set the AUX SOURCE of that LFO 2 row to Macro 1 (3). Now the wobble only kicks in when you turn Macro 1 up. A second macro can point straight at the cutoff, as in the video.
Add a short envelope LFO on the cutoff
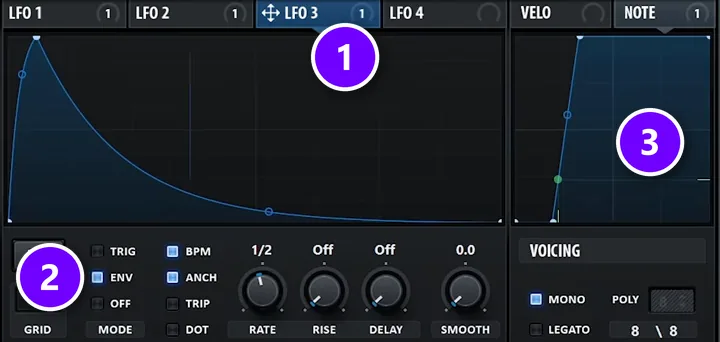
The last level 3 move is a short shape in LFO 3 (1) that jumps up and falls away. Drag it onto the cutoff too and set the LFO’s MODE to ENV (2), so it runs once per note, like an envelope. Set its amount on the cutoff to about 15 to 20, which is the row marked 4 in the matrix above.
You can give it a macro as its aux source as well, and lengthen the release of ENV 1 so the notes ring out a little. The NOTE curve from the last step is on the right (3).
Why does my reese bass sound weak and muddy in the mix?
Usually its detuned, out-of-phase low end is doing the sub’s job and fighting the kick. Cut the reese below about 120 Hz, put a clean mono sine sub under it, and make the bass duck each time the kick hits. Then bring out the growl in the mids with distortion and multiband compression, as in level 2.
Check its role, too. In a drop that needs a super clean low end, a reese often isn’t the main bass, Max points out, so let the sub and the kick carry the weight and the reese carry the movement above them. For the ducking, sidechain the sub to the kick so it drops out of the way on every hit. If the kick still needs room, duck the reese as well.
How do you keep the sub clean while the reese bass stays wide?
Split the job in two. Cut the reese below about 120 Hz so it keeps only the mids and the width, play a mono sine sub under it with a high cut at the same point, and trigger both from one Layer channel. On a stereo imager, the sub should show up as a narrow line in the middle while the reese stays wide above it.
Here’s the catch with all that width. Put the finished reese on its own mixer track with a stereo imager on it, and you’ll see how out of phase it is. Depending on where people listen, it doesn’t always have to be perfectly mono.
When you do want it clean, here’s the split, step by step. Our guide to a clean, punchy low end explains why the lows should stay mono.
Cut the reese below about 120 Hz
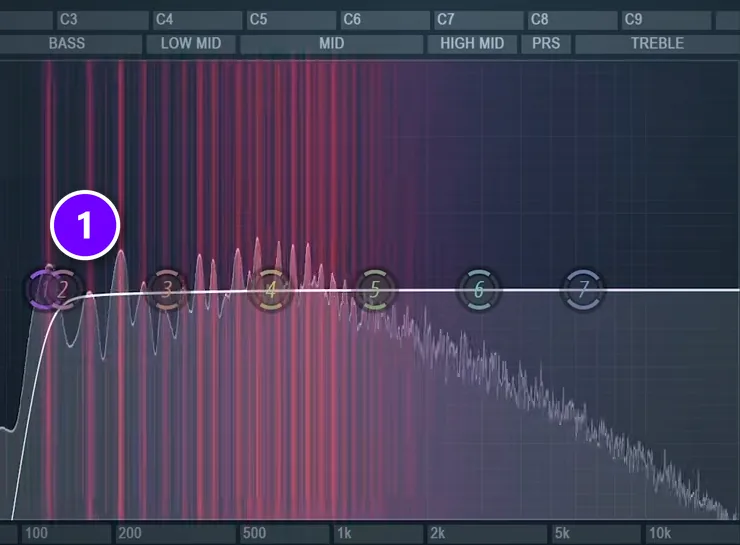
Name your Serum channel Reese and route it to its own mixer track. Add Fruity Parametric EQ 2 and turn band 1 into a very steep low cut (1) at about 120 Hz. Nothing below that line is left in the reese.
Add a sine sub and cut everything above it
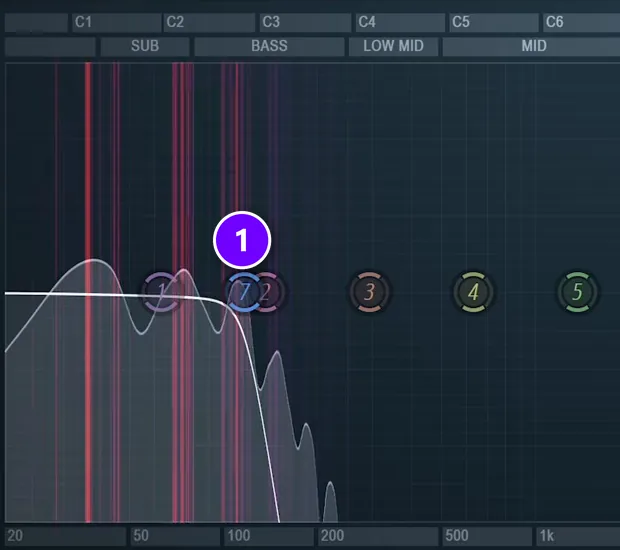
Load a second Serum and call it SUB. Give it a plain sine wave (a saw works too) and leave the rest of the patch alone. Route it to its own mixer track, add Parametric EQ 2 and make band 7 a very steep high cut (1) at the same point. It sits at 117 Hz in the video. Now the two layers meet instead of overlapping.
Play both from one Layer channel
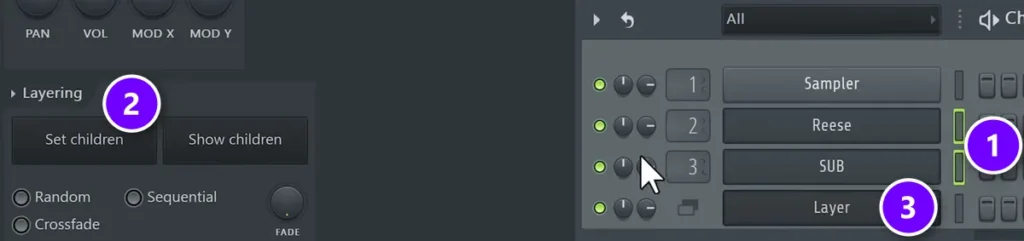
In the Channel Rack, click + and add a Layer channel. Select the Reese and SUB channels (1), open the Layer’s settings and click Set children (2). Now the notes you put on the Layer channel (3) play both sounds, so you only write the bassline once.
To check it, send both tracks to one bus and put the imager on that. The sub now shows up as a narrow line in the middle while the reese stays wide above it.
Pro tip: Max doesn’t always bother with the sub split. In his intros and breakdowns, mono compatibility doesn’t matter much to him. Save it for the parts where the low end has to hit.
How to make a reese bass in FL Studio with stock plugins
No Serum? FL Studio’s own synths get you there. The video shows two: 3x Osc, the simple three-oscillator synth, and GMS (Groove Machine Synth), which has unison built in. The FL Studio free trial includes every instrument, so you can follow along before you buy anything.
3x Osc: three saws pulled apart
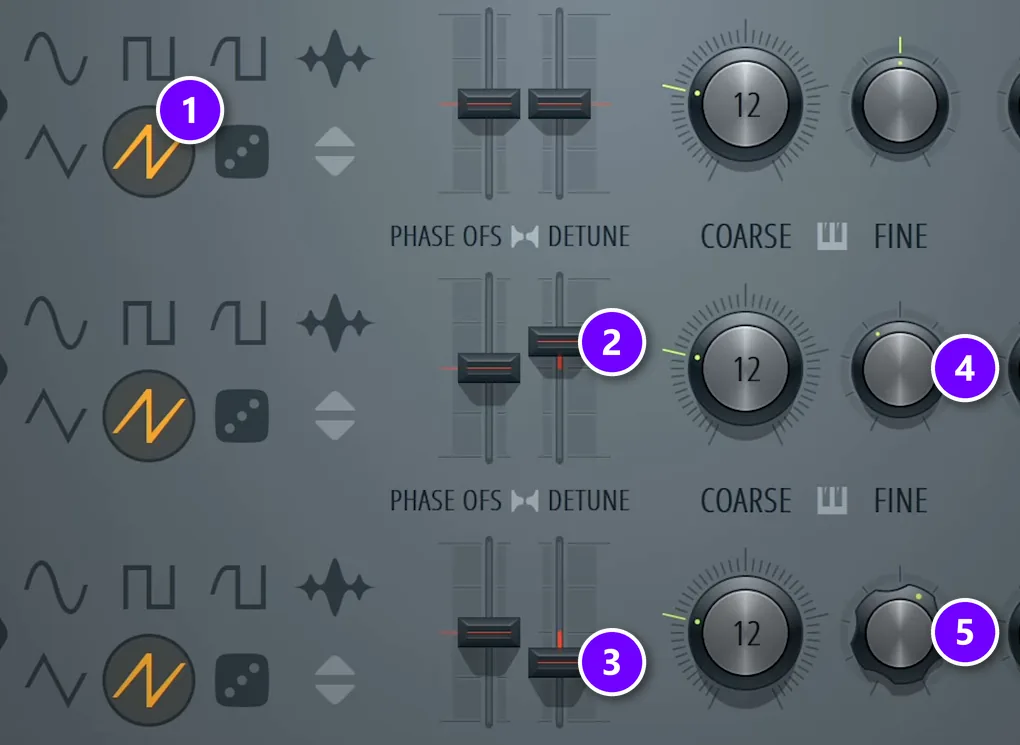
Add 3x Osc from the Channel Rack (+). Set all three oscillators to the saw shape (1) and give their COARSE knobs the same value, so they play one note together. All three read 12 in the video. Push oscillator 2’s DETUNE slider up (2) and oscillator 3’s down (3), then turn their FINE knobs in opposite directions (4, 5). The three saws now rub against each other, and that rub is your reese.
Shape the 3x Osc reese in the channel settings
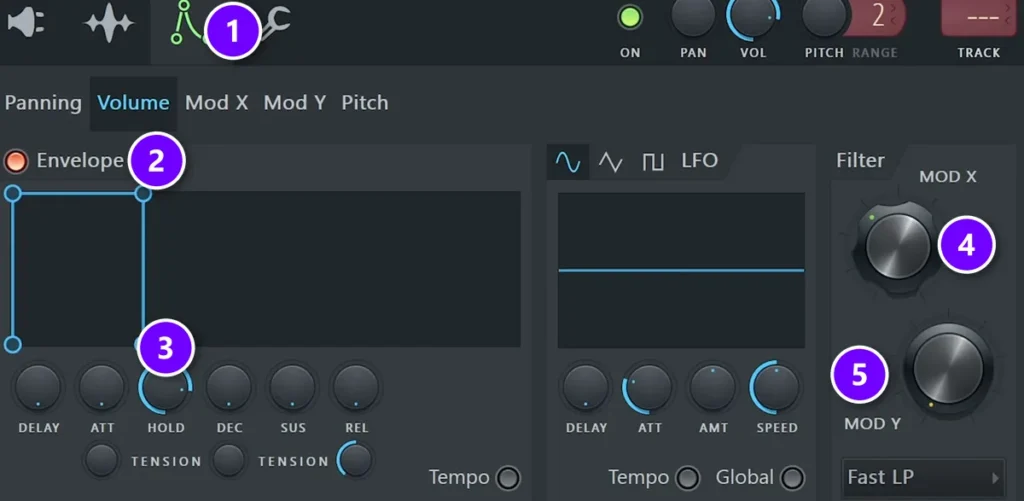
Open the channel settings and click the envelope tab (1). On Volume, switch the Envelope on (2) and leave only HOLD up (3), so each note stays at full level until you let go. Turn MOD X (4), which is the filter cutoff, down to darken the sound, and raise MOD Y (5), the resonance.
Make it glide with Porta and Mono
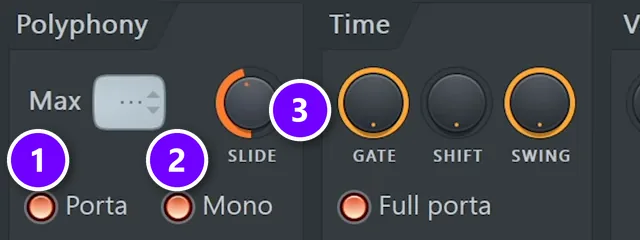
Click the wrench tab. Switch on Porta (1) and Mono (2), then set the glide time with SLIDE (3). Fine-tune the level, and save the sound from the plugin’s menu (Presets, then Save preset as) so it’s ready in your next project.
GMS: a reese bass in about a minute
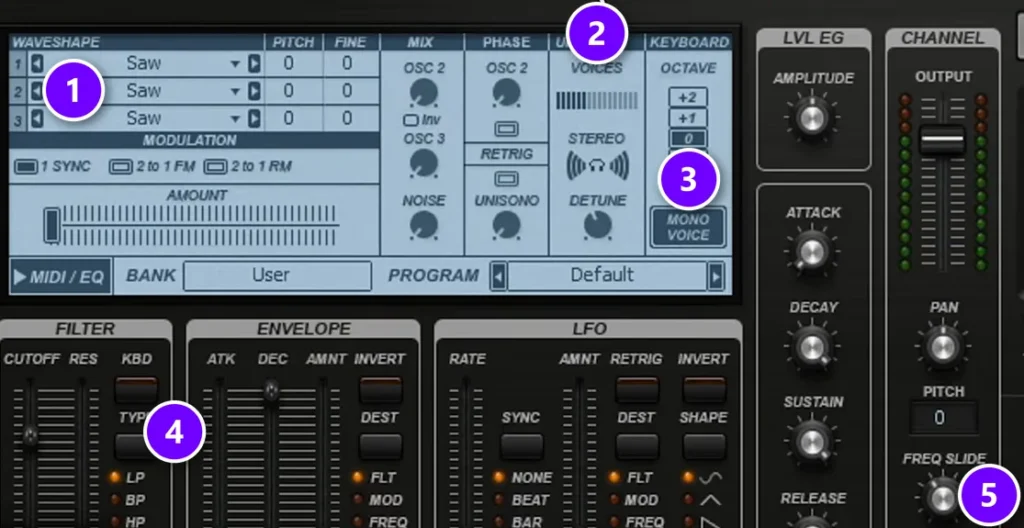
GMS is quicker, because unison is built in, and it shows up a lot in Mix Elite’s online courses. Load it and pick the User bank’s Default program to start clean. Check that all three waveshapes are Saw (1). In the UNISONO section (2), raise VOICES to 6, set DETUNE to about 40 and turn STEREO up to 100.
Click MONO VOICE (3), pick LP in the FILTER section (4) to darken it, and turn up FREQ SLIDE with its switch on (5), so notes glide. Switch on the DIST effect at the top right for grit, too. Then try other waveshapes and keep what you like.
Make the drop hit harder: narrow the reese in the breakdown
The last tip is about arrangement. A reese works in mono too, and you can use that on purpose. “As in music everything is relative, you want your drop to feel a lot wider than your breakdown to have more wow effect,” Max explains.
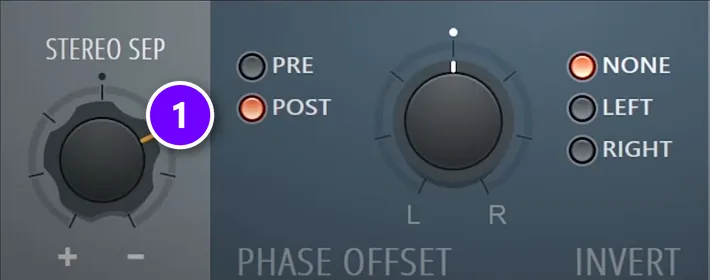
So in the breakdown, or the build into the drop, turn the reese’s width down. It sounds just as good, only narrower, and the drop feels bigger when the full width comes back. On the Serum patch, put Fruity Stereo Enhancer on the reese’s mixer track and turn STEREO SEP (1) to the right, which merges the left and right sides toward mono. In GMS you can simply turn STEREO down.
To make the change at the right moment, right-click the STEREO SEP knob and choose Create automation clip. Draw it low in the breakdown and back up for the drop.
How do you set up glide for smooth reese slides?
Play the reese in mono with a short glide and let the notes overlap. In Serum, tick MONO and set PORTA to about 70 to 80 ms; unless ALWAYS is on, only overlapping notes glide, so stretch each note into the next one. A longer glide time gives slower, lazier slides.
- Serum: MONO on and PORTA at about 70-80 ms, as in step 3. Switch on ALWAYS if you want every note to glide, even the ones that don’t overlap.
- 3x Osc and GMS: in 3x Osc, switch on Porta and Mono in the wrench tab and set SLIDE (further right means a longer slide). In GMS, turn on MONO VOICE and FREQ SLIDE.
- Big dives and rises: on FL Studio’s own synths, draw a slide note in the Piano Roll (turn on the slide switch first). It bends the note it overlaps to its own pitch, and the overlap sets the slide time. For Serum and other plugins, automate the channel’s pitch knob instead.
Do you need Serum to make a reese bass?
No. The 3x Osc and GMS versions above prove it, and any synth with two saws and a filter will get you close. Serum just makes it quicker, because unison, the filter types and the effects all sit in one window.
If you want it, Serum 2 costs $249 on Xfer’s site (checked October 2026). It’s a free upgrade if you already own Serum 1, and the demo is limited to 15 minutes. The video uses the first Serum. For other options, free ones included, see our list of the best synth plugins.
Start with level 1 tonight. Six voices, MG Low 18 and mono with a short glide take a few minutes, and you’ll hear the reese before you touch a single effect.
DAY 2 OF THE 7-DAY MUSIC PRODUCER COURSE
Find pro-quality instruments, paid and free
Day 2 of the 7-Day Music Producer Course shows you where to find pro-quality instruments and how to install them, paid and free, then covers the music theory, chords and melodies you play on them. You also download 20+ free plugins and tools and 30+ chord progressions. It’s taught in FL Studio, the course is $27, and you’re covered by a 60-day money-back guarantee.
Frequently asked questions
How do I design a heavy, moving reese bass from scratch?
Start with one saw and 6 unison voices, or two or three saws detuned apart, and play it in mono in the second octave with a short glide. Darken it with a low-pass filter and some drive, add distortion and multiband compression for weight, then move it with a slow LFO on the wavetable position and the filter cutoff.
Why does detuning saw waves create the rolling reese sound?
Two saws tuned slightly apart drift in and out of phase, so they add up, cancel and add up again. That beating runs at the difference between their frequencies, and every harmonic beats at its own speed, so the sound seems to roll and sweep. More detune makes it faster, and more unison voices make it thicker.
Why does my reese bass sound weak and muddy in the mix?
Usually its detuned low end is fighting the kick and doing the sub’s job. Cut the reese below about 120 Hz, add a clean mono sine sub under it, and duck the sub when the kick hits. Then bring out the growl in the mids with distortion and multiband compression.
How do I keep the sub clean while giving a reese bass lots of stereo width?
Split it into two layers. The reese keeps everything above about 120 Hz, wide and moving, and a mono sine sub plays everything below with a steep high cut at the same point. Trigger both from one Layer channel, and check on a stereo imager that the sub is a narrow line in the middle.
How do I set up glide so my reese slides sound smooth?
Turn on mono and set a short glide, about 70 to 80 ms on Serum’s PORTA knob, then overlap your notes so each one slides into the next. Switch on ALWAYS in Serum to glide every note. On FL Studio’s own synths, Porta, Mono and SLIDE do the same, and slide notes in the Piano Roll handle bigger dives.