
“If you want to be a master at your craft, you should endeavour to know everything that has been done with those 12 notes.”
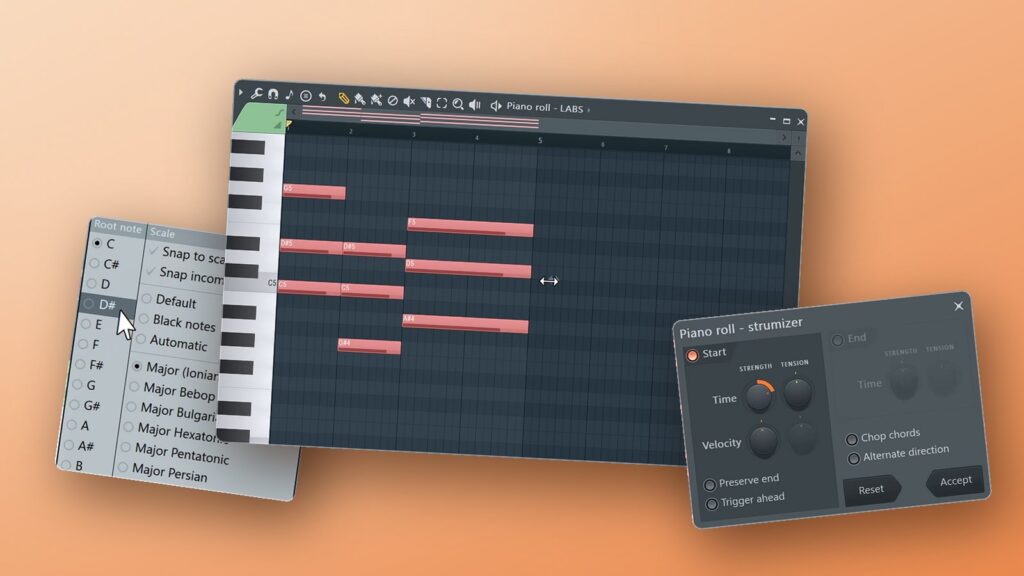
The FL Studio Piano roll is the window where you write the notes an instrument plays: pitch runs up the keyboard on the left, time runs left to right, and each click draws a note. Open it with F7 or by right-clicking a channel, draw with P, set velocity with Alt and the mouse wheel, and turn on scale highlighting so every note stays in key.
You load a piano into FL Studio, open the Piano roll and stare at a dark grid full of thin lines. One click makes a green bar. Then what? Most beginners poke around for a while, get nowhere and close the window again. It has nothing to do with talent: nobody showed them the handful of moves that do most of the work.
This guide walks through those moves in the order you’ll need them, with a real screenshot from Mix Elite’s free 4.5-hour FL Studio course or a Mix Elite short for each one. You’ll go from your first note to chords that strum like a guitar. You don’t need to play piano.
Table of Contents
What is the Piano roll in FL Studio?
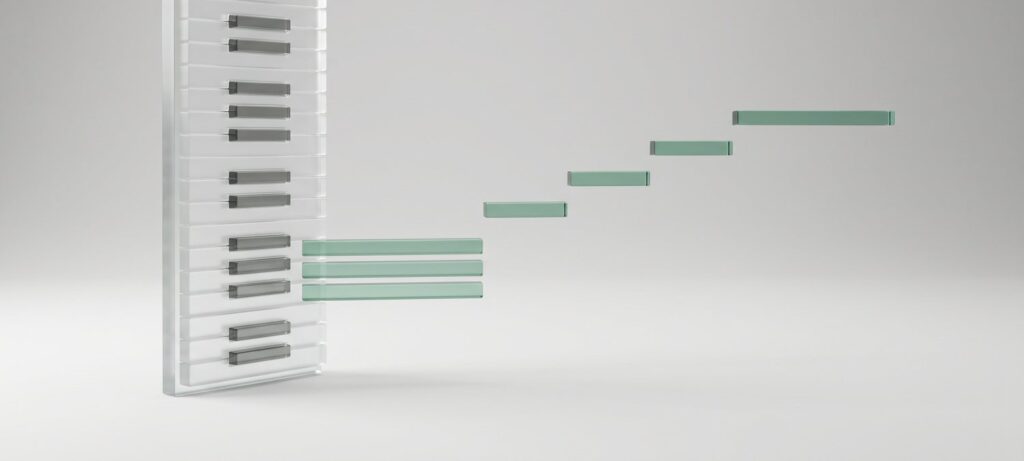
The Piano roll is FL Studio’s note editor. A piano keyboard runs down the left side, so every row of the grid is one note, low at the bottom and high at the top. Time runs from left to right in bars and beats. A note is a bar on that grid: where it starts is when it plays, its length is how long it rings, and its row is its pitch.
Every instrument in the Channel Rack has its own Piano roll, so the chords for your piano live in one and the melody for your synth in another. Max, the founder of Mix Elite, puts it simply in the course: “Here you can dial in the notes you want your instrument to play, again in time. It will basically mimic the step sequencer, but allow you to choose different pitch.”
That last part matters. The step sequencer is great for drums, where every hit has the same pitch. The moment you want chords, a melody or a bassline, you need the Piano roll. What you write here is MIDI, which means instructions for the instrument rather than recorded sound, so you can change any note at any time. If the rest of FL Studio is new to you too, start with our beginner’s guide to what FL Studio is and come back.
The four parts of the window
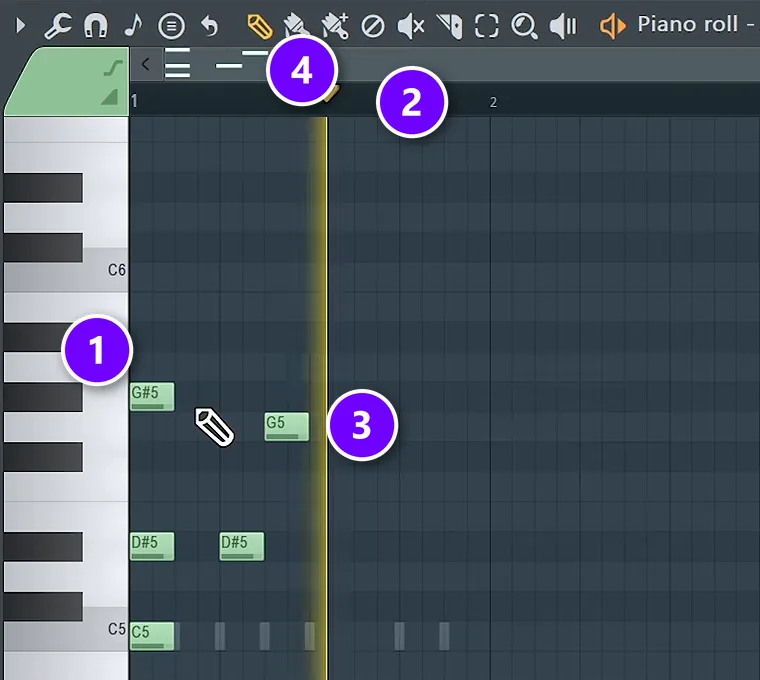
Here’s what you’re looking at. The keyboard (1) shows the pitch of every row, and clicking a key plays it. The numbers along the top (2) are bars. The green blocks (3) are notes, each with its name on it. The toolbar (4) holds the tools you’ll learn below, and under the grid sits the Control lane, where velocity lives.
How do you open the Piano roll in FL Studio?
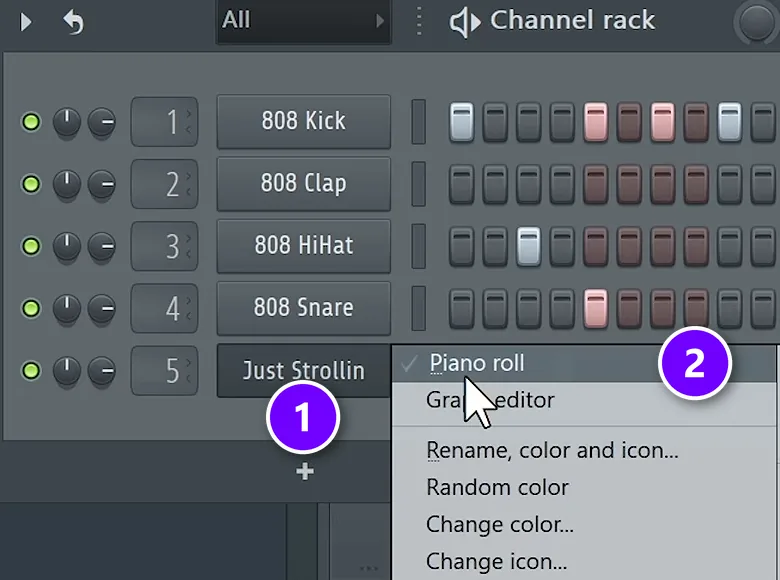
There are three ways, and they all open the same window:
- Right-click an instrument’s name in the Channel Rack (1) and choose Piano roll (2). This is how the free course opens it.
- Press F7. It opens or closes the Piano roll.
- Click the Piano roll button in FL Studio’s top bar, next to the buttons for the Playlist, Channel Rack and Mixer.
Any of them works. New to the Channel Rack itself? It’s the window with your instruments and drum sounds in rows, and each row is a channel. Every channel gets its own notes, which is why the Piano roll always edits one channel at a time.
Pick which instrument it edits
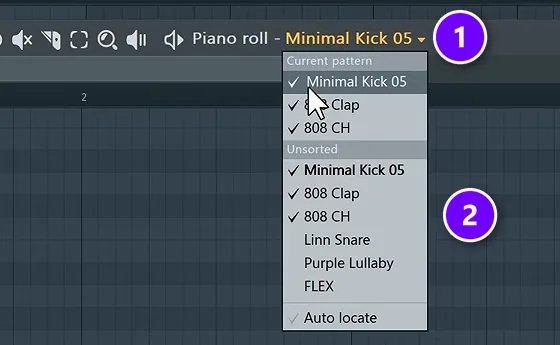
The title bar shows the channel you’re editing, here a kick called Minimal Kick 05 (1). Click that name to see every channel in the project (2) and switch without closing the window. The free course shows this on Day 1: open the Piano roll, then choose the channel you want from the drop-down.
Three settings to turn on first
A 36-second Mix Elite short shows three settings that make the Piano roll friendlier. All of them sit in the small arrow menu at the top-left corner of the window:
- View > Keyboard labels > All notes prints a name on every key, so you always know where C is.
- Edit > Allow resizing from left lets you drag the start of a note, not only its end.
- View > Scale highlighting shades the notes of your key, which you’ll set up further down.
How to draw, paint and delete notes
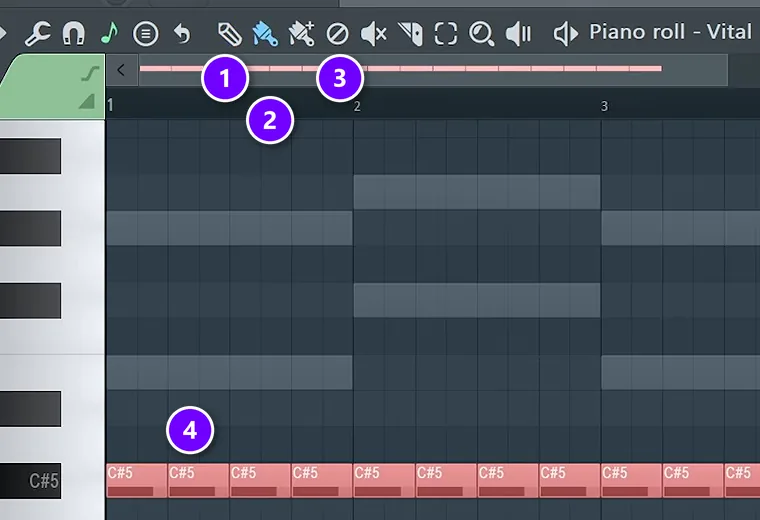
The toolbar has a tool for every job, but three of them do most of the work. Pick the Draw tool (1), the pencil, with P. Left-click the grid to place a note, drag a note to move it, and right-click a note to delete it. That’s the whole tool.
The Paint tool (2), the brush, is B. Hold the mouse button and drag, and it lays down a row of notes in one sweep (4). It’s a quick way to find a melody’s rhythm: paint over a row, then delete some notes so each bar gets its own pattern. The Delete tool (3), D, removes every note you click or drag across.
Want to hear notes before you place them? Hold Left Alt and right-click on the grid. It plays the notes under the mouse without writing anything.
To work on several notes at once, hold Ctrl and drag a box around them, or press Ctrl + A to select all of them. Then drag to move them, hold Shift while you drag to copy them, or press Ctrl + B to repeat them right after themselves. If anything goes wrong, Ctrl + Z undoes your last move.
How to change note length
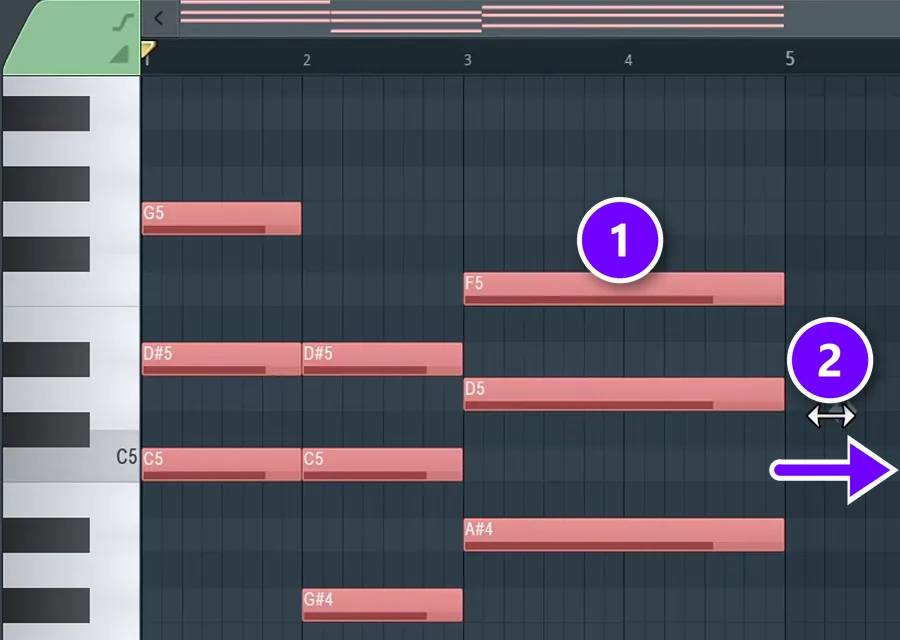
A new note copies the length of the last note you touched. The free course points this out on Day 2, and it saves a lot of resizing: click a short note before you draw short notes, and a long one before you draw a pad. To change a single note, hover over its right edge until the cursor turns into a double arrow, then drag.
To stretch a whole chord progression, select all of it first (1). Grab the double arrow at the end of the selection (2) and drag to the right. Hold Alt while you drag and let go when the chords are twice as long. It’s the fix for a progression that feels too fast, and one drag makes it calmer.
Need to move the start of a note instead? Turn on Allow resizing from left in the Edit menu, one of the three settings above, and both ends of every note become handles.
How do you change velocity in the Piano roll?
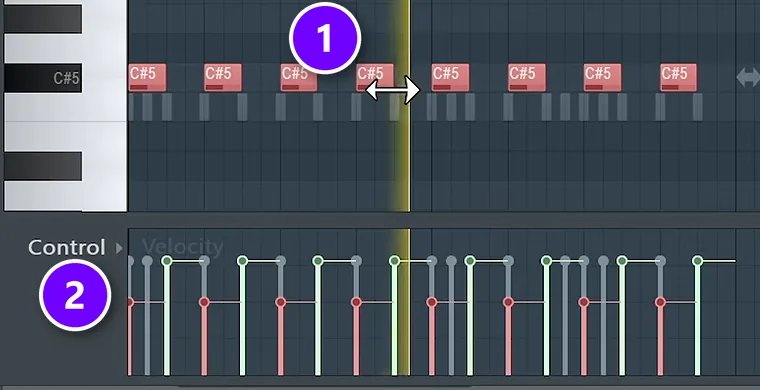
Velocity is how hard a note is played. In most instruments a higher velocity is louder, and often brighter, while a lower one is softer. When every note has the same velocity, a part sounds stiff, like a machine pressing keys, so changing it is the fastest way to make your music feel played.
Velocity lives in the event editor, the lane under the grid marked Control (2). Each note has a lollipop there, and its height is the velocity. Drag one down to soften that note. To change many notes at once, select them (1), hold Alt and roll the mouse wheel. Every selected note moves together.
Add Ctrl to that (Ctrl + Alt and the wheel) for finer steps. Max’s rule for hi-hats is a good start for any part: lower the velocity of every other note a little, because it doesn’t have to be perfect, it has to sound human. Our guide to humanizing MIDI drums takes the idea further.
Switch the lane to pan and more
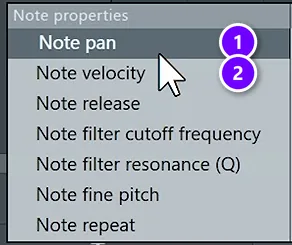
Click the word next to Control to choose what the lane edits. Note pan (1) places each note left or right in the stereo field, and Note velocity (2) is the one you’ll use most. There are others, such as release and filter cutoff, but Max keeps it simple: “To be honest, I only use note pan or note velocity, never anything else.”
If you’d rather type exact values, double-click any note to open its properties.
How do I turn off snap to grid in the Piano roll?
Click the magnet icon in the Piano roll’s toolbar and choose (none). If it’s set to Main, change the main snap in FL Studio’s top bar instead. To nudge just one note off the beat, leave snap on and hold Alt while you drag it, and snap switches off until you let go.
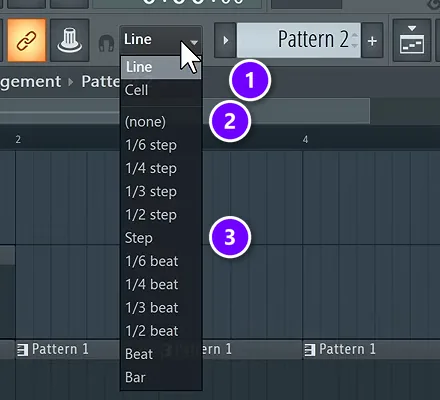
Snap decides where notes land. With snap on, a note jumps to the nearest line of the grid, so your rhythm stays tight even when your mouse hand isn’t. The Piano roll has its own snap menu, the magnet icon in its toolbar. FL Studio’s top bar holds the main one (1), and the Piano roll’s Main setting simply follows it.
Max’s advice in the free course is to leave snap on. If you set it to (none) (2), nothing sticks to the grid any more, and he warns that your rhythms can start to sound off. Step (3) or Beat is a good place to start for normal writing. Line follows your zoom, so the grid gets finer as you zoom in.
How do I turn on scale highlighting in the Piano roll?
Right-click the small note icon in the Piano roll’s toolbar and pick a scale and its root note. The rows of the scale turn lighter, so you can see the safe notes at a glance. Left-click the same icon to turn on Snap to scale, and notes can only land in key, which stops wrong notes for good.
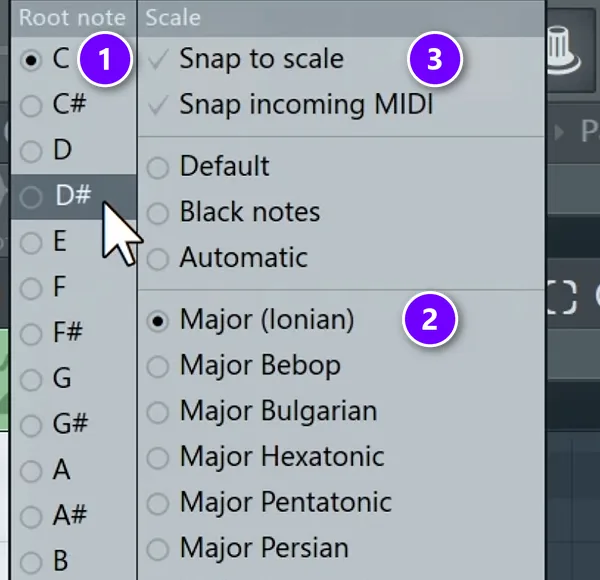
This is the feature that lets you write in key without knowing any theory. In the screenshot, the menu shows the root note (1) and the scale (2). The rows that belong to the scale turn lighter and the root note’s row turns darker.
A left-click on the same icon turns on Snap to scale (3), and notes can now only land on rows of the scale. It’s handy when you want to work fast, but Max often leaves it off: “This is definitely useful. I don’t know why, it just feels weird to do that, because, you know, happy accidents, right.”
Which scale should you choose? Max’s pick for today’s pop, hip hop, R&B and electronic music is a minor scale. Natural minor and harmonic minor are the most common ones, and harmonic minor is his personal favorite.
Max shows all of this in Mix Elite’s free 4.5-hour FL Studio course below: skip to 32:07 for the Piano roll and its scale helpers.
Ghost notes: see your other instruments
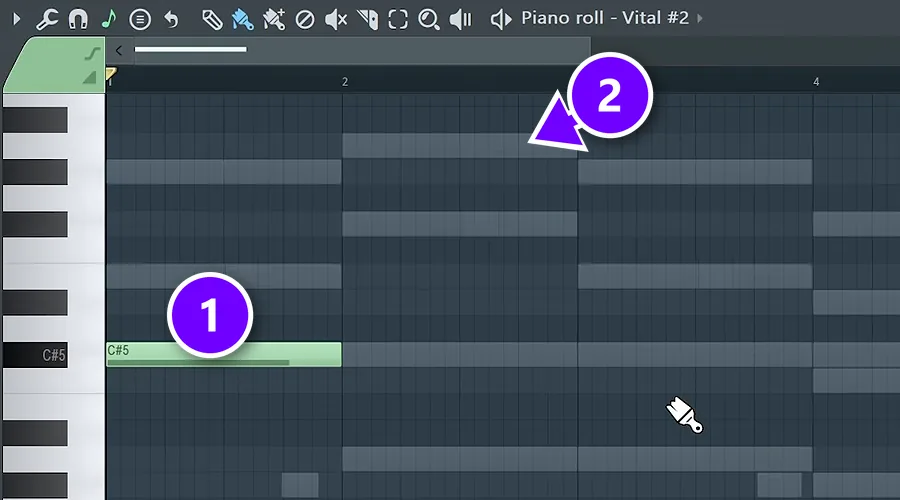
Ghost notes are the grey notes of your other channels, shown behind the one you’re editing. Here the bass channel’s note (1) sits under the chords from the piano (2), so you can follow the chords without switching windows. Turn them on or off with Alt + V or View > Ghost channels.
The free course writes melodies and basslines this way: follow the grey chord notes first, then move a note or two away from them. Double-right-click a ghost note and FL Studio jumps straight to the channel it belongs to.
How to use the Stamp tool and other scale tools
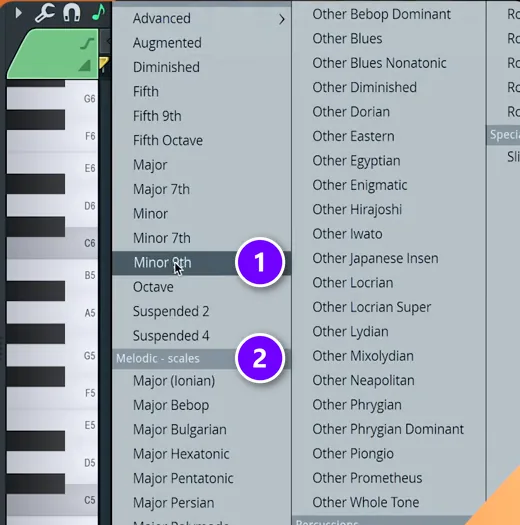
The Stamp tool places a whole chord with one click. Click its icon in the toolbar, right next to the note icon, choose a chord type from the list, then click the grid where the chord should go. In this Mix Elite short it’s a Minor 9th (1), the soft, jazzy chord the video uses for quick house chords.
The same list holds scales further down (2), so a single click can lay out a whole scale for you. Stamped chords come out in their plain shape, though. A row of them can sound blocky. The fix from the free course is to move notes that jump too far between chords down an octave with Ctrl + Down, so the chords flow, and to copy each root note an octave lower to make every chord sound fuller.
Two more tools keep you in key. Limit (Alt + K) moves notes into a key and a range, and a Mix Elite short uses its slider to fix chord voicings that sound off. In Mix Elite’s scale-tricks video, Max right-clicks the typing keyboard to piano keyboard button and picks a scale, so whatever you play on your computer keyboard stays in key.
To learn which chords to stamp in the first place, read our guide to writing chords and harmonies in FL Studio with no experience.
How do I chop a long note into smaller notes?
Select the note and press Ctrl + U for Quick chop, which cuts it into pieces the size of your snap setting, so set snap first. For a rhythm instead of even slices, press Alt + U to open the Chopper, pick a pattern and click Accept.
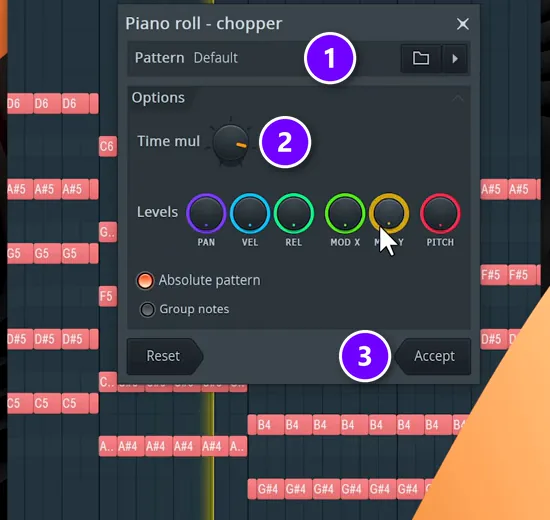
Chop cuts long notes into a rhythm. Select the notes and press Alt + U to open the Chopper. Choose a rhythm from the Pattern list (1), turn Time mul (2) to make it faster or slower, and click Accept (3). In the same house-chords short, a simple chord progression turns into a bouncy stab pattern in a few seconds.
To cut at one exact spot instead, pick the Slice tool, C, and drag straight down across the notes. They split where you drag.
Arpeggiate a chord
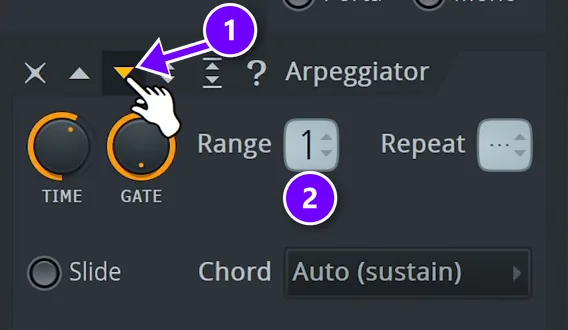
An arpeggio plays a chord one note at a time instead of all at once. The Piano roll’s Arpeggiate tool (Alt + A) writes the arpeggio out as real notes you can edit. Its knobs set the speed, the range in octaves and the gate, which is how short each note is.
Every instrument channel also has a live arpeggiator, shown in this Mix Elite short. Open the channel’s settings, click the wrench tab and choose a direction (1). Range (2) sets how many octaves it climbs. Now any chord you hold or draw plays as an arpeggio, and your Piano roll notes stay untouched.
How to strum chords in FL Studio
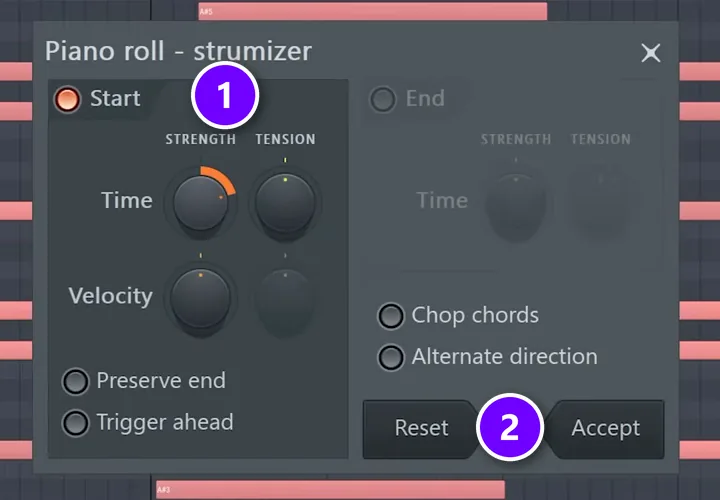
A block chord, with every note starting at the same moment, sounds like a keyboard player. A strum starts each note a hair later than the one before, like a guitar. Select your chords and press Alt + S, as in the scale-tricks video, to open the Strum tool.
The Start section (1) does the work. Turn up Time to spread the notes further apart and Velocity to make each later note a little softer. A positive time strums from low to high and a negative one from high to low, while Alternate direction flips every other chord like a real down-and-up strum. Click Accept (2) to write it.
Strum is also the quickest way to loosen up piano chords. Even a small Time setting stops them sounding like a robot hit every key at once.
How to quantize notes in the Piano roll
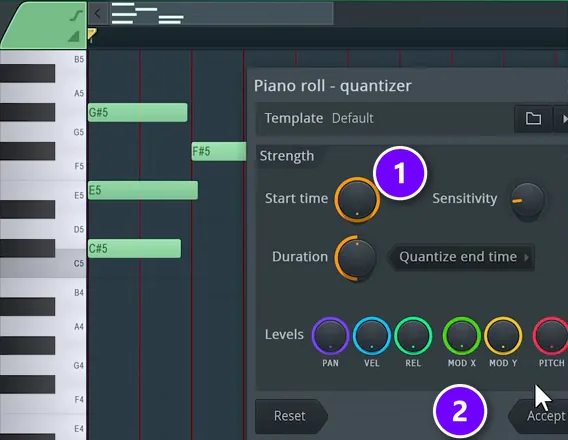
Quantize moves notes onto the grid. It fixes notes you played on a MIDI keyboard that landed a little early or late. Select the notes and press Ctrl + Q for Quick quantize, which snaps them to the grid of your main snap setting. Shift + Q fixes only the start times and leaves the lengths alone.
For more control, Alt + Q opens the Quantizer. Start time (1) sets how far notes move toward the grid: all the way puts them exactly on it, and less keeps some of your natural timing. Click Accept (2) when it sounds right.
Quantize while you record
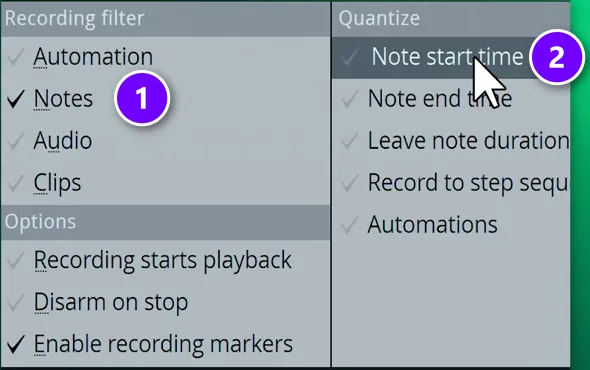
You can also skip the fixing. Right-click the record button in FL Studio’s top bar, make sure Notes is ticked (1), and turn on Note start time under Quantize (2). Notes now land on the grid while you play. It follows the main snap setting, so pick a real value like Step first; this Mix Elite short warns it won’t work on Line, Cell or (none).
Why do my Piano roll melodies sound robotic?
Because every note has the same velocity and starts exactly on the grid, like a machine pressing keys. Vary the velocities, nudge a few notes off the grid with Alt held, strum chords so their notes don’t all start at once, and quantize only part of the way so some of your natural timing stays.
- Velocity: select every other note and lower it a little with Alt + mouse wheel, Max’s rule for hi-hats, or let Randomize (Alt + R) vary the velocities for you.
- Timing: hold Alt and drag a few notes a hair early or late.
- Chords: strum them with Alt + S. Even a small Time setting stops every note hitting at once.
- Recorded parts: in the Quantizer (Alt + Q), pull Start time back from full, so notes move toward the grid without landing exactly on it.
It matters even more on drums. Our guide to humanizing MIDI drums goes further.
What else is in the Piano roll Tools menu?
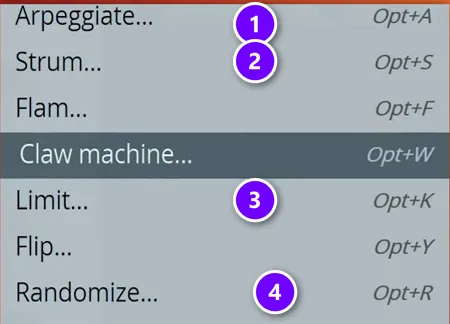
Every tool above lives in the Tools menu, the wrench icon at the top-left of the Piano roll. The short in this screenshot was recorded on a Mac, so it shows Opt; on Windows, use Alt. You’ve met Arpeggiate (1) and Strum (2) already. These are worth a try next:
- Limit (3), Alt + K: keeps notes inside a key and a range.
- Randomize (4), Alt + R: writes random notes, or randomizes velocity and pan for a looser feel.
- Flip, Alt + Y: mirrors a melody upside down or back to front.
- Claw machine, Alt + W: removes, adds or shifts notes to make new rhythms. A Mix Elite short uses it to make a hi-hat pattern bounce.
- Scale levels, Alt + X: changes a value such as velocity across many notes at once.
- Riff machine, Alt + E: generates note patterns when you’re stuck.
- Quick legato, Ctrl + L: stretches each note until the next one starts.
One more from the free course, and it’s a lifesaver. If you played something great on your MIDI keyboard but forgot to press record, FL Studio’s main Tools menu has Dump score log to selected pattern. It pulls back what you played, and the course picks the last 2 minutes. For more hidden gems like these, see our favorite FL Studio tricks.
Why can I see notes playing in the Piano roll but hear no sound?
The notes are fine. Something after them is silent. Check that the channel isn’t muted and its volume is up, that the Mixer track it plays through isn’t muted, and that the instrument has a sound loaded. If nothing in FL Studio makes any sound, check the output device in Options > Audio settings.
- The wrong channel. The title bar shows which channel the Piano roll is editing. Click its name and pick the instrument you meant.
- A muted or silent channel. In the Channel Rack, the small light next to the channel turns it on and off, and its volume knob may be all the way down.
- The Mixer track. Press F9 and check that the channel’s Mixer track isn’t muted and its fader is up.
- Zero velocity. Notes with their velocity lollipops pulled all the way down play no sound.
- Song mode. If the playhead doesn’t move over your notes at all, the switch next to play is on Song and the pattern isn’t in the Playlist yet. Switch to Pattern mode.
Which FL Studio Piano roll shortcuts help you write melodies fast?
Start with eight: F7 opens the Piano roll, P draws and B paints notes, Ctrl + B repeats a selection, Shift + Up or Down moves notes a semitone, Ctrl + Up or Down moves them an octave, Alt + mouse wheel sets velocity, and Ctrl + Q quantizes.
You don’t need all of them. Learn these and you’ll rarely open a menu:
- F7: open or close the Piano roll.
- P Draw, B Paint, D Delete and E Select. You can also hold the right mouse button and roll the wheel to switch tools.
- Ctrl + drag selects notes, and Ctrl + A selects all of them.
- Shift + drag copies notes, and Ctrl + B duplicates them to the right.
- Shift + Up or Shift + Down moves notes a semitone, and Ctrl + Up or Ctrl + Down moves them an octave.
- Alt + mouse wheel over a note changes its velocity, or the velocity of every selected note.
- Alt + V shows or hides ghost notes.
- Ctrl + Q quantizes, Alt + U chops, Alt + S strums and Alt + A arpeggiates.
- Ctrl + Z undoes, and Ctrl + Alt + Z keeps stepping back.
On a Mac, use Cmd for Ctrl and Option for Alt. Our list of 30 must-know FL Studio shortcuts covers the rest of the program, and these essential FL Studio tips for beginners build the habits around them.
Piano roll tips: what to practice first
Give yourself one 45-minute session with nothing but the Piano roll. Load a piano, turn on scale highlighting in a minor key and stamp four chords. Fix their voicing, stretch them to two bars each and strum them. Then add a second instrument, switch on ghost notes and write a simple melody on top.
That one loop uses almost every tool in this guide, and it follows the same path as Day 2 of Mix Elite’s free FL Studio course: scale, chords, voicing, then a melody over the ghost notes. Do it once and the grid stops being scary. Do it three times and it’s fast.
THE 7-DAY MUSIC PRODUCER COURSE
Day 2: write your first chords and melody
Day 2 of the 7-Day course is all about chords and melodies: the music theory you need for fresh-sounding harmonies, the 3-step chord progression formula, 4 easy ways to write melodies even if you’ve never touched a keyboard, and where to find pro-quality instruments, paid and free. You also download 30+ chord progressions. It’s $27, and you have 60 days to decide if it was worth it.
Frequently asked questions
How do I turn on scale highlighting in the FL Studio Piano roll?
Right-click the small note icon in the Piano roll’s toolbar and choose a scale and its root note. The rows of the scale turn lighter, so you can see which notes fit. Left-click the same icon for Snap to scale, and every note you draw lands in key.
Why do my Piano roll melodies sound robotic?
Every note has the same velocity and starts exactly on the grid. Lower the velocity of some notes (select them, hold Alt and roll the mouse wheel), nudge a few notes off the beat with Alt held, strum chords with Alt + S, and quantize only part of the way so some natural timing stays.
Why can I see notes playing in the Piano roll but hear no sound?
Check that the channel isn’t muted and its volume is up, that the Mixer track it plays through isn’t muted, and that the instrument has a sound loaded. Notes with zero velocity are silent too. If nothing in FL Studio makes sound, check the output device in Options > Audio settings.
How do I chop a long note into smaller notes in FL Studio?
Select the note and press Ctrl + U for Quick chop, which cuts it at your snap size, so set snap to the length you want first. For a rhythm instead of even slices, press Alt + U to open the Chopper, pick a pattern and click Accept. The Slice tool (C) cuts at one exact spot.
How do I turn off snap to grid in the FL Studio Piano roll?
Click the magnet icon in the Piano roll’s toolbar and choose (none), or change the main snap in FL Studio’s top bar if the Piano roll is set to Main. To move just one note off the beat, keep snap on and hold Alt while you drag it.