

“He would turn the quantize off and make it imperfect.”
To humanize MIDI drums, change what a real drummer changes: play some hits softer than others, move a few hits a hair off the grid, and vary the pattern as the song goes on. In FL Studio, that means the Channel Rack’s velocity graph and swing knob, nudging notes with Alt held in the Piano Roll, or playing the beat in on FPC pads.
Your beat has good sounds and a solid pattern. It still sounds like a machine. Every hit lands at the exact same moment and at the exact same strength, bar after bar, and no drummer on earth plays like that. Your ears notice, even when you can’t say why.
This guide shows how to humanize MIDI drums with six moves in FL Studio, from a two-second swing tweak to playing the beat in with your fingers. The screenshots come from Mix Elite’s own videos.
Table of Contents
Why do my programmed drums sound stiff and robotic?
Because MIDI plays every hit at the same strength and exactly on the grid, and the loop repeats without a single change. Real drummers hit harder and softer, land a hair early or late, and throw in fills. To fix the stiffness, put those three things back: velocity, timing and variation.
What does humanizing MIDI drums mean?
MIDI is just a list of instructions: which drum, when, and how hard. Programmed drums sound robotic when every one of those instructions is perfect. Real drummers are never perfect.
Humanizing means adding back the small differences a player makes without thinking:
- Velocity: how hard each hit is. In MIDI it’s a number from 0 to 127, and on most drum sounds a soft hit sounds different from a hard one, not just quieter.
- Timing: where each hit lands. Drummers push some hits a little early and drag others a little late.
- Variation: what changes over time. Fills, open hi-hats and small extra hits keep a loop from repeating like a copy machine.
The reason is simple. “Varying the velocity of your hats will also bring them to life, so you don’t want to sound too robotic,” says Max, the founder of Mix Elite, in Mix Elite’s free 4.5-hour FL Studio course. Each move below is a small change. Together, they turn a stiff loop into something that grooves.
How to humanize MIDI drums in FL Studio
Start with velocity and timing, the two things a drummer changes on every hit: make every other hi-hat a little softer, keep the kick and snare strong, and move only a few hits a hair off the grid. Then add swing or a groove template, play a take in on pads, and change the pattern every few bars.
These six moves go from easiest to most hands-on. You don’t need all of them on every beat. Start with the first two.
1. Vary the velocity in the Channel Rack
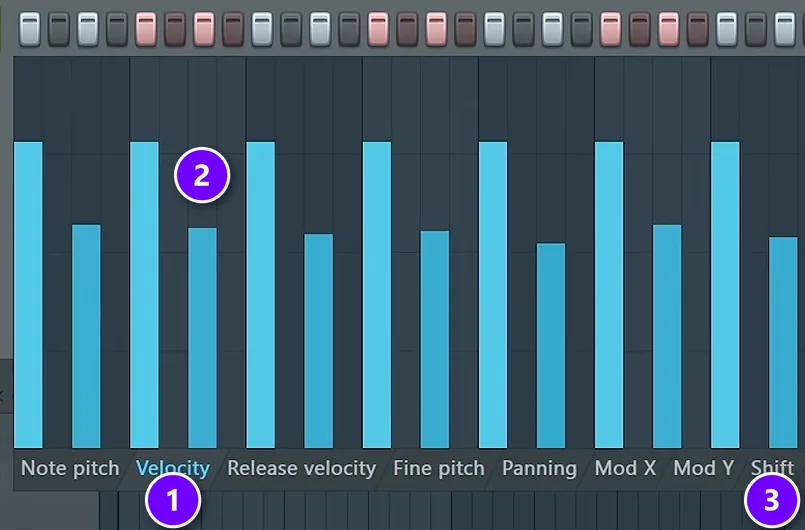
Select the hi-hat channel in the Channel Rack and open the graph editor with the bar-graph icon at its top right. Click the Velocity tab (1). Each bar is one step, and its height is how hard that step hits. Now pull every other bar down a little (2), so the hats go loud, soft, loud, soft.
It doesn’t need to be neat. “It doesn’t have to be perfect. Even if it’s not perfect, it’s better because it’s more human,” Max says about this exact step. Keep the change small. In Mix Elite’s free course the soft hats sit at about three quarters of full height, and that’s plenty.
Kicks and snares need less change than hats. Keep the snare on beats 2 and 4 strong and the kick steady, so the backbone holds while the hats breathe. The Piano Roll works the same way. Its control lane at the bottom shows Velocity. The quick trick there: select the notes, hold Alt and scroll down to lower them all at once. Max says velocity and pan are the only note settings he ever touches in that lane.
For a quick start in the Piano Roll, select the notes and press Alt + R to open the Randomize tool. Turn off its Pattern section, which makes new notes, and keep the Levels section on. Then it only varies the velocity of the notes you already have. Keep the amount low.
2. Add swing with the Channel Rack swing knob
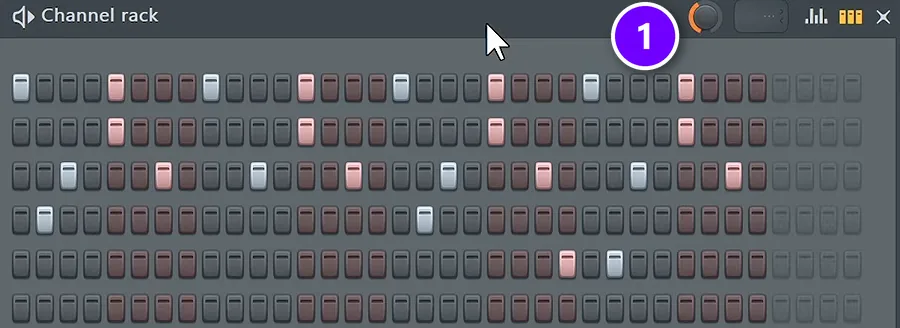
Swing pushes some notes slightly late, so a loop bounces instead of marching. In FL Studio, it’s the small knob at the top right of the Channel Rack (1). It takes the notes that fall between the beats and the off-beats and delays them by a few milliseconds. For house drums in Mix Elite’s free course, it goes to about 40%. The hint bar at the top left of FL Studio shows the value as you turn it.
Two things to know. The main swing knob only moves steps in the Channel Rack, not notes in the Piano Roll. And each channel has its own swing amount, under its channel settings in the Miscellaneous functions tab, in the Time section. Use it to keep the kick straight and swing only the hats. Both the main knob and the channel’s own swing have to be above 0% for that channel to swing.
3. Nudge a few hits off the grid
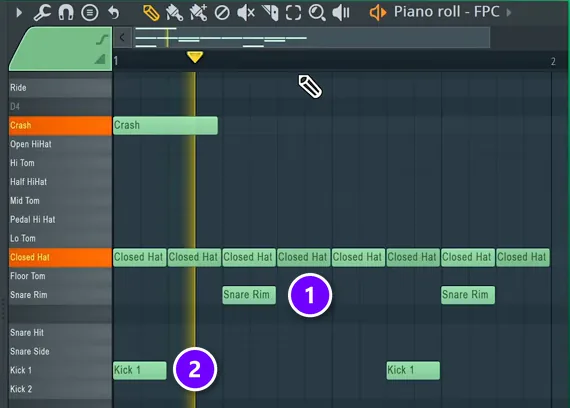
The grid is where FL Studio snaps notes to. Real drummers land a hair before or after it. In the Piano Roll, every row is one drum, and here the snare (1) and the kick (2) sit exactly on the grid. Hold Alt while you drag a note to move it freely, without snapping. Move it only a tiny bit.
Two classic moves come from live drummers. Drag the snares slightly late for a laid-back, lazy feel. Or push the hi-hats slightly early for a driving, urgent feel. Leave the kick on the grid, so everything still locks together.
In the Channel Rack, the graph editor’s Shift tab does the same job for each step. A Shift bar delays its step by up to one 16th note, so keep those bars very low. You can see the Shift tab (3) in the velocity screenshot above. To move a whole drum at once, use the Shift knob in that channel’s Miscellaneous functions tab.
This loose feel is all over hip-hop. In his Red Bull Music Academy lecture, Questlove of The Roots describes how J Dilla turned quantize off on purpose and let his drums sit a little off. Fans have chased that sound ever since.
4. Use a groove template from the Quantizer
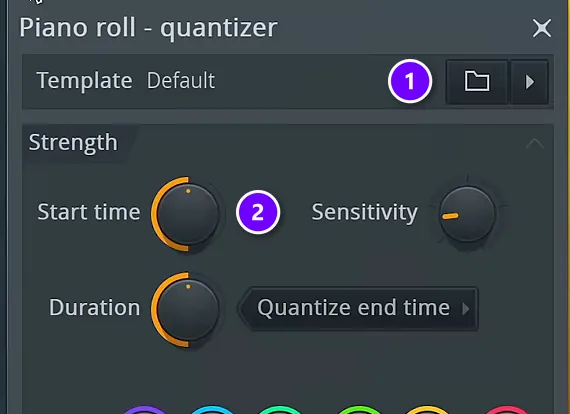
Quantizing snaps notes to the grid. FL Studio’s Quantizer can snap them to a groove instead, a timing template that sounds like real playing. Select the drum notes in the Piano Roll and press Alt + Q. Open the template list (1) and try a few presets, like 16_drummer swing 1, 16_funkyB or 16_hiphop.
Then turn Start time (2) down from full. At full, every note jumps onto the groove. Lower settings mix your own timing with the groove’s timing, which usually sounds the most natural. A Mix Elite short on this tool points out that the presets are also a great way to learn how velocity and timing make a groove.
5. Play the beat in with FPC pads
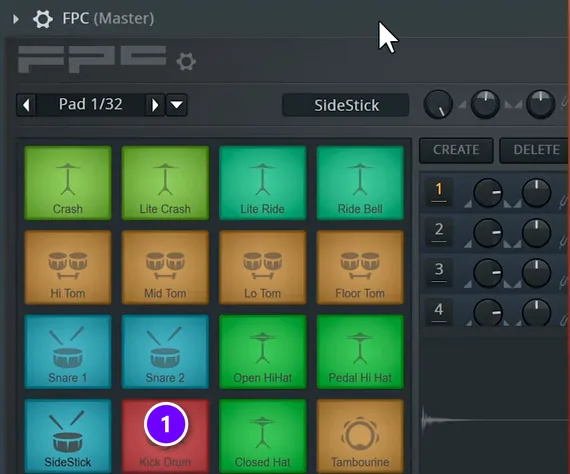
The most human drums come from a human. FPC is FL Studio’s drum sampler, with pads you can play on a pad controller, a MIDI keyboard or even your computer keyboard. Load it in the Channel Rack, drag your own drum sounds onto the pads (1), and play along with the metronome.
Two Mix Elite shorts make the same point: stop clicking every step into the Channel Rack and play the drums instead. Here’s the one that walks through it:
How to record your drum take
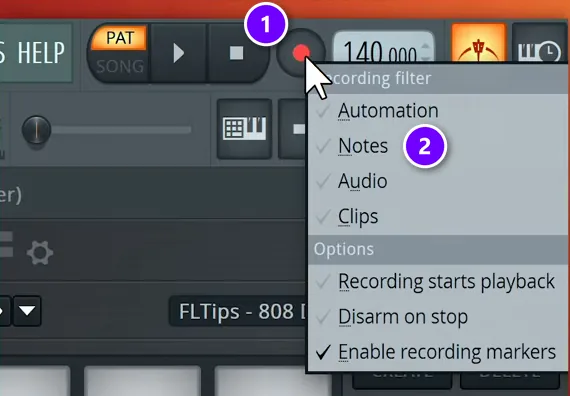
Click the record button (1) and check that Notes (2) is ticked in the menu that opens, so FL Studio records what you play. Press play, record a few bars, and listen back. Fix only the hits that sound wrong. Or run the Quantizer with a low Start time, so the take gets tighter but keeps its feel.
6. Change the pattern like a drummer would
Even perfect velocity and timing sound fake if the same bar repeats for three minutes. Mix Elite’s free course has a simple rule for hi-hat rolls. Max says: “One framework that I like to use is change something every four beats.” The same idea works for the whole kit:
- Add a small fill at the end of every 4 or 8 bars, like a snare roll, a tom run or a hi-hat roll. The graph editor’s Repeat tab makes quick rolls.
- Open the hi-hat now and then instead of keeping it closed all the time.
- Add ghost notes: very soft snare hits between the main ones. You feel them more than you hear them.
- Swap between two similar hi-hat samples, so the exact same sound never fires twice in a row.
- Layer two hats and pan them a little left and right, as Mix Elite’s free course does, so they don’t sit on the same spot.
- Think about hands. A drummer has two hands and two feet, so a hi-hat, crash, ride and snare all hitting at once gives the game away.
Pattern changes are also how a loop grows into a full beat. Our tips on how to structure a beat show where the bigger changes go.
How much should you humanize drums?
Less than you think. If a listener can hear the mistakes, it’s too much. You want a groove people feel, not a drummer who sounds tired. How loose to go depends on the style:
- Trap: hats usually stay right on the grid. The life comes from velocity, rolls and pitch changes, not loose timing.
- House: swing does most of the work, around the 40% used in Mix Elite’s free course, with a steady kick on every beat.
- Hip-hop and lo-fi: the loosest styles. Late snares and lazy hats are part of the sound, going back to the breakbeats hip-hop was built on.
- Rock, pop and anything with live-style drums: a groove template or a recorded take, plus careful velocity on every hit.
- EDM drops: tight and punchy. Vary velocity and add fills, but keep the timing locked.
Whatever the style, humanize the hats and percussion most, the snare a little and the kick least. A steady kick and snare under moving hats is what a tight drummer sounds like.
How to humanize MIDI in Logic, Ableton, Reaper and Cakewalk
The ideas are the same in every DAW. Only the buttons change.
How do you humanize MIDI in Logic Pro?
Open the drum region in the Piano Roll, select the notes and choose Functions > MIDI Transform > Humanize. It randomizes each note’s position, velocity and length within the ranges you set, and the Select and Operate button applies it. Keep the ranges small.
Sound On Sound’s Humanize walkthrough finds a position range of 10 too strong and uses 6. On drums, select only the hi-hat and percussion notes before you apply it, so the kick stays tight.
How do you humanize MIDI in Ableton, REAPER and Cakewalk?
- Ableton Live: drag a groove from the Groove Pool onto a clip and raise its Random amount for small timing changes.
- REAPER: select the notes in the MIDI editor and run Edit > Humanize notes, which moves timing and velocity by the strength you choose.
- Cakewalk: the Quantize dialog has a Randomize option that adds a small random time offset to each note.
Do you need a drum humanizer plugin?
No. FL Studio’s swing knob, the Quantizer’s groove templates and the Randomize tool already vary timing and velocity for free, and the other big DAWs have humanize tools built in. A dedicated plugin is a shortcut, not a requirement.
If you want one anyway, two stand out:
- HumBeat 3 by Develop Device hosts your drum plugin inside it and plays your MIDI the way a drummer would, with two hands, two feet and a lead hand. Its maker says it works in every DAW except Pro Tools.
- Humanizer Pro by Wide Blue Sound is a MIDI effect that adds human timing and velocity changes without overwriting your original notes. It comes as VST3, AU, AAX and Max for Live.
Whatever you use, the rules on this page still apply. Humanize the hats most and the kick least, and keep the amounts small.
Mistakes that make humanized drums sound sloppy
- Randomizing everything at once. Big random amounts on every drum sound sloppy, not human.
- Moving the kick and snare as much as the hats. The backbone has to stay solid.
- Judging the groove on a solo track. Check it with the bass and melody playing, since that’s what the drums have to lock with.
- Using groove to hide bad sounds. If a hi-hat sample is harsh or thin, no velocity trick saves it. Our guide to hard-hitting drums in FL Studio shows how to pick and mix sounds that hit.
Humanizing is the finishing touch on a drum part. If you’re still building the pattern itself, start with our step-by-step guide on how to make beats, then come back and make it groove.
DAY 3 OF THE 7-DAY MUSIC PRODUCER COURSE
Build drums that groove, then turn them into a full song
Day 3 of the 7-Day course is about drums and arranging: how to choose sounds that work, how to build drum patterns fast even if you have no feel for rhythm, and one simple tactic for turning an idea into a full song. You get the 2025 Producer Toolkit sound pack to work with. It’s taught in FL Studio (the free trial works), about 45 minutes a day, and on day 7 a pro gives you personal feedback on your finished track. It’s $27, with 60 days to decide if it was worth it.
Frequently asked questions
How do you make MIDI drums sound real?
Vary the velocity so no two hits are equally loud, move a few hits slightly off the grid, and add swing or a groove template. Then change the pattern every few bars with fills, open hi-hats and ghost notes. Good samples matter too. Playing the part on pads and fixing only the worst hits gives the most natural result.
How do I adjust velocity and timing so MIDI drums groove?
Change velocity first: make every other hi-hat a little softer, about three quarters of full height, and keep the kick and snare strong. Then move only a few hits a hair off the grid, the snare slightly late for a laid-back feel or the hats slightly early for drive, while the kick stays on the grid.
Does FL Studio have a humanize button?
Not one button called Humanize. The closest tools are the Channel Rack swing knob, the Piano Roll Quantizer (Alt + Q) with a groove template and a lower Start time, and the Randomize tool (Alt + R) with only its Levels section on, which varies the velocity of notes you already have. The graph editor’s Velocity and Shift tabs let you shape each step by hand.
Do you need a drum humanizer plugin?
No. FL Studio’s swing knob, the Quantizer’s groove templates and the Randomize tool vary timing and velocity for free, and most DAWs have humanize tools built in. If you want a dedicated plugin, HumBeat 3 plays your MIDI like a drummer with two hands and two feet, and Wide Blue Sound’s Humanizer Pro adds timing and velocity changes without overwriting your notes.
How do you humanize MIDI in Logic Pro?
Open the region in the Piano Roll, select the notes and choose Functions > MIDI Transform > Humanize. It randomizes position, velocity and length within the ranges you set, and the Select and Operate button applies it. Keep the ranges small, and select only the hats and percussion if you want the kick to stay tight.