
“The object is not to make art, but to be in the wonderful state which makes art inevitable.”
To record vocals in FL Studio, pick your audio interface’s ASIO driver in Options > Audio settings (F10), set a free Mixer track’s input to your mic’s mono input (like In 1) with External input only, and arm it. Then click record, choose Audio, into the playlist as an audio clip, and press play to sing over your beat; every take lands as a clip in the Playlist. You need Producer Edition or higher, or the free trial.
You’ve got a beat you love and a melody stuck in your head. Then you plug in a mic, press record and hear your own voice a split second late in your headphones. Or you hear nothing at all, and the take comes out silent.
That’s almost never the mic. It’s one of a few settings, and once they’re right you won’t touch them again. Below is the setup used by Max, the founder of Mix Elite, click by click, with screenshots from his own videos. It ends with the part most guides skip: recording several takes and stitching the best lines into one vocal.
Table of Contents
What do you need to record vocals in FL Studio?
You need FL Studio Producer Edition or higher (the free trial works too), a microphone, an audio interface to plug it into and closed headphones, plus a quiet corner to sing in. Fruity Edition can’t record audio.
Here’s what each one does:
- FL Studio Producer Edition or higher. Recording audio is a Producer Edition and up feature, so Fruity Edition can’t do it. The free trial can, because it has every feature unlocked; it just can’t reopen projects you saved.
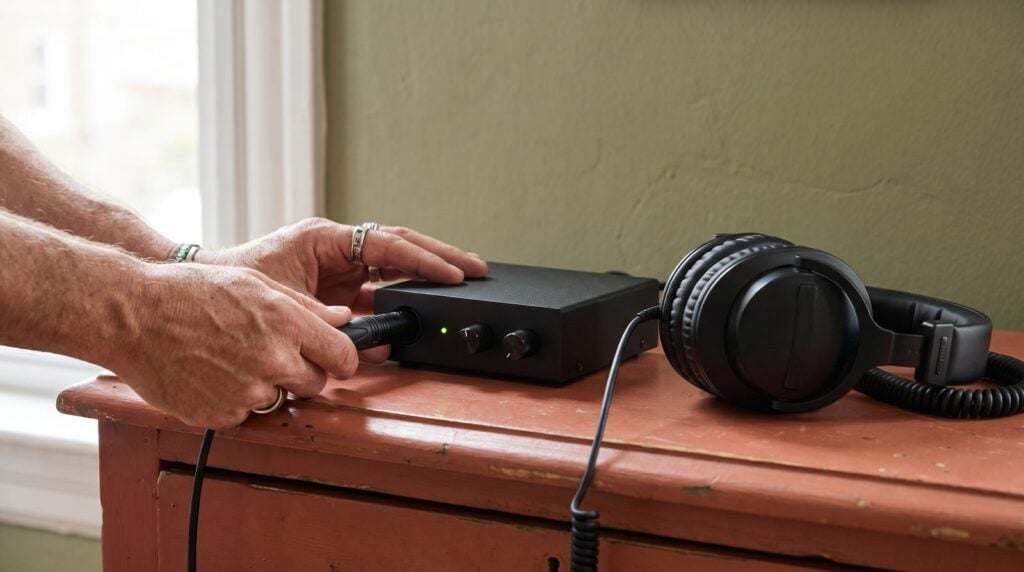
- A microphone and an audio interface. The interface is the small box your mic plugs into. It turns the mic’s signal into audio your computer can record. Still shopping? Start with our picks of vocal microphones for singers.
- Closed headphones. Speakers would leak the beat back into your mic, so you listen on headphones while you sing.
- A quiet corner. The room, where the mic goes and how loud to set it are a topic of their own, covered in our vocal recording tips. This guide is only the FL Studio side.
How to record vocals in FL Studio in 6 steps
Load your beat into the Playlist and set FL Studio’s tempo to its BPM. Then pick your interface’s ASIO driver, give a free track your mic’s mono input with External input only, arm it, turn on the count-in, and record into the Playlist as an audio clip. The first three steps are one-time setup.
A normal session is then just steps 4 to 6: arm, count in, record. The video shows the whole setup in under three minutes, then moves on to autotune. Watch it once, then follow along with FL Studio open.
Step 1: Choose your audio interface’s ASIO driver
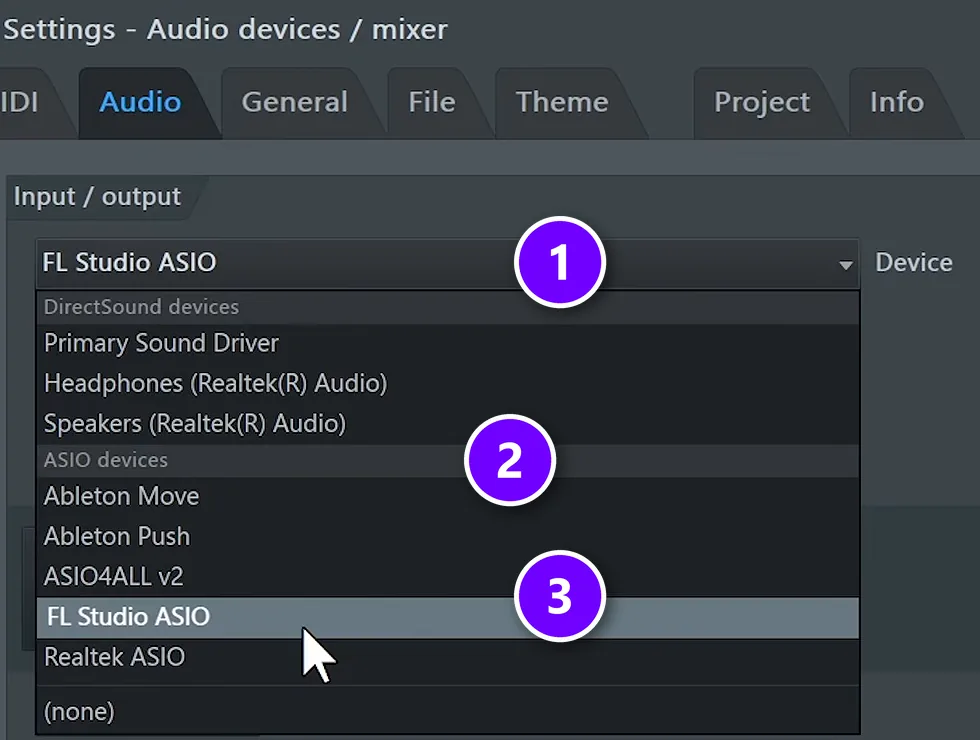
Open Options > Audio settings in FL Studio, or press F10. Open the Device menu (1) and look under ASIO devices (2). ASIO is driver software that lets FL Studio talk to your interface with very little delay. Choose the one with your interface’s name in it.
Don’t see it? Search for your interface’s ASIO driver and download it from the maker’s website. Until then, ASIO4ALL v2 or FL Studio ASIO (3) will do. Image-Line’s audio settings manual ranks them in that order: your interface’s own driver first, then ASIO4ALL, then FL Studio ASIO, which can add timing jitter to recordings.
On a Mac, your interface shows up in the same Device menu, usually with nothing to install. macOS also has to allow FL Studio to use the microphone in its privacy settings, or FL Studio won’t hear your mic.
Step 2: Add a vocal track and pick your mic’s mono input
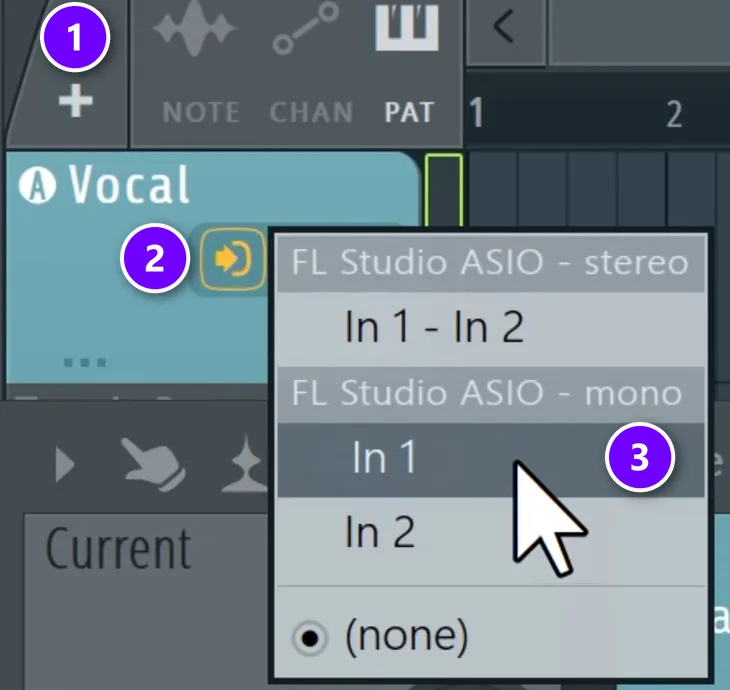
Right-click the + above the Playlist’s tracks (1). FL Studio adds a Playlist track linked to its own Mixer track, so a name you give one shows up on the other. Call it Vocal.
Now click the input button on the track (2). The list shows stereo pairs at the top and single mono inputs below. A mic is one channel, so pick the mono input it’s plugged into, like In 1 (3). Max’s rule: “you always want to choose the mono one.” A mono input puts your voice on both sides, right in the middle. Pick the stereo pair by mistake and your vocal comes out of one ear only.
The same input menu sits at the top of the Mixer track’s panel. Choosing an input there arms the track for you, too.
Never record on the Master track. Use a free Mixer track, like the Vocal track here, so FL Studio records your mic and nothing else.
Step 3: Record dry with External input only
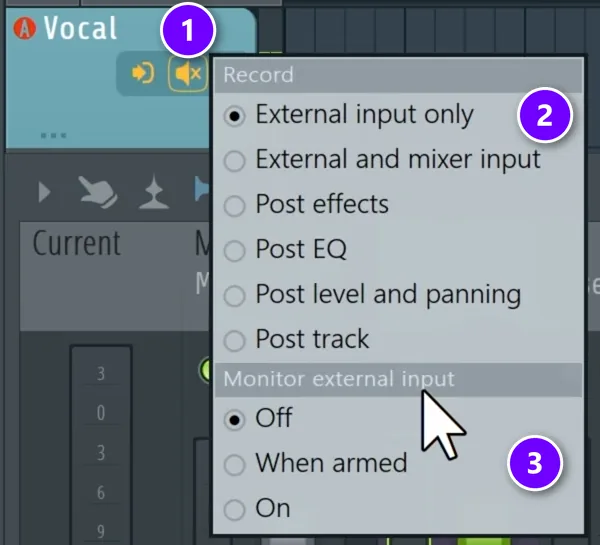
As soon as you pick an input, FL Studio asks if you want to switch to External input only to avoid recording internal audio on this track. Click Yes. You can check the setting any time behind the speaker icon next to the input (1).
External input only (2) records your raw voice and nothing else. The options below it, like Post effects and Post EQ, run your voice through the track’s plugins and bake them into the take. Record dry almost every time, for a good reason: a dry take keeps every choice open. You can change the EQ, reverb or autotune tomorrow, but you can’t pull a printed effect back out.
Under Monitor external input, choose When armed (3) to hear yourself in your headphones while the track is armed. Leave it on Off if your interface has its own direct monitoring, so you don’t hear yourself twice.
Step 4: Arm the track
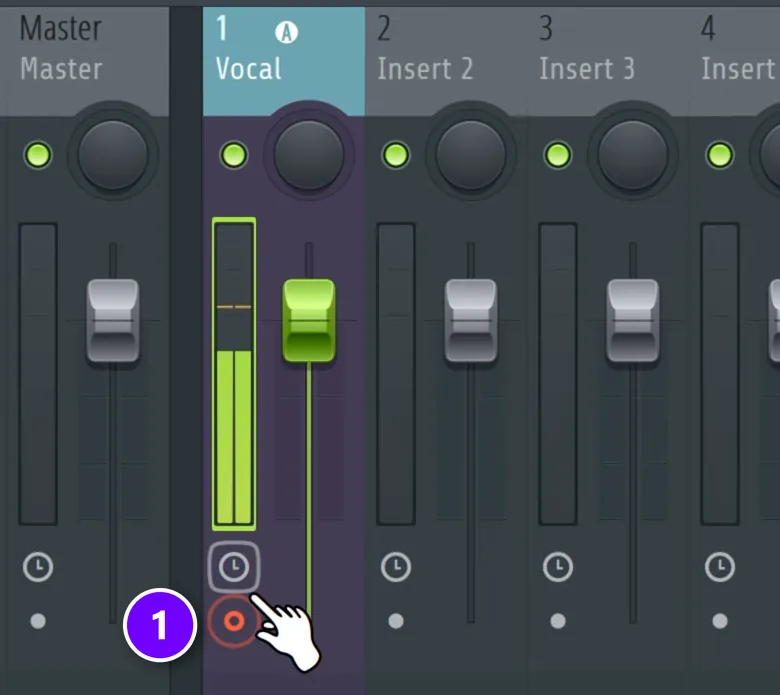
Click the round button at the bottom of the Vocal Mixer track (1). That’s called arming. The track is now ready to record, and its meter should jump when you talk into the mic. The small red dot on the Playlist track does the same job.
Before the first take, sing the loudest line of the song and watch that meter. If it hits red, turn the gain knob on your interface down. The warning in Mix Elite’s free 4.5-hour FL Studio course: a level that’s too high causes clipping, and it doesn’t sound good. The full gain routine is in our vocal recording tips.
Step 5: Turn on the metronome and count-in
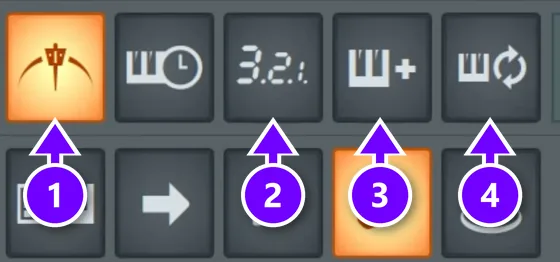
Next to the tempo at the top of FL Studio sits a row of recording buttons. These four matter for vocals:
- Metronome (1), Ctrl + M: a click on every beat that keeps you in time. Keep your headphones quiet enough that the mic can’t pick it up.
- Countdown before recording (2), Ctrl + P: FL Studio counts you in before it records. Right-click it to choose how many bars.
- Blend recording (3), Ctrl + B: when you loop-record, you hear your earlier passes under the new one. Turn it off to mute them.
- Loop recording (4): records the same section again and again, one take per pass. More on that below.
Use the countdown and the metronome for vocals, so every take sits in time with the beat. One more check: right-click the big record button and make sure Audio is ticked in the recording filter. If it isn’t, FL Studio can record your notes and knob moves but not your voice.
Step 6: Record into the Playlist (or into Edison)
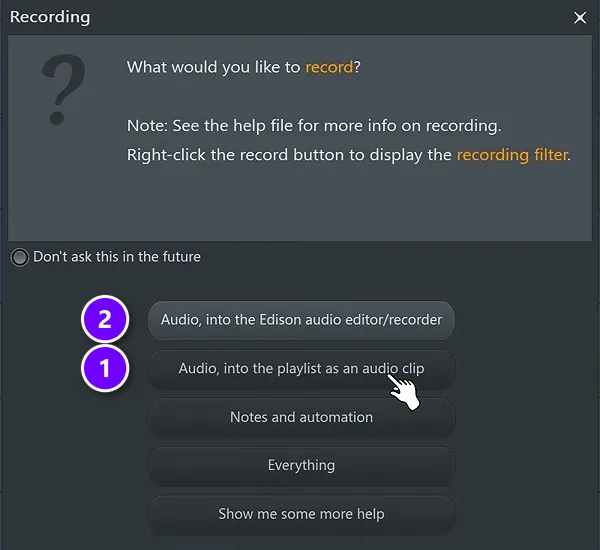
Check that FL Studio is in SONG mode, using the PAT/SONG switch left of the play button. Then click the record button or press R. FL Studio asks what you’d like to record: choose Audio, into the playlist as an audio clip (1). Max’s pick: “the best for recording overall I would say is audio into the playlist as an audio clip,” because you can see every take right there in your song.
Press play with Space, wait for the count-in and sing. Press stop when you’re done. The take shows up as an audio clip on the Vocal track. FL Studio saves it as a WAV file in Documents\FL Studio\Audio\Recorded, unless you right-click the track’s record button first and choose your own name and folder.
The option above it, Audio, into the Edison audio editor/recorder (2), records into Edison, FL Studio’s wave editor. Edison keeps the recording in your computer’s memory, so it suits short takes you want to edit right away. For a whole song the Playlist is the safer pick, and Image-Line’s recording manual recommends it for anything longer than about 15 minutes.
Always record into the Playlist? Tick Don’t ask this in the future in that dialog. Alt-click the record button whenever you want the question back.
Newer versions also have a one-click route: the microphone button in the toolbar. Choose the Playlist option there and pick your input. FL Studio builds the audio track for you and starts recording after a 4-beat count-in.
How do you fix latency when recording vocals in FL Studio?
Latency is the delay you hear because your voice passes through the computer’s audio buffer before it reaches your headphones. Fix it with your interface’s own ASIO driver, a smaller buffer (256 samples, about 6 ms, in the video), a light project with heavy effects off, wired headphones, or your interface’s direct monitoring.
A little latency is normal. Too much, and you start singing behind the beat without noticing.
Fix latency in FL Studio, step by step
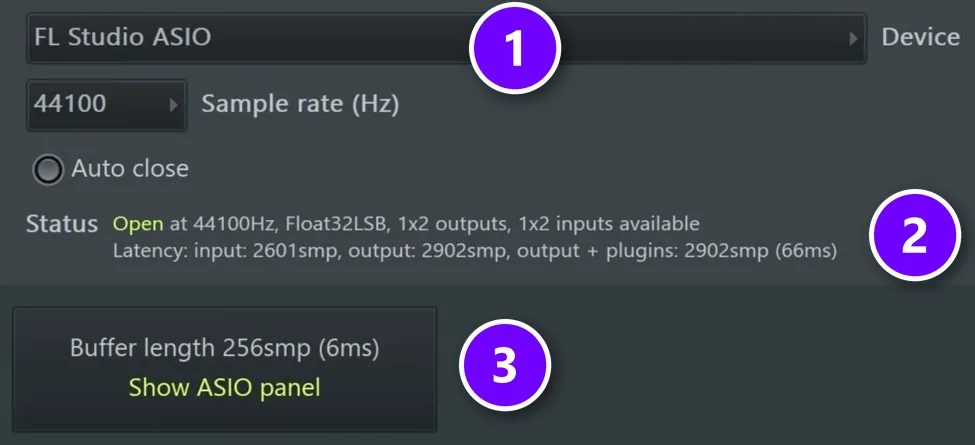
Work through these fixes in order:
- Use wired headphones. Bluetooth adds its own delay, anywhere from 34 to 300 ms according to BandLab, while wired headphones sit around 5 to 10 ms. No FL Studio setting can remove it.
- Use your interface’s own driver (1), as in Step 1. FL Studio ASIO is the handy choice, not the fast one.
- Lower the buffer length (3). Click Show ASIO panel and choose the smallest buffer that plays without crackles. In the video, the buffer goes from 512 down to 256 samples, about 6 ms, and Image-Line calls 10 ms a good target on Intel and AMD computers. The Status line (2) shows the total delay FL Studio measures, so check it after every change.
- Record in a separate project. A big project full of plugins can’t run at a tiny buffer, so this is the first fix in Mix Elite’s free FL Studio course. Export your beat as a WAV, load it into a new empty project, record there, then drag the finished takes into your song.
- Switch off heavy effects while you record. The free course disables the effects on busy Mixer tracks for the vocal session and turns them back on afterwards.
- Use direct monitoring. If your interface has a direct monitor switch or knob, use it and set Monitor external input to Off. You hear your voice straight from the interface, with no delay you can hear.
Don’t worry about the recorded clip itself landing late. With Latency compensation on (Mixer menu > Disk recording), FL Studio removes the buffer delay from the recording. It fixes the file, not what you hear, which is why the steps above still matter.
Why are my recorded vocals so quiet?
Usually it’s a setting, not your voice. A condenser mic needs +48V phantom power, the mic must go into a mic (XLR) input, any pad button should be off, and you have to sing into the front of the mic. Raw takes also look small next to a finished beat, which is normal: you raise them later.
Check these in order:
- No phantom power. A condenser mic needs the +48V button on your interface. Without it you get little or no signal, as PreSonus points out, and phantom power only travels through an XLR cable.
- The wrong input or cable. Plug the mic into a mic (XLR) input. A line input expects a much stronger signal, so a mic plugged into it records very quietly.
- A pad switched on. A pad turns the input down for very loud sources, so your voice needs much more level to show up. Switch it off for vocals.
- Singing into the wrong side. The front of a studio mic can be misleading, and Max sees people get it wrong all the time. Find the front, then keep the mic at mouth level, about one or two fists away.
- It’s simply raw. Recordings are usually made around -24 to -12 dB, far below 0 dB, to leave room for mixing. Compression and gain bring the vocal up later, so don’t crank the interface gain to match the beat: that raises the noise and risks clipping.
How do you record vocals in a bedroom without echo or noise?
Pick the quietest spot you have, switch off fans and air conditioning, and surround the mic with soft, heavy things instead of bare walls. Even a closet works. Then sing close, one or two fists from the mic, so it hears more of you and less of the room.
Mix Elite’s free 4.5-hour FL Studio course spends its vocal lesson on exactly this, because a good mix starts with a clean recording. Its checklist:
- Quiet first. No fans and no air conditioner blowing air into the mic. The space can be small, as long as it’s quiet.
- Kill the echo. Shelves with books, sofas, carpets and mattresses soak up and scatter sound. No space like that? A small vocal booth, a cube that sits around the mic, shields it from the room.
- Pick the right mic for your room. A condenser catches every detail of your voice but also the room. A dynamic mic picks up mostly what’s in front of it, so it’s more forgiving when the room isn’t perfect.
- Use a stand, a pop filter and a shock mount. Never hold a condenser mic in your hand while you record.
- Keep the same distance. Mouth level, one or two fists away, and try not to move, because the mic hears your voice differently as the distance changes.
Any noise left in the quiet gaps between lines gets cut out when you comp, below. For the full routine, see our vocal recording tips.
How to record more takes, loop-record and punch in
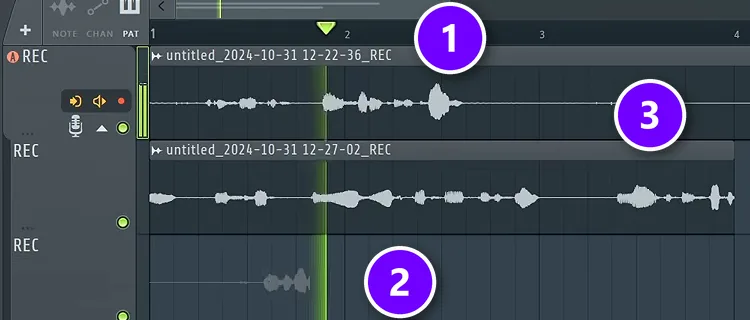
One take is rarely the keeper. Record the same part a few times, and FL Studio stacks each new pass on its own lane under the Vocal track (2), leaving the earlier takes (3) untouched. As Max puts it, “you don’t have to delete anything, you can just play it again and it will add the recording.” To start from a different spot, click the bar ruler (1) where you want playback to begin.
Loop one section until you nail it
Hold Ctrl and drag along the bar ruler to select the section, plus one bar before it as a run-up. Turn on Loop recording, arm the track and press play. FL Studio plays the selection over and over and saves a new take on every pass, and with Blend recording off the earlier passes stay muted while you sing. Stop when you’ve got it.
That extra bar isn’t only for you. The recording manual notes that the first few milliseconds after each loop restart can glitch on some systems. Start singing after the run-up and the glitch never lands on your voice.
Punch in on one line
To redo one word or line without touching the rest, use two time markers. Right-click the bar ruler just before the line and choose Add marker. Then right-click the marker and set it to Start recording. Add a second marker right after the line and set it to Stop recording.
Now start playback a few bars earlier. You hear the run-up, and FL Studio only records between the two markers, as the Playlist manual describes. The new take lands on its own lane, so the old line is still there if the new one isn’t better.
How to comp vocal takes in FL Studio
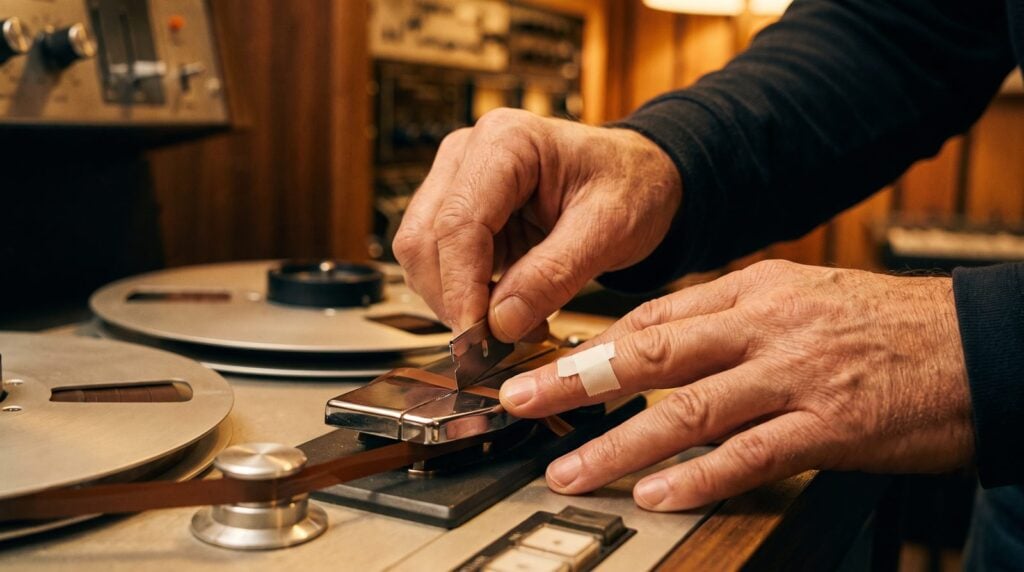
Comping means building one vocal out of the best pieces of several takes. Engineers used to do it with tape and a razor blade. In FL Studio it takes two Playlist tools, so record a couple of takes even when the first one sounds perfect, just to have the choice.
Slice, mute and fade your takes
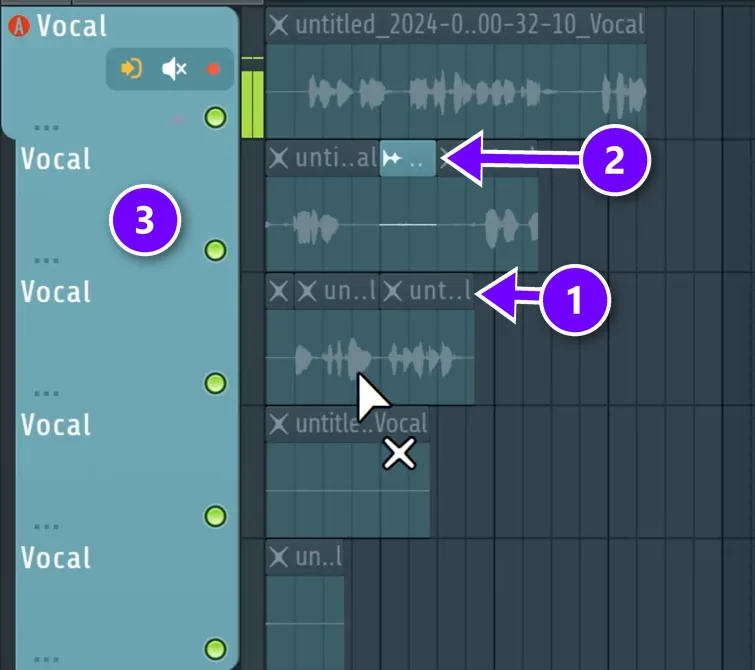
- Listen to every take of one section (3) and note the best version of each line.
- Pick the Slice tool (C) and cut the takes where the lines change, ideally in a breath or a short gap.
- Pick the Mute tool (T) and click every piece you don’t want. Muted pieces get an X and go dim (1). The piece you keep stays bright (2).
- Cut out long silences between lines and delete them. A condenser mic picks up room noise, and in a quiet gap that noise is all you’d hear.
- Hover over the top corner of each piece until you see the pinch hand, then drag to fade it in or out, so the cuts don’t click.
- Select the pieces you kept and press Ctrl + Alt + C to consolidate them into one clean audio clip. FL Studio mutes the pieces it used, so nothing is lost.
Takes recorded minutes apart rarely match in loudness, because your distance from the mic and your energy change. Even them out with volume automation before you start mixing. It’s the V in the vocal chain below.
Why do raw vocals sound flat and disconnected from the beat?
Because the beat is already mixed and mastered, and your raw take isn’t. A dry vocal has no EQ, compression or space yet, so it sits on top of the music instead of inside it. That’s normal, and the vocal chain below fixes it.
Don’t try to fix it while recording by adding effects to the input. Record dry, comp the best take, then mix.
What effects should a beginner vocal chain have?
A beginner vocal chain needs five steps, in this order: even out the volume, EQ, compression, a de-esser for harsh S sounds, then reverb and delay on sends. Mix Elite’s free FL Studio course calls it the V.O.C.A.L. chain, and FL Studio’s own plugins cover every step. Pitch correction, if you use it, goes in before the EQ.
- V: Volume automation. Even out the loud and quiet lines first, because a compressor only works on what goes over its threshold.
- O: Optimize with an EQ. A steep low cut so nothing under about 100 Hz is left, then shape the body and the presence. Pull harsh spots down by only 2 to 3 dB.
- C: Compression. Fruity Limiter in COMP mode at about 4:1, with the threshold set so every word is equally audible. Then raise the gain 1 dB at a time until the vocal sits just above the beat.
- A: Attenuate harshness. Tame ear-piercing S sounds with a de-esser, or with Maximus on the 4 to 6 kHz range. Keep a little bite, just not the painful part.
- L: Layer with effects. Reverb and delay on their own send tracks, with the low end cut and the reverb ducked under the dry vocal.
To fix the pitch, see how to tune vocals in FL Studio, which covers Newtone, Pitcher and free tuners; the second half of the video above covers autotune settings. For the cleanup steps, our guide to treating vocals in FL Studio walks through noise removal, de-essing and compression.
Want it bigger? Record a few extra passes while the mic is still set up, then follow our double tracking guide to layer them under the lead. The full vocal mixing guide takes every step further.
Set it up tonight, record three takes of one verse and comp the best lines. Do that a couple of times and the whole routine stops feeling technical.
DAY 5 OF THE 7-DAY MUSIC PRODUCER COURSE
Got your takes? Day 5 shows you how to make them sound finished.
Day 5 of Mix Elite’s 7-Day Music Producer Course covers recording and mixing vocals: setting up your room, the best recording equipment for every budget, the V.O.C.A.L. mixing formula and 10 copy-and-paste vocal processing chains, plus practice acapellas if you don’t have a singer yet. It’s taught in FL Studio (the free trial works), about 45 minutes a day, and on day 7 a pro gives you personal feedback on your finished track. It’s $27, and you get 60 days to decide if it was worth it.
Frequently asked questions
Why is there a delay in my headphones when I record vocals?
That’s latency: your voice goes through the computer’s audio buffer before you hear it. Choose your interface’s own ASIO driver in Options > Audio settings, lower the buffer to the smallest size that plays without crackles, record in a light project with heavy effects off, and use wired headphones, since Bluetooth adds 34 to 300 ms on its own. Direct monitoring on your interface removes the delay you hear completely.
Why are my recorded vocals so quiet?
Check the setup first: a condenser mic needs +48V phantom power through an XLR cable, the mic belongs in a mic input rather than a line input, any pad should be off, and you need to sing into the front of the mic. A raw take also looks small next to a finished beat. That’s normal, and compression and gain bring it up when you mix.
How do I record vocals in my bedroom without echo?
Find the quietest spot, turn off fans and air conditioning, and get soft, heavy things around the mic: a closet full of clothes, a mattress, blankets or a small vocal booth. Sing one or two fists from the mic and keep that distance. A dynamic mic is more forgiving in an untreated room than a condenser.
What effects should I put on my vocals as a beginner?
Use five, in this order: volume automation to even out the takes, an EQ, a compressor at about 4:1, a de-esser for harsh S sounds, and reverb and delay on sends. That’s the V.O.C.A.L. chain from Mix Elite’s free 4.5-hour FL Studio course, and FL Studio’s stock plugins can do all of it. Add pitch correction before the EQ if you need it.
Can you record vocals in FL Studio Fruity Edition?
No. Recording audio, into the Playlist or into Edison, needs Producer Edition or higher, according to Image-Line’s edition comparison. The free trial has every feature, so you can record vocals in it, but the trial can’t reopen projects you saved. If you’re testing with the trial, finish and export your song in one sitting.