


“People felt like I was using it to sound good. But I was just using it to sound different.”
To tune vocals in FL Studio, open the vocal clip’s menu and choose Pitch-correct sample to load Newtone. Set your song’s scale with Snap to scale, select all the notes, turn Center all the way up and Variation down to about 9 o’clock, then fix any odd notes by hand for a natural sound.
When you learn how to tune vocals in FL Studio, the goal is simple: fix the flat notes without losing the emotion that made the take great. Sometimes you want nobody to notice the tuning at all; other times you want that hard, robotic sound on purpose. Below is how to do both, the way Max, the founder of Mix Elite, teaches it in Mix Elite’s tutorials, with screenshots from those videos. You’ll also see how Pitcher compares, the settings for natural-sounding autotune and two free tuners worth trying.
Table of Contents
What does vocal tuning do?

Vocal tuning, also called pitch correction, moves notes that are a little sharp (too high) or flat (too low) onto the right note. Most songs you hear on the radio use some. Done gently, nobody notices it. Pushed hard, it becomes the robotic autotune sound you hear in a lot of trap and pop.
There are two ways to do it. An autotune plugin listens to the voice while it plays and pulls each note to the closest note in your scale, all on its own. A graphic editor, like Newtone or Melodyne, shows every syllable as a note you can move, cut or reshape by hand. The second kind is the more powerful one: a note editor can do everything a simple autotune plugin does, but an autotune plugin can’t do what a note editor like Newtone can.
Newtone or Pitcher: which FL Studio tuner should you use?
Use Newtone, FL Studio’s note editor, for lead vocals that should sound natural: you fix each note by hand, the way you would in Melodyne. Use Pitcher, the real-time autotune, for the hard autotune effect and for letting the singer hear a tuned voice while recording.
- Newtone: shows every note so you can fix it by hand. It’s best for natural, polished vocals. You open it from the audio clip, and its extra tricks are formant, vibrato and timing edits.
- Pitcher: tunes the voice live while it plays. It’s best for hard autotune and live use. You open it in a mixer track’s effect slot, and its extra trick is harmonies played from MIDI.
Mix Elite’s workflow follows the pros. The singer often records with autotune on, so they hear a tuned voice in their headphones while they sing. The real tuning happens afterwards, in an editor like Newtone. For a finished vocal that sounds natural, that’s where you’ll spend most of your time.
Both tuners come with FL Studio Signature Bundle and up, according to Image-Line’s edition comparison. The free trial has every plugin too. In Producer Edition, as Mix Elite’s free course points out, Newtone works as a demo: you can use it, but it can’t export the tuned vocal.
How to tune vocals in FL Studio with Newtone, step by step
To tune vocals in FL Studio, open the vocal in Newtone, set your song’s scale, turn Center all the way up and lower Variation to about 9 o’clock. Then check it with the beat, fix single notes by hand and send the tuned vocal back to the Playlist.
Here are the six steps from Mix Elite’s Newtone tutorial:
- Open the vocal clip’s menu and choose Pitch-correct sample.
- Set your song’s scale and turn on Snap to scale.
- Select all the notes, turn Center all the way up and lower Variation to about 9 o’clock.
- Listen with the beat, using Slave playback to host.
- Fix single notes by hand, and leave breaths alone.
- Send the tuned vocal back to the Playlist.
Watch the whole process here, then follow the details for each step below:
Step 1: Open the vocal in Newtone
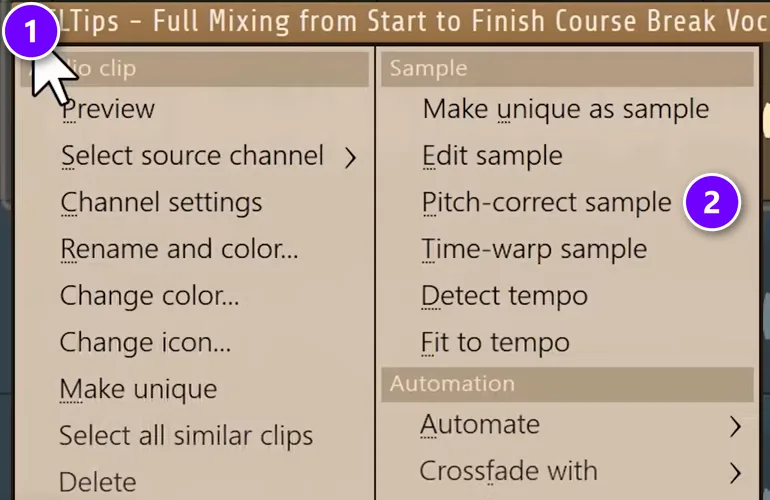
Make sure the whole vocal sits in one clip in the Playlist. If it’s in pieces, consolidate it first, which means joining the pieces into one audio clip. Then click the small icon in the top-left corner of the clip (1) and choose Pitch-correct sample (2). Newtone opens and turns the vocal into notes on a piano roll, about one for every word.
Each note shows an orange line, the pitch the singer really sang, inside a box that marks its average. Where a note is off, a shaded orange area shows where Newtone thinks it should be. Most of the time, Newtone guesses the target note right.
Step 2: Set your song’s scale
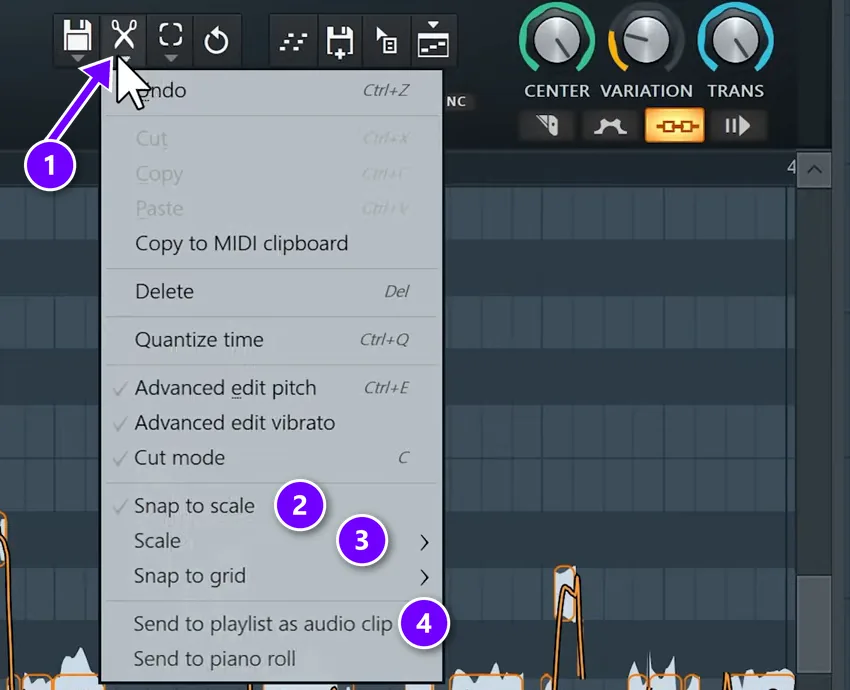
Open Newtone’s Edit menu, the scissors icon (1). Go to Scale (3) and pick the key and scale of your song. Then turn on Snap to scale (2). Now any note you move can only land on a note that fits the song.
Don’t know the key? In Mix Elite’s free course, the vocal goes into an online key finder, the Tunebat analyzer at tunebat.com/analyzer, which shows C# minor for the practice vocal. Newtone only offers major and minor here, so pick the one that matches.
A vocal is almost always sung in the key of its beat. If whoever made the beat told you the key, start there. A wrong scale pulls good notes onto wrong ones and makes the vocal sound worse.
Step 3: Turn up Center, then lower Variation
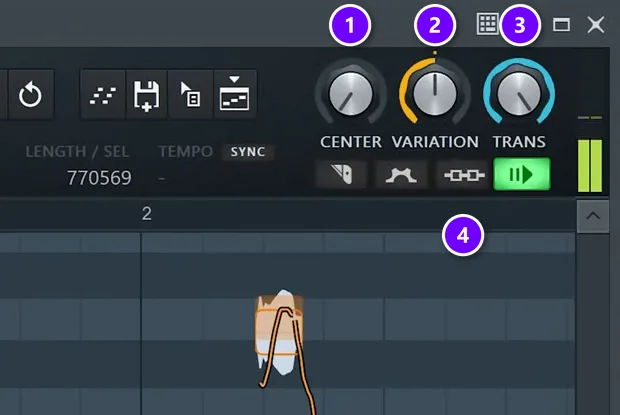
Select all the notes with Ctrl + A. The three knobs at the top right now do most of the work:
- Center (1) moves each note’s average pitch to the middle of its target note. Turn it all the way up almost every time.
- Variation (2) flattens the wobble inside each note. The lower you set it, the more the voice sounds like autotune.
- Transition (3), labeled TRANS, sets how smoothly the voice slides from one note to the next. Leave it alone.
Center is the safe one: on its own it doesn’t sound robotic at all, and the vocal sounds almost exactly the same as before. Variation is where the autotune sound comes from, so go easy. Max says: “I usually find myself going to about nine o’clock. It’s just a perfect sweet spot.” Don’t take Variation or Transition all the way down to 0%, unless you want to sound like a robot.
Step 4: Listen to it with the beat
A tuned vocal can sound fine on its own and wrong in the song, so always check it with the beat. Detach the Newtone window so it stays on screen while you work in the Playlist, then turn on Slave playback to host, the third button under the knobs (4). Right-click that button and tick Ignore host selection. Mute the original vocal in the Playlist, press play, and you hear Newtone’s version over your beat.
Step 5: Fix single notes by hand
Play the vocal through and listen for anything that still sounds off. Drag a note up or down to change its pitch. If one long note holds two words and only one should move, press C for Cut mode and click where you want to split it. Hold Alt to cut or move without snapping to the grid.
If everything sits a little high, like the trap vocal in the video, select all and move the whole lot down together. Leave breaths and tiny sounds between words alone, because tuning them makes them sound digital.
For timing, skip Quantize time. It pulls every note onto the grid and kills the groove. Instead, hover over the edge of a note, hold Alt and drag it a little left or right.
Step 6: Send the tuned vocal back to your song
When it sounds right, open the Edit menu again and choose Send to playlist as audio clip, number 4 in the Step 2 picture. The tuned vocal lands in the Playlist as a new clip, ready to mix. Then mute or delete the original so you don’t hear both.
Newtone advanced edit: volume, formant and vibrato
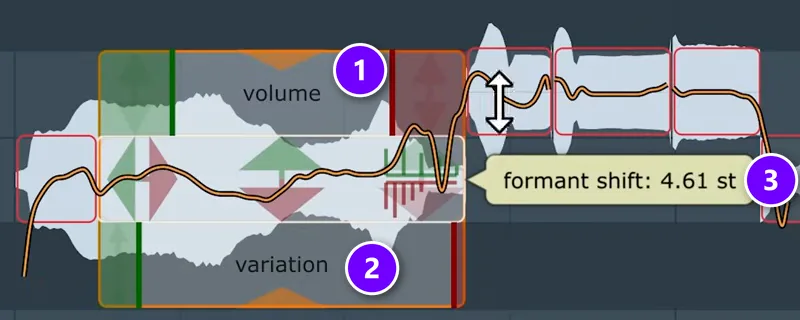
Turn on Advanced edit pitch in the Edit menu, or press Ctrl + E, and each note gets its own handles. This is where Newtone does things a simple autotune can’t:
- Volume (1): drag the top handle to make one word louder or quieter. The video rarely uses it and prefers volume automation.
- Variation (2): the bottom handle sets the wobble of one note, so you can calm down a shaky long note and leave the rest alone.
- Formant shift (3): drag the arrows on a note’s edge to make the voice sound bigger and deeper, or smaller and thinner, without changing the pitch. Shift a whole vocal down for a more masculine sound.
- Vibrato: Advanced edit vibrato adds a wobble to a long, flat note. You set how fast and how deep it goes.
- Transitions: small handles between notes make the voice slide into the next note, like the Transition knob but for one spot only.
One more trick from the video: Copy to MIDI clipboard puts the vocal’s melody into the Channel Rack as notes. Load a synth on it and it plays along with the singer, which can make a house or EDM vocal hook sound much bigger.
How to use Pitcher for real-time autotune in FL Studio
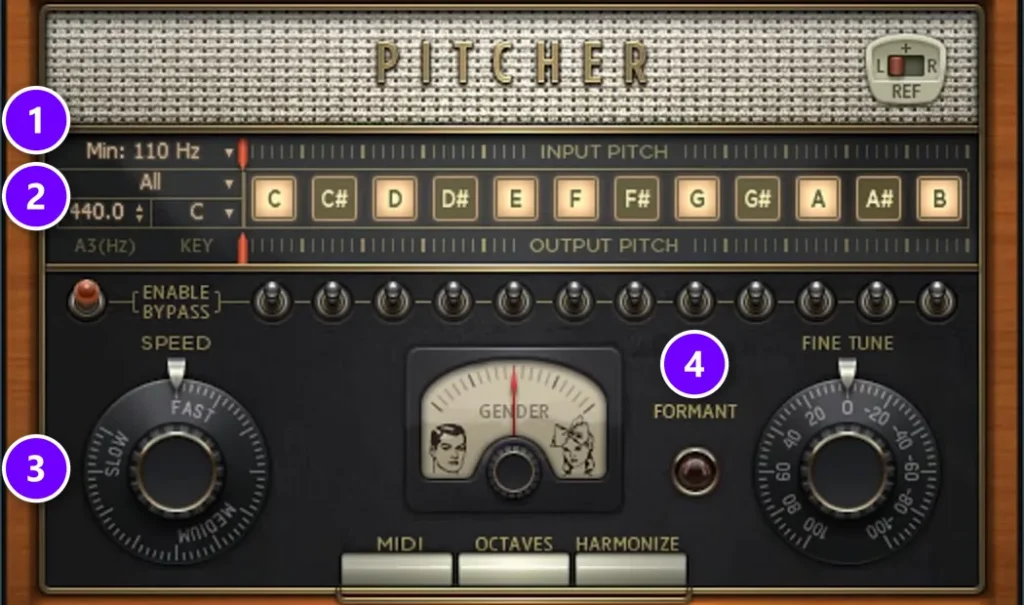
Pitcher is FL Studio’s live autotune. It sits in an effect slot and tunes the voice while it plays, so you hear the result right away. Here’s how to set it up, with the settings from Image-Line’s own manual:
- Put the vocal on its own mixer track: select its channel and press Ctrl + L, or double-click the clip and pick a free track number in its settings. Load Pitcher in the first effect slot, before any reverb or chorus, because those make the pitch harder to read.
- Set Min (1) to the lowest note the singer reaches. The manual suggests 80 to 170 Hz for male voices and 170 to 220 Hz for female voices.
- Choose the scale and key (2). You can also click single note buttons to switch them off, and Pitcher will pull the voice to the closest note that’s still on.
- Turn Speed (3) toward Fast for the hard, robotic sound, or toward Slow for something more natural.
- Leave Formant (4) on. It keeps the character of the voice when the pitch moves. Switched off, you get the squeaky helium sound.
Pitcher can also build harmonies. In Harmonize mode, up to four notes you play on a MIDI keyboard or in the Piano roll each turn into a tuned copy of the voice.
Live autotune is mostly for recording, so the singer hears a tuned voice. Pitcher gives you one speed control for the whole vocal, so for the final version, go back to Newtone or a dedicated autotune plugin.
Why do my tuned vocals sound robotic?
Tuned vocals sound robotic when the tuner pulls too hard or too fast: a retune speed near 0 ms, Newtone’s Variation or Transition at 0%, or a wrong key dragging good notes around. Slow the correction down, keep Variation near 9 o’clock and check the key first.
Every tuner has its own robot switch. In Auto-Tune it’s Retune Speed, where 5 or 0 ms sounds like a robot. In Graillon it’s Smooth, which sounds robotic at 1 ms. In Newtone it’s Variation and Transition: at 0%, the voice turns completely robotic. Back those off a little and the human voice comes back.
Sometimes robotic is the point, because hard autotune is a sound people choose on purpose in trap and pop. If it isn’t what you want, the next section shows how to hide the tuning.
How to make autotune sound natural
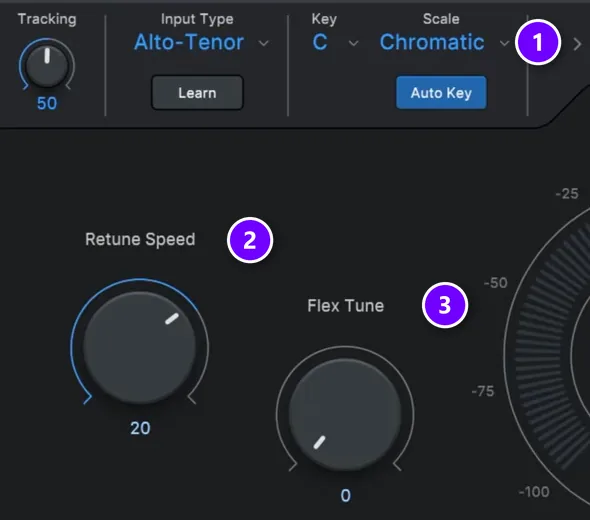
To make autotune sound natural, set the right key, slow the retune speed to around 20 ms or more, and add Flex Tune and Humanize so small, natural pitch moves come through. For the most natural result, tune by hand in a note editor like Newtone instead.
Most autotune plugins share the same few controls. The settings below come from Mix Elite’s video with Antares Auto-Tune, which it calls the industry standard, and Waves Tune Real-Time has close matches for each one.
- Set the key and scale first (1). Everything else depends on it, so check it twice.
- Pick the input type. For most male vocals, use Alto/Tenor. It changes the quality a lot.
- Set Retune Speed (2). It decides how fast notes get pulled into tune, in milliseconds (ms). The lower the number, the more robotic it sounds.
- Add Flex Tune (3). It lets quick little pitch moves through, so some realism comes back.
- Use Humanize on sung notes. It only works on long, held notes and eases off the tuning later in each note.
On Retune Speed, Max says: “The default 20 milliseconds is already pretty quick and will be definitely enough for most applications.” Going down to 5 or 0 ms makes you sound like a robot, and 10 ms gives a cool creative effect.
To hide autotune, go the other way on all three: a higher Retune Speed number, more Flex Tune and more Humanize. Max’s best advice is simpler, though: “the best way to hide your autotune is not using it at all,” and to tune by hand in an editor like Newtone instead. It’s more work, but you get more control and a more natural result.
How do you find the key of a beat for autotune?
Ask whoever made the beat, or drop the beat or the vocal into a free key finder such as Tunebat’s analyzer (tunebat.com/analyzer). Then set that key and scale in your tuner before you touch any other setting, because every note gets pulled toward it.
Setting the key is the first and most important step in any autotune plugin, and Mix Elite’s autotune video starts there. If you own the Antares bundle, its Auto-Key plugin can sit on the instrumental for a few seconds and tell you the key. Newtone only offers major and minor, so pick whichever matches what the key finder says. If major and minor are new to you, our beginner’s guide to music scales explains them.
Then check it by ear. Play the tuned vocal with the beat: if good notes start jumping to strange ones, the key is wrong, so try again before you change anything else.
Why is autotune pulling notes to the wrong pitch?
A tuner always pulls a note to the closest note in your scale, so a sung note that’s more than halfway to the next one lands on the wrong note. Effects before the tuner, a wrong voice-range setting and notes outside the scale cause it too. Fix those spots by hand in Newtone.
Five things to check, even when the key is right:
- The singer was too far off. If a note sits closer to the wrong note than the right one, the tuner picks the wrong one. Move it by hand in Newtone.
- Effects come before the tuner. Reverb and chorus make the pitch harder to read, so load the tuner in the first effect slot, as Image-Line’s Pitcher manual advises.
- The voice range is set wrong. In Pitcher, set Min to the lowest note the singer reaches: 80 to 170 Hz for male voices, 170 to 220 Hz for female voices. In Auto-Tune, pick the right input type, like Alto/Tenor for most male vocals.
- The melody uses a note outside the scale. Choose which notes Pitcher may use with its note buttons, or fix that spot by hand in Newtone.
- The tuner hears clicks. In Auto-Tune, clicks and pops can come from the Tracking setting. In Mix Elite’s autotune video, a clean recording clicked at the 50% default and was clean at about 20 to 30.
Free vocal tuners that work in FL Studio
The best free vocal tuners for FL Studio are the free edition of Auburn Sounds’ Graillon, which Mix Elite’s free course calls the best free autotune, and MeldaProduction’s MAutoPitch from its free MFreeFXBundle. Both are free downloads for Windows and Mac.
FL Studio’s free trial includes Newtone and Pitcher with every feature, but the trial won’t reopen a project once you close it. If you’re on Fruity or Producer Edition, or you want a free tuner you can keep using, these two are worth a try. For more options, see our list of the best free autotune plugins.
Graillon by Auburn Sounds (free edition)
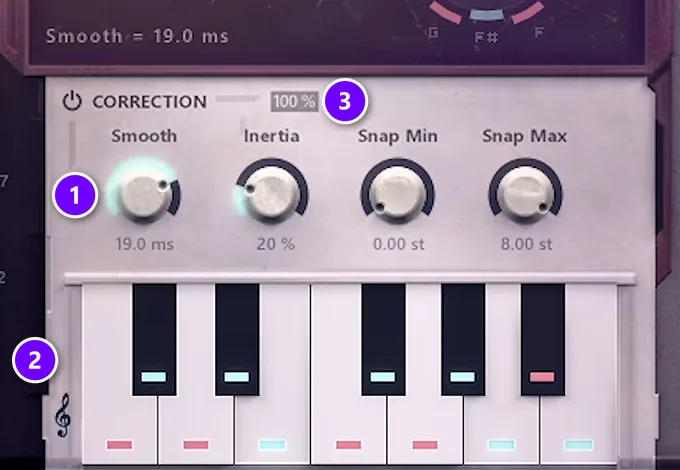
Mix Elite’s free FL Studio course calls Graillon the best free autotune, and its videos use Graillon 2. The current version from Auburn Sounds is Graillon 3, and its free edition still includes pitch correction, for Windows, macOS and Linux.
The setup from the videos: switch Correction on and leave it at 100% (3). Click the treble-clef icon (2) and pick your scale, or Graillon tries to snap the voice to every note there is. Then set Smooth (1), which works like retune speed. At 1 ms it sounds robotic, around 20 ms it’s soft, and the course settles on 10 ms.
One install tip: pick the VST3 version in the installer, not the FL Studio format, so other people can still open projects that use it.
MAutoPitch by MeldaProduction
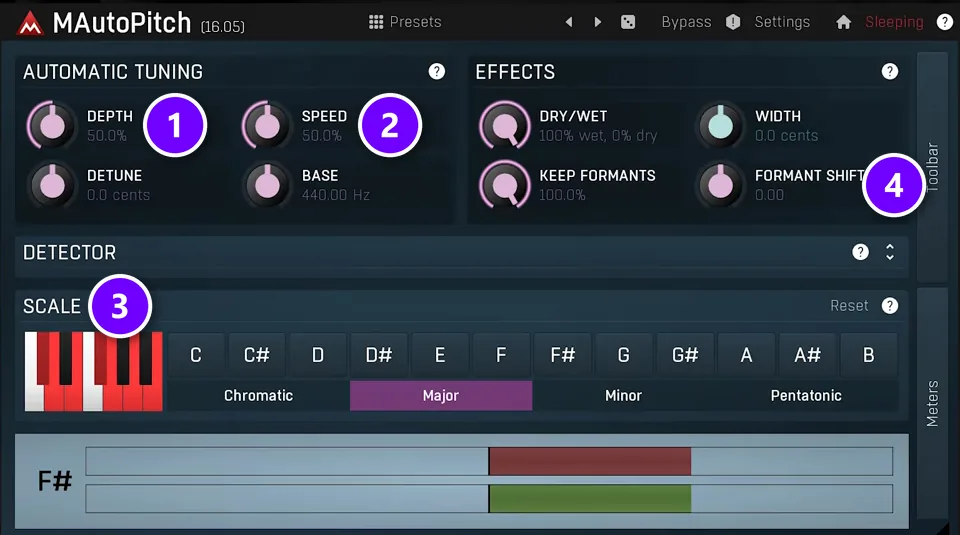
MAutoPitch is free as part of MeldaProduction’s free effects bundle, MFreeFXBundle. Depth (1) sets how hard notes get pulled into tune and Speed (2) sets how fast that happens. You pick your scale in the Scale section (3), and Formant shift (4) changes the character of the voice.
Mix Elite’s autotune video finds MAutoPitch good for formant shifting, but prefers Graillon for the tuning itself. Try both on your own vocal and keep the one you like.
Common vocal tuning mistakes
The biggest mistake is the wrong scale. If the key is off, the tuner drags good notes onto wrong ones and the vocal sounds worse than before. Check the key first, every single time.
- Tuning a vocal that already has effects on it. Tune the dry recording, because reverb and chorus confuse the pitch reading.
- Taking Variation or Transition to 0% by accident, which turns a natural vocal into a robot.
- Quantizing the timing of every note. Move single notes with Alt instead.
- Tuning breaths and the little sounds between words, which makes them sound digital.
- Judging the tuning with the vocal soloed. Always check it with the beat playing.
- Trying to fix a weak take with tuning. Record several takes first, so you can pick the best one.
That last one comes straight from Mix Elite’s free course: always record a couple of takes, even when you think one was perfect. Tuning makes a good take great. It can’t save a bad one.
What to do after tuning your vocal
Tuning comes early in a vocal mix. After it comes Mix Elite’s V.O.C.A.L. formula: volume, EQ, compression, taming harsh sounds and effects like reverb. Our guide on how to mix vocals in FL Studio with only stock plugins walks through that chain, and the full guide on how to mix vocals covers the rest. If you’re stacking harmonies on top, read how to mix background vocals next.
DAY 5 OF THE 7-DAY MUSIC PRODUCER COURSE
Tuning is step one. Day 5 shows you the whole vocal.
Day 5 of the 7-Day course is about recording and mixing vocals: setting up your room, the best recording equipment for every budget, the V.O.C.A.L. mixing formula and 10 copy-and-paste vocal processing chains, plus practice acapellas if you don’t have a singer yet. It’s taught in FL Studio (the free trial works), about 45 minutes a day, and on day 7 a pro gives you feedback on your finished track. It’s $27, and you get 60 days to decide if it was worth it.
Frequently asked questions
Does FL Studio have autotune?
Yes, two kinds. Pitcher tunes the voice live from a mixer slot, like classic autotune, and Newtone lets you edit every note by hand, like Melodyne. Both come with Signature Bundle and up, and the free trial has them too. In Producer Edition, Newtone runs as a demo that can’t export the tuned vocal.
How do I autotune my voice in FL Studio for free?
Put a free tuner, such as the free edition of Graillon or MeldaProduction’s MAutoPitch, on the vocal’s mixer track, set your song’s scale and adjust the speed. FL Studio’s free trial also includes Newtone and Pitcher, but the trial won’t reopen a saved project, so finish and export in one session.
Should you use real-time autotune or a manual editor for lead vocals?
For a lead vocal that should sound natural, use a manual editor: Newtone in FL Studio, or Melodyne, lets you fix each note by hand and can do everything an autotune plugin does. Real-time autotune like Pitcher is best for the hard autotune effect and for letting the singer hear a tuned voice while recording.
How do you make vocal tuning sound natural?
Correct gently. In Newtone, turn Center all the way up, keep Variation around 9 o’clock instead of 0% and leave Transition alone. In an autotune plugin, use a slower retune speed, around 20 ms or more, and add Flex Tune and Humanize. Always set the right key, and leave breaths untouched.
Should you tune vocals before or after mixing?
Before. Tune the dry vocal first, before EQ, compression and reverb, so the tuner hears a clean voice. Image-Line’s manual says to load Pitcher first in the effect chain for the same reason. Then mix the tuned vocal with the beat playing.