

Valhalla Space Modulator is the best free flanger VST in 2026: eleven modes, free on Windows and Mac. For beginners, Kilohearts Flanger has the simplest controls, Blue Cat’s Flanger is the best vintage-style pick, and FL Studio users already have Fruity Flanger and Fruity Flangus built in.
You’re four bars into a loop that sounds fine but flat, and you want something to move. A slow sweep on the hi-hats or a whoosh on the guitar before the drop can do it. The catch is that a flanger goes from exciting to cheesy fast, so the plugin you pick, and how hard you push it, really matters.
We checked every plugin on this list on its maker’s own website in October 2026. Some old favorites didn’t make it. They went paid, disappeared, or only run on old 32-bit systems. Below are the seven that work today, what each one is best at, and how to use a flanger without making your mix sound like a cheap demo.
Table of Contents
What is a flanger?

A flanger mixes a sound with a copy of itself that’s delayed by a few milliseconds, which are thousandths of a second. Then it keeps sweeping that delay a little longer and a little shorter. That moving sweep is the jet plane whoosh you know from rock guitars, house drums and old psychedelic records. You’ve heard it a thousand times.
As the two copies slide in and out of line, some frequencies cancel out and others get louder, and those gaps move up and down through the sound.
The name comes from the tape days. Engineers played the same recording on two tape machines and pressed a finger on the rim, or flange, of one tape reel to slow it down for a moment. Plugins do the same thing with a tiny delay. In FL Studio’s Fruity Flanger, the Delay knob only goes from 0 to 20 milliseconds.
A flanger is really a very short delay that moves, so its controls are close to a normal delay’s. Max, the founder of Mix Elite, explains Fruity Delay 3 in Mix Elite’s free 4.5-hour FL Studio course. He goes through the time, the delay mode and the feedback, and “also wet, because it’s the amount of effect applied.” If delay itself is new to you, read our guide to reverb vs delay first. On a flanger, you’ll usually see these six controls:
- Delay: the shortest gap between the two copies. Lower values give a deeper flange.
- Depth: how far the delay sweeps. At zero, the sound stops moving.
- Rate: how fast it sweeps, in hertz, which means sweeps per second.
- Feedback: sends some of the effect back into itself. More feedback makes it ring and whistle.
- Spread or Phase: offsets the left and right sides, so the sweep moves across your speakers.
- Mix or Wet: how much of the effect you hear next to the original sound.
Flanger vs chorus vs phaser: what’s the difference?
All three make a sound swirl, but they move different things. A flanger sweeps a very short delay, usually with feedback, so it sounds sharp and jet-like. A chorus uses a slightly longer delay to thicken a part, and a phaser shifts the phase with filters for a softer sweep. Here’s each one in a little more detail:
- Flanger: a very short delay that sweeps, usually with feedback. It sounds sharp, metallic and jet-like.
- Chorus: a slightly longer moving delay with little or no feedback. It sounds like several people playing the same part, so it thickens and widens more than it whooshes.
- Phaser: no delay at all. It shifts the phase of the sound with filters, so its sweep is softer and rounder than a flanger’s.
Some plugins can do more than one job. Turn off both Invert switches in Fruity Flanger and, as Image-Line’s manual puts it, the sound is more like a chorus than a flanger. Fruity Flangus stacks several flangers to make a part thicker, almost like a synth playing many voices at once. Gooper is a flanger and a phaser in one.
What are the best free flanger VST plugins?
The best free flanger VST plugins are Valhalla Space Modulator, Blue Cat’s Flanger, Kilohearts Flanger, MFlanger and Gooper. As a beginner, start with Valhalla Space Modulator for the sound or Kilohearts Flanger for the simplest controls. FL Studio users also get two flangers built in, covered further down.
Each pick below has what it does, what it runs on and who it’s for. We checked every price, platform and format on the maker’s own site in October 2026.
1. Valhalla Space Modulator (Valhalla DSP)
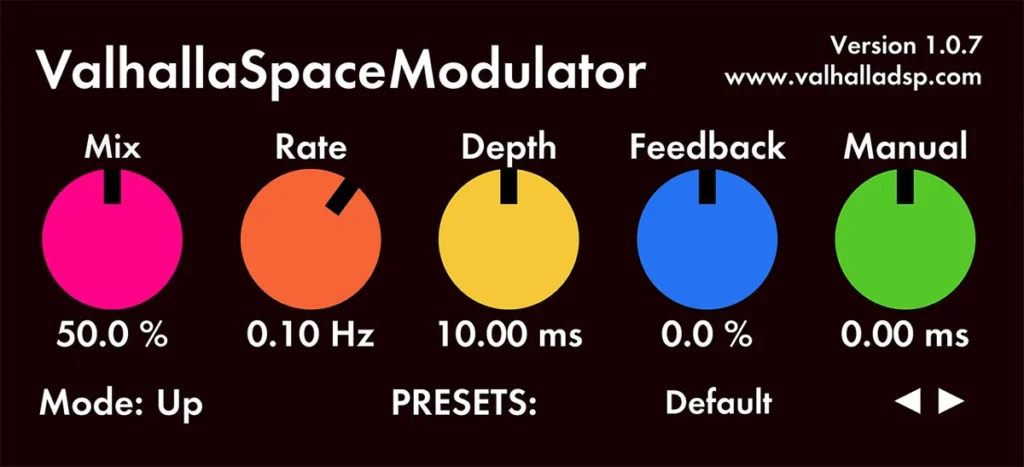
Valhalla DSP calls this “our take on flanging”, and it’s our top pick. Its eleven modes, which Valhalla calls algorithms, cover through-zero flanging, barberpole flanging, detuning, doubling and some strange echoes and reverbs. Through-zero is the classic tape sound, where the two copies cross over each other and cancel for a split second. Barberpole is a sweep that seems to rise or fall forever, like the stripes on a barber’s pole.
The face of the plugin is five big knobs: Mix, Rate, Depth, Feedback and Manual, plus a Mode menu and presets. Hover over any control and a short tip tells you what it does. The settings in Valhalla’s own screenshot make a good first sweep: Mix 50%, Rate 0.10 Hz, Depth 10 ms and no feedback.
It’s free for Windows 7 to 11 and for Macs from OS X 10.9 to macOS Tahoe, on Intel and Apple Silicon. You get 64-bit VST2, VST3 and AAX, plus AU on the Mac. VST3 is the newest plugin format, and FL Studio loads it on Windows and Mac. The current version is 1.2.8 on Mac and 1.1.6 on Windows.
Best for: wide, lush flanging on synths, pads and guitars, and doubling a part so it sounds bigger. Get it from Valhalla DSP.
2. Blue Cat’s Flanger (Blue Cat Audio)
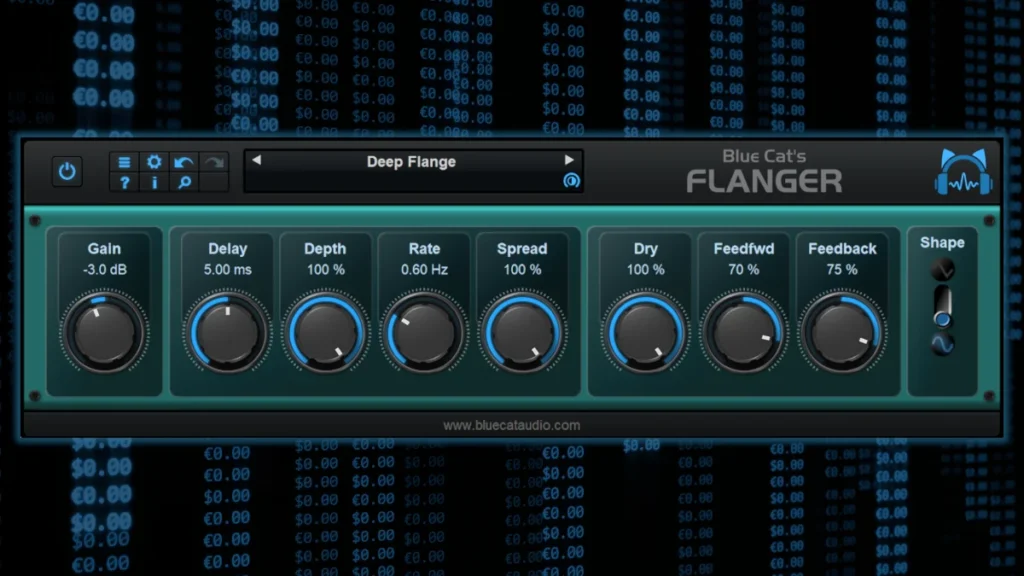
Blue Cat Audio calls it “The Free Vintage Flanger”, built after the flanger sound that was famous in the 70s and 80s. The knobs are plain and clearly labeled: Delay, Depth, Rate, Spread, Dry, Feedforward and Feedback, with a switch for a sine or triangle sweep. Push Spread and the sweep starts moving around your head in stereo.
It can sound smooth and soft or harsh and metallic, because the feedback can run in or out of phase. You get mono and stereo versions and a preset manager, and it uses no CPU while the track is silent. It’s freeware for Windows Vista to 11 and macOS 10.9 or newer, on Intel and Apple Silicon, as VST, VST3, AU and AAX. Blue Cat updated it to version 3.6 on October 2, 2026.
Looking for an MXR Flanger or Electric Mistress plugin? Those are classic guitar pedals from the 70s, and this vintage-style flanger is the most pedal-like free plugin on the list. Best for: guitars, drums and anyone who wants simple knobs. Get it from Blue Cat Audio.
3. Kilohearts Flanger (Kilohearts Essentials)
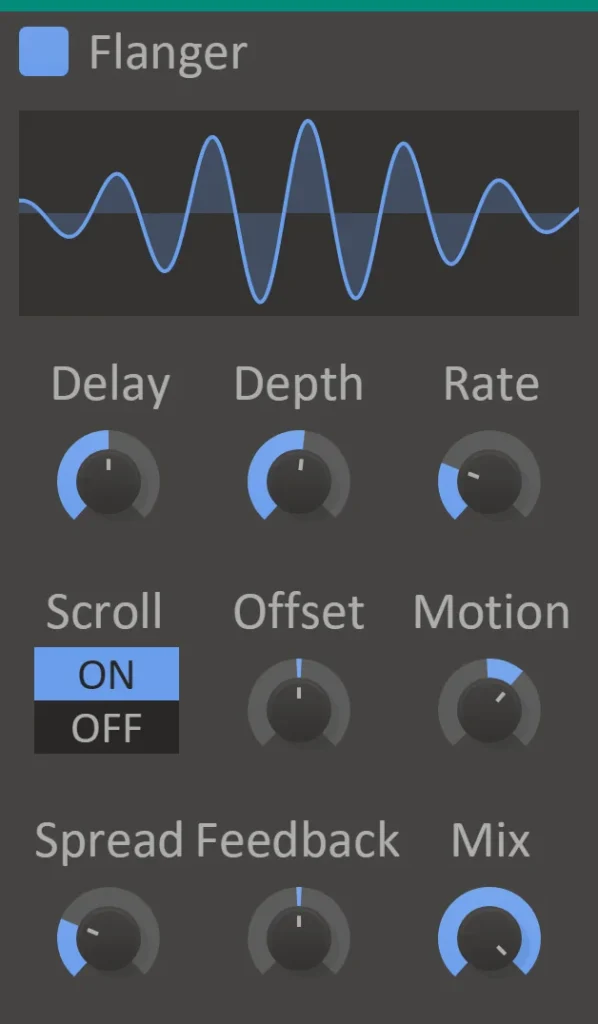
Kilohearts Flanger is part of Kilohearts Essentials, a set of 30 free effects you get with a free Kilohearts account. It has the cleanest layout here: Delay, Depth, Rate, Spread, Feedback and Mix, plus a Scroll switch.
Turn Scroll on and the Offset and Motion knobs add a phase shift between the dry and wet sound. That gives you an endless barberpole sweep that rises or falls forever. It’s perfect for builds.
It runs on 64-bit Windows and on Macs, including Apple’s M chips, as VST2, VST3, AU and AAX. You install it with the Kilohearts installer after you make your free account. Best for: beginners who want a flanger they understand in a minute. Get it from Kilohearts.
4. MFlanger (MeldaProduction)
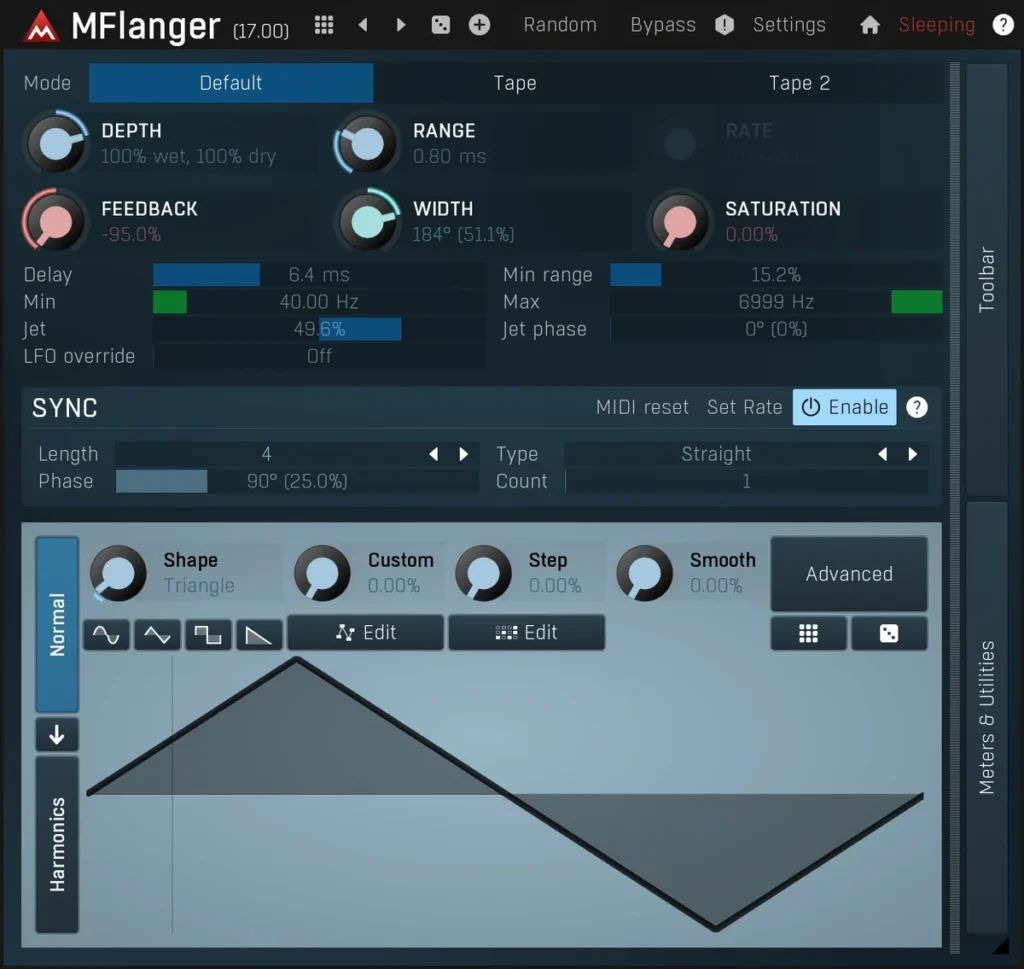
MFlanger comes in MeldaProduction’s MFreeFXBundle, a big pack of free effects. Melda calls it a versatile flanger with a variable oscillator shape and built-in tube saturation. In plain words, you can change the shape of the movement that drives the sweep, and add some warm grit at the same time.
It’s the deepest free flanger on this list. It suits people who like to tweak. Mix Elite’s video on must-have free plugins recommends the same free Melda bundle, for its MAutoPitch auto-tune and its loudness analyzer.
It runs on Windows 10 and 11 (64-bit) as VST, VST3 and AAX, and on macOS 10.14 or newer as VST, VST3, AU and AAX, on Intel, AMD and Apple Silicon. You can add paid features later by buying a license, but the free version works on its own. Best for: deep, detailed flanging with some saturation. Get it from MeldaProduction.
5. Gooper (brand0)
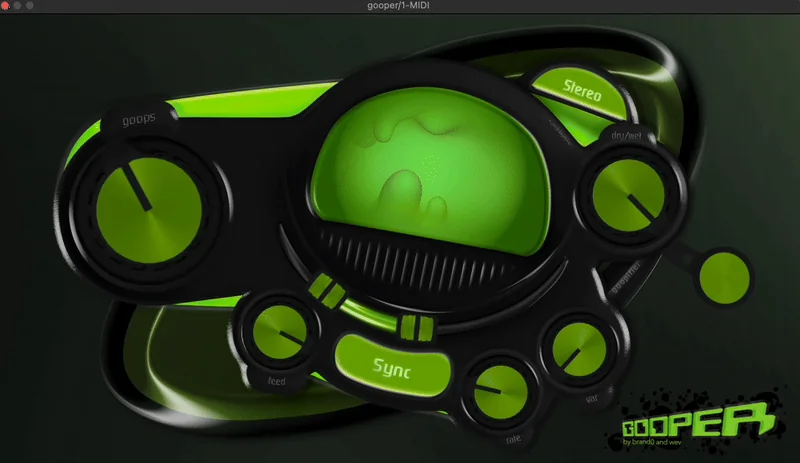
Gooper is a free “multi flanger/phaser” from producer brand0, with an interface he designed with his friend wev. Instead of one sweep, it runs up to 5 comb filters at once, and you choose the range they sweep through. A comb filter is the pattern of gaps a flanger cuts into a sound. A lever on the right turns on a barberpole phaser, and a Sync button locks the movement to your song’s tempo. It’s weird in the best way.
Version 1.2.2 is free on brand0’s Gumroad page, as VST3 and AU on Mac and VST3 on Windows. The paid gooper MAX adds presets, a randomizer, visualizer options and an upgraded interface, so the free version has no presets. Best for: drum loops and vocals that should sound strange in a good way. Get it from brand0.
Already using FL Studio? You have two free flangers
Every edition of FL Studio comes with Fruity Flanger and Fruity Flangus, and so does the free trial. Try them before you download anything. Both are in the effect list of every mixer slot.
6. Fruity Flanger (FL Studio)
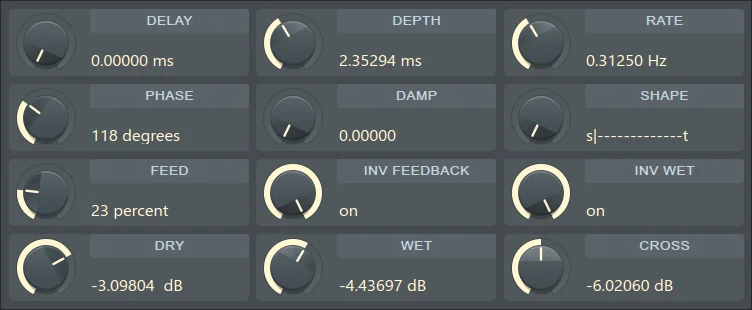
Fruity Flanger is the classic one. It has a knob for every part of the sound, and here’s what each does, based on Image-Line’s manual:
- Delay: the shortest gap between the copies, from 0 to 20 ms. Low values give a deeper flange.
- Depth: how far the delay sweeps. At zero, the flange stands still.
- Rate: how fast it sweeps, from 0 to 5 Hz.
- Phase: offsets the left and right sweeps to widen the sound. Image-Line suggests about 10 degrees for a subtle stereo boost.
- Feed: the feedback, from 0 to 100%. High values make the flanger “whistle”.
- Inv Feedback and Inv Wet: flip the feedback or the effect. With both off, it sounds more like a chorus.
- Damp, Shape, Dry, Wet and Cross: soften the effect’s highs, change the sweep from smooth to even, and set the mix of the original, the effect and a left-right swapped copy.
Best for: getting the classic sound with zero downloads.
7. Fruity Flangus (FL Studio)
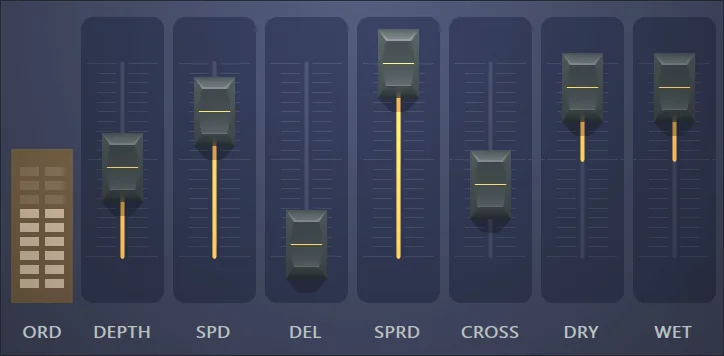
Fruity Flangus stacks several flangers on top of each other. Image-Line made it to widen the stereo picture of your mix, create complex flanges and fake the thick unison sound of a synth playing many slightly detuned voices. Its faders have short names:
- ORD: how many flangers are stacked. More makes the effect smoother and richer.
- DEPTH and SPD: how far and how fast each flanger moves.
- DEL: the overall amount of delay.
- SPRD: spreads each flanger’s speed and depth, so they don’t all move together.
- CROSS: mixes some of the left side into the right side, and back.
- DRY and WET: the original sound and the effect. Negative values flip the phase.
Best for: pads, chords and backing vocals that need to sound wider.
How to use a flanger in FL Studio
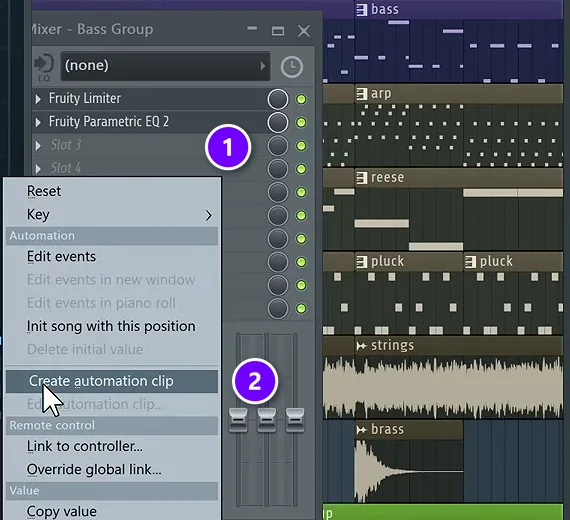
These steps work the same for every plugin above. It takes about two minutes.
- Press F9 to open the Mixer, then click the mixer track your sound plays through.
- Click an empty slot on the right, like Slot 3 (1), and pick your flanger from the list.
- Start gentle: about half wet, a slow rate and little or no feedback.
- Turn up Depth until you clearly hear the sweep, then back it off a little.
- Add feedback for a sharper, metallic jet sound, or keep it low for a soft swirl.
- To make it move with the song, right-click a knob like Mix or Rate and choose Create automation clip (2). On a plugin from another maker, move the knob first, then pick Tools > Last tweaked > Create automation clip.
- Play the part with and without the flanger. If you only notice it when it’s gone, it’s about right.
Automation is where a flanger comes alive. In Mix Elite’s free FL Studio course, Max automates an EQ’s high cut to sweep a bass line. Max’s rule from that lesson works for any effect: “You can automate every single knob inside FL Studio.” A classic move is to raise a flanger’s Mix over the last few bars before a drop, then cut it the moment the drop hits.
Check wide flanger settings in mono before you finish. Some stereo sweeps sound huge in headphones and thin out on a phone speaker. Our guide to mono vs stereo mixing shows how to check.
How do you use a flanger on synths without ruining the mix?
Put the flanger on its own mixer track at 100% wet and blend it in under the dry synth. Then cut the flanger’s lows with a high-pass filter at about 120 to 150 Hz. Keep the feedback low, around 10 to 20%, and the rate slow, about 0.2 to 0.5 Hz, or synced to your tempo.
That way your dry synth stays exactly as it was, and the swirl sits around it. Here’s the setup in FL Studio, using the same send trick Mix Elite’s free course uses for reverb:
- Press F9 to open the Mixer and click the synth’s mixer track.
- Click the small arrow at the bottom of an empty mixer track. The synth now also plays through that track.
- Load your flanger on the new track. Turn its dry sound all the way down and its wet up, so it only plays the effect.
- Add Fruity Parametric EQ 2 after the flanger and cut everything below about 120 to 150 Hz.
- Raise the new track’s fader until you hear the swirl, then pull it back a little.
Eventide blends its own flanger the same parallel way on drums and bass in its mixing tips. Automate the send fader to bring the swirl in for a chorus or a build, and out again for the verse.
Why does a flanger make my sound lose its punch?
Because a flanger mixes your sound with a delayed copy of itself, and at some frequencies the two cancel out. Those gaps, called comb filtering, sweep up and down, and when they hit the low end, the sound turns thin. More feedback makes the gaps deeper.
iZotope’s guide to modulation effects explains these comb-filter gaps in more detail. To get the punch back, change one setting at a time:
- Lower the Mix or Wet until the sound feels solid again.
- Turn the feedback down. Around 10 to 20% keeps the sweep smooth instead of metallic.
- Keep the lows dry. High-pass the flanger at about 120 Hz on bass-heavy parts, or 150 Hz on a kick.
- Lower the Depth to about 30 to 40%, so the sweep covers less ground.
- Move it to a send, as in the steps above, so the original sound stays untouched.
- Check in mono. A wide flanger can thin out when left and right are added together, as our guide to mono vs stereo mixing explains.
What to use a flanger on
A flanger works on almost anything. But a little goes a long way. These are the most common uses, and the one place to be careful:
- Guitars: the classic home of the flanger. A slow sweep with some feedback gives you that 70s and 80s rock sound.
- Drum loops and hi-hats: a slow flanger makes them shimmer and move, which keeps a loop interesting.
- Synths and pads: a wide, slow flange or Fruity Flangus makes a chord sound bigger without adding notes.
- Vocals: use it lightly on ad-libs or a doubled vocal. Heavy flanging on a lead vocal sounds robotic, which only works as a special effect.
- Builds and transitions: automate the mix up, or use a barberpole mode, for a rising whoosh into the drop.
- Short fills: a quick flange on the whole beat for one bar is an old DJ trick for a fill.
- Bass: be careful. A flanger can weaken the low end, so keep it subtle or put it on a higher layer of the bass.
Flangers are fun, so it’s easy to use too much. Set it where you like it, then turn the Mix down a notch. In a full song, that’s usually the right amount.
Which old free flangers don’t work anymore?
Five old favorites are out: DLYM, TAL-Flanger, Dead Duck Flanger, Kjaerhus Classic Flanger and Klevgrand’s Svep. Older lists still recommend them, but they went paid, lost their official download or only run on old systems. Here’s where each one stands in October 2026:
- DLYM by Imaginando: no longer free. It costs €39 now, and the free demo plays a short noise burst every 60 seconds.
- TAL-Flanger: only an archived download now, for Windows (VST2) and for 32-bit Macs on OS X 10.6 to 10.9, which today’s Macs can’t run.
- Dead Duck Flanger: the maker’s website is gone, so there’s no official download. It was Windows VST2 only.
- Kjaerhus Audio Classic Flanger: the maker’s web address is now for sale, so there’s no official download either.
- Svep by Klevgrand: no longer listed on Klevgrand’s site.
If an old flanger you love still loads on your computer, keep using it. Just don’t build a new setup around a plugin nobody updates anymore.
Are paid flanger plugins worth it?
Only if you’re chasing a specific vintage sound. For most songs, the free picks above do the same job. If you want to pay, the makers’ own sites listed Eventide Instant Flanger Mk II at $99, D16 Antresol at €59 and Arturia Flanger BL-20 at €49 on October 12, 2026.
- Eventide Instant Flanger Mk II ($99): Eventide’s emulation of its original 1975 studio rackmount, which Eventide calls the world’s first studio flanger. There’s a free demo.
- D16 Antresol (€59): a model of a classic mid-70s analog stompbox flanger, built around an emulated analog bucket-brigade delay.
- Arturia Flanger BL-20 (€49): a recreation of a rare vintage analog studio flanger, also built on bucket-brigade circuits. There’s a free demo here too.
Those are each maker’s own prices, in the currency its site showed. Prices change, so check before you buy, and try the free demo first where there is one.
How to install a free flanger in FL Studio
Download the 64-bit VST3 version from the maker’s site and run its installer. Then open FL Studio and let it scan for new plugins, and your flanger shows up in the effect list. Our guide to installing VST plugins in FL Studio shows every click with screenshots.
The best free flanger VST plugins at a glance
Here are all seven in one place, from the best all-rounder to FL Studio’s built-in pair.
| Plugin | Best for | Runs on | Formats |
|---|---|---|---|
| Valhalla Space Modulator | Tape-style, barberpole and wide flanging | Windows, Mac | VST2, VST3, AU, AAX |
| Blue Cat’s Flanger | Classic 70s-style flanging | Windows, Mac | VST2, VST3, AU, AAX |
| Kilohearts Flanger | Easy controls and endless sweeps | Windows, Mac | VST2, VST3, AU, AAX |
| MFlanger | Deep tweaking and saturation | Windows, Mac | VST2, VST3, AU, AAX |
| Gooper | Strange, stacked sweeps on loops | Windows, Mac | VST3 (plus AU on Mac) |
| Fruity Flanger | Classic flanging inside FL Studio | FL Studio | Built in |
| Fruity Flangus | Wide, thick stereo flanging | FL Studio | Built in |
The five plugins from other makers all come in 64-bit versions, which is what modern DAWs run. A DAW is the music app you make songs in, like FL Studio.
More free mixing plugins from Mix Elite (video)
MFlanger’s free bundle also shows up in Mix Elite’s list of must-have free plugins. In this video, Max walks through the free tools he uses in his mixes, including MAutoPitch, Ozone Imager, SPAN, TDR Nova, OTT and the Youlean Loudness Meter.
Max’s point about SPAN fits every effect on this page: “The most important mixing tip is referencing.” Play a song you love next to yours and use about as much flanger as it does. For more free tools, see our list of the best free mixing plugins.
DAY 4 OF THE 7-DAY MUSIC PRODUCER COURSE
Effects are the fun part. Day 4 makes them fit the mix.
A flanger only sounds good in a clean mix. Day 4 of the 7-Day course is all about mixing: the simple Holy-Quad mixing formula, the “Mix Murdering” mistakes most beginners make, and a one-click setting that makes your song wider, with no new plugins. You also get a mixing checklist and a mixing and production template. It’s taught in FL Studio (the free trial works), about 45 minutes a day, and on day 7 a pro gives you feedback on your finished track. It’s $27, and you get 60 days to decide if it was worth it.
Frequently asked questions
What is the best free flanger VST?
Valhalla Space Modulator is the best free flanger VST in 2026. It has eleven modes, including through-zero tape flanging, barberpole sweeps and doubling, and it runs on Windows and Mac as VST2, VST3, AU and AAX. For a simpler vintage sound, try Blue Cat’s Flanger, which is also free.
What is the best flanger plugin, free or paid?
For a paid flanger, Eventide’s Instant Flanger Mk II is the classic choice: an emulation of Eventide’s original 1975 studio rackmount, listed at $99 on Eventide’s site on October 12, 2026. If you don’t want to pay, Valhalla Space Modulator is the best free flanger, with eleven modes for flanging and doubling on Windows and Mac.
Why does a flanger make my sound lose its punch?
A flanger mixes your sound with a delayed copy, and some frequencies cancel out as the delay sweeps. When those gaps hit the low end, the sound turns thin. Lower the Mix and the feedback, high-pass the flanger at about 120 to 150 Hz, or put it on a send so the dry sound stays untouched.
Does FL Studio have a flanger?
Yes, two. Fruity Flanger is a classic flanger with Delay, Depth, Rate, Phase and Feed controls, and Fruity Flangus stacks several flangers for a wide, thick stereo sound. Both come with every FL Studio edition and with the free trial, so you can load them from any mixer slot without downloading anything.
What is the difference between a flanger and a chorus?
Both mix a sound with a moving, delayed copy of itself. A flanger uses a very short delay, usually with feedback, which gives a sharp, metallic, jet-like sweep. A chorus uses a slightly longer delay with little or no feedback, so it sounds like several players at once and makes a part thicker rather than whooshing.