


“Give us the tools, and we will finish the job.”
To add a VST to FL Studio, install the plugin so its VST3 file lands in your VST3 folder (C:\Program Files\Common Files\VST3 on Windows, /Library/Audio/Plug-Ins/VST3 on a Mac). Then open Options > Manage plugins, click Find installed plugins and star the plugin. It shows up under + in the Channel Rack (instruments) or in an empty Mixer slot (effects).
You download a plugin everyone raves about, click through the installer, open FL Studio, and it’s nowhere to be found. Learning how to add VST to FL Studio properly fixes that. A VST is simply a plugin, an instrument or effect from another company that runs inside FL Studio. Below are the five steps, with screenshots from a video by Max, the founder of Mix Elite, plus the exact folders on Windows and Mac and fixes for when a plugin won’t show up.
Table of Contents
How to add a VST to FL Studio, step by step
Adding a VST to FL Studio takes five steps: the plugin goes into your VST3 folder, FL Studio scans for it, and you star it and load it from the Channel Rack (instruments) or a Mixer slot (effects). Each step has its own section below.
- Install the plugin and note its VST3 folder.
- Open the Plugin Manager in FL Studio.
- Check the plugin search paths.
- Click Find installed plugins.
- Star the plugin and load it.
The video below shows the whole thing in about two minutes. It uses LABS, a free instrument plugin with an installer, and a free loudness meter that comes without one.
Two terms before you start. VST3 is the newer version of the VST format, and most plugins come in both. Max’s rule: “I always prefer to use the VST3 format, it’s the newest one.” And 64-bit is the version that matches FL Studio today, so pick it whenever a plugin offers 32-bit and 64-bit.
Step 1: Install the plugin and note its VST3 folder
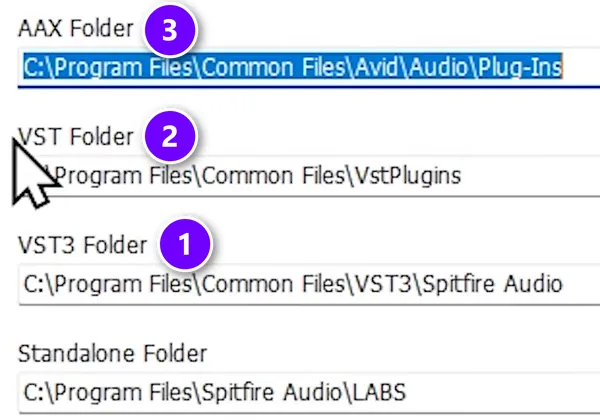
Download the plugin from its maker’s website and run the installer. Most installers ask which versions you want. Tick VST3, and VST too if you like. Skip AAX, which only works in Pro Tools, and you won’t need the standalone app either, since you’ll play the plugin inside FL Studio.
Then comes the screen that matters. Max’s advice: “If your plug-in comes with an installer, always the important part will be your VST or VST3 folder. So, just make sure you remember that path.” In the screenshot, the VST3 folder is (1), the VST folder is (2), and the AAX folder you can ignore is (3).
If an installer also offers a version made just for FL Studio, skip that one too and stick with the VST3. That way your projects behave the same on any computer you open them on.
Where is the FL Studio VST folder?
FL Studio has no VST folder of its own. It scans the standard plugin folders on your computer, so that’s where plugins belong: C:\Program Files\Common Files\VST3 for VST3 on Windows and /Library/Audio/Plug-Ins/VST3 on a Mac. Image-Line recommends running the plugin’s installer and keeping its default location. These are all the standard folders:
- Windows, VST3:
C:\Program Files\Common Files\VST3 - Windows, VST (also called VST2):
C:\Program Files\Common Files\VST2, plus older folders likeC:\Program Files\VstPlugins - Windows, CLAP:
C:\Program Files\Common Files\CLAP - Mac, VST3:
Macintosh HD/Library/Audio/Plug-Ins/VST3 - Mac, VST:
Macintosh HD/Library/Audio/Plug-Ins/VST - Mac, AU (Audio Units):
Macintosh HD/Library/Audio/Plug-Ins/Components - Mac, CLAP:
Macintosh HD/Library/Audio/Plug-Ins/CLAP
One rule matters more than the rest. VST3 plugins have to sit in the standard VST3 folder, or FL Studio won’t find them. You can only add folders of your own for older VST2 plugins.
Step 2: Open the Plugin Manager
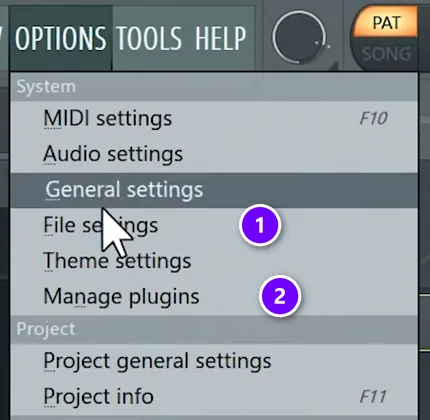
In FL Studio, click OPTIONS in the menu at the top, then File settings (1). In the window that opens, find the Plugins area and click Manage plugins. The Options menu also lists Manage plugins directly (2), which saves a click.
The Plugin Manager is FL Studio’s list of every plugin it knows about. You’ll come back to it every time you add a plugin, so it’s worth knowing where it lives.
Step 3: Check the plugin search paths
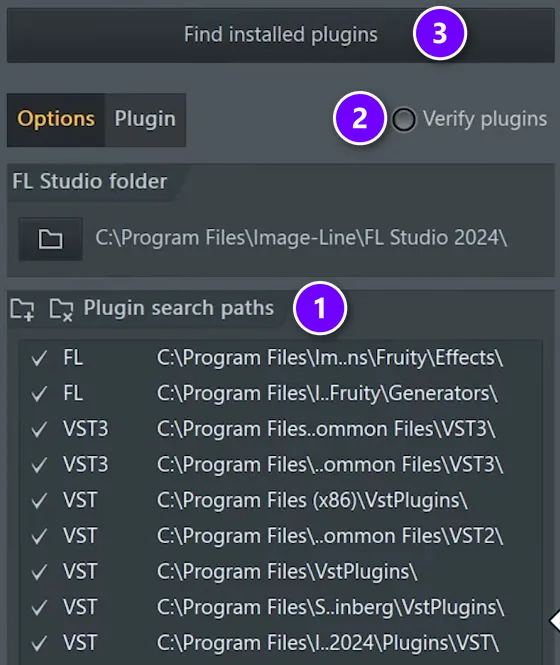
On the left of the Plugin Manager is Plugin search paths (1), the list of folders FL Studio scans. It’s the part of this window that matters. FL Studio already includes the standard Windows folders, so if your plugin went into one of them, there’s nothing to change here.
If you installed a VST2 plugin somewhere else, click the small folder icon with a plus sign at the left end of that bar, and add its folder. VST3 plugins should always go in the standard VST3 folder instead.
Step 4: Click Find installed plugins
Now click Find installed plugins at the top of the window, marked (3) in the screenshot above. FL Studio scans every folder in the list and fills the right side with what it found: each plugin’s name, its format (VST, VST3 or CLAP), 32 or 64 bit, and whether it’s an effect or a synth.
If a plugin gave you trouble before, or you changed a folder, turn on Verify plugins (2) before you click. Max’s tip: “If you have any issues, for example, a plug-in doesn’t load or you’ve changed the path, you can just mark verify plugins before clicking the button. It should fix most of the issues.” Verifying opens each plugin once to check that it works and to sort it as an instrument or an effect, so the scan takes a little longer.
Step 5: Star the plugin and load it
After the scan, the plugin is ready to use. If the Channel Rack, the Mixer and the Browser are new to you, our beginner’s guide to FL Studio gives you a tour of all three.
Star it so it’s easy to find
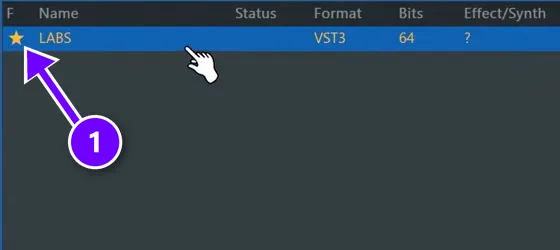
Type the plugin’s name into the Find box at the bottom right of the Plugin Manager. Then click the star next to it (1). Starring LABS makes it show up quicker, because starred plugins go to the top of FL Studio’s plugin menus. Close the window when you’re done.
Load an instrument from the Channel Rack
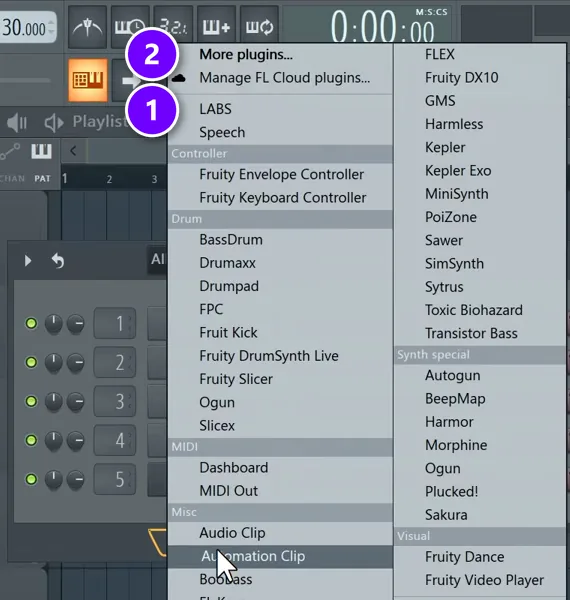
Instruments, which FL Studio calls generators, go in the Channel Rack. Open it with F6, click the + at the bottom of the channel list, and pick your plugin. Starred plugins sit near the top of the menu, like LABS here (1). Anything you didn’t star is under More plugins… (2).
Load an effect in a Mixer slot
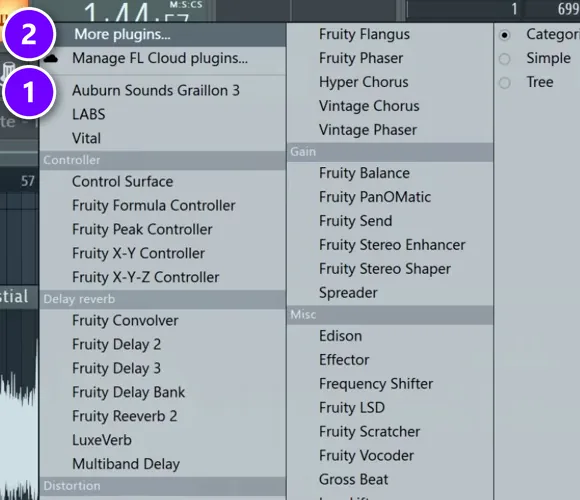
Effects, like an EQ, a reverb or a meter, go on a Mixer track instead. Open the Mixer with F9, pick a track, click (or right-click) an empty slot and hover over Select. Your starred effects are at the top (1). More plugins… (2) opens the full list of everything you have installed, with a search box.
Find it in the Browser’s Plugin database
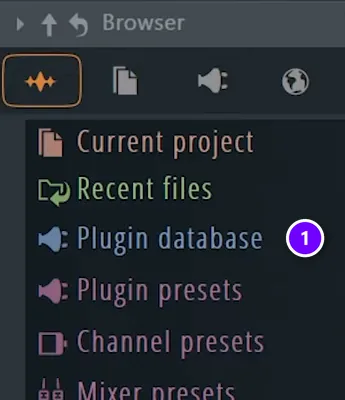
The Browser on the left side of FL Studio keeps a copy of your plugin list too. Open Plugin database (1). New plugins land in its Installed folder, and your starred ones are sorted into Generators and Effects. You can drag a plugin from there onto the Channel Rack or a Mixer slot.
Why can’t FL Studio find a plugin in my Downloads folder?
Because FL Studio only scans the folders in its plugin search paths, and Downloads isn’t one of them. A plugin sitting there is usually still a zip file or an installer you haven’t run. Run the installer, or unzip the download and copy the .vst3 file into C:\Program Files\Common Files\VST3, then click Find installed plugins.
Don’t add your Downloads folder to the search paths as a shortcut. FL Studio only finds VST3 plugins in the standard VST3 folder, and Image-Line advises adding extra search locations only when you have a specific reason. The next section shows the copy-and-paste way, step by step.
How to install a plugin that has no installer
Some free plugins come as a zip file full of folders instead of an installer. The video shows it with the Youlean Loudness Meter, a free meter that shows how loud your song is, and the same steps work for any plugin.
Copy the 64-bit VST3 file
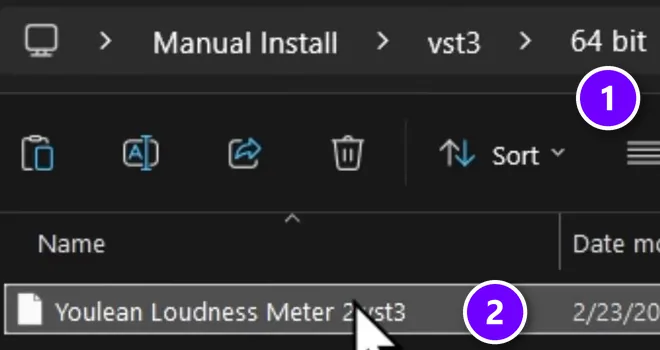
- Unzip the download and open the vst3 folder, then the 64 bit folder (1).
- Click the file that ends in .vst3 (2) and press Ctrl + C to copy it.
You can grab both formats, VST3 and VST2. Start with the VST3.
Paste it into the VST3 folder and scan
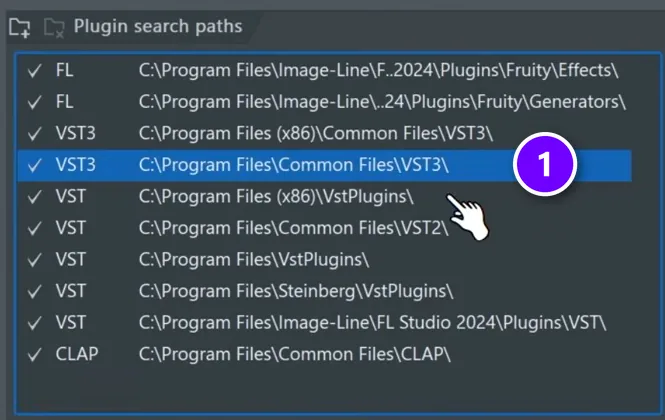
- Open the Plugin Manager again. Its search paths show your VST3 folders, and the main one is
C:\Program Files\Common Files\VST3(1). - Open that folder in File Explorer and paste the file there. Windows may ask for admin permission, which is normal for this folder.
- Back in the Plugin Manager, click Find installed plugins, and the meter shows up in the list.
A meter is an effect, not an instrument, so you load it from a Mixer slot, not the Channel Rack.
How to add VST plugins to FL Studio on a Mac
The steps are the same on a Mac: run the installer, open the Plugin Manager, scan, star and load. Only the folders change. VST3 plugins go in /Library/Audio/Plug-Ins/VST3, older VST plugins in /Library/Audio/Plug-Ins/VST, and Audio Units, Apple’s own plugin format, in /Library/Audio/Plug-Ins/Components.
Many Mac installers put in both an AU and a VST3 version, so you may see the same plugin twice. Either one works. Macs only run 64-bit plugins, so an old 32-bit one won’t load at all. And if macOS blocks a plugin you downloaded, look for an Open Anyway button in System Settings > Privacy & Security.
On a Mac with Apple Silicon, older Intel-only plugins still load. Image-Line’s manual says FL Studio bridges Intel VST plugins automatically and macOS handles Intel AU plugins, though bridged plugins use more CPU. If you switch FL Studio between native and Rosetta 2 mode, rescan your plugins the first time you open it in each mode.
VST, VST3, AU or CLAP: which version should you use?
Use VST3 whenever a plugin offers it, and always the 64-bit version. It’s the newest VST format, and FL Studio loads it on Windows and Mac. The other formats, in short:
- VST3: the newest VST format, and Max’s first choice.
- VST (VST2): the older format. It still works fine, and it’s the only one you can put in a folder of your own.
- AU (Audio Units): Apple’s format, for Macs only.
- CLAP: a newer, open format that FL Studio supports from FL Studio 2024.
- AAX: Pro Tools only. FL Studio can’t use it.
Then there’s 32-bit versus 64-bit. Always install the 64-bit version. FL Studio itself has been 64-bit only since version 20.9. On Windows, FL Studio can still run an old 32-bit plugin through a bit bridge, a small helper that translates between the two. Image-Line says each bridged plugin uses about 2% extra CPU, and that adds up fast in a big project.
Why is my VST not showing up in FL Studio?
Usually the plugin is in the wrong folder, FL Studio hasn’t scanned since you installed it, or you’re looking in the wrong menu: effects only show up in Mixer slots, not the Channel Rack. Move VST3 files to the standard VST3 folder, run Find installed plugins with Verify plugins on, and check More plugins… If it’s still missing, work through these fixes in order:
- Look in the right menu. Instruments show up under the Channel Rack’s +, and effects only in Mixer slots. A reverb or a meter won’t appear in the Channel Rack.
- Check More plugins… Only starred plugins sit at the top of the menus. You don’t have to star everything, because More plugins… lists every plugin you have installed.
- Move VST3 files to the standard folder. A .vst3 file anywhere else won’t be found, even if you add that folder to the search paths.
- Add your VST2 folder. If a VST2 installer used a folder of its own, add it to the Plugin search paths and scan again.
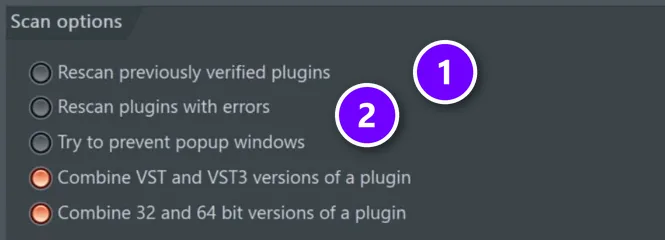
- Rescan with Verify plugins on. After you update a plugin, also tick Rescan previously verified plugins (1), so FL Studio checks it again instead of skipping it. If a plugin failed before, tick Rescan plugins with errors (2) too.
- Check that you have the right file. A .dll file is a Windows VST2 plugin and a .component file is a Mac AU plugin. Get the version for your system, in 64-bit.
- Sign in or activate it. Some plugins need you to log in first. LABS asks for a free account the first time it opens, and Vital lets you log in or choose to work offline.
- Rescan after switching Mac modes. On an Apple Silicon Mac, FL Studio needs a fresh scan the first time you run it in native mode and the first time in Rosetta 2 mode.
Seeing the same plugin twice, once as VST and once as VST3? That’s normal when an installer adds both formats, and either one works. Pick the VST3.
Which free plugins should you install first?
Start with the five free plugins installed in Mix Elite’s free 4.5-hour FL Studio course on YouTube: LABS, Vital, Graillon, OTT and the Youlean Loudness Meter. You don’t need to buy anything to start, and each one goes in with the steps above:
- LABS by Spitfire Audio: real instruments like soft pianos and strings, and the course’s pick for the best free instrument plugin.
- Vital: a full synthesizer. The free Basic version is enough, and Max says the paid tiers mainly add presets.
- Graillon by Auburn Sounds: pitch correction for vocals, with a free edition.
- OTT by Xfer Records: a free multiband compressor, used in the course on vocals and as a quick mastering shortcut.
- Youlean Loudness Meter: the free meter from the video, for checking how loud your finished song is.
For more, see our lists of the best free mixing plugins and free trap VSTs. If your computer starts to crackle once a project is full of plugins, here’s how to fix crackling and CPU problems in FL Studio.
Plugins are only half of a good sound. The samples you start with matter just as much, so learn how to add sample packs to FL Studio next.
THE 7-DAY MUSIC PRODUCER COURSE
Get pro-quality instruments, plus 20+ free plugins
Day 2 of the 7-Day course shows where to find pro-quality instruments, paid and free, and how to install them. You also download 20+ free plugins and tools, then use them to write your first chords and melodies. It’s taught in FL Studio, and the free trial works. Each day takes about 45 minutes, and on Day 7 a pro gives you feedback on your finished track. It’s $27, with a 60-day money-back guarantee.
Frequently asked questions
How do I install a VST in FL Studio?
Run the plugin’s installer, or copy its 64-bit .vst3 file into C:\Program Files\Common Files\VST3. Then open Options > Manage plugins in FL Studio, click Find installed plugins and star the plugin. Load instruments from the + in the Channel Rack and effects from an empty Mixer slot.
Where is the VST folder for FL Studio?
FL Studio doesn’t have its own VST folder. It scans the standard system folders: C:\Program Files\Common Files\VST3 for VST3 plugins on Windows, plus VST2 folders such as C:\Program Files\Common Files\VST2. On a Mac it’s /Library/Audio/Plug-Ins/VST3 and /Library/Audio/Plug-Ins/VST. Open Options > Manage plugins to see the full list.
Why is my VST not showing up in FL Studio?
Usually it’s in the wrong folder or the wrong menu. VST3 files must be in the standard VST3 folder, and effects only appear in Mixer slots, not in the Channel Rack. Run Find installed plugins with Verify plugins turned on, then check More plugins…, which lists everything installed, even plugins you haven’t starred.
Why can’t FL Studio find a plugin in my Downloads folder?
FL Studio only looks in its plugin search paths, and your Downloads folder isn’t one of them. The plugin is probably still zipped or not installed yet. Run its installer, or unzip it and copy the .vst3 file into your VST3 folder, then click Find installed plugins in the Plugin Manager.
How do I add plugins to FL Studio on a Mac?
Run the plugin’s installer, which puts it in /Library/Audio/Plug-Ins, in the VST3, VST or Components folder. Then open Options > File settings > Manage plugins in FL Studio and click Find installed plugins. Star the plugin and load it from the Channel Rack or a Mixer slot, just like on Windows.