

“An ambience is defined as an atmosphere, or a surrounding influence: a tint.”
To make vocal ambience in FL Studio, load a vocal into Fruity Granulizer, turn RAND all the way up, lower GR. SPACING, raise ATTACK and PAN, then smear it with Fruity Convolver. Or open the vocal in Edison, press Ctrl + B, push the Blur Amount to 100% and drag the result into a new channel. Both turn the words into a soft pad.
Your beat has drums, a bass and a lead, and it still sounds a little empty. Play it next to a song you love and you’ll hear what’s missing: a soft haze behind everything that makes the track feel big and finished.
Very often, that haze is a voice. Producers take one vocal line, wash out the words and keep only the tone. FL Studio can do it with two stock tools in a few minutes. Below are both methods from Mix Elite’s tutorial with the exact knobs, plus where the layer goes in your song and how to stop it from burying your main vocal.
Table of Contents
What is vocal ambience?
Vocal ambience is a vocal turned into a soft background layer, like a pad or a drone. You can’t make out the words anymore, but you still hear the warmth and color of a human voice. It fills the space between your drums, bass and lead, so the whole track feels wide and deep instead of thin.
Think of it like a tint on a photo. It colors everything without asking for attention. Vocals make great raw material for it, because a voice is full of rich overtones that sound natural when you smear them. A vocal from your own song has one more bonus: it’s already in the right key.
What do you need to make vocal ambience in FL Studio?
FL Studio and one vocal sample. An acapella, a vocal one-shot from a sample pack or your own recording all work. Long, open vowels like “ooh” and “aah” give the smoothest result. Hard sounds like S and T turn into hiss once they’re blurred, so skip the parts that are full of them.
Fruity Granulizer and Fruity Convolver come with FL Studio. Edison, the audio editor in the second method, needs Producer Edition or higher, as Image-Line’s Edison manual notes. The free trial includes every feature, so you can follow along before you buy.
How to make vocal ambience in FL Studio: 2 methods
There are two quick ways to make vocal ambience in FL Studio with stock tools. Fruity Granulizer chops the vocal into tiny grains and plays them back as a random cloud, and Fruity Convolver then melts that cloud into a pad you can play from your keyboard. Edison’s Blur tool smears the vocal itself into a long, washed-out drone that you save as new audio.
Max, the founder of Mix Elite, shows both methods in this short Mix Elite tutorial, which has been watched more than 250,000 times. The steps below follow his video and add the exact knob names from Image-Line’s manual.
How do you turn a vocal into a pad with Fruity Granulizer?
Load the vocal into Fruity Granulizer, turn RAND fully up, bring GR. SPACING close to the bottom, and raise ATTACK and PAN. The vocal breaks into a soft, shifting cloud. Then add Fruity Convolver with a blur impulse to smooth it into a pad, and play long notes in the piano roll.
A granulizer cuts a sound into grains. Those are tiny slices that each last a fraction of a second, and the plugin plays them back in a new way. Change how the grains are spaced, faded and ordered, and a sung phrase stops sounding like words.
Step 1: Load the vocal into Fruity Granulizer
- Click the + button at the bottom of the Channel Rack and pick Fruity Granulizer.
- Drag your vocal from the Browser and drop it on the waveform display at the bottom of the plugin (1 in the screenshot below).
- Faster: right-click the vocal in the Browser and choose Open in new Fruity Granulizer channel. Image-Line’s Browser manual lists this option.
- Play a note. For now it still sounds like the plain vocal, because the grains play in their original order.
Step 2: Set RAND, grain spacing, attack and pan
Here’s the order Max uses in the video. Each move makes the vocal a little less like a voice and a little more like a texture, so listen after every step.
- Turn RAND (2) all the way up. It shuffles the order of the grains, so the words fall apart.
- Turn GR. SPACING (3) down until it’s almost at the bottom. The grains now sit close together, which sounds dense and smooth instead of stuttery.
- Raise ATTACK (4) to about a third of the way up. Every grain now fades in and out, which takes the clicky edges off.
- Turn PAN (5) up past the middle. It sends every other grain left and right, so the cloud spreads across your speakers.
Leave WAVE SPACING where it is at first. It sets how many grains the plugin takes from your sample, and below zero it even plays them in reverse order, says the Fruity Granulizer manual. Once the basic sound works, come back and play with it.
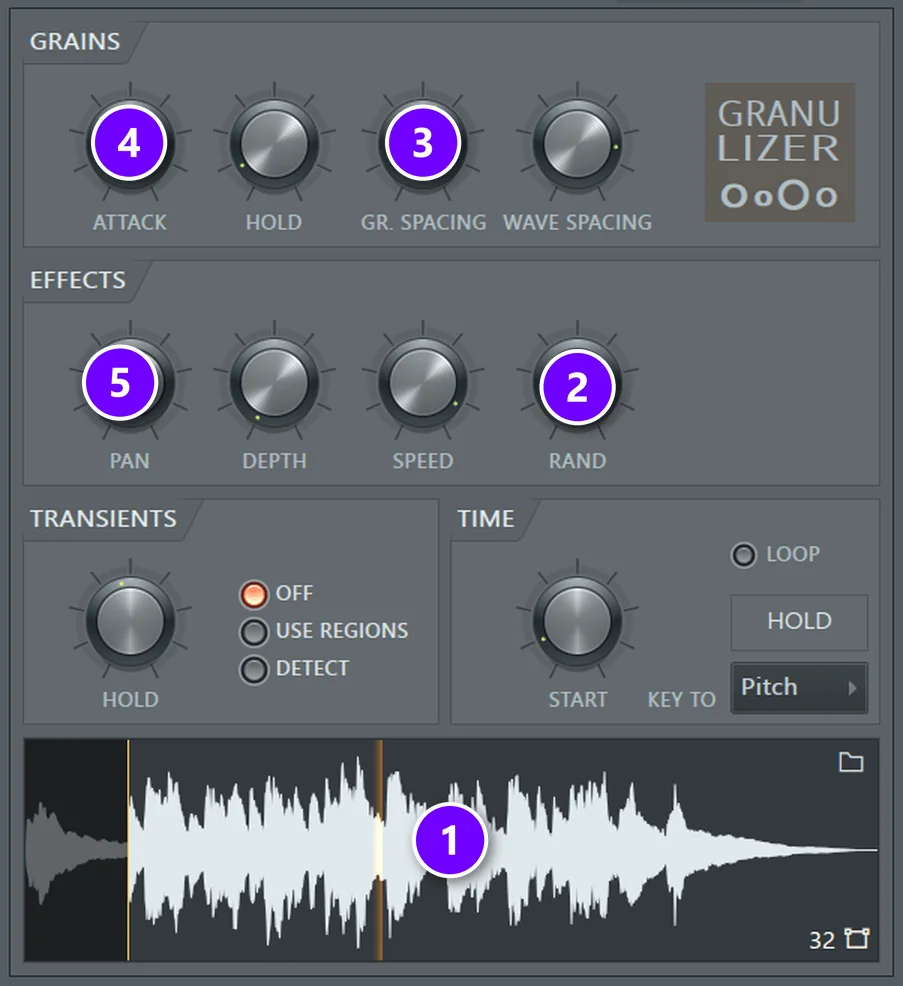
No two vocals react the same way, so treat these settings as a starting point. Still hear words? Lower GR. SPACING a bit more. Sounds buzzy or grainy? Raise ATTACK until each grain blends into the next.
Step 3: Blur it with Fruity Convolver
The grains still flicker a little. To melt them together, give the Granulizer its own mixer track and add Fruity Convolver there. Fruity Convolver is a convolution effect: it stamps the sound of an impulse, a short recording of a room or a texture, onto whatever plays through it.
- Select the Granulizer channel in the Channel Rack and press Ctrl + L. That routes it to a free mixer track.
- Open an empty effect slot on that mixer track and pick Fruity Convolver.
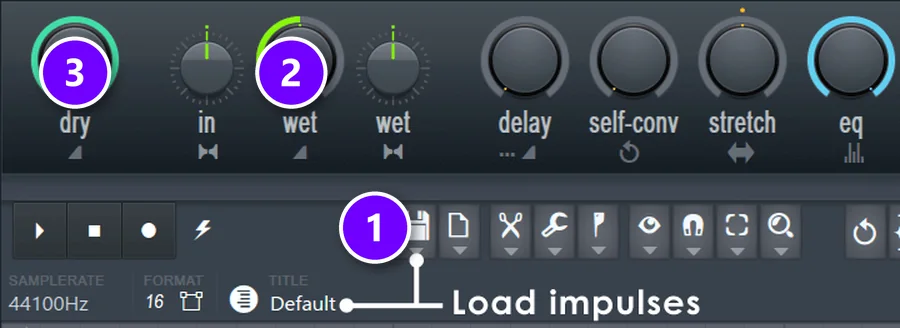
- Click the load impulses button (1) and pick a blur impulse. In the video, Max loads one called Blur Pink.
- Play a note. The grains melt into one smooth, airy pad.
- Balance the wet knob (2), the blurred sound, against the dry knob (3), the original. More wet gives a softer, more distant pad.
Don’t see Blur Pink in your list? Image-Line’s FL Guru video on real-time blur links free Blur and Noise impulses made for exactly this job, and the Fruity Convolver manual shows how to load any impulse file. Or use the Edison method below, which needs no impulse at all.
Step 4: Play long notes to turn it into a pad
Press F7 to open the piano roll and draw long notes, a bar or more each. Max plays slow, sustained notes and octaves, and the vocal turns into an ambient pad or a drone. Chords work too. Keep them in your song’s key, and the pad locks onto your harmony.
Then he plays it inside a full beat with drums, a Reese bass and a lead. Alone, it sounds like a blur. In the beat, it fills the gaps between the other parts.
Step 5: Swap the vocal and save the preset
The knobs stay where they are when you change the sample. Drop a different vocal on the waveform and you get a brand-new ambience in seconds, so one setup can give you a whole folder of textures. When you find a sound you love, open the plugin menu with the small arrow at the top left of the window and choose Save preset as, which Image-Line’s plugin wrapper manual explains.
How do you blur a vocal in Edison?
Open the vocal in Edison, press Ctrl + B to open the Blur tool, set Amount to 100% and click Accept. Edison rewrites the vocal as a washed-out drone. Select the part you like, drag it into the Channel Rack or the Playlist, and shape it with a volume envelope.
Edison is FL Studio’s audio editor. Its Blur tool works a bit like a convolution reverb, mixing noise into the waveform to smear it, as the Blur tool manual describes. Unlike the Granulizer, it changes the audio itself, so the result is fixed.
- Right-click the vocal in the Browser and choose Edit in audio editor. Edison opens with your vocal loaded. On a sampler channel, Ctrl + E does the same.
- Press Ctrl + B. You can also click the Blur button or go to Tools, Spectral, Blur.
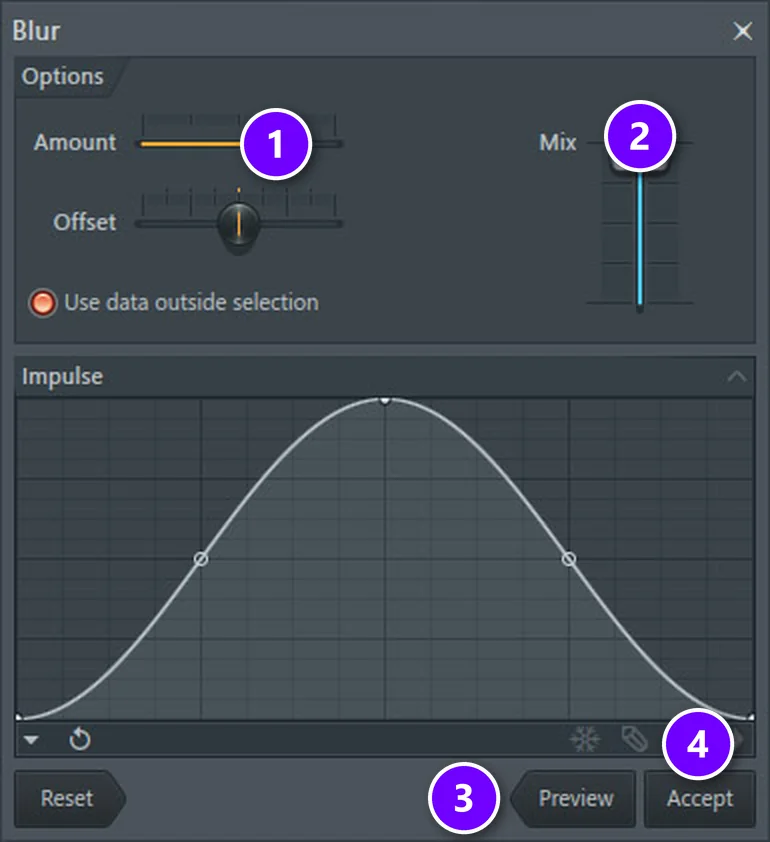
- Drag Amount (1) all the way up to 100%. Mix (2) blends the dry vocal with the blurred one, if you want a hint of the voice back.
- Click Preview (3) to listen, then Accept (4). Don’t like it? Ctrl + Z undoes it.
- Turn on Loop, play the result and select the part that sounds best.
- Drag the selection out with Edison’s drag button and drop it on the Channel Rack or the Playlist.
How do you shape the blurred vocal with an envelope?
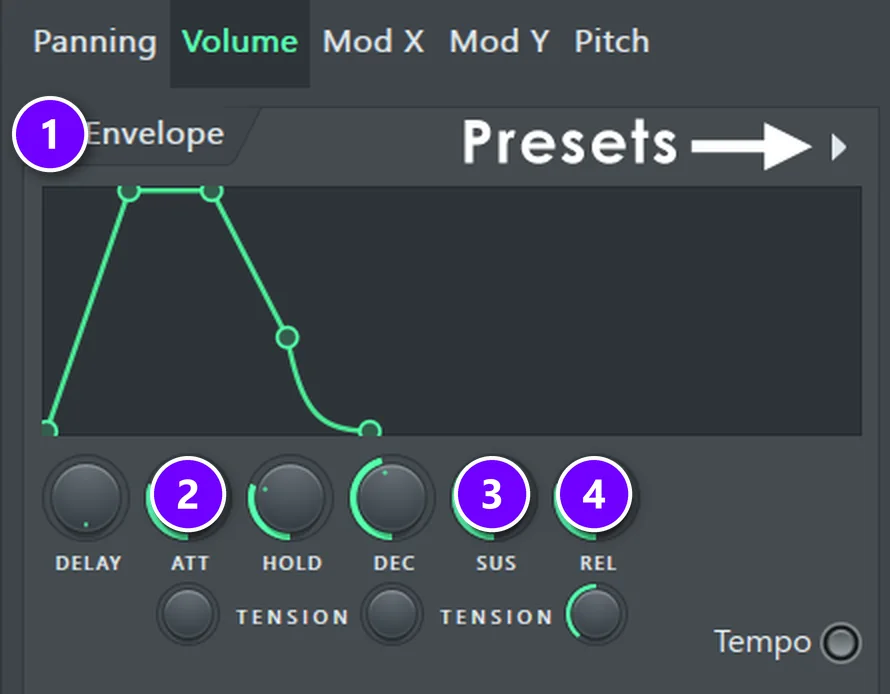
A raw blur starts and stops hard. A volume envelope makes it swell in and fade out like a real pad. An envelope is a shape that changes the sound over time, every time you play a note.
- Double-click the new sampler channel to open Channel settings and click the second tab, the one with the envelope icon. Image-Line’s manual calls it the Envelope / Instrument tab.
- Pick Volume and click the switch next to Envelope (1) so it lights up.
- Raise ATT (2) for a gentle fade-in.
- Turn SUS (3) all the way up, so the sound holds at full level while a note plays.
- Raise REL (4), so each note fades out slowly after you let go.
Want it to move? The LFO next to the envelope can sway the volume or the panning slowly. In his trap mixing tutorial, Max puts a tremolo LFO on a vocal ambience layer for the same reason. “It will work kind of like this background layer for this whole thing,” Max says.
Granulizer or Edison blur: which one should you use?
Both start from the same vocal, but they behave differently once they’re in your song.
- Fruity Granulizer stays live. You can play it from a keyboard, turn any knob while the song runs and automate it. Pick it when you want a pad that moves and changes.
- Edison blur makes new audio. The result is a smooth, steady drone that sounds the same every time and is light on your computer. Pick it for long beds under an intro or a breakdown.
- Both together work too. Blur a vocal in Edison, then drop the result into the Granulizer for an even softer cloud.
Where does vocal ambience sit in a song?
Vocal ambience sits low in the mix, behind the drums, bass and lead. It works best in the intro, in breakdowns and quietly under a chorus or drop, where it fills empty space. Think of it as the bottom layer of your arrangement: you should feel it more than you hear it.
- Intro: it sets the mood before the drums arrive. Open a low-pass filter on it slowly and you get a simple build.
- Breakdown: when the drums drop out, the ambience carries the track, so it can come up a little.
- Chorus or drop: under a busy section it glues the parts together. Keep it quiet here.
- Transitions: a swell of ambience into a new section works like a soft riser.
- Outro: let it ring after the beat stops for an easy ending.
When Max breaks down a finished track by ear in one of his arrangement videos, he labels the ambience as its own layer and stacks the louder parts, like plucks, above it. That’s the right picture. The ambience is the floor the other parts stand on.

If you’d like ready-made layers to try there, Mix Elite’s Nova Vocal Ambiences pack has 219 of them, 188 full ones and 31 single ones you can play like pads, for any DAW.
How do you keep vocal ambience from drowning out the main vocal?
Keep it quiet, cut its low end and duck it under the lead. A low cut, a gentle high cut if it gets hissy, and a sidechain compressor that turns it down while the singer sings will keep the words clear while the ambience fills the gaps.
Blur on a lead vocal is usually a mistake. In Mix Elite’s free 4.5-hour FL Studio course, Max says: “Reverb is something that beginner producers overuse because it just blurs imperfections.” A lead vocal should stay clear and easy to understand. An ambience layer is the one place where blur is the goal, so keep the two jobs on separate tracks.
- Set the level by ear. Bring the ambience up until you clearly hear it, then pull it back down a little. Mute it: if the track suddenly feels empty, the level is right.
- Cut the low end. Start with a low cut somewhere between 150 and 300 Hz, the same range Mix Elite suggests for background vocals, so the layer stays clear of your kick, bass and 808.
- Tame the top if it hisses. Blurred S and T sounds can turn into fizz. A gentle high cut softens it and pushes the layer further back.
- Duck it under the lead. Put Fruity Limiter in COMP mode on the ambience track and sidechain it to the lead vocal, so the ambience dips while the singer sings and swells back in the gaps. Our vocal reverb guide shows the same setup on a reverb send.
- Leave the center for the lead. The Granulizer’s PAN knob already spreads the grains. Keep the lead vocal in the middle and let the ambience live at the sides.
- Match the key. Play the pad in your song’s key. A vocal from another song may need a pitch change first, and our guide on how to sample in FL Studio shows how to find a sample’s key and move it.
That low cut is Max’s habit too. On a vocal layer in the same trap tutorial, Max says: “We don’t need any of the low end, right? We just want the highs.” The drums, the 808 and the other layers already own the bottom of that mix.
Why does my vocal ambience sound muddy?
Usually because the low mids pile up. Blur, convolution and reverb all stretch out the warm, lower part of a voice until it clouds everything else. Raise the low cut, turn down the Convolver’s wet knob or shorten the notes, and the layer turns light and airy again.
Two more causes are easy to miss. A source vocal full of breaths and S sounds turns into noise once it’s smeared, so pick a part with long vowels. And a pad that plays the same notes as your chords stacks up in the same range. Try it an octave higher, where it adds air instead of weight.
What are other ways to make a vocal atmosphere in FL Studio?
The Granulizer and Edison are the fastest routes, but not the only ones. Each of these gives a slightly different kind of haze.
- A big reverb send. Send the vocal to a mixer track with a long reverb at 100% wet. Our guide to reverb on vocals covers the send setup step by step.
- Delay into reverb. A stereo delay before the reverb turns single words into a wash of repeats that blur together.
- Stretched chops. Cut a vocal into short vowels, stretch them long and play them as chords. The chopping steps are in our guide on how to sample in FL Studio.
- A whole ambient track. Love this sound? Our guide on how to make ambient music builds a full song from pads and textures, and it uses Fruity Granulizer too.
Start small tonight. Take one vocal, run it through the Granulizer with the four knob moves above, add the blur and play one long chord under your beat. If the track suddenly feels wider and more finished, you’ve got it. Then make the main vocal shine with our full guide on how to mix vocals.
DAY 5 OF THE 7-DAY MUSIC PRODUCER COURSE
Now make the main vocal sound as good as the ambience
Day 5 of Mix Elite’s 7-Day Music Producer Course is about vocals: how to record great vocals at home on any budget, the V.O.C.A.L. formula that turns rough vocals into head-turners, and the vocal mistakes even advanced producers make. You also download 10 copy-and-paste vocal chains and practice acapellas, so you can practice without a singer. It’s taught in FL Studio (the free trial works), and on Day 7 a pro gives you personal feedback on your track. It’s $27, with 60-day refunds.
Frequently asked questions
Can you make a vocal pad in FL Studio without third-party plugins?
Yes. Fruity Granulizer and Fruity Convolver both come with FL Studio. Load a vocal into the Granulizer, turn RAND up, lower GR. SPACING, raise ATTACK and PAN, and add Fruity Convolver with a blur impulse on its mixer track. Play long notes in the piano roll, and the vocal becomes a pad you can play from your keyboard.
What does Ctrl+B do in Edison?
It opens Edison’s Blur tool. Blur smears the selected audio by mixing noise into the waveform, a bit like a convolution reverb. Set Amount to 100% for a full wash, click Preview to listen and Accept to apply it. Ctrl+Z undoes it. You can also find it under Tools, Spectral, Blur.
Does every FL Studio edition include Edison?
No. Image-Line lists Edison for Producer Edition and higher. The Granulizer method in this guide doesn’t need Edison at all. FL Studio’s free trial includes every feature, so you can try Edison’s Blur tool before you buy, as long as you keep your project open, because the trial can’t reopen saved projects.
How loud should vocal ambience be in a mix?
Quiet enough that you feel it more than you hear it. Bring it up until it’s clearly audible, then pull it back down a little. Mute it to check: if the track suddenly sounds empty and thin, the level is right. Cut its low end and duck it under the lead vocal so it never covers the words.