
“Honor thy error as a hidden intention.”
To use Newtone in FL Studio, click the small icon at the top left of your vocal clip and choose Pitch-correct sample. Press Ctrl + A, turn Center all the way up and bring Variation down to about nine o’clock. Fix any odd notes by hand, then choose Send to playlist as audio clip in the Edit menu to put the tuned vocal back in your song.
The take is good. The energy is right, the words land, and then one note goes sour right in the hook. Singing it again means another session, and the new take rarely has the same feel. Newtone can fix that single note in a minute, and it’s already inside FL Studio.
This guide covers every part of Newtone you’ll actually use: the three big knobs, cutting a word in half, snapping to a key, the formant and getting the result back into your song. It follows Mix Elite’s Newtone tutorial, with real screenshots and the exact menu names from Image-Line’s manual.
Table of Contents
What is Newtone in FL Studio?
Newtone is FL Studio’s built-in pitch correction and timing editor. It splits a recorded vocal into note blocks on a piano roll, so you can see which words are sharp (too high) or flat (too low) and drag them onto the right note. If you know Melodyne, it works the same way.
Image-Line’s Newtone manual describes it as an editor that can slice, warp, correct and edit vocals, instruments and other recordings. In plain words, Newtone retunes and retimes anything that plays one note at a time. It’s made for single lines, like a lead vocal or a solo instrument. Chords and full mixes are not its job.
Max, the founder of Mix Elite, says Newtone imitates Melodyne, the industry standard, very well. The difference is that Newtone already comes with FL Studio, so it’s the tool Mix Elite’s Newtone tutorial uses for the whole vocal, start to finish.
Which FL Studio editions include Newtone?
Newtone comes with FL Studio Signature Bundle and All Plugins Edition. Image-Line’s edition comparison lists it as “Signature Bundle and up”. The free FL Studio trial includes it with every feature, though the trial can’t reopen a saved project once you close it.
In Producer Edition, Newtone opens as a demo. You can try every tool, but it can’t export the tuned vocal, as Mix Elite’s free 4.5-hour FL Studio course points out. Check your edition before you spend an hour on a vocal.
How to use Newtone in FL Studio: 7 steps
Every Newtone session follows the same order. You open the vocal, read the notes, set three knobs, check it against the beat, then fix what’s left by hand. Tap a step to jump to it.
Here’s Mix Elite’s full Newtone tutorial, where Max tunes a real trap vocal from start to finish. Watch it once, then use the sections below as your checklist:
How do you open a vocal in Newtone?
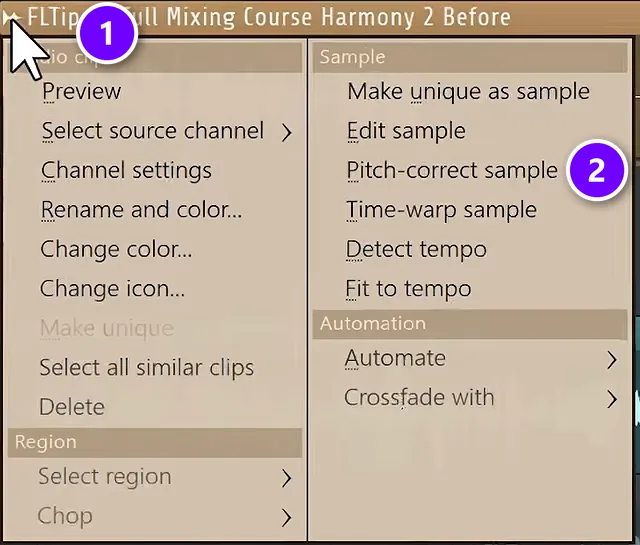
Click the small icon in the top-left corner of the vocal clip in the Playlist (1) and choose Pitch-correct sample (2). Newtone opens with the vocal already loaded and split into notes. The Playlist manual lists it under the Sample part of the clip menu.
Get the whole vocal into one clip first. Max’s first step in the video is to consolidate the vocal into a single clip, because Newtone works on one audio file at a time. If your take is spread over several clips, right-click the track name in the Playlist and choose Consolidate this track. FL Studio renders everything on that track into one new clip and mutes the old ones.
There are two other ways in:
- From a sampler channel: open the channel, right-click the waveform and choose Edit in pitch corrector.
- From inside Newtone: use File > Load sample (Ctrl + O) to open any audio file on your computer.
What does the Newtone window show?
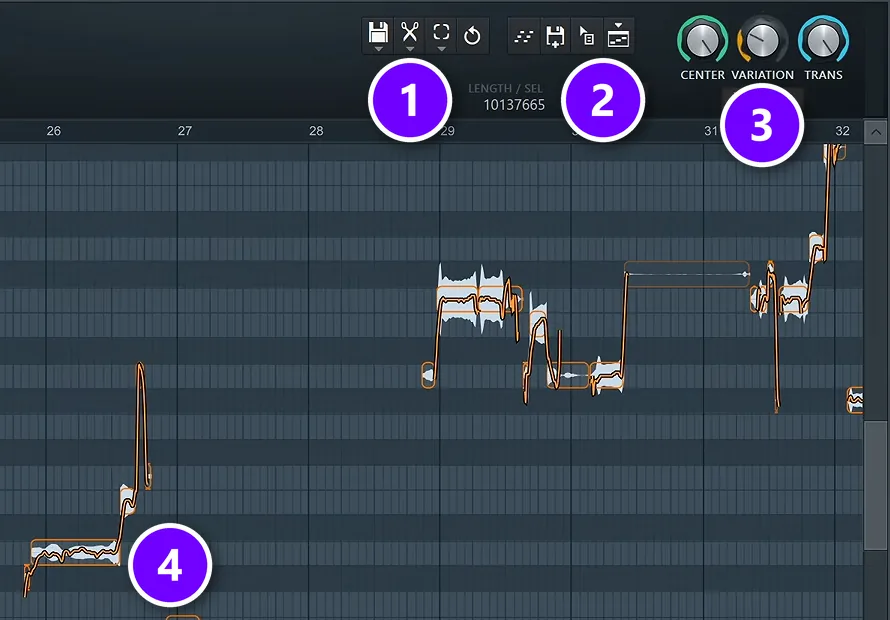
Newtone shows your vocal as note blocks on a piano roll. Each note has three orange marks: a rectangle for its average pitch, a shaded block for the nearest semitone (half step), and a thin line for the pitch the singer really sang at every moment.
When a rectangle sits above or below its shaded block, that word is out of tune. That’s your cue to fix it. Newtone guesses the target note for you, and Max finds it’s almost always the note the singer was trying to hit. The picture shows the parts you’ll use most. There’s the Edit menu behind the scissors icon (1), the Drag selection and Send selection to Playlist buttons (2), and the Center, Variation and Trans knobs (3). Number 4 is a detected note with its orange pitch line.
Moving around works much like FL Studio’s Piano roll:
- Scroll the mouse wheel to move up and down, and hold Shift to scroll sideways.
- Zoom with Ctrl and the mouse wheel (horizontal) or Alt and the wheel (vertical), as the manual lists them.
- Drag with the middle mouse button, or hold Ctrl + Alt and drag, to move the view any way you want.
- With playback stopped, click the middle of a note and drag sideways to scrub through just that word.
- Press Space to play and L to switch loop mode on, so a tricky line repeats while you work.
Center, Variation and Trans: what do Newtone’s knobs do?
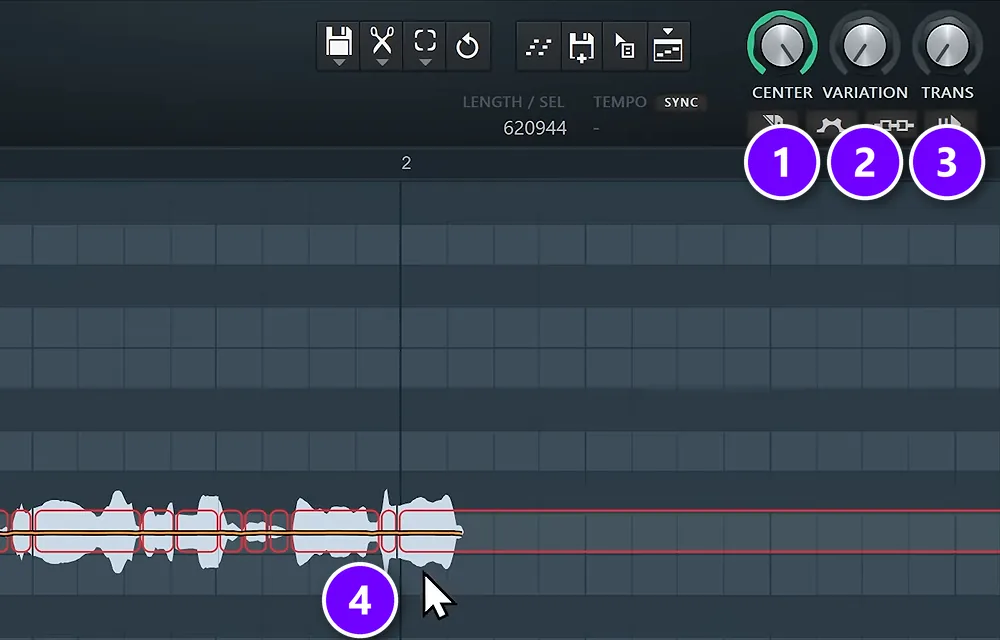
These three knobs at the top right change every note at once. Start with them. Max calls them the most important part of the plugin, and you’ll touch them every time you open Newtone. In the picture, Center is all the way up (1), with Variation (2) and Trans (3) set lower, so the notes of this harmony sit flat on one pitch (4).
Center: pull each note onto its pitch
Center moves each note’s average pitch onto the nearest semitone. Turn it all the way up and the orange rectangles snap into their shaded blocks, while the natural movement inside each note stays. On Max’s vocal, it “doesn’t sound robotic at all. It sounds pretty much exactly the same as without it.”
That’s why Center is the safe knob. Max turns it all the way up on almost every vocal, because it barely changes the tone.
Variation: how much wobble stays in each note
Variation controls the pitch movement inside a note: vibrato, drifting and small errors. The lower you set it, the flatter each note gets and the more the vocal sounds like Auto-Tune. All the way down, held notes turn into a straight, robotic line.
Max’s setting for a tuned vocal that still sounds human: “I usually find myself going to about nine o’clock. It’s just a perfect sweet spot.” Picture a clock face: at nine o’clock the knob points straight to the left.
Trans: how fast one note slides into the next
Trans (short for Transition) sets how quickly the pitch moves from one note to the next. Turn it down and the voice jumps from note to note with no slide at all. That’s the hard, robot sound. Max leaves it alone unless he wants that effect on purpose.
What are the best Newtone FL Studio settings for a natural vocal?
For a natural lead vocal, select all notes with Ctrl + A, turn Center all the way up, bring Variation down to about nine o’clock and leave Trans as it is. Then play it with the beat and fix the few notes that still sound off by hand.
- Center: all the way up.
- Variation: about nine o’clock for a light, modern tuned sound. Go higher if the singer’s vibrato is part of the charm.
- Trans: untouched, unless you want stepped, robotic autotune.
For hard autotune, go the other way: Center up, Variation at zero and Trans all the way down. That’s the setting Mix Elite’s background vocals guide uses to turn a copy of the lead into a harmony, following Mix Elite’s harmonies video.
How do you hear Newtone with the beat?
Switch on Slaved playback mode (shortcut H), then right-click its button and tick Ignore host selection. Newtone now plays in sync with your FL Studio song, so you hear the tuned vocal over the beat instead of on its own.
Here’s how Max sets it up in the video. Detach the Newtone window so it stays open, select the whole clip, turn on slave playback and pick Ignore host selection. He stresses that last step. Then mute the original vocal clip in the Playlist and press play. The manual adds one detail: keep FL Studio in Song mode.
Why bother? Context changes everything. A vocal can sound fine alone and wrong against the chords. In Max’s demo, the tuned and untuned takes sound almost the same until the beat plays under them.
How do you snap Newtone to a scale?
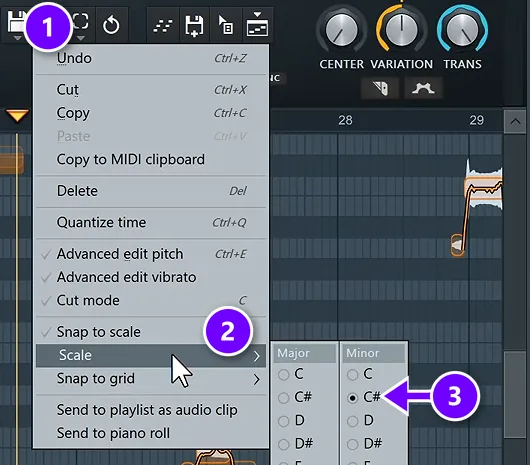
Open the Edit menu (the scissors icon), go to Scale and pick your song’s key, then make sure Snap to scale is ticked. From then on, any note you drag up or down can only land on notes of that scale.
The screenshot from Mix Elite’s free FL Studio course shows the Edit menu (1), the Scale list (2) and C sharp minor picked (3). Newtone offers major and minor keys. Max says the hardest part is simply knowing which scale you’re in. If the beat maker didn’t tell you, drop the beat into a free key finder like Tunebat’s analyzer, which is what the free course does.
On sung house and EDM toplines, the scale does most of the work. Max centers everything, brings Variation down a little, snaps to the scale and is nearly done. Rap and trap vocals need more hands-on work. On the trap vocal in the video every note sat a little high, so he pressed Ctrl + A and dragged the whole vocal down at once.
Snap to scale only acts on notes you move. If a note won’t go where your ear wants it, turn Snap to scale off and fix it by hand. Right-click a note to snap it to the nearest semitone, or hold Alt and drag the middle of the note for fine tuning between semitones.
How do you cut and join notes in Newtone?
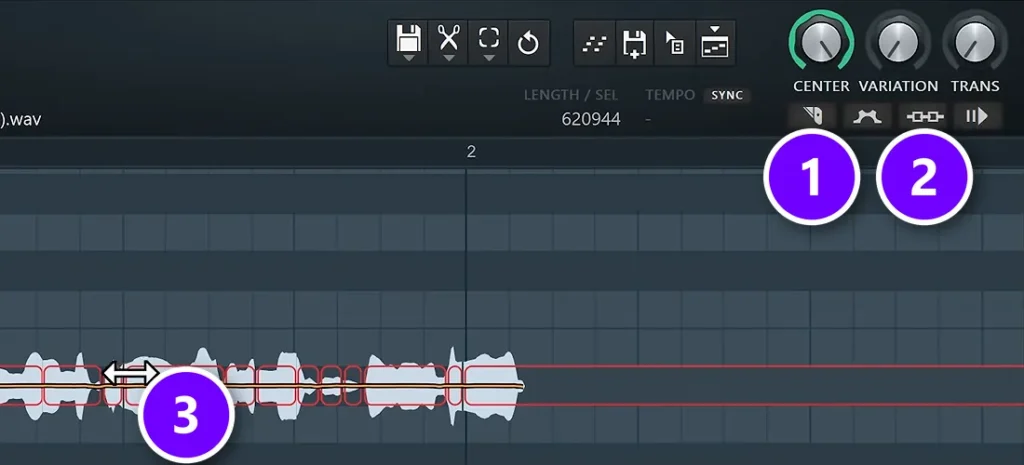
Press C (or click the Cut mode button, 1 in the picture) and click a note where you want to split it. To glue two pieces back together, stay in Cut mode, hold Ctrl and click the second piece when the pointing finger shows.
Why cut at all? Singers often hold one pitch across two words, so Newtone reads them as one long note. In the video, one note carried two words. Max wanted only the second word on that pitch and the first one a little higher. One cut, one drag, done.
Cuts follow the grid. For a cut between grid lines, set Snap to grid in the Edit menu to none (it runs from none to 1/8 beat). You can also group notes: hold Ctrl and drag up or down through several notes to select them, then click a key on the piano on the left, and they all jump to that pitch.
How do you fix vocal timing in Newtone?
Hover over the edge of a note until the double arrow shows, then drag it left or right (3 in the picture). Where two notes touch, both edges move together. Hold Ctrl to move one note on its own, or Alt to drag past the grid.
Newtone’s Edit menu also has Quantize time, which pulls every note onto the grid at once. Max tried it on the vocal and his verdict was clear: “You never want to quantize time.” It wipes out the groove of a real performance. Small moves win. Move only the words that feel late or early, and leave a vocal that was sung in time alone.
How do you change the formant in Newtone?
Double-click a note to open Advanced edit, or turn on Advanced edit pitch in the Edit menu (Ctrl + E in FL Studio 24). Then drag the Formant control up or down. The formant changes how big, old, male or female a voice sounds, without changing the note.
Formants are the resonances of the throat and mouth, the manual explains, which is why moving them makes the same singer sound like someone else. Max’s trick is to select every note first and pull the formant down for a deeper, more masculine take, or up for a thinner one. Pushed further, it makes a whisper-like effect he layers over the original vocal.
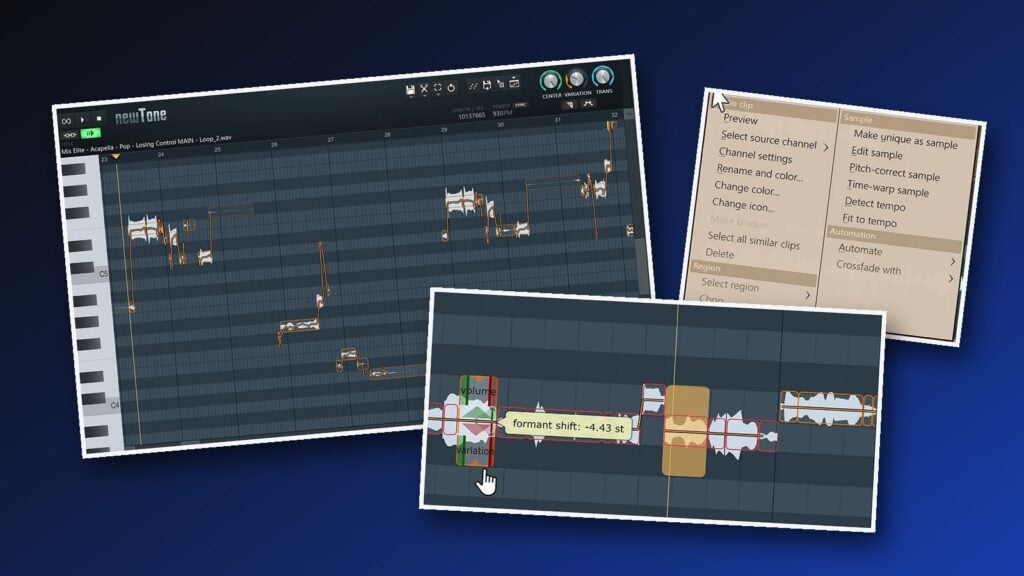
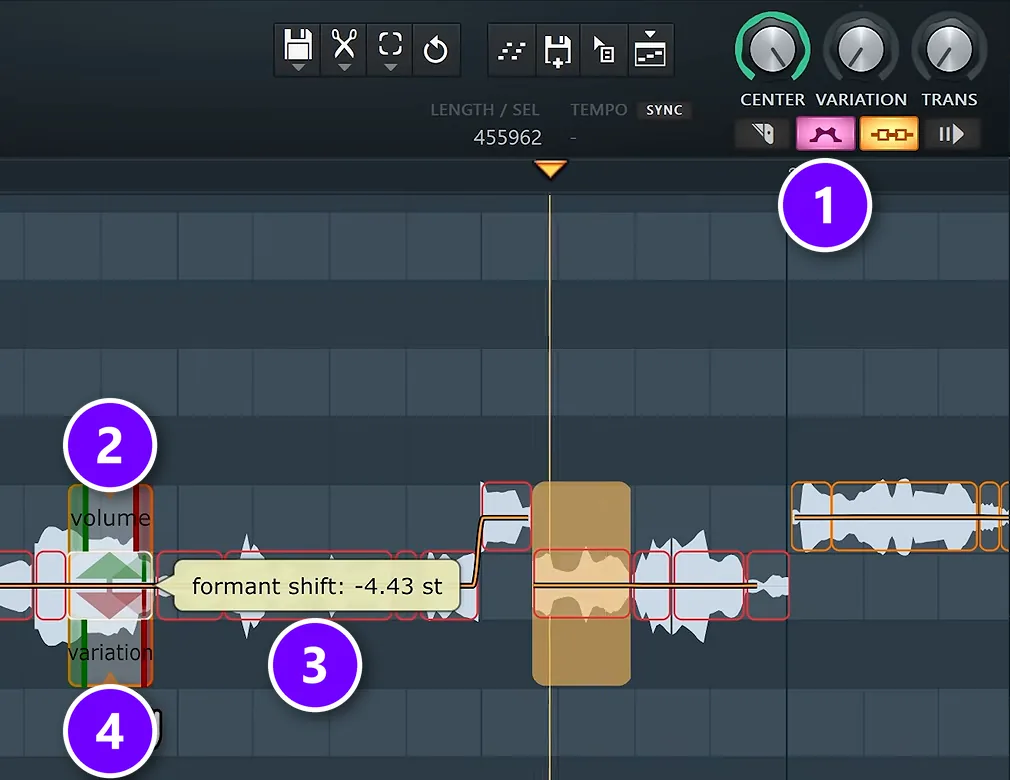
In the frame from Mix Elite’s harmonies video, Advanced edit is switched on (1). The chosen note shows its volume handle (2), a formant shift of -4.43 semitones (3) and its variation handle (4).
What else can Newtone’s Advanced edit do?
Advanced edit gives every note its own set of controls. Image-Line’s diagram below labels all of them:
- Volume: makes one word louder or quieter, like a loud breath. Outside Advanced edit, Max holds Alt and scrolls down over a note to silence it.
- Pitch variation: the Variation knob for one note only. Max lowers it on a single wobbly word instead of flattening the whole vocal.
- Ramp in and ramp out: how the pitch and volume glide into and out of the note. Max uses the pitch ramps as a hand-drawn portamento, which is a slide between notes.
- Position: moves the note in time, just like dragging its edges.
How do you add vibrato in Newtone?
Choose Advanced edit vibrato in the Edit menu, then double-click a note. Drag the blue line sideways to set how fast the vibrato goes, and drag the start and end levels to set how deep it gets. The green line marks the speed of the singer’s own vibrato.
The manual suggests dialing the natural vibrato out with Variation first, so you hear exactly what you add. Go easy. Max pushes it on a held note in the video until the vocal sounds like opera, just to show the range.
Newtone vs Pitcher: which one should you use for real-time autotune?
Use Pitcher for real-time autotune and Newtone for careful fixes. Pitcher sits in a mixer slot and tunes the voice live while it plays, like classic Auto-Tune. Newtone edits a recorded vocal note by note after the take, like Melodyne.
Max explains how pro sessions split the work. The artist usually records with autotune on, so he hears himself tuned in the headphones. After the take, the producer opens Newtone or a similar editor and corrects the recording itself. A simple autotune plugin can’t do what Newtone does, but Newtone can do what autotune does.
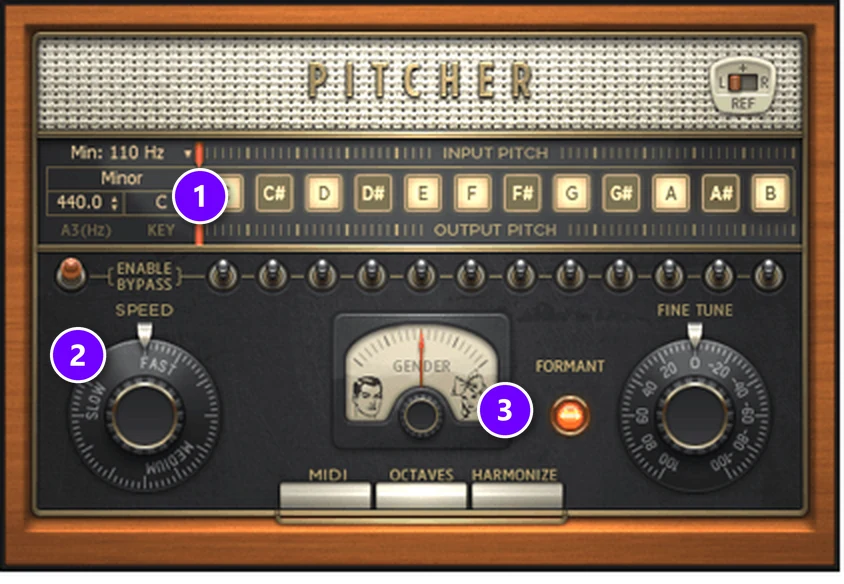
To set up Pitcher, pictured here from Image-Line’s Pitcher manual:
- Route the vocal to its own mixer track and load Pitcher in the first effect slot, before any reverb or delay.
- Pick Major or Minor and the key, or switch single note buttons on and off by hand (1).
- Set Min to the lowest pitch you expect. Image-Line suggests 80-170 Hz for male voices and 170-220 Hz for female voices.
- Set Speed (2). Faster settings sound more artificial, slower ones more natural.
- Leave Formant on (3), so big pitch moves don’t sound like helium.
Pitcher also comes with Signature Bundle and up, and it only works on single voices. To record with it switched on, follow Mix Elite’s guide to recording vocals in FL Studio.
How do you export from Newtone back to the Playlist?
Open the Edit menu and choose Send to playlist as audio clip. Newtone drops the tuned vocal into your Playlist as a new audio clip, with markers at the note boundaries. The Send selection to Playlist button sends the selection, or the whole vocal, in one click.
You have five more ways to get your work out:
- Drag selection: drag this button onto the Playlist or Channel rack. With nothing selected, it copies the whole vocal.
- File > Save sample as (Ctrl + S): saves the tuned vocal as a WAV file, or MP3, OGG or WavPack.
- Copy to MIDI clipboard (Edit menu): copies the melody as notes for a Piano roll. Max uses it to layer a synth with sung house vocals and make them bigger.
- Send to piano roll or the Create Score button: sends the notes straight into the Piano roll of the selected channel.
- File > Save as MIDI: saves the melody as a .mid file.
That’s it. Then mute the original clip so you don’t hear both versions at once. Keep the untuned take in the project, though. If you change your mind later, you can start again from the raw vocal.
In Producer Edition, Newtone runs as a demo that can’t export the tuned vocal. If none of these options gives you audio, check your edition first. Signature Bundle and All Plugins Edition include the full version.
Why does my Newtone vocal sound robotic or harsh?
Usually a knob went too far. Variation near zero flattens every note into a straight line, and a low Trans makes the voice jump between notes. Raise Variation, set Trans back up, and check the key, because a wrong scale drags good notes onto wrong ones.
Four more things to check:
- Breaths and hissy consonants. Leave breaths and sounds like S and T untouched. Max usually leaves them alone, because tuning them makes them sound weird and digital.
- A note moved too far. A shift of several semitones rarely sounds natural. Try a smaller move, or record that word again.
- The wrong key. If good notes start jumping to strange ones, try the other likely key or turn Snap to scale off.
- Quantized timing. A vocal pulled tight to the grid sounds stiff even when every note is in tune.
Sometimes robotic is exactly the goal, as in a lot of trap and pop. Mix Elite’s broader guide on how to tune vocals in FL Studio covers hard Auto-Tune settings and how to make autotune sound natural.
What should you do after tuning in Newtone?
Tuning is the first step of a vocal mix, not the last. Next come EQ, compression, de-essing and space, which Mix Elite’s guide to mixing vocals walks through in order. To do it with FL Studio’s own plugins only, follow the guide to mixing vocals with stock FL Studio plugins.
Or start that mix from a preset. Mix Elite’s Spirits vocal presets give you 51 one-click presets for rap, singing, adlibs and vocal effects in FL Studio, Ableton Live and Logic Pro.
No Signature Bundle? The best free autotune plugins are the closest free alternatives to Newtone. They tune in real time like Pitcher rather than note by note, but they cost nothing.
Open one vocal tonight. Turn Center up, set Variation to nine o’clock and play it with the beat. You’ll hear the difference in the first chorus.
DAY 5 OF THE 7-DAY MUSIC PRODUCER COURSE
Newtone fixes the notes. Day 5 makes the vocal shine.
Day 5 of Mix Elite’s 7-Day Music Producer Course is all about vocals: how to record great vocals at home on any budget, the V.O.C.A.L. formula that turns rough vocals into head-turners, and 10 copy-and-paste vocal chains. You also get practice acapellas and free vocal plugins, so you can practice without a singer. It’s taught in FL Studio (the free trial works), and on Day 7 a pro gives you feedback on your track. It’s $27, with a 60-day money-back guarantee.
Frequently asked questions
Is Newtone free in FL Studio?
Newtone is included with FL Studio Signature Bundle and All Plugins Edition, so there’s nothing extra to buy on those editions. The free FL Studio trial has it with every feature, but the trial can’t reopen saved projects. In Producer Edition, Newtone runs as a demo that can’t export the tuned vocal.
Is Newtone as good as Melodyne?
For everyday vocal tuning, Newtone does the same core jobs. It splits a vocal into notes you can move, evens out pitch drift and vibrato, fixes timing and shifts formants. Melodyne is the industry standard with more tools, but Newtone is already inside FL Studio, and Mix Elite’s tutorials tune complete vocals with it.
What is a free alternative to Newtone?
If your FL Studio edition doesn’t include Newtone, free tuners such as the free edition of Auburn Sounds’ Graillon or MeldaProduction’s MAutoPitch work in a mixer slot. They tune in real time like Pitcher, not note by note like Newtone. Mix Elite’s list of the best free autotune plugins compares them.
Why can’t I export from Newtone?
Most likely you’re on FL Studio Producer Edition or lower, where Newtone runs as a demo that can’t export the tuned vocal. Signature Bundle and All Plugins Edition include the full version. If you have it, use Send to playlist as audio clip in the Edit menu, or drag the Drag selection button onto the Playlist.
Can Newtone tune vocals in real time?
No. Newtone edits a recorded audio file, so you tune after the take. For live tuning while you sing, load Pitcher, FL Studio’s real-time pitch corrector, on the vocal’s mixer track. Many producers record with Pitcher on so the singer hears a tuned voice, then clean up the recording in Newtone.