

“Clay is fashioned into vessels; but it is on their empty hollowness, that their use depends.”
To sidechain in Ableton, put Compressor on the track you want to duck, usually the bass. Click the toggle in its title bar, switch on Sidechain and choose the kick’s track in the Audio From menu. Then lower the Threshold and set the Ratio to about 4:1, until the bass drops a few dB each time the kick hits.
The kick sounds huge on its own. So does the bass. Then you play them together, and the low end turns into one thick blur while the kick loses the punch you spent an hour on. It’s one of the most common problems in a mix, and Ableton has the fix built in.
This guide shows how to set up an Ableton compressor sidechain in Live 12, click by click, plus the settings that keep the duck clean instead of choppy and the other ways to use the same trick. Mix Elite teaches FL Studio, so the last part shows the same move there, with screenshots from our sidechain video.
Table of Contents
What is sidechain compression in Ableton?
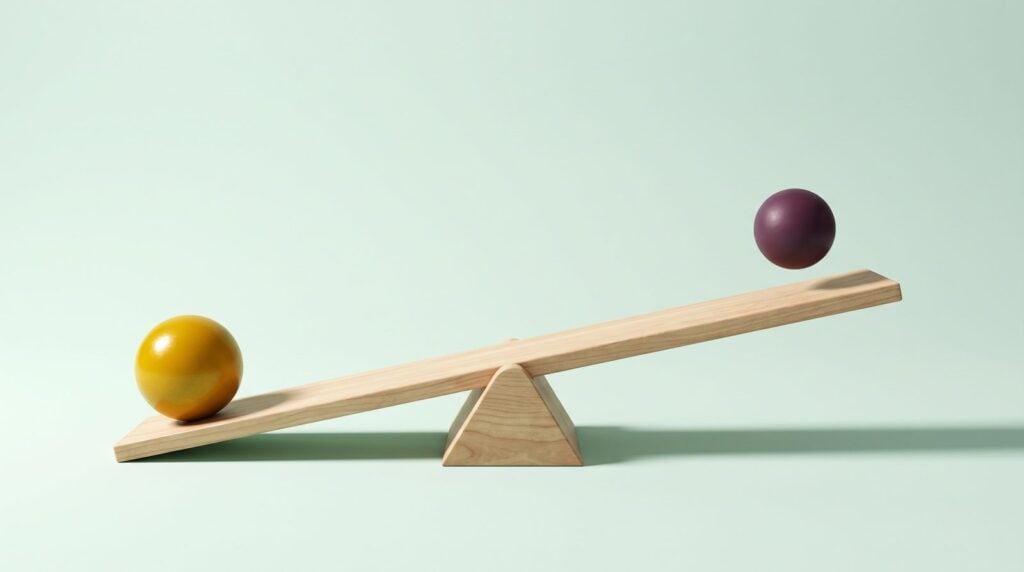
Sidechain compression is a compressor that listens to one track and turns down another. In Ableton Live, you put Compressor on the bass and tell it to listen to the kick. Every time the kick hits, the bass gets quieter for a split second, then comes back. Producers call that dip ducking.
Max, the founder of Mix Elite, sums it up like this in Mix Elite’s free 4.5-hour FL Studio course: “Sidechain compression works exactly like a compressor, attenuating whatever exceeds the threshold, but we take a different trigger for the compressor.” A normal compressor reacts to the track it sits on. A sidechained one reacts to something else, usually the kick.
Why bother? The kick and the bass both live in the low end, the deep part of a mix that you feel as much as hear. When they hit at the same moment, they pile up and the mix gets muddy. The course’s rule is simple: no sub bass should play at the same time as the kick. Duck the bass for a moment on every kick, and the kick punches through while the bass still sounds full.
The same tool also makes the pumping sound of house and EDM, where pads and chords swell back up after each kick. It’s one technique. Pumping just pushes it harder.
What does Ableton’s Compressor do?
Compressor turns a sound down whenever it goes over the Threshold, by an amount set by the Ratio. Attack sets how fast it reacts and Release how fast it lets go, while the Out knob, or the Makeup button, brings the level back up. Switch on its sidechain, and it listens to another track instead, which is how ducking works.
It also has a Knee control, Lookahead and three modes, Peak, RMS and Expand, which the settings below explain for sidechaining. A Dry/Wet knob blends the uncompressed sound back in, and three views show what it’s doing: Collapsed, Transfer Curve and Activity. Live 12’s audio effect reference covers every control.
How to set up an Ableton compressor sidechain, step by step
Put Compressor on the bass, the track you want to duck, then switch on its sidechain and choose the kick as the source. Live 12 Intro, Standard and Suite all come with Compressor (see the editions), so these steps work in every one of them:
- Find Compressor in the browser under Audio Effects, or press Ctrl + F (Cmd + F on a Mac) and type its name. Drag it onto the bass track, the track you want to duck.
- Click the small toggle button in Compressor’s title bar. The device unfolds and shows its sidechain section.
- Switch on Sidechain.
- In the Audio From menu, choose the track your kick is on.
- Lower the Threshold until the bass dips each time the kick plays.
- Set the Ratio to about 4:1 and the Attack to fast, then set the Release by ear (more on all three below).
- Play the full mix, not just the two tracks, and adjust until the kick feels clear and the bass still feels big.
The menu under Audio From picks the point where Live listens to the kick. Pre FX listens before the kick’s effects, Post FX after its effects but before its fader, and Post Mixer after the fader. With Pre FX or Post FX, the duck stays the same even if you turn the kick down later. Live’s manual explains these tapping points in its routing chapter.
Click the headphones button between the sidechain controls and the sidechain EQ. You’ll hear only the signal that triggers the compressor, which is the fastest way to check the kick is really coming through.
What are the best sidechain compressor settings in Ableton?
Start with a 4:1 ratio, a fast attack near 0 ms and a Threshold low enough to duck the bass by about 7 to 10 dB on each kick. Then set the Release so the bass is back before the next kick. These starting points come from Mix Elite’s mixing lessons and from how each control works in Live:
- Ratio. Start at 4:1, the sidechain ratio in Mix Elite’s free course. Go higher for a harder duck.
- Threshold. Lower it until the bass drops by about 7 to 10 dB on each kick.
- Attack. Keep it fast, close to 0 ms, so the duck starts with the kick and not after it.
- Release. The bass has to come back before the next kick. At 128 BPM, kicks on every beat land about 469 ms apart (60,000 divided by 128). A short release sounds tight. A longer one gives you the breathing pump of house music.
- Knee. A knee of 0 dB, called a hard knee, gives a clear, obvious duck. Raise it for a softer one.
- Lookahead. Choose 1 ms or 10 ms instead of 0 ms, and Compressor can react a moment early, so even the very start of the kick comes through clean.
- Peak or RMS. Peak reacts to every short hit, which suits a kick. RMS follows the average level and ducks more gently.
The 7 to 10 dB target comes from the course’s mixing lesson, where Max says: “I think that attenuating by about 7 to 10 dB will be perfect in that case.” Treat it as a starting point and trust your ears on your own track.
Two more things to know. Compressor’s Makeup button doesn’t work while an external sidechain is on, according to the Live 12 manual, so set the level by ear with the Out knob. And once the duck is in, check your whole mix again, because after sidechaining, EQ and compression, new problems often pop up, especially with levels.
Switch Compressor to its Activity view with the view switches in the bottom corners of its display. It draws the level over time together with the gain reduction, so you can see every duck as a dip.
How to sidechain with Glue Compressor
Live 12 Standard and Suite also include Glue Compressor. Its sidechain works the same way: unfold the device with the toggle in its title bar, switch on Sidechain and pick the kick. Two settings are worth knowing. Set Release to A (Auto), and Glue Compressor adapts its release to the music. The Range knob limits how much compression can happen, so it’s a quick way to cap the duck. Leave Soft clip off unless you want the distortion it adds.
Which one should you use? Compressor shows you more, with its Activity view and Lookahead. Glue Compressor has fewer controls to think about. Both can duck a bass, so pick one and learn it well.
How do you sidechain several tracks to the kick?
Don’t stop at the bass. Mix Elite’s free course makes one group for everything that should duck, then puts a single compressor on that group. In Live, that’s a Group Track:
- Select the bass, chords, pads and any other tracks that should duck.
- Press Ctrl + G (Cmd + G on a Mac) to group them.
- Put one Compressor on the Group Track and set its sidechain to the kick, the same way as above.
Every track inside now ducks together, and you only tweak one set of knobs. A Group Track mixes everything inside it and can hold its own effects (Live 12 manual, Mixing). Leave out sounds that are meant to hit hard, though. The course keeps brass hits and crashes out of the group, and Max explains why: “I don’t think that we need to sidechain it, because it creates this impact.” For more ways to speed up Live, see our Ableton workflow tips.
How do you sidechain a kick that sits in a Drum Rack?
If your kick sits in a Drum Rack with the snare and hats, choosing the drum track as the trigger makes the bass duck on every hit, not just the kick. There are two clean fixes:
- Use the sidechain EQ. It sits on the right side of Compressor’s sidechain section and limits the trigger to one range of frequencies. Set it so only the low end of the drums counts, and the hats stop triggering the duck.
- Use a ghost kick. Make a new MIDI track with a kick sound that plays the same pattern, then pull its volume fader all the way down. Pick that track in Audio From with Pre FX or Post FX. Those points listen before the fader, so the silent track still triggers the duck.
The ghost kick has a bonus. You can move its notes, or swap in a shorter kick sound, to shape the duck without touching the kick anyone hears.
How to sidechain reverb in Ableton
This trick comes from the vocal lesson in Mix Elite’s free course. A long reverb on a vocal sounds big, but it smears the words. So the reverb ducks while the singer sings and swells back up in the gaps:
- Press Ctrl + Alt + T (Cmd + Option + T on a Mac) to add a return track, and load a reverb on it.
- Turn up the vocal’s send to that return track.
- Add Compressor after the reverb, open its sidechain section and pick the vocal track in Audio From.
- Start around 4:1, the ratio that lesson uses, and lower the threshold until the tail drops back while the vocal plays.
The vocal stays clear, and the space still blooms in every pause. Our guide to reverb vs delay explains when each effect fits.
Other ways to duck a track in Ableton
Ducking just means one sound dips while another plays, and Compressor isn’t the only way to do it. Live can also make a sound react to another track with Auto Filter, Gate or a sidechain-ready plug-in, or, in Suite, duck it with a Max for Live device mapped to the volume:
- Auto Filter (Live 12.2 and newer). Its sidechain section opens from the upper left corner. Switch on External, pick the source and its tapping point, and the filter moves with another track.
- Gate. It can let a pad through only when the drums hit, for a choppy rhythm. Its Flip switch turns that around, so sound passes only while the trigger is quiet.
- Third-party plug-ins. When a plug-in supports sidechaining, Live shows the controls on the left side of the device: source menus, Gain, Mix and Mute (Using Plug-Ins).
- Max for Live, in Suite. Shaper lets you draw a dip that repeats in time with the song, and LFO repeats one of its wave shapes in sync. Envelope Follower can turn a sidechain signal into rhythmic ducking (Max for Live devices). Map one to the bass’s volume and you get a duck with no compressor at all.
Why is my Ableton sidechain not working?
If Sidechain is on but the bass still isn’t ducking, check the routing first: Compressor belongs on the bass, not the kick, and Audio From must show the kick’s track. Then lower the Threshold until the gain reduction meter moves on every kick. Almost every case comes down to one of these six things:
- Compressor on the wrong track. It goes on the sound you want to duck, not on the kick.
- Sidechain switched off. The section can be open while the switch is still off.
- Wrong source. Check that Audio From shows the kick’s track.
- Threshold too high. Lower it until the gain reduction meter moves on each kick.
- Post Mixer with the kick turned down. Post Mixer listens after the fader, so a quiet kick track sends a weak trigger. Switch to Pre FX or Post FX.
- Too much pumping. Raise the threshold, lower the ratio or shorten the release.
Will sidechaining the bass to the kick fix a muddy low end?
It helps, but it’s rarely the whole fix. A sidechain only clears the low end for the moment the kick hits. Mud also comes from several sounds playing sub bass at once, so let one sound own the sub, cut the lows on everything else, and then sidechain the bass to the kick.
That’s the order Mix Elite’s free course follows. It starts the EQ stage of a mix with the low end, because that’s the most sensitive part:
- Let one sound own the sub. When you layer basses, only one of them should play the sub range. Give the others a low cut, also called a high-pass filter, with a gentle slope, because very steep filters sound less natural.
- Clean everything that doesn’t need lows. Arps, pads and other parts often carry sub you can’t hear on their own. Cut it, and keep an eye on the low mids too.
- Leave the kick’s sub alone. The course doesn’t cut sub from the kick, because the sidechain handles the clash. If the kick itself sounds muddy, dip its low mids a little instead of boosting the lows, or choose a better kick sample.
How to sidechain in FL Studio
FL Studio does the same job with its own tools. Mix Elite teaches in FL Studio, and the screenshots below come from our sidechain video. Weighing the two programs? Our FL Studio vs Ableton Live comparison lays out the differences.
Send the kick to the track you want to duck
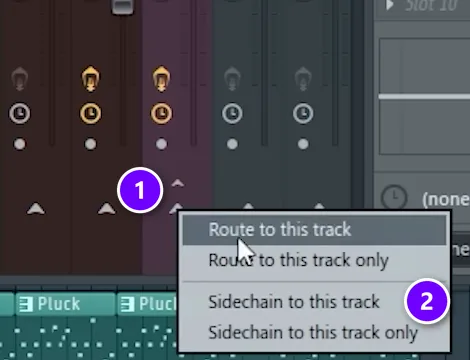
Open the mixer and select the kick’s track. Then right-click the small arrow at the bottom of the track you want to duck (1) and choose Sidechain to this track (2). In our video, that’s a mixer track called Sidechain that collects every instrument that should duck, the same group idea as in Ableton. The kick’s signal now reaches that track, but you don’t hear the kick twice.
Pick the kick in Fruity Limiter
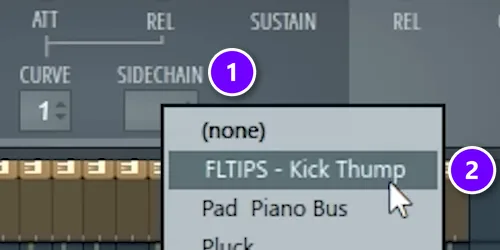
Load Fruity Limiter on that track. Right-click its SIDECHAIN box (1) and choose the kick from the list (2).
Turn on COMP and set the duck
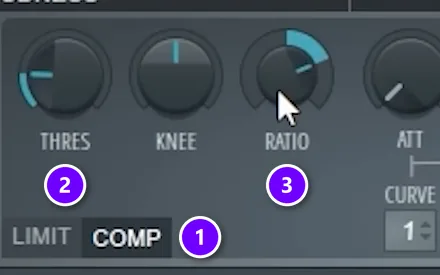
Click COMP (1) so the limiter works as a compressor. Lower THRES (2) until the bass dips on each kick, and raise RATIO (3) to about 4:1. Aim for a duck of 7 to 10 dB, the same target as in Ableton.
The video above walks through the whole setup in under four minutes. For more FL Studio methods, like keeping an 808 punchy while it ducks or sidechaining a reverb, read our full guide on how to sidechain in FL Studio. New to compression? Start with how to use a compressor. You can try every FL Studio step in the free FL Studio trial.
Whichever DAW you use, the order stays the same: pick the trigger, pick the target, then set threshold, ratio and release by ear. Sidechain is one step of a bigger process, and our guide on how to mix a song shows where it fits.
DAY 4 OF THE 7-DAY MUSIC PRODUCER COURSE
Sidechain is one move. Day 4 teaches the whole mix.
Day 4 of the 7-Day course is all about mixing: the simple Holy-Quad mixing formula, the volume mistake beginners make in the first 5 minutes of every mix, a mixing checklist and a mixing template to start from. It’s taught in FL Studio (the free trial works), and every process in it applies whatever software you use. It’s $27, with a 60-day money-back guarantee.
Frequently asked questions
Where is the sidechain on Ableton’s Compressor?
Click the toggle button in Compressor’s title bar to unfold the device. The sidechain section appears with a Sidechain switch, the Audio From menus, Gain, Dry/Wet, a sidechain EQ and a headphones button for hearing the trigger. Switch on Sidechain and choose the kick’s track in Audio From.
What is ducking in Ableton?
Ducking means one sound gets quieter for a moment whenever another sound plays. In Ableton you set it up with a sidechained Compressor: the bass, pad or reverb dips each time the kick or vocal comes in, then comes back up. It gives the important sound room without turning the rest down for good.
Should the compressor go on the kick or the bass?
On the bass, or on whatever track you want to duck. The kick is only the trigger, and you choose it in the Compressor’s Audio From menu. A compressor on the kick would change the kick itself, not the bass.
Why isn’t my bass ducking in Ableton?
Usually it’s the routing. Check that Compressor sits on the bass, that Sidechain is switched on, and that Audio From shows the kick’s track. Then lower the Threshold until the gain reduction meter moves on each kick. If you turned the kick’s fader down and picked Post Mixer, switch the tap point to Pre FX or Post FX.
How do you sidechain in FL Studio?
Select the kick’s mixer track, right-click the routing arrow of the bass track and choose Sidechain to this track. Load Fruity Limiter on the bass, switch it to COMP, right-click its SIDECHAIN box and pick the kick. Then lower the threshold and set the ratio to about 4:1 until the bass ducks by 7 to 10 dB.