

“When I sampled that kick and that snare and made my own beats, that changed hip-hop.”
The main audio sampling techniques are chopping a sample into slices, pitching and time-stretching it to your song’s key and tempo, flipping the slices into a new part, layering it with other sounds, and resampling, which means bouncing a processed sound to audio and treating it as a fresh sample. In FL Studio, you chop with Slicex or Fruity Slicer and resample with Ctrl+Alt+C.
You find a loop you love, drag it into FL Studio, and it sounds great. Then it hits you: everyone who downloaded that pack has the exact same loop, and nothing about it says you.
This guide fixes that. It walks through the moves Max, the founder of Mix Elite, teaches on the Mix Elite YouTube channel, in the order you’d use them on a real beat, with a screenshot of every window and the exact clicks.
Table of Contents
What are the main audio sampling techniques?
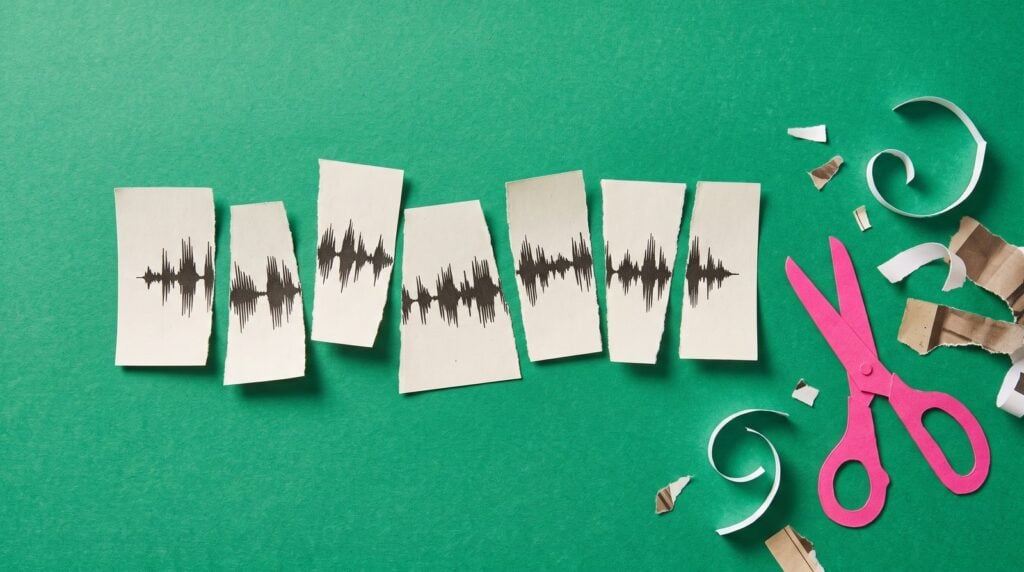
The main audio sampling techniques are chopping, pitching, time-stretching, flipping, layering and resampling. A sample is any piece of recorded audio you reuse in a new track, like one drum hit, a vocal phrase or a few bars of a record, and these six techniques are the ways you reshape it until it fits your song:
- Chopping: cutting a sample into short slices you can replay in any order.
- Pitching: moving a sample higher or lower so it fits the key of your beat.
- Time-stretching: making it faster or slower, with or without changing the pitch.
- Flipping: using the slices to write a brand-new part, so the original is hard to spot.
- Layering: stacking two or more sounds so they hit like one bigger sound.
- Resampling: recording your processed sound as a new audio file, then working on that file.
You rarely need all six at once. A typical beat might chop a loop, pitch it down and layer a clap under it. Everything below is shown in FL Studio, but the same ideas work in any DAW (the music software you produce in).
Where do you find samples worth flipping?
Start with good sound. In Mix Elite’s free 4.5-hour FL Studio course, the rule is simple: great sounds in, great sound out. A thin or muddy sample stays thin or muddy, however clever your chops are. Spend a few minutes picking the source.
- Sample packs. Royalty-free packs are made to be chopped and used in your own songs, as long as you follow each pack’s license. Here’s how to add sample packs to FL Studio so they show up in your Browser.
- Your own old tracks. Pulling a sound out of a finished song is a great trick for your own music, such as old tracks whose project files you lost.
- Sounds you record yourself. Your voice, a guitar, a door slam on your phone: anything you record is yours to chop.
- Records by other artists. This is the classic way to sample, but you need permission before you release anything built on someone else’s recording. Our guide on how to clear a sample covers the steps and the alternatives.
A speed trick for picking sounds: select the channel in the Channel Rack, let the beat play, then click a sample in the Browser and press Shift + ↑ or ↓. FL Studio loads the next or previous sample in that folder onto the channel, so you hear each option in the mix.
How do you chop a sample in FL Studio?
Chopping means cutting a sample into slices, then playing those slices back in a new order. FL Studio gives you three ways to do it. Two are slicer plugins, Slicex and Fruity Slicer. The third is the Chop menu right in the Playlist.
Open the sample in a slicer
- Drag the sample from the Browser into the Channel Rack.
- Double-click the new channel to open its sampler window.
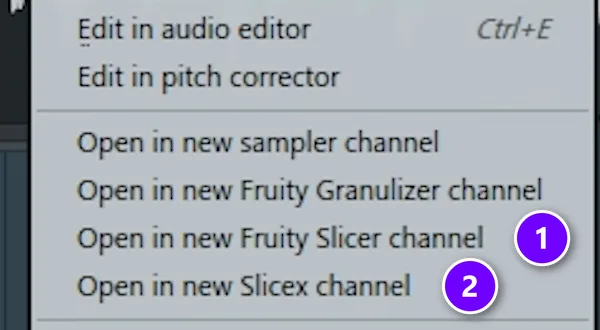
- Right-click the waveform and pick Open in new Fruity Slicer channel (1) or Open in new Slicex channel (2).
Both plugins cut the sample at its hits and put one slice on each key of the piano roll. Fruity Slicer is the quick one. Slicex has more tools for editing single slices.
Chop it in Slicex
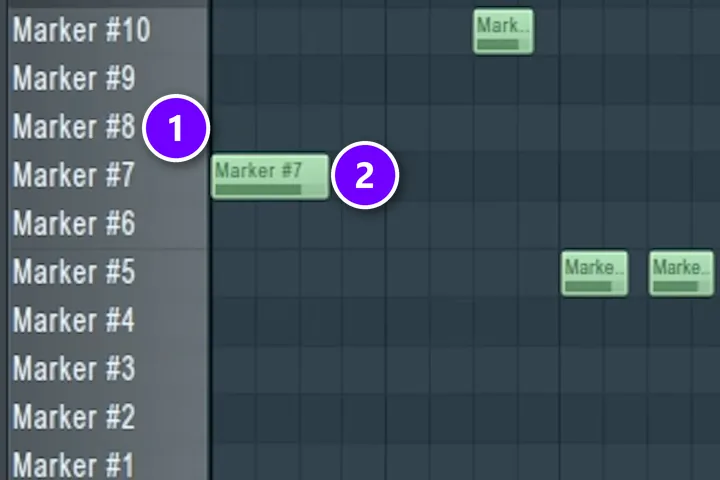
Open the piano roll. Each key on the left now plays one slice, named Marker #1, Marker #2 and so on (1), and every note you draw plays its slice (2). Mix Elite’s vocal chop video starts exactly like this: play with the slices until you have a short, simple sequence, and only then start shaping the sound. Simple wins here.
Three Slicex features save you a lot of time:
- Declick every slice at once. Open the Tools menu, go to Regions and choose Declick in all regions (or Declick out). It adds a tiny fade to each slice, so the cuts don’t click.
- Give a slice its own mixer track. In the region settings, scroll your mouse wheel over the number next to Out to send that slice to a different mixer track and process it on its own.
- Edit slices like audio. Slicex runs on the same engine as Edison, FL Studio’s audio editor, so its Tools menu can time-stretch, pitch-shift, denoise or blur any part of the sample.
The vocal chop chain in that video is short. Send the Slicex channel to a mixer track and add OTT (a free compressor from Xfer) at about 30% depth, then reverb, a cut in the low end and in some of the mids, and a limiter at the end. Watch the whole build here:
Chop it in Fruity Slicer
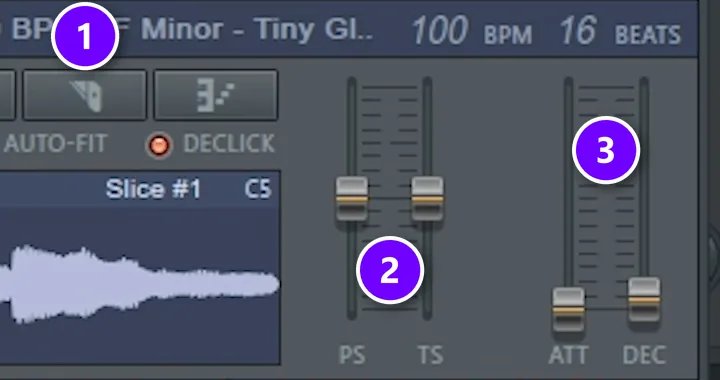
Click the knife button (1) to choose how Fruity Slicer cuts. Dull, Medium and Sharp auto-slicing find the hits with low, medium or high sensitivity, while options like 1/4 beat, 1/2 beat and Beat cut evenly on the grid.
Next, raise ATT and DEC (3) a little. These fade each slice in and out, which stops the click you hear when a chop starts or ends in the middle of a sound. The PS slider (2) moves every slice up or down by as much as 12 semitones (half steps), and TS stretches the slices without changing their pitch.
Then open the piano roll with F7. If AUTO-DUMP is on, Fruity Slicer has already written the slices in their original order. Delete those notes and draw your own pattern.
Chop audio clips right in the Playlist
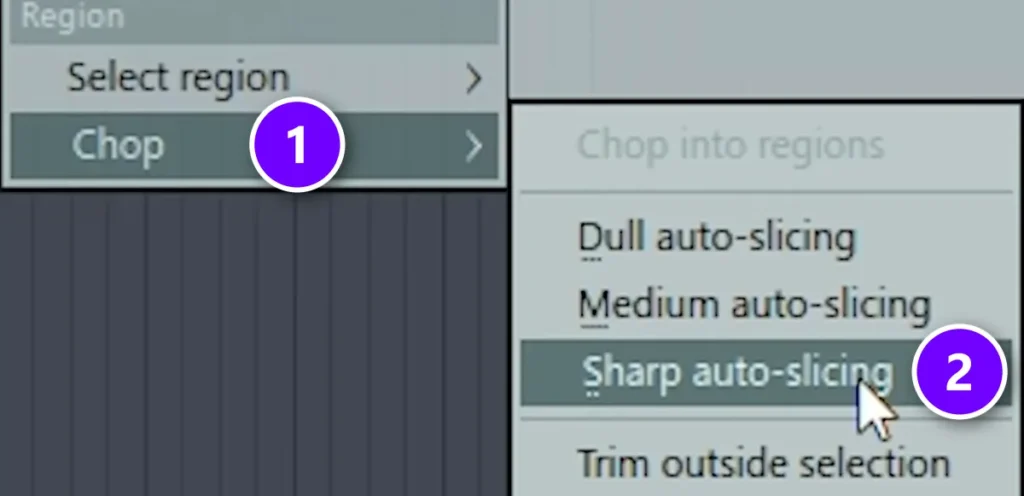
You don’t need a plugin for quick chops. Click the small icon in the top-left corner of an audio clip in the Playlist, open Chop (1) and pick Sharp auto-slicing (2). FL Studio cuts the clip at every hit, and you can delete, move or copy the pieces to build a new rhythm.
Don’t chop everything into tiny bits, though. The same video’s tip is to leave some longer original parts in too. A few longer phrases between the short hits keep the new pattern from sounding random.
One more Playlist trick: with the Slice tool selected, hold Shift and right-click a clip. FL Studio trims away the shorter side of the cut. It’s a fast way to tidy samples.
How do you pitch and time-stretch a sample?
Pitch is how high or low a sound is. Time-stretching changes how long a sample plays, which also changes its speed. Both live in the sampler’s Time stretching panel. The PITCH knob moves the sample in semitones, TIME sets how long it plays, and the Mode menu decides whether speed and pitch move together.
The Mode menu matters most. In Resample mode, speed and pitch are linked like on a tape machine: speed a sample up and it sounds higher, slow it down and it sounds lower and darker. That’s the sound of the classic sped-up soul sample. Pick Stretch, Stretch Pro or one of the elastique modes when the sample has to change speed but stay in key.
Fitting a loop to your project’s tempo is its own job: Autodetect, typing in the loop’s BPM, picking the right stretch mode. We cover it click by click in the FL Studio part of our guide to time-stretching and warping. The two tricks below are the sampling side of pitch.
Fine-tune single slices in the piano roll
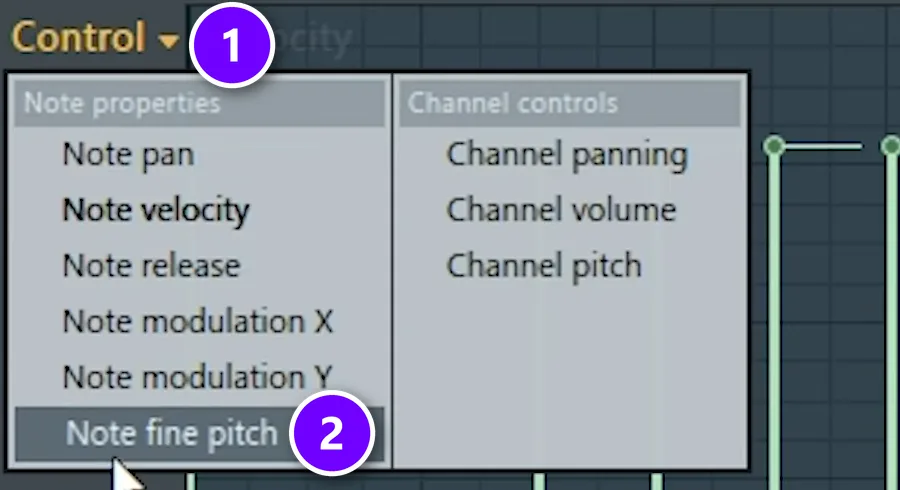
This one comes from the same vocal chop video. In the event editor at the bottom of the piano roll, open the Control menu (1) and choose Note fine pitch (2). Every note now has its own pitch bar. Drag one up or down to nudge that single chop until it sits right, without touching the others.
Make a sample darker without changing its pitch
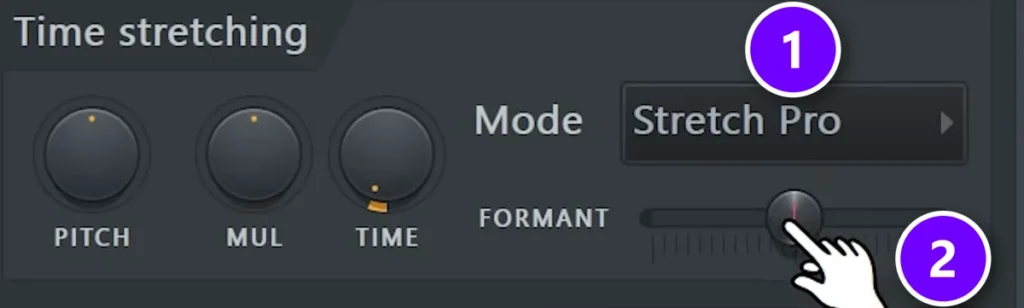
Pitch a vocal sample up and it turns bright. To keep the same notes with a darker tone, set the Mode to Stretch Pro (1) and move the Formant slider (2). Formants are the resonances that make a voice sound big or small. Shifting them changes the character of a sound but not its note.
Right-click the slider and choose Create automation clip to change the formant over time. Mix Elite’s video on 10 FL Studio features draws one that slowly darkens a vocal across a whole section.
How do you keep sample chops in key?
Find the sample’s key first, then pitch the whole sample to your song’s key before you chop it. Going from A minor to C minor, for example, means moving it up 3 semitones. After that, every slice plays notes from your song’s key, and you only fine-tune the odd chop that still sounds off.
- Find the key. Play notes on a keyboard along with the sample until one sounds like home, or drop the file into a key finder like Tunebat.
- Pitch the whole sample. Turn the sampler’s PITCH knob by the number of semitones between the two keys, or move Fruity Slicer’s PS slider, which shifts every slice at once. Pick the smaller move, up 3 rather than down 9, because the further you pitch a sample, the more its character changes.
- Keep the tempo. In Resample mode, a pitch change also changes the speed. If the sample has to stay at your tempo, switch to a Stretch mode, as shown above.
- Write new notes in the same key. When you add a bassline or a melody around the chops, right-click the piano roll’s snap to scale button and pick your scale and root note, so every note you draw stays in key.
If one chop still sounds a little off, nudge just that note with Note fine pitch, shown above. And if the sample comes from someone else’s record, clear it before you release the song.
How do you flip a sample into something new?
Flipping means using a sample as raw material for a new part. You keep its sound, but the melody, rhythm or feel becomes yours. Here are three ways to do it.
Write a new melody from the slices
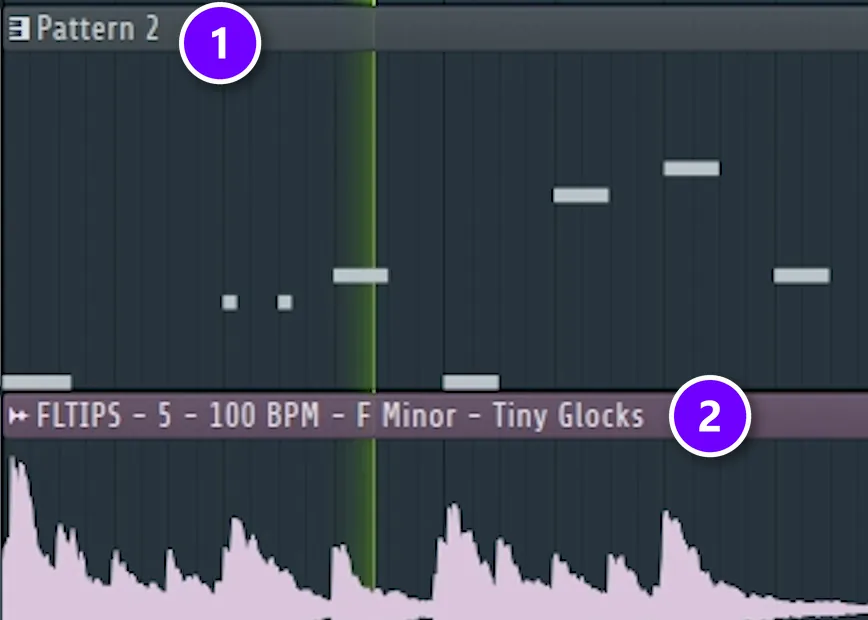
Mix Elite’s trap melody video flips a glockenspiel loop with Fruity Slicer:
- Open the loop in a new Fruity Slicer channel.
- Pull the PS slider down to drop all the slices lower.
- Send the channel to its own mixer track and add Fruity Delay 3 in ping-pong mode, with its feedback filter set to band-pass. Add some reverb and EQ after it.
- Press F7, delete the notes Fruity Slicer wrote, and draw a new melody with the slices.
- In the Playlist, stack the new pattern (1) on top of the original loop (2) so they play together.
The result is a second part made from the same sound. It fits the loop perfectly, yet it plays a melody nobody else has.
Turn one sound into a playable instrument
One sample can become an instrument. Load one long vocal note into the sampler, move the start point in, shorten the length and turn down OUT. Then switch on the volume envelope, add a little attack, pull the decay down and drop the sustain all the way, so the vocal plays like a short pluck on any key.
The same idea works on drums. The sampler’s precomputed effects include a Pogo knob that bends the sample’s pitch. Turn it to make a kick shorter and clickier, or to give crashes and claps a tape-stop feel. “You can get so many colors out of just one drum sample, that is insane,” Max says.
Keep the rhythm or the notes, not the audio
Sometimes the best part of a loop is its groove. Right-click the waveform in the sampler and choose Edit in time warper. Pick an empty channel, such as an FPC drum kit, and send the hits over as MIDI notes (note data that any instrument can play). Now the loop’s exact rhythm plays your own drum sounds.
Melodies work the same way. Right-click the waveform, pick Edit in audio editor to open Edison, and choose Convert to score and dump to piano roll from its wrench (tools) menu. Then move the notes to a new instrument. The conversion isn’t very accurate, so select every note with Ctrl + A and quantize with Alt + Q. Keep in mind that notes copied from someone else’s song are still their composition.
How do you layer drum samples so they sound like one hit?
Give each layer one job, like the attack, the body or the top end, and let only one layer own the low end. Line up their starts, flip one layer’s polarity if the stack sounds thinner instead of bigger, and send all the layers to one group track so they behave as one sound.
Layering means stacking sounds so they hit together, like a bright clap on top of a fat one. Done right, the layers blend into one bigger sound. Done wrong, they fight. In Mix Elite’s free 4.5-hour FL Studio course, Max’s first rule is about what not to stack: “You never layer kicks. Sometimes you just can layer claps or open hats or percussion elements just to add more depth.”
- Pick layers that sound different. Layer a hat with a brighter hat, for example, so each one adds something the other doesn’t have.
- Pan them apart a little. Nudge one layer slightly left and the other slightly right, so they don’t sit on the same spot in your headphones.
- Give each layer a job. A strong clap can use three layers: a very short one for the attack, one placed slightly early for body, and one for the high end. We show it step by step in how to make drums hit hard.
- Line up the starts and check the phase. Trim each sample so it starts right on its hit. If the stack suddenly sounds thinner, the layers are canceling each other out, so turn on Reverse polarity in one layer’s sampler and listen again.
- Group the layers. Send all of them to one mixer track and process them together, the way the free course groups its three bass layers so they behave as one.
- Back up a chop with an instrument. Send a loop’s rhythm or notes to a synth or drum kit (see the time warper trick above) and play it under the sample to add weight.
Only one layer gets the sub
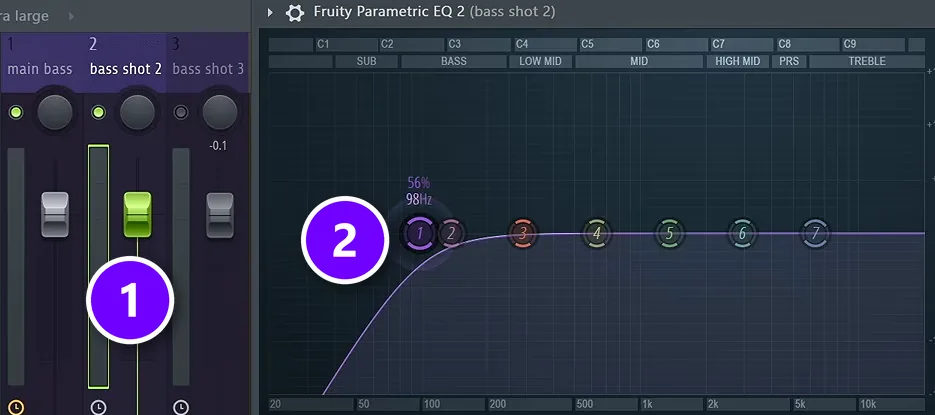
Bass needs one more rule: never layer the sub. The low end of a song is the part most likely to cause problems, so only one sound gets to own it. Keep the sub on the main bass. On the second bass layer (1), the free course uses Fruity Parametric EQ 2 with a high-pass band (2) that rolls off everything below about 98 Hz.
What is resampling, and why bounce MIDI to audio?
Resampling means rendering a sound you’ve already processed into a new audio file, then treating that file as a fresh sample. Bouncing MIDI to audio lets you chop, reverse and stretch a part like any sample, saves CPU once you turn off the plugins that made it, and lets you share the project with someone who doesn’t own those plugins.
Max explains the main reason in the trap melody video: “I rendered it to sample so it’s easier to play with it.” Keep the original pattern too, just muted, so you can still change the notes later.
Render a pattern to audio with Ctrl+Alt+C
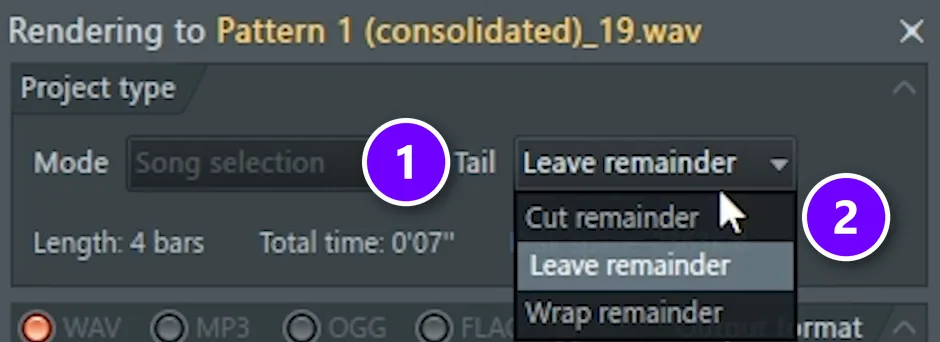
- In the Playlist, click the pattern clip you want to resample.
- Press Ctrl + Alt + C to consolidate it.
- In the render window, open Tail (1) and choose Cut remainder (2), so the audio ends exactly where the pattern ends.
- Start the render. FL Studio drops the new audio clip into the Playlist, ready to chop or reverse.
Reverse a melody but keep its notes
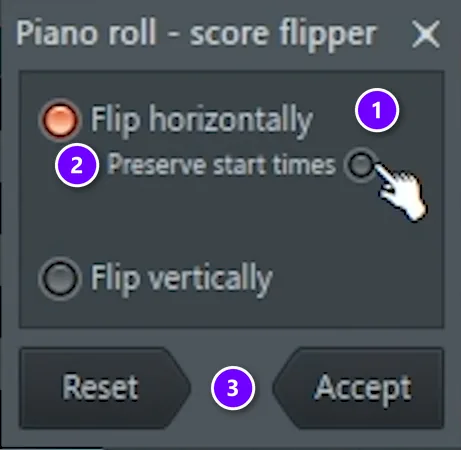
This trick comes from the same video. Normally, reversing a melody plays its notes backwards. This one keeps the melody in order and reverses only the sound of each note:
- In the piano roll, press Ctrl + A to select all notes, then Alt + Y to open the score flipper.
- Choose Flip horizontally (1), turn on Preserve start times (2) and click Accept (3).
- Render the pattern with Ctrl + Alt + C, with Tail set to Cut remainder.
- Double-click the new audio clip and tick Reverse under Precomputed effects.
Flipping the notes first and then reversing the audio puts the melody back in its original order. Every note now swells in like a reversed sample, but the tune stays the same.
Resample a synth into a sampler instrument
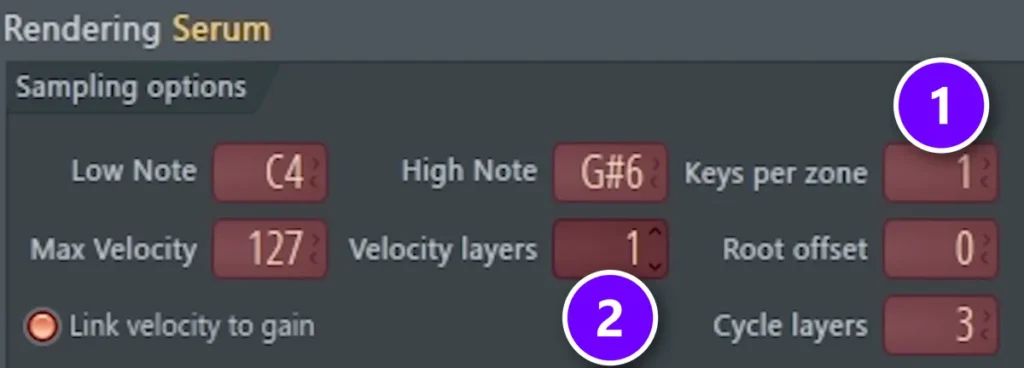
Resampling can also turn a heavy synth into a light sampler instrument. Right-click the synth’s channel in the Channel Rack and choose Create DirectWave instrument. FL Studio plays the synth note by note and records each one into DirectWave, its sampler plugin.
Set Keys per zone to 1 (1) so every key gets its own recording. With 2, one recorded note is stretched in pitch to cover the key next to it. Pick 1 every time. Lower the Velocity layers (2) if the file gets too big. The new channel sounds like the synth, uses less CPU, and lets you share the project with someone who doesn’t own that plugin.
Not the same resampling: FL Studio’s export window also has a Resampling setting. That one controls render quality, not this technique. Use at least 32-point, and something higher (up to 512-point) if your track uses a lot of stretched samples, though in most songs you won’t hear much difference.
What are some advanced sound design techniques with samples?
Advanced sound design with samples means changing what a sound is, not just the order it plays in. Shift its formants, bend its pitch, reverse it, break it into tiny grains with granular synthesis, and resample the result to start again. One sample can turn into many sounds that nobody else has.
- Resample in rounds. Process a sound, render it with Ctrl + Alt + C, then chop, reverse or stretch the new file and render again. Each round takes it further from where it started.
- Granular synthesis. FL Studio’s Fruity Granulizer splits a sample into tiny pieces called grains and loops or replays them. Changing the length and spacing of the grains gives very different tones from the same sample.
- Formants and pitch bends. The Formant slider in Stretch Pro mode and the sampler’s Pogo knob, both shown above, change a sound’s character without a single new note.
- One hit, many instruments. A single vocal note or drum hit becomes a playable instrument once you shape it with the sampler’s volume envelope, as in the flip section above.
What are the most common sampling mistakes?
- Clicks between chops. Use Declick in Slicex, ATT and DEC in Fruity Slicer, or a short fade on the clip.
- Two layers fighting in the sub. Keep the sub on one sound and high-pass the rest.
- A sample that’s a little out of key. Use the PITCH knob for whole semitones and Note fine pitch for small fixes.
- FX samples that jump out. Sweeps and crashes usually come in too loud. Double-click the clip and turn down the volume in its sampler.
- Using a loop exactly as it came. If someone could find your sample in the pack, chop it, pitch it or layer something under it.
Put it together on your next beat
Pick one loop and give yourself one session. Chop it in Fruity Slicer, write a four-bar melody from the slices, layer a clap under the drums, and resample the result with Ctrl + Alt + C. Then build the beat around it with our step-by-step guide to your first beat. When the loop feels done, use this method to turn a loop into a full song.
Short on time? Save the chopping practice for one night and the arranging for the next. Small sessions add up fast.
DAY 3 OF THE 7-DAY MUSIC PRODUCER COURSE
Pick better sounds and turn your loop into a full song
Day 3 of the 7-Day course is about drums and arranging: how to find and choose sounds that work, how to build drum patterns fast even if you have no feel for rhythm, and one simple tactic for turning an idea into a full song. You get the 2025 Producer Toolkit sound pack to work with. It’s taught in FL Studio (the free trial works), about 45 minutes a day, and on day 7 a pro gives you personal feedback on your finished track. It’s $27, with 60 days to decide if it was worth it.
Frequently asked questions
What are the main audio sampling techniques?
The six you’ll use most are chopping (cutting a sample into slices), pitching, time-stretching, flipping (writing a new part from the slices), layering and resampling (bouncing a processed sound to audio and using it as a fresh sample). Most beats only need two or three, like a chopped loop pitched down with a clap layered under the drums.
How do you chop a sample and keep it in key?
Find the sample’s key by ear or with a key finder like Tunebat, then pitch the whole sample to your song’s key before you chop it. A move from A minor to C minor is up 3 semitones. In FL Studio, use the sampler’s PITCH knob or Fruity Slicer’s PS slider, and fix single chops with Note fine pitch.
How do you layer drum samples without making them muddy?
Give each layer one job, such as the attack, the body or the high end, and let only one layer carry the low end. Line up their starts, flip one layer’s polarity if the stack sounds thinner, pan the layers a little apart and send them all to one group track. Never layer two kicks.
What is resampling, and why bounce MIDI to audio?
Resampling means rendering a processed sound to a new audio file and using that file as a fresh sample. As audio, a part can be chopped, reversed and stretched, the plugins that made it can be turned off to save CPU, and the project opens without them. In FL Studio, select a pattern in the Playlist and press Ctrl+Alt+C.
How do you sample a song in FL Studio?
Drag the audio file from the Browser into the Channel Rack and double-click it to open the sampler. Right-click the waveform and choose Open in new Slicex channel or Open in new Fruity Slicer channel, then play the slices from the piano roll. If the song isn’t yours, get permission before you release anything: our guide on how to clear a sample walks you through it.