

“I realized that the bass is the backbone, and the drum is the heartbeat of the music.”
To make a bassline in FL Studio, load a bass sound into the Channel Rack, open its Piano Roll and draw the root note of each chord, one or two octaves below the chords. Then add groove with off-beats, octave jumps and a little glide, and sidechain the bass to the kick so the low end stays clean.
You have chords you like and a drum loop that knocks, and still the beat sounds thin. Something is missing underneath. You can feel it before you can name it, and very often it’s the bassline.
Here’s the good news. Max, the founder of Mix Elite, calls the bassline “very easy” to write, because it borrows almost everything from the chords you already have. Below you’ll find that method, seven ways to make a plain bass line groove, the fix for a bass that fights your kick, and the stock plugin settings that shape the sound itself.
Table of Contents
How to make an FL Studio bassline, step by step
This is the method from day 2 of Mix Elite’s free 4.5-hour FL Studio course on YouTube. By then the loop already has chords and a melody, so the bass only has to follow them. You don’t need to buy anything to try it.
- Add a bass instrument to the Channel Rack. The course loads a second copy of Vital, a free synth, and picks a bass from Mix Elite’s own Paradigm Vital presets. Any bass preset works, and FL Studio’s 3x Osc is fine too.
- Right-click the new channel and choose Piano roll.
- Turn on ghost notes so you can see your chords: in the Piano Roll menu, open View > Helpers > Ghost channels (Alt + V). The notes of your other channels now show up in grey.
- Find the root of each chord by ear. Play single notes under the first chord until one sounds like “home”, then do the same for the next chord.
- Draw one long note on each root, one or two octaves below the chords.
- Play it with the drums. If the bass sounds weak, check the octave first, before you touch the sound.
What a root-note bassline looks like
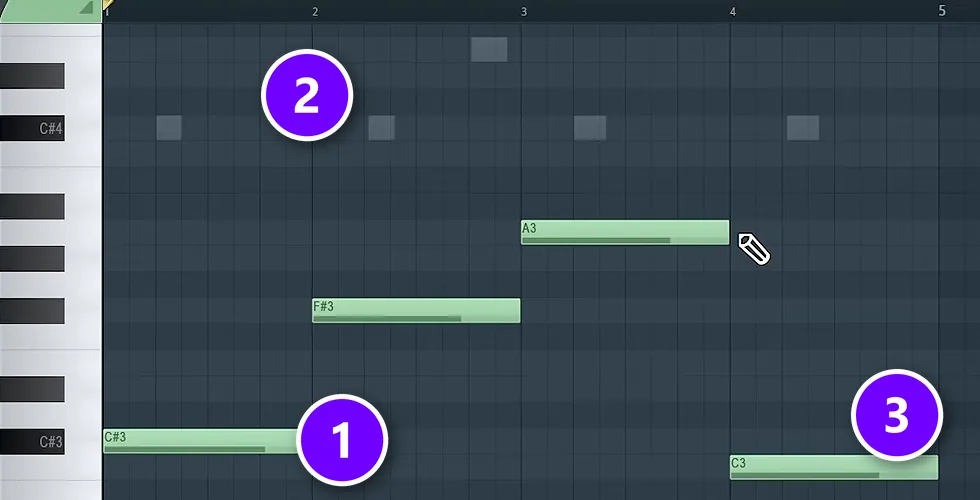
This is the bass from the course: one note per bar, each on the root of its chord. The first chord’s root is C# (1), and the grey blocks are ghost notes (2), the notes your other parts play. The last note is a C moved down an octave (3), and Max stops right there: “I would not suggest you go any lower than this, because the bass will start to sound pretty weak.”
Which octave should the bass play in?
Keep the bass one or two octaves below your chords, and no lower. That’s the whole rule. In the course example, every bass note sits between C3 and A3 on the Piano Roll keyboard. Don’t let the names confuse you: FL Studio numbers its octaves differently from many other apps, and its middle C is called C5.
Why not go deeper for more weight? The lowest notes are felt more than heard, and phone and laptop speakers can barely play them. Push the whole bassline down there and it fades away on the speakers most people use. If you want rumble under the bass, add a separate sub layer instead. You’ll see how further down.
7 tips to make your FL Studio bassline groove
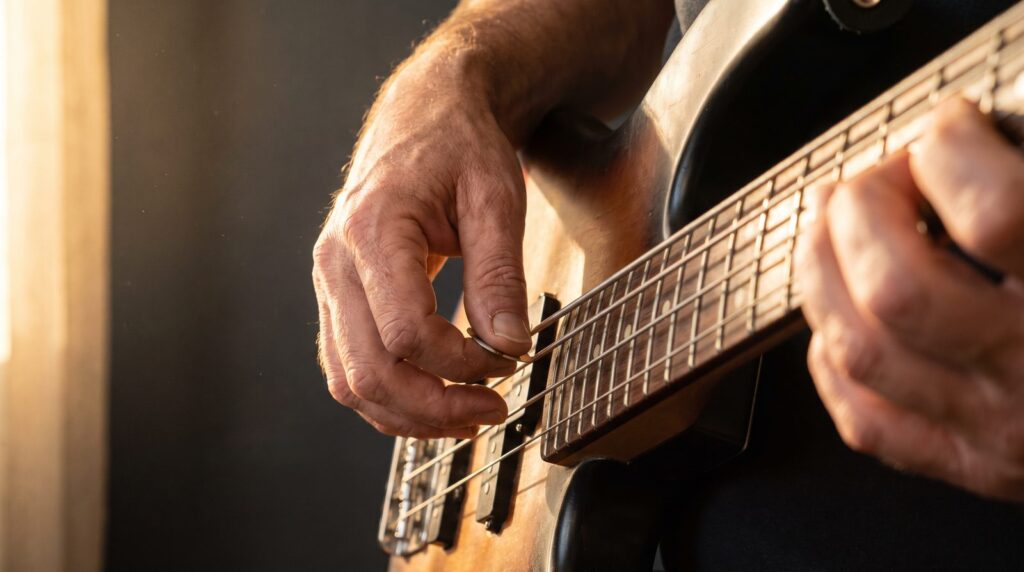
Root notes give you a solid start, but they can sound stiff. Each tip below adds one kind of movement. Try them one at a time and keep what you like.
1. Hold one note while the chords change
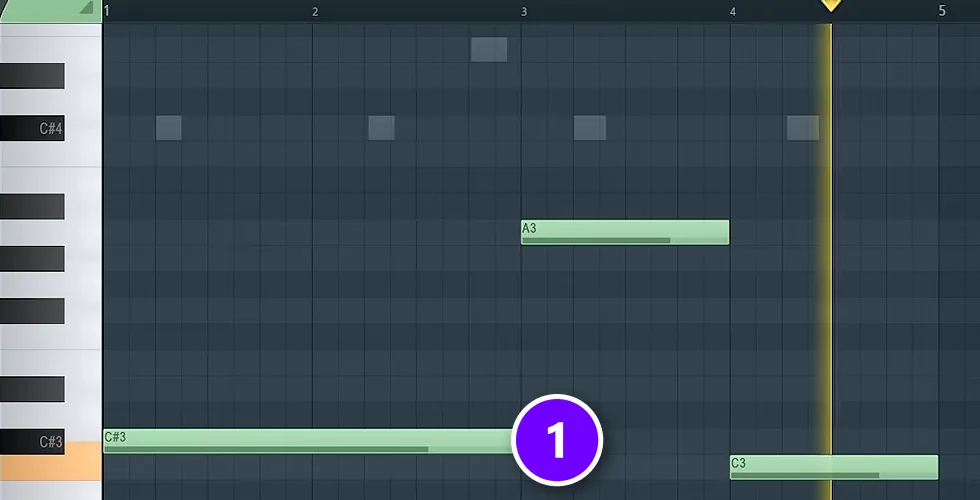
For a darker, more emotional feel, stretch the first root note so it keeps playing under the next chord too (1). Max likes this one a lot: “This sounds super cool because the chords change but the bass stays the same.” Musicians call a held note like this a pedal note.
2. Put notes on the off-beats
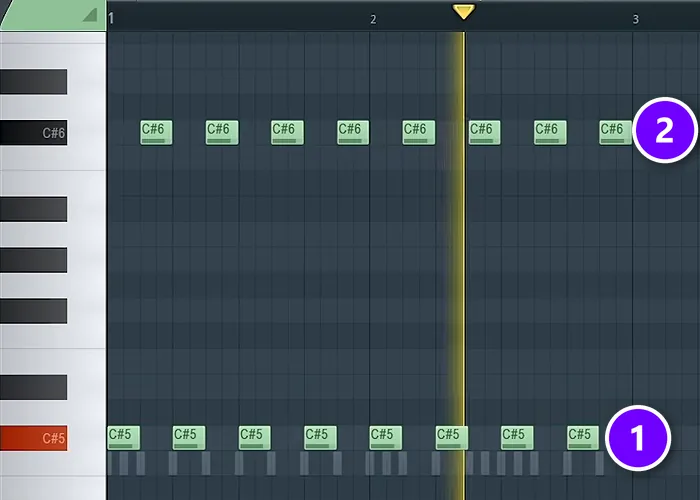
“Basses love offbeat as well, especially in house drums,” Max says. An off-beat is the spot halfway between two beats, the “and” when you count “1 and 2 and”. In this pattern from the course, the low notes land on the beats (1) and the high notes sit on the off-beats in between (2).
Once one bar grooves, select its notes and press Ctrl + B. FL Studio copies the selection right after itself, so filling a whole loop takes seconds.
3. Jump between octaves
Look at the high notes in that picture again: they’re the same C#, just an octave up. Bouncing between the low and the high octave turns one note into a pattern, and you’ll hear it in a lot of disco and house basslines. It also helps on small speakers, because the higher octave still comes through when the low one doesn’t.
4. Use syncopation: gaps and early notes
Syncopation means putting the weight on the spots between the beats. There are two easy ways to get it. Leave a short gap after some notes so the groove can breathe, and start a note one step early, just before the chord changes. In FL Studio one step is a 16th note, the same as one box in the Channel Rack. That early note pulls the music forward. Try it on the last note of a bar.
5. Walk to the next chord
Roots don’t have to be your only notes. Add a few. The safest extra note is the fifth of the chord, which is G# over a C# minor chord. You can also walk into the next root through one or two notes from your scale: to get from C# up to F#, try C#, D#, E and then F#. If scales are new to you, our guide on how to make chords in FL Studio shows how to stay inside one.
6. Leave room for the kick
The kick and the bass share the low end, so they cover each other up when they hit together. Mix Elite’s course fixes this with sidechain compression: a Fruity Limiter in COMP mode on the bass, with the kick as its sidechain input, a ratio of about 4:1 and 7 to 10 dB of ducking. Each kick pushes the bass down for a moment, then lets it back up. Our guide on how to mix kick and 808 shows the routing step by step.
7. Shape notes with velocity and glide
Not every note should hit equally hard. In the Piano Roll’s control lane, Max only ever uses two things: note velocity and note pan. To soften a few notes, select them, hold Alt and scroll down, the way the course does it. Then add glide, so notes slide into each other like a bass player’s finger moving up the neck. The switch for that is in the stock plugin section below.
How do you make a bassline less robotic?
A bassline sounds robotic when every note has the same length, the same loudness and the same spot on the grid. To make it bounce, shorten some notes so the groove has gaps, turn the in-between notes down in velocity, move a few notes to the off-beats or up an octave, and let some notes glide into the next one.
Start with velocity, the loudness of each note. Mix Elite’s course gives this advice for hi-hats that sound too robotic: turn down the velocity of every other note, and don’t worry about getting it perfect, because a little unevenness sounds more human. Do the same on the bass notes between the main hits.
Then give the notes a bouncy shape. Gaps let the groove breathe (tip 4), and the house bass envelope further down makes each note open bright and close fast. If the line still feels stiff, add a little swing.
How do you add swing to a bassline in FL Studio?
Swing delays the notes that fall between the beats and the off-beats by a few milliseconds, so a straight rhythm starts to bounce. FL Studio’s Swing knob, at the top of the Channel Rack, adds it to step-sequencer patterns like your drums, and Mix Elite’s course sets it to about 40% on house drums.
A bassline drawn in the Piano Roll needs a hand nudge to groove with those drums:
- Find the bass notes that sit between the beats and the off-beats. Those are the spots the swing moves on your drums.
- Hold Alt while you drag each one a tiny bit to the right. Alt turns off snap for that move, so the note can land just off the grid.
- Play it with the drums and stop as soon as it bounces. A small nudge is plenty.
How to make a bass sound in FL Studio with stock plugins
A great line can still fall flat with a dull sound. You don’t need to buy anything to fix it, because 3x Osc, GMS and Fruity Parametric EQ 2 come with every edition of FL Studio. The video below builds a Reese bass in Serum first, then rebuilds it with these stock plugins.
Start from a preset
The fastest route is a good preset. Vital‘s free plan gives you the full synth with all its features, plus 75 presets and 25 wavetables. In the course, a bass preset gets picked and then its macro knobs get turned, which quickly change how the bass sounds.
Build a Reese bass in 3x Osc
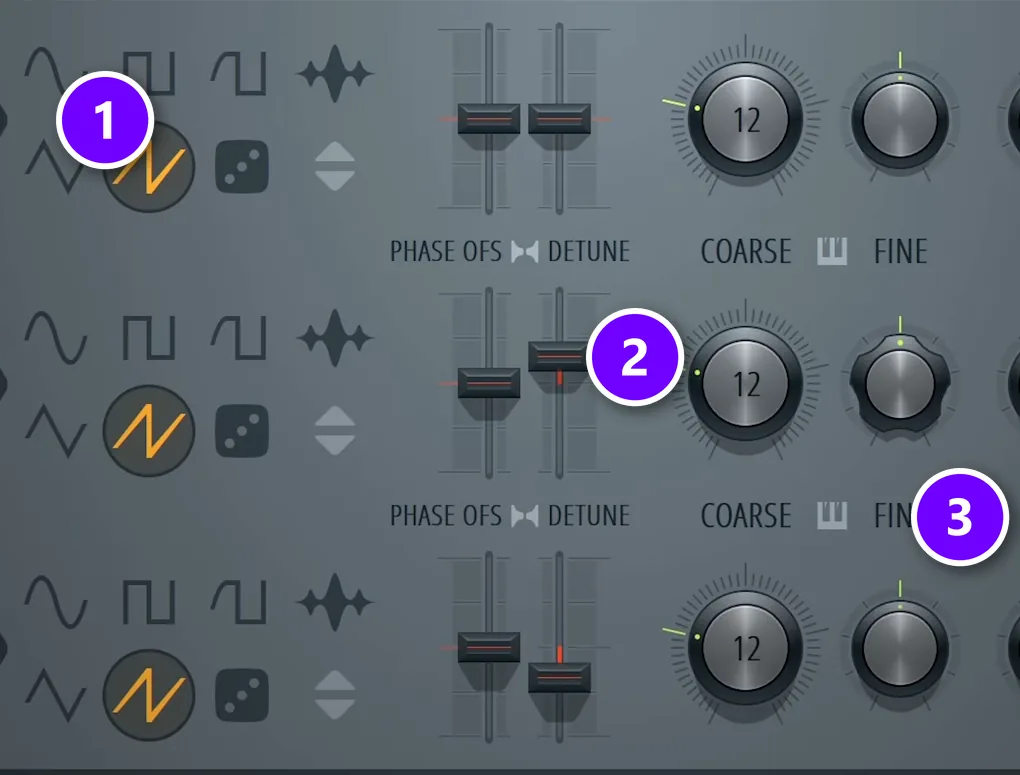
A Reese is a thick, moving bass made from detuned saw waves. Here’s the version from the video, in 3x Osc. Choose the saw wave on all three oscillators (1), push the Detune sliders of oscillators 2 and 3 in opposite directions (2), and turn their Fine knobs in opposite directions as well (3). Then pull the filter down and add a little resonance.
In GMS you get a similar sound by raising the unison voices to 6, setting the detune around 40 and the stereo width to 100. Then turn on the distortion and a low-pass filter.
Make it glide with Mono and Porta
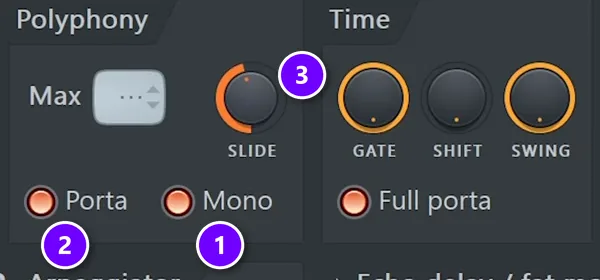
Glide is what makes a synth bass slide from one note to the next. Open the channel’s settings and click the wrench tab, Miscellaneous functions. Switch on Mono (1) so only one note plays at a time, and Porta (2) so each note slides into the next. The Slide knob (3) sets how long the slide takes. In Serum, the video sets the glide to about 70 or 80 milliseconds.
Shape the notes with the envelopes
Envelopes decide how each note starts and fades. Mix Elite’s house bass recipe uses these settings:
- Oscillators: a synth with at least two, and the second one set 7 semitones up.
- Volume envelope: attack at 0, decay and sustain at 100%, release around 20%.
- Filter: closed all the way, so only the envelope opens it.
- Filter envelope: amount at 100%, decay and sustain around 20%, release at 50%.
- Voicing and space: mono, plus a light reverb with a low cut, a little pre-delay and a short decay.
The low filter sustain is the key. Each note opens bright and then closes fast, which gives you the bouncy, plucky shape you hear in so much house music.
Why does my bassline clash with my kick drum?
Because the kick and the bass both live in the sub, the deep low end you feel more than hear. When they hit at the same moment, they cover each other up and the low end turns to mud. The fix is to let only one of them own the sub at any moment.
Mix Elite’s mixing mistakes video puts it as a rule: no more than one instrument in the subs at one time. Pick your main sub sound, usually the bass or the 808, and put a low cut at about 100 Hz on every other low layer. Then make the bass duck whenever the kick plays, with the sidechain from tip 6.
Wrong notes muddy the low end too. In the same video, Max points out that a muddy mix very often comes down to the bass notes themselves and chords that are too dense down low. Keep the bass on the roots of your chords and inside your song’s scale.
How to keep the bass clean in the mix
Thick basses spread out, and the lowest part is where mixes get muddy. The fix in the Reese video is to split the job between two layers. The Reese keeps the mids and highs, and a plain sine wave plays the very bottom.
Split the bass into a sub and a top layer
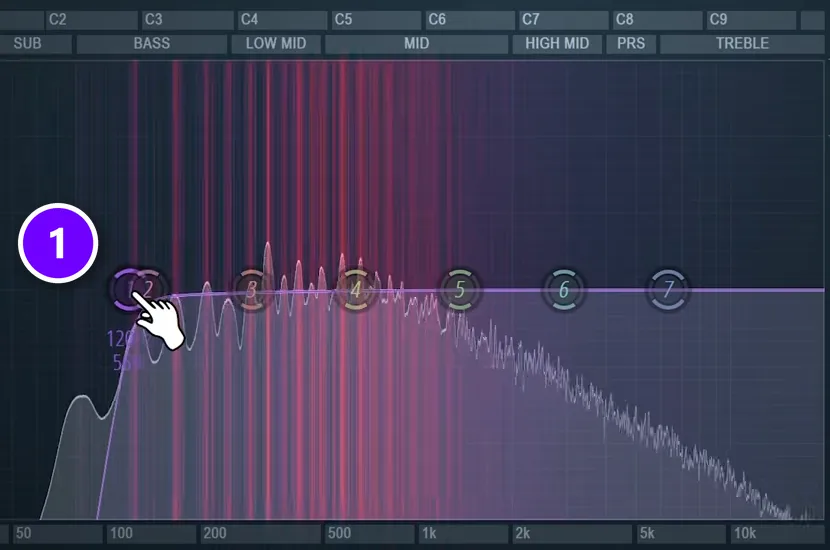
- Put the Reese and a sine-wave sub on two channels, each routed to its own mixer track.
- On the Reese’s track, open Fruity Parametric EQ 2 and cut everything below about 120 Hz with a steep low cut (1).
- On the sub’s track, cut everything above that same point with a steep high cut.
- Add a Layer channel (Add > Layer), select both channels and click Set children, so one Piano Roll plays both.
- Check the sub on a stereo imager. It should sit right in the middle, in mono.
Make the drop wider than the breakdown
Max doesn’t chase perfect mono in his intros and breakdowns. He uses width as a tool instead. Everything in music is relative, so make the bass narrower in the breakdown, for example with the stereo separation knob in Fruity Stereo Enhancer, and the drop feels wider when it hits. For the full routine, read our guide to a clean, punchy low end.
Bassline vs 808: what’s the difference?
An 808 is a bass too. As Mix Elite’s course explains, it works like the synth bass above, except you play a sample instead of an instrument like Vital. In trap and hip-hop the 808 often is the bassline, so everything in this guide still applies: follow the roots, mind the octave and leave room for the kick. Getting the kick and the 808 to hit together is a mixing job, and our guide on mixing kick and 808 covers it.
Start tonight with root notes only. Add one tip per session, and your basslines will start to move instead of just sitting there. If you want the theory behind roots, fifths and scales, our music theory guide for producers explains it in plain words.
DAY 2 OF THE 7-DAY MUSIC PRODUCER COURSE
Basslines follow chords. Day 2 teaches the chords.
Day 2 of the 7-Day course covers music theory, chords and melodies: the 3-step chord progression formula, 4 easy ways to write melodies even if you’ve never touched a keyboard, and where to find pro-quality instruments, paid and free. You also download 20+ free plugins and tools and 30+ chord progressions to build your basslines on. It’s taught in FL Studio (the free trial works), about 45 minutes a day, and on day 7 a pro gives you feedback on your finished track. It’s $27, and you get 60 days to decide if it was worth it.
Frequently asked questions
How do you make a bassline in FL Studio?
Load a bass sound, like a free Vital preset or FL Studio’s 3x Osc, into the Channel Rack and open its Piano Roll. Turn on ghost notes so you can see your chords, then draw the root note of each chord one or two octaves below them. Add off-beats, octave jumps and glide for groove, and sidechain the bass to the kick.
Why does my bassline clash with my kick?
Both sounds sit in the sub, and when they hit at the same moment they mask each other and the low end turns muddy. Keep only one sound in the sub at a time: low cut the other low layers at about 100 Hz and sidechain the bass so it ducks every time the kick hits. Check that the bass notes fit your chords too.
How do I make my bassline less robotic?
Vary it. Make some notes shorter so the groove has gaps, turn the in-between notes down in velocity, move a few notes onto the off-beats or up an octave, and add a little glide with Mono and Porta. A touch of swing helps too: nudge the notes between the beats slightly late.
How do you add swing to a bassline in FL Studio?
The Swing knob at the top of the Channel Rack swings step-sequencer patterns, and Mix Elite’s course uses about 40% on house drums. For a bassline in the Piano Roll, hold Alt while you drag the notes between the beats a little to the right, so they lag like the swung drums. Keep it subtle.
What is the best free bass plugin for FL Studio?
Vital is a strong free choice. Its free plan includes the full synth with all features, 75 presets and 25 wavetables. Mix Elite’s free FL Studio course on YouTube uses it for the bass. FL Studio’s own 3x Osc and GMS come with every edition too, and both can make a thick Reese bass.