
“A work of art must be harmonious in its entirety: any superfluous detail would replace some other essential detail in the mind of the spectator.”
Frequency masking happens when two sounds are loud in the same frequency range at the same time, so the louder one covers the quieter one and the mix turns muddy or crowded. To fix it, decide which sound matters more, cut what each sound doesn’t need with EQ, carve the winner’s main frequencies out of the other sound, and use a dynamic EQ with sidechain when the clash only comes and goes.
You found a lead sound you love, and on its own it’s perfect. Then you play the whole beat and it’s gone, buried somewhere under the chords. So you turn it up, and now the vocal gets lost instead.
That isn’t bad gear or bad ears. Max, the founder of Mix Elite, calls it one of the first things to understand about mixing, right after volume, and once you can hear it, you’ll notice it in almost every song you’ve made. Below is how to spot it, where it usually hides, and the exact FL Studio moves that fix it, including a free plugin that only makes room when room is needed.
Table of Contents
What is frequency masking?
Frequency masking is when two sounds fight over the same part of the sound spectrum. Every sound is made of frequencies. The deep lows are the boom of a kick or a bass, the mids hold the body of chords, pianos and voices, and the highs carry the sizzle of hi-hats and the air around a vocal.
When two sounds are strong in the same range at the same moment, your ear can’t pull them apart. The louder one wins. The quieter one seems to vanish, even though it’s still playing.
Mix Elite teaches it with the mixing box, the space every song has to fill. A good mix fills that box evenly, without piling up sounds that are too alike or that sit on the exact same frequencies. As Max puts it, frequency masking “is basically two elements that fight with each other for the same space in your mixing box.”
Masking isn’t the same as layering
One more point: overlapping doesn’t mean layering. Layering is stacking a few sounds on purpose so they act as one big sound, like three synths that together make one huge lead. Masking is when separate parts, each with its own job, bury each other by accident.
What does frequency masking sound like?
It rarely sounds like one clear problem. You hear a mix that feels muddy, boxy or tiring, and parts that sound great in solo disappear as soon as the full beat plays.
Think of a friend talking to you in a loud bar. His voice is fine. You just can’t follow it, because a hundred other voices sit in the same range. Masking in a mix works the same way: every sound is fine on its own, and together they blur.
These are the usual signs:
- A sound that’s great on its own disappears when the full beat plays.
- The low end is a boomy blur, and you can’t tell the kick from the bass or 808.
- The middle feels crowded, and the vocal or lead never quite comes through.
- The top end sounds harsh, with the hi-hats fighting a bright synth.
- You keep turning parts up, and every fix starts a new problem.
- The more parts you add, the smaller and less clear the song gets.
If that last one sounds familiar, the sounds aren’t the problem. The way they share space is.
How do you train your ears to hear frequency masking?
Listen to the full mix with your eyes closed and notice which part keeps disappearing. Then mute one sound at a time: if muting the chords suddenly makes the lead clear, those two are masking each other. Use the analyzer only to confirm what you heard.
Find the clash before you touch a plugin. It takes a few minutes, and it stops you from cutting the wrong sound. Practice this routine on every mix:
- Listen to the full mix. Close your eyes and listen to what’s happening. Notice which part you keep losing.
- Mute one sound at a time. If muting the chords suddenly makes the lead clear, those two are masking each other.
- Sweep a boost. Put an EQ on a sound, make a narrow boost and slowly drag it from left to right. Where the sound jumps out, that’s where it lives.
- Read the analyzer. Fruity Parametric EQ 2 draws the sound’s spectrum behind the EQ curve. The brightest red stripes, the heat map, show where a sound is loudest.
- Check it in mono. Panning can hide a clash in stereo. On a single speaker that plays in mono, it comes right back.
Do all of it with the whole mix playing. Masking only happens when sounds play together, so solo hides it.
Once you know which two sounds collide, and roughly where, the fix is quick.
Where does frequency masking happen most?
Mostly in the low end, where the kick fights the bass or 808, and in the low mids and mids, where chords, pads, leads and vocals pile up. These pairs cause most of the trouble. The ranges are rough starting points, so trust your ears over the numbers.
- Kick vs bass or 808, about 40 to 120 Hz. The classic low-end fight. Our guide to mixing the kick and 808 shows how to make them share it.
- Bass vs chords and pads, about 120 to 500 Hz. Warm chords often carry far more low end than they need.
- Chords vs the lead, about 500 Hz to 3 kHz. In the video, the chords bury a pluck until it gets its own room.
- Vocals vs synths, guitars or a flute, about 1 to 4 kHz. This is where words become clear, so the vocal usually gets first claim. In the video, a flute fights another busy part right around 1.5 kHz.
- Hi-hats vs bright synths, about 10 kHz and up. A synth with lots of air on top smears the hats.
- Two parts of the same kind. Two pads, two plucks or two guitars playing in the same octave will mask each other almost every time.
Why does my kick lose its punch when the bass comes in?
Because the kick and the bass hit the same low end, roughly 40 to 120 Hz, at the same moment. The longer bass notes cover the kick’s short hit, and the two waves can partly cancel each other out. Sidechain the bass’s low end to the kick so it dips on every hit, and let only one sound own the deep sub.
Mix Elite’s low-end rules, from Max’s videos:
- One sound in the sub at a time. Pick the main one, usually the kick or the 808, and give every other bass layer a low cut at 100 Hz.
- Duck only the low end. Sidechain the kick to the bass and use a multiband sidechain, so just the bass’s lows dip on each hit. A classic full-volume duck makes the kick pump and overpower the whole mix.
- Don’t cut the kick’s sub. The sidechain takes care of the clash.
- Check it on the Master. Add a steep high cut and an oscilloscope. A clean kick shape is the goal; a blurry blob instead of a clear hit means the two are phasing, and skipping the sidechain also tends to cause distortion.
Our guide to mixing the kick and 808 shows both sidechain methods in FL Studio, step by step.
Which frequencies should you cut to stop synth chords sounding muddy?
Start with a low cut somewhere between 100 and 250 Hz, because the bass already owns that range, and keep the slope gentle. If the chords still sound muddy, dip the low mids, roughly 150 to 450 Hz, a little with a wide bell, or move the chords up an octave so they sit above the bass.
For a really clear mix, Mix Elite’s EQ lesson lets nothing but the kick and the bass sounds keep anything below about 200 to 250 Hz. Skip it, and the instruments blend into the kick and bass and the whole mix turns muddy. Sage Audio puts most mud between roughly 150 and 450 Hz, where the bass’s overtones meet the chords.
In the video, the chords get exactly that treatment: a gentle low cut, because a very steep one can sound strange, plus a small dip in the low mids, since the bass and the sub already fill them.
How do you fix frequency masking in a muddy mix?
Work from the simplest fix up: balance the volumes, cut what each sound doesn’t need, pick a winner where two sounds must share and carve its main frequencies out of the other, clear the top for the hi-hats, and use a dynamic EQ when a clash comes and goes. Stop as soon as the mix sounds clear.
Mix Elite’s method comes down to one question you ask about every sound: what does it really need? The steps below go from the simplest fix to the smartest one.
Step 1: Get the volume balance right first
Before any EQ, set your levels. Volume balance comes first for a reason: turning one of two clashing sounds up or down already changes which one you hear. It’s a masking fix without the frequency part.
Just don’t turn the buried sound up and call it done. Push it louder and it starts to cover the next sound in line, and you run out of headroom, the space left before your mix clips. Balance the levels the way our guide to mixing a song shows, then fix the overlap.
Step 2: Cut what each sound doesn’t need
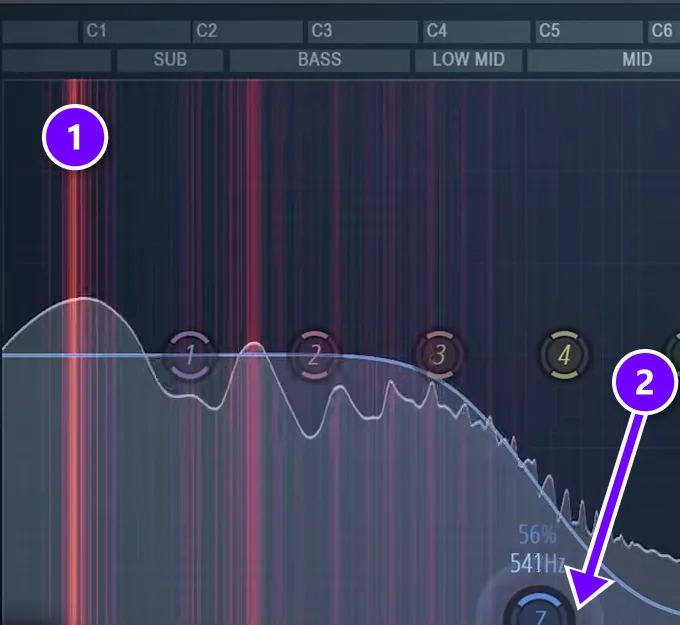
Now go through your sounds one at a time and ask the question: which frequencies matter most for this instrument, and where does it really live? A bass guitar doesn’t need high end. A flute doesn’t need low end, but it does need body. Drums already have plenty of body, so a flute full of it will fight them for that space.
Do this with Fruity Parametric EQ 2 on each mixer track. The red stripes (1) are the heat map: the brighter the stripe, the more of the sound lives there. Here’s what the video cuts:
- Bass: turn band 7 into a high cut (FL Studio calls this type Low Pass) and slide it down to about 540 Hz (2). The bass keeps its low end and hands the rest to other parts. If a hard cut feels like too much, a high shelf that lowers the top by 12 to 18 dB is the gentler choice.
- Chords: a low cut, so nothing in them fights the bass. Keep the slope gentle, because a very steep cut can sound strange, and lower the low mids a little, since the bass and sub already cover them.
- Plucks and leads: a high pass that stops below where the heat map gets bright, so they stay in the mids and highs.
- A second layer of the same sound: if one pluck already owns the bright top end, cut the highs from the other one.
The rule of thumb for a song with lots of parts: take the highs out of the bass first. You can always bring them back if the bass needs its edge. For what each EQ band and filter type does, see how to use EQ in mixing.
Step 3: Pick the winner and find its main frequencies
Some sounds will always share frequencies. In the video’s beat, the chords and a pluck both live in the mids and play at the same time, so you can’t just cut one of them out. You have to choose. As Max puts it, “first off you need to decide which one you want to actually win this fight.”
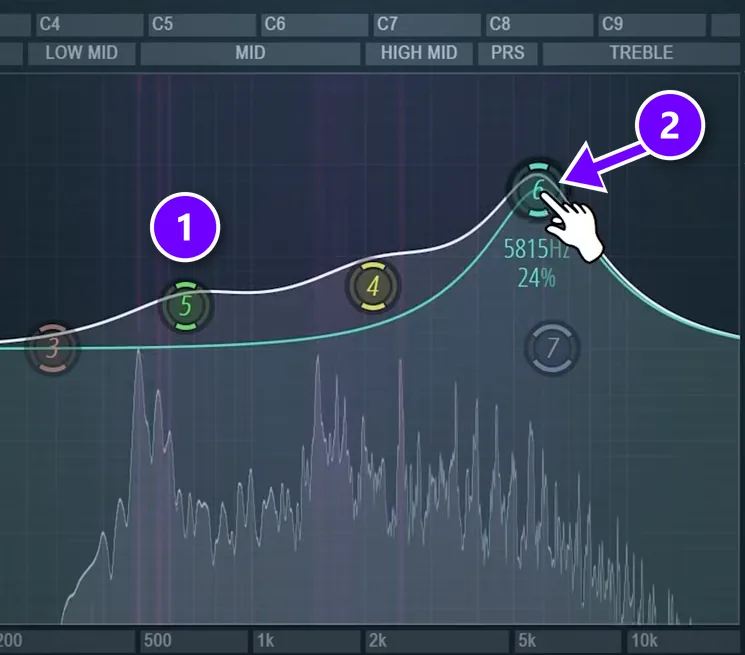
Here the pluck matters more, so it wins. On the pluck’s EQ, make two or three smooth, wide boosts (1) and drag them along (2) until the pluck jumps out the most. Those spots are its presence, the frequencies that make it sound like itself. Keep the bumps wide and soft, because a melody moves around the frequency range as it plays.
Step 4: Copy that curve to the other sound and flip it
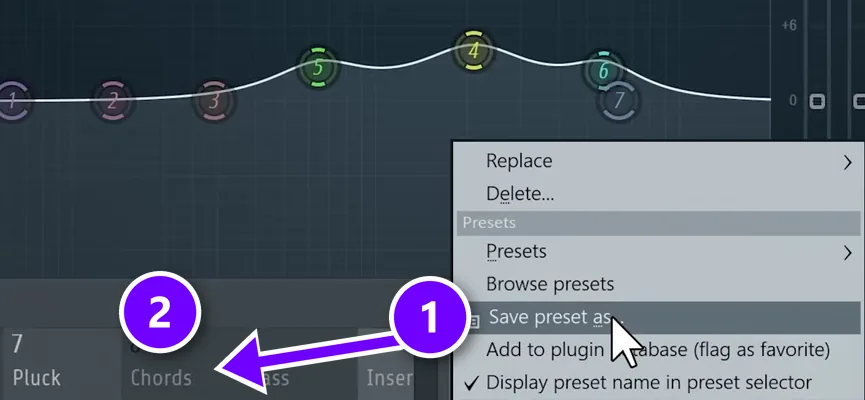
Now copy that curve to the loser. In the Mixer, open the small menu on the pluck’s EQ slot, then click and hold Save preset as… (1) and drag it onto an empty slot on the chords track (2). FL Studio drops in a copy of the EQ with the same bumps. The Effects Slots page of the FL Studio manual covers that slot menu.
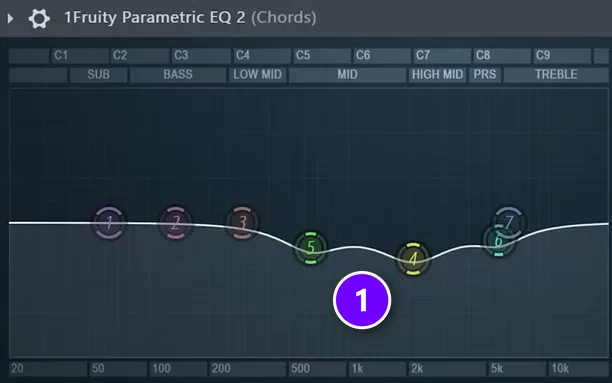
Open the copy on the chords and pull each of those bands down below the line (1). The chords now step aside in the exact spots where the pluck needs to shine, and nowhere else. Mix engineers call this mirror EQ or complementary EQ.
The video cuts quite a lot. Listen with the full mix playing and back the cuts off until the chords still sound full. You can also give the pluck a small boost at those same spots. A small lift is fine, as long as it isn’t a lot.
Then compare before and after. On its own the change can sound small. But a lot of these tiny moves add up to the big difference you hear in a finished mix.
Step 5: Clear the very top for the hi-hats
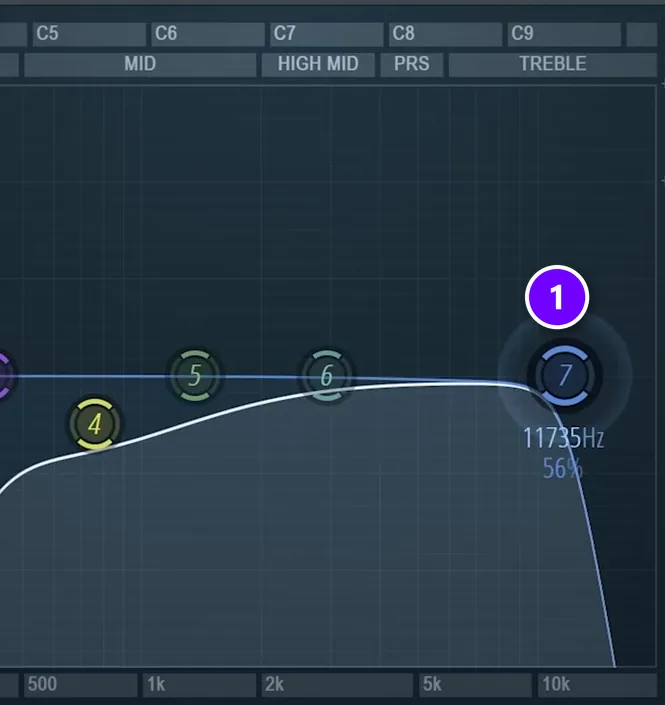
A pro tip for the highs: if a synth or chord sound is full of very high treble, it fights the hi-hats for the same air. Cut the top of that range out of the synth. On the Pluck 3 track in the video, band 7’s high cut (1) slides down to about 12 kHz, and the rule of thumb is about 12 or 13 kHz.
Why give two sounds the same space when one of them already owns it? Max sums up the whole idea in one line: “the more space you make the clearer your mix will be.”
How do you use dynamic EQ to fix masking automatically?
Put a dynamic EQ on the track that gets in the way, feed it the important track as a sidechain, and set one band on the clashing frequency to dip only while that sidechain plays. In the video, a free TDR Nova band at about 1.4 kHz with a gentle 1.4:1 ratio clears room for a flute without thinning the other track.
Step 6: Send the lead to TDR Nova as a sidechain
The EQ cuts so far have one weak spot. They’re always on. In the video’s beat, the flute doesn’t play all the time, and a fixed cut on the track it fights, a part called Fundamental, would thin that track out even while the flute is silent. The fix is a dynamic EQ, an EQ band that only cuts when something triggers it, with a sidechain, so the trigger is the flute itself.
The video uses TDR Nova, a free dynamic EQ from Tokyo Dawn Labs. Here’s the setup in FL Studio:
- Route the flute to the Fundamental track as a sidechain. Select the flute’s mixer track, right-click the small arrow at the bottom of the Fundamental track and choose Sidechain to this track. Our FL Studio sidechain guide shows this routing step by step.
- Load TDR Nova on the Fundamental track.
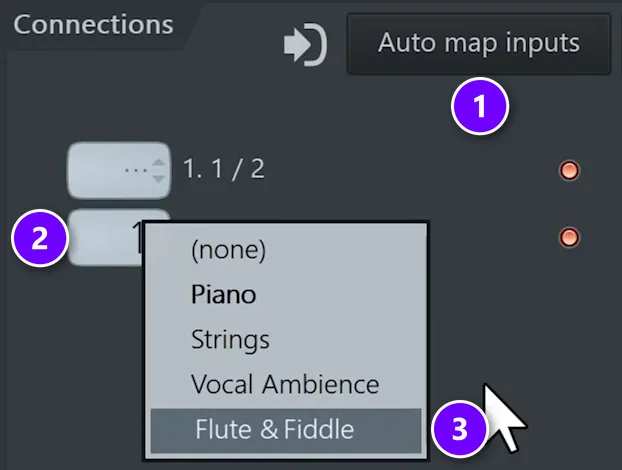
- Click the gear icon at the top left of the plugin window, open the Processing tab and click Auto map inputs (1).
- If more than one track sends a sidechain here, right-click the second input box (2) and pick the one you want. Here it’s Flute & Fiddle (3).
Step 7: Let Nova dip only while the lead plays
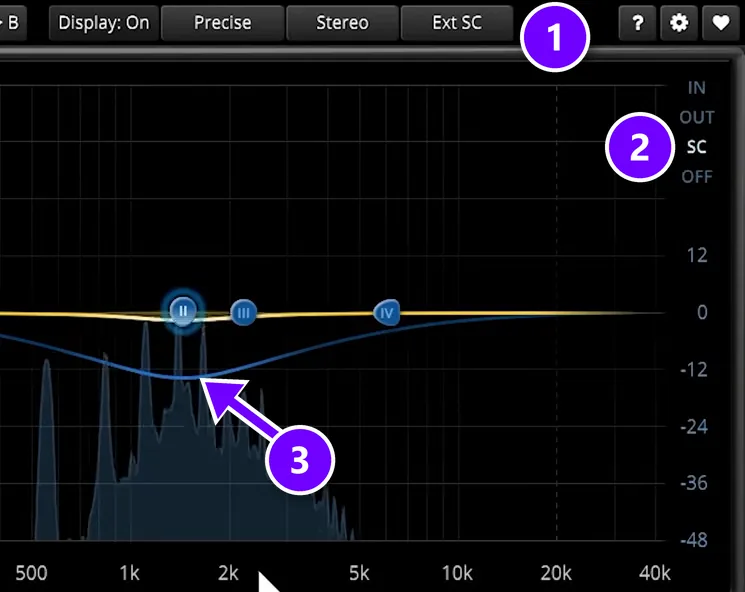
Back in Nova, switch the sidechain menu from Int SC to Ext SC (1) and set the display to SC (2). Now the analyzer shows the flute instead of the track you’re cutting, so you can see exactly where the flute lives.
Pick a band and drag it to the flute’s busiest spot, about 1.5 kHz in the video. Switch on THRESHOLD and pull it down until the band dips (3) whenever the flute plays, then nudge the Q. Keep the move gentle and add no boost. Here are the final settings from the video:
The TDR Nova band for the flute
- SidechainExt SC, display on SC
- BandII, bell shape
- Frequency1442 Hz
- Q0.95
- Threshold-13.8 dB
- Ratio1.4:1
- Attack / release10 ms / 180 ms
- Gain0.1 dB (no boost)
Read off the video at 16:26. Your sounds will want their own frequency and threshold, so treat these as a starting point.
That’s what makes this trick so useful. It takes down only the frequencies the flute plays in, and only in the moments the flute is playing. The rest of the time, the Fundamental track sounds full.
Pro tip: while you set the band up, pull it down hard so you can clearly hear it working. The video does exactly that, then backs it off to a gentle 1.4:1 ratio.
How do you carve out EQ space for a lead vocal?
Let the vocal win. Find the two or three spots where it sounds clearest, then cut those same spots a little on the chords, synths or guitars that fight it. If they only clash while the singer sings, put a dynamic EQ on those parts, keyed from the vocal, so they dip only then. Keep the vocal centered.
It’s Steps 3 and 4 with the vocal as the winner. The words become clear roughly between 1 and 4 kHz, which is exactly where chords, synths and guitars like to crowd, so start your search there and keep the cuts small.
The video then does the same with the dynamic EQ: copy the Nova, sidechain the main vocal to the same track, pick it in the input menu and set the band in the mids, where the body of the vocal sits. For more on threshold, ratio and when a dynamic band beats a fixed cut, read how to use dynamic EQ.
Can panning fix frequency masking?
Partly. Panning two clashing sounds to different sides, say one 30% left and the other 30% right, gives each its own spot in the stereo field, and they stop stepping on each other. It works well for pairs like two guitars, two synth layers or a shaker and a hi-hat.
But panning only helps in stereo. On a single phone speaker or a club system that plays in mono, both sounds land in the middle again and the masking comes back. Keep the kick, bass, snare and lead vocal centered, fix the overlap with EQ first, and pan for extra width after that. Our guide to mono vs stereo mixing explains why the middle matters so much.
How to avoid masking with arrangement choices
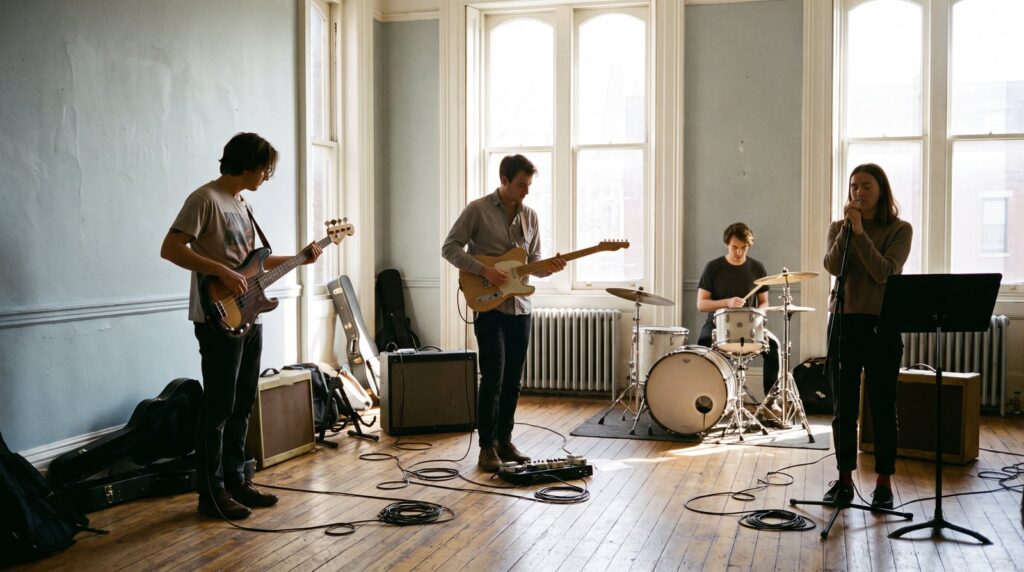
The cleanest fix is a clash that never happens. Think of the classic band: lead guitar, bass guitar, drums and vocals. Just four parts, and between them they cover every range a song needs, which is why a simple band can sound so powerful.
That doesn’t mean every song should have four parts with a brick wall of EQ around each one. It means choosing sounds that each get their own place:
- Pick sounds in different ranges. A deep pad and a deep bass will always fight, while a bright pad and a deep bass won’t.
- Move a part up or down an octave so it lands in an empty range.
- Let parts take turns. A lead that answers the vocal between lines never has to fight it.
- Mute what doesn’t earn its place. Fewer parts, less masking.
Other tools that fix frequency masking
EQ does most of the work, but a few other tools help, especially when sounds clash only some of the time.
- Sidechain compression turns one sound down every time another one hits, like a bass that ducks under each kick. It’s the go-to fix for the low end, and our sidechain guide shows three ways to set it up.
- A multiband sidechain compressor does the same thing in just one frequency band. It works pretty much like the Nova trick, with fewer options, and it’s close to drag and drop.
- soothe by oeksound is a paid plugin that finds and tames clashing frequencies on its own, and it can run from a sidechain too. Max names soothe2 (the current version is soothe3) as the upgrade once your music earns money, but the free techniques above get very similar results.
- Trackspacer by Wavesfactory listens to a sidechain and cuts those same frequencies from the track it sits on, across 32 bands.
- FabFilter Pro-Q 4 can show the spectrum of a sidechain or another Pro-Q 4 in its display and glow red where the two may collide. FabFilter itself says to trust your ears over that glow.
Frequency masking mistakes to avoid
- Turning the buried sound up. It just moves the masking to the next sound and eats your headroom.
- A hard wall around every sound. Some overlap is normal, and it’s part of what makes a mix sound full and glued together.
- High-passing out of habit. Many tutorials tell you to high-pass without saying why. The reason is to make space for another sound, so always know which sound you’re making room for.
- Judging in solo. Masking only happens when sounds play together, so make every cut with the full mix playing.
Try it on your last beat
Open the last beat you made and pick the one sound that has to be heard, usually the vocal or the lead. Do steps 2 to 4 for that sound only, then play the full mix and listen with your eyes closed. Once you hear one part come through clean, you’ll start hearing masking everywhere, and you’ll know what to do about it.
DAY 4 OF THE 7-DAY MUSIC PRODUCER COURSE
Masking is one piece. Day 4 shows you the whole mix.
Day 4 of Mix Elite’s 7-Day Music Producer Course is all about mixing: the Holy Quad, Mix Elite’s simple mixing formula, the “Mix Murdering” mistakes most beginners make, and the volume mistake people make in the first 5 minutes of every mix. You also get a mixing checklist and a mixing and production template. It’s taught in FL Studio (the free trial works), about 45 minutes a day, and on day 7 a pro gives you feedback on your finished track. It’s $27, and you get 60 days to decide if it was worth it.
Frequently asked questions
Why does my kick lose its punch when the bass comes in?
The kick and the bass hit the same low end at the same time, so the longer bass notes cover the kick’s short hit, and the two waves can partly cancel out. Sidechain the bass’s low end to the kick so it dips on every hit, keep only one sound in the deep sub, and give other bass layers a low cut at 100 Hz.
How do I train my ears to hear frequency masking?
Listen to the full mix with your eyes closed and notice which part keeps disappearing. Mute one sound at a time: if muting the chords suddenly makes the lead clear, those two mask each other. Sweep a narrow EQ boost to hear where each sound lives, use the analyzer only to confirm, and always judge with the full mix playing.
How do I carve out EQ space for my lead vocal?
Let the vocal win. Find the two or three spots where it sounds clearest, then cut those same spots a little on the chords, synths or guitars that fight it. If they only clash while the singer sings, put a dynamic EQ like the free TDR Nova on those parts, keyed from the vocal, so they dip only then.
What frequencies should I cut to stop synth chords sounding muddy?
Start with a gentle low cut somewhere between 100 and 250 Hz, since the bass already owns that range. If the chords still sound muddy, dip the low mids, roughly 150 to 450 Hz, a little with a wide bell, or move the chords up an octave so they sit above the bass.
How do I use dynamic EQ to fix frequency masking?
Put a dynamic EQ on the track that gets in the way, send the important track to it as a sidechain, and set one band on the clash to dip only while the sidechain plays. In FL Studio, the free TDR Nova does it: Ext SC, a bell on the clashing frequency, a gentle ratio like 1.4:1, and no boost.