

“We have also divers strange and artificial echoes, reflecting the voice many times, and as it were tossing it.”
Put reverb on vocals with a send, not on the vocal’s own track: give the reverb its own mixer track at 100% wet, feed the vocal into it, and set the amount with the send knob. Then use a big room, a pre-delay under 50 ms, a decay timed to your tempo (shorter for rap), cut the reverb’s lows and highs, and duck it under the vocal so every word stays clear.
You put a reverb on your vocal, and on its own it sounds huge. Then you play it with the beat. The words smear into each other, the voice slides behind the instrumental, and the song starts to sound like a cheap demo. That’s the most common vocal reverb problem, and it has nothing to do with which plugin you own.
Max, the founder of Mix Elite, says the way you add effects to a vocal is what separates a decent mix from an amazing one. Below is his reverb method from the video, one setting at a time, with a real FL Studio screenshot for every knob. It works in any DAW.
Table of Contents
What does reverb do to a vocal?
Reverb adds the sound of a room to a vocal. A little of it gives a dry vocal depth, so it sits inside the beat instead of on top of it, while too much blurs the words together.
When you sing in a real space, your voice bounces off the walls and comes back to your ears a split second later, again and again, until it fades away. A reverb plugin fakes those echoes, so a vocal recorded in a small, dead closet sounds like it lives somewhere.
That’s why a dry vocal often feels pasted on top of the beat. Max’s goal is clarity first: “we want our vocals to be quite clear, right? We just want to add depth into it.”
The catch is that reverb is easy to overdo. It blurs the small flaws in a performance, so beginners keep turning it up until the words wash into each other. Every step below is there to stop that. If you’re not sure how reverb differs from an echo, our reverb vs delay guide explains both.
Why put vocal reverb on a send instead of the vocal track?
Because a send keeps the dry vocal clean. Reverb loaded straight on the vocal’s own track washes out every word. On a send, the reverb sits on its own track at 100% wet, the vocal feeds into it, and the send knob sets how much you hear, so the words stay clear while the reverb adds depth behind them.
A send is simply a separate mixer track that holds only the reverb. Other DAWs call it a bus, an aux or a return track.
That setup gives you four things you can’t get with the reverb on the vocal track itself:
- The dry vocal stays untouched, so the words stay clear and upfront.
- You can EQ, saturate and duck the reverb on its own, without touching the vocal.
- Your lead, doubles and ad-libs can share one reverb, so they sound like they were sung in the same room.
- It saves CPU. One reverb on a send can serve every vocal in the song, instead of a separate copy on each track. FL Studio’s own Mixer manual suggests send effects to lower the CPU load.
How do you set up a reverb send for vocals?
Make an empty mixer track for the reverb and send the vocal to it. Load the reverb there at 0% dry and 100% wet, then turn up the send knob until you hear the space. The dry vocal keeps playing through the Master on its own, so the reverb only adds to it.
Route the vocal to a reverb track in FL Studio
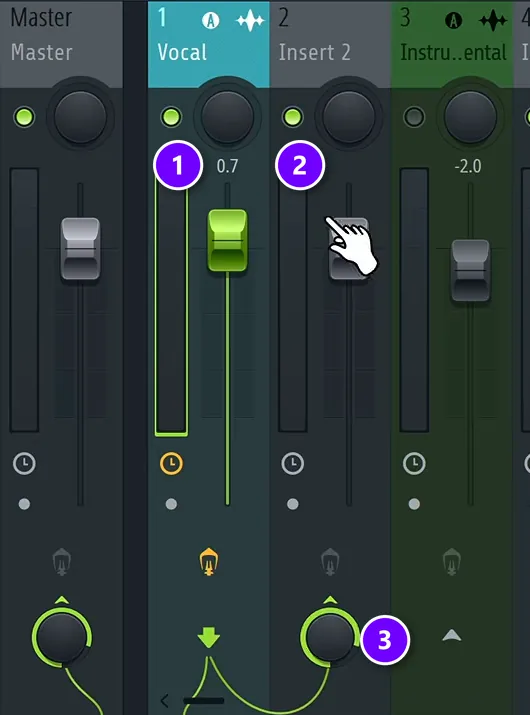
Open the Mixer with F9, then:
- Select your vocal’s mixer track (1) and find an empty insert right next to it (2). Rename it Reverb so it’s easy to spot.
- With the vocal still selected, left-click the small arrow at the bottom of the empty track (3). The vocal now goes there too, and it still plays through the Master. The knob that appears is your send level. Don’t pick Route to this track only, because that cuts the dry vocal off from the Master.
- Load your reverb in the first free slot of the new track. If the reverb was sitting on the vocal track, copy it over and delete it from the vocal.
- Set the reverb to 0% dry and 100% wet (next step).
- To hear only the reverb while you tweak it, turn off the vocal’s route to the Master for a moment. Turn it back on when you’re done.
Set the reverb to 100% wet and 0% dry
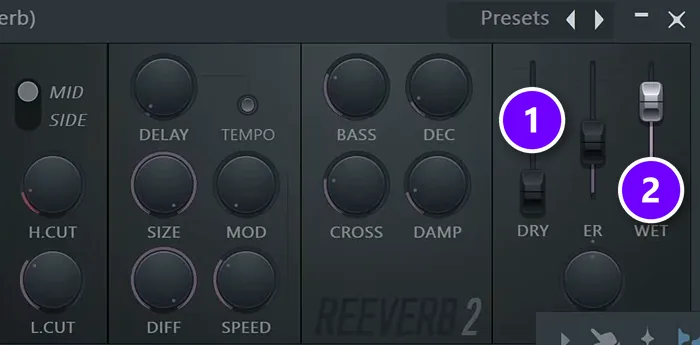
On the reverb track, pull the DRY fader all the way down (1) and push WET all the way up (2). Dry is the untreated vocal, and wet is the pure reverb. No dry vocal should go through this track, because the clean vocal already reaches the Master on its own. Image-Line’s Fruity Reeverb 2 manual gives the same advice for send tracks.
On a reverb with one Mix knob, like Valhalla VintageVerb, set the mix to 100%.
What are the best settings for reverb on vocals?
Use a big room, a decay timed to your tempo, a pre-delay under 50 ms and the reverb’s low cut turned up. At 128 BPM that means about 1.8 seconds of decay for a slow sung vocal and much less for rap, because the tail has to fade before the next words come in.
Almost every reverb has these four controls under similar names. The screenshots below show Fruity Reeverb 2, the reverb that comes with FL Studio.
- Routing
- Its own mixer track, fed by a send, set to 0% dry and 100% wet
- Size
- Big. Valhalla VintageVerb starts at 100%, Fruity Reeverb 2 at about half
- Decay
- Timed to the tempo: 1.8 s (one bar at 128 BPM) for a slow vocal, much shorter for rap
- Pre-delay
- Under 50 ms, or a 1/64 to 1/32 note (about 29 to 58 ms at 128 BPM)
- Low cut
- Turned up, as high as 1 kHz in a dense mix, plus an EQ before the reverb
- Ducking
- A compressor keyed from the dry vocal, ratio 4:1 to 8:1
Size and decay: a big room with a short tail
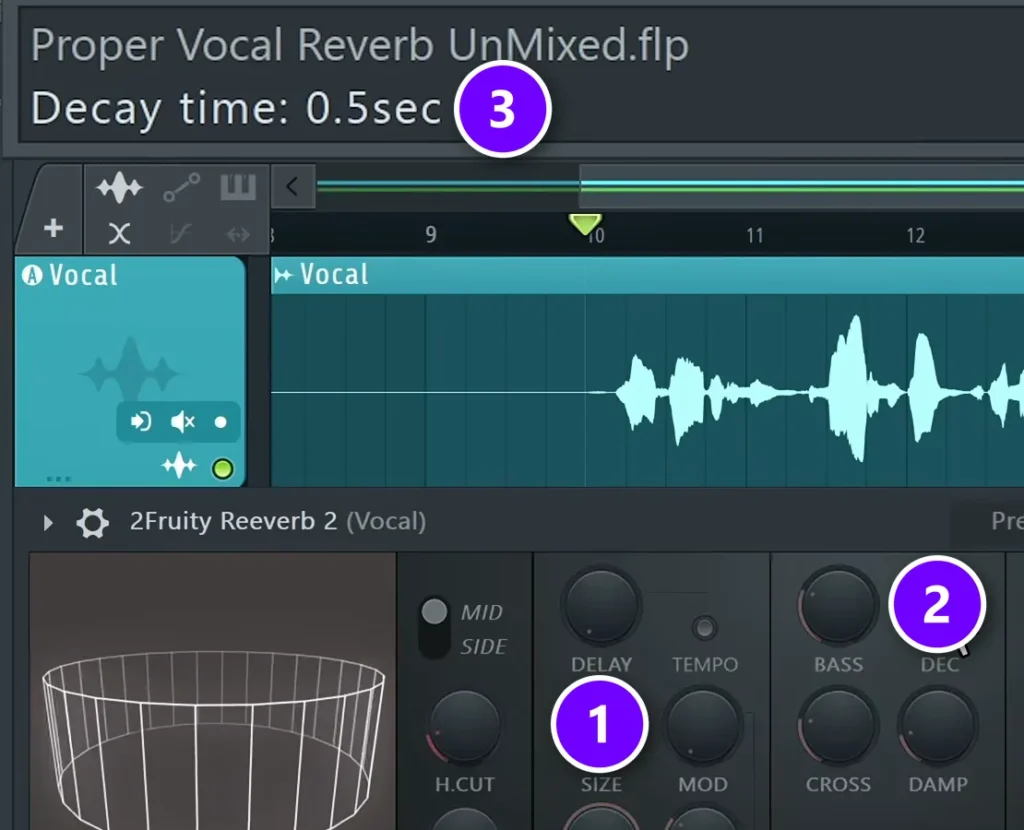
Size sets how big the room is. Decay is how long the reverb keeps ringing after each word, and FL Studio shows it in seconds.
Turn the size up first (1). Reverbs start in different places: Valhalla VintageVerb opens at 100% size, while Fruity Reeverb 2 opens at about half. A small size just doesn’t fit most vocals, because you hear a weird, ringing echo instead of a space.
Then set the decay (2). For rap, keep it short, so the words don’t wash into each other. A slower, sung vocal can take a longer tail. Go by ear, and make sure you aren’t blurring too many words together. While you turn a knob, the hint bar in FL Studio’s top-left corner shows the exact value (3).
How long should vocal reverb decay be?
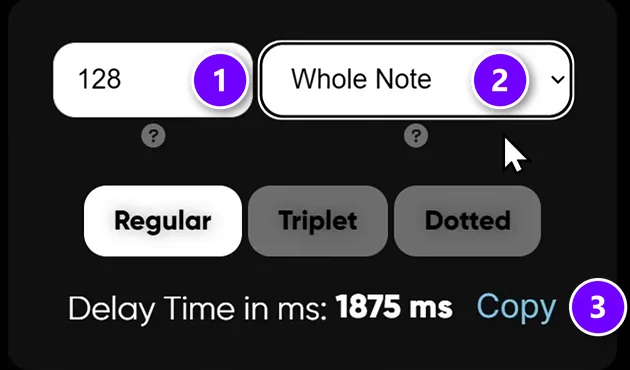
Vocal reverb should fade out just before the next line starts: long enough to fill the gap, short enough not to blur the words. Time it to the tempo, from about one beat for a fast rap verse up to one bar for a slow sung vocal, which is about 1.8 seconds at 128 BPM.
To get the exact time, use Mix Elite’s free reverb and delay calculator. Type your BPM (1), pick a note length (2), and it gives you the time in milliseconds (3).
At 128 BPM, a quarter note is 468 ms, so a decay of about 0.5 seconds lasts exactly one beat. A whole note, one full bar, is 1,875 ms. In the video, the decay goes to 1.8 seconds, so the tail of one loud line fades right before the next, busier words come in. Want a little more wash? Add a few tenths of a second.
No calculator handy? Divide 60,000 by your BPM to get one beat in milliseconds, then multiply by 4 for a bar. For a fast rap verse, start near one beat and only go longer if every word stays clear.
How much pre-delay should vocal reverb have?
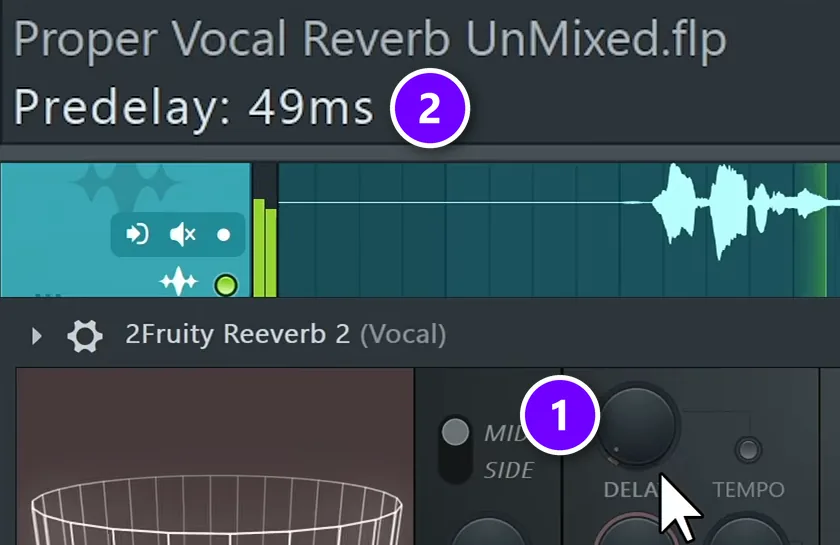
Start just under 50 ms, which sounds natural. To lock it to the beat, use a 1/64 or a 1/32 note, about 29 or 58 ms at 128 BPM. Pre-delay is the short gap before the reverb starts: with none at all, the reverb sounds unnatural and the words slowly turn mushy.
It’s a big part of vocal reverb that a lot of people overlook. In a real room, your voice has to hit the wall and travel back before you hear it, so the reverb never starts at the exact same moment as the word. That tiny gap sounds natural.
On Fruity Reeverb 2, start at about 50 ms on the DELAY knob (1); the hint bar shows the value (2). To lock it to the beat, go back to the calculator: at 128 BPM, a 1/32 note is about 58 ms. If that gets too mushy and you’d rather stay under 50 ms, halve it to a 1/64 note, about 29 ms. Fruity Reeverb 2 also has a TEMPO switch next to the knob that syncs the pre-delay to your project.
The difference is small, maybe 1%, but a timed pre-delay keeps a tight vocal from turning mushy over a whole song. Using another reverb? Copy the number from the calculator and paste it into that plugin’s pre-delay, the way the video pastes 28 ms into Valhalla.
Low cut: keep the reverb out of the low end
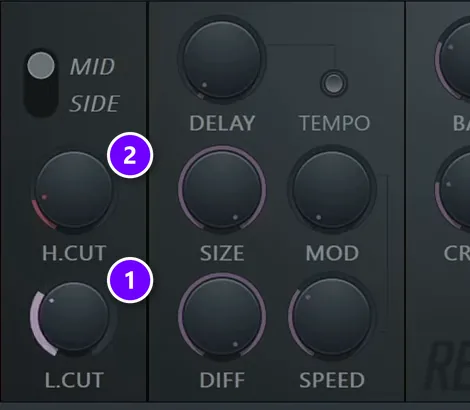
Most reverbs have a low cut built in, and it’s a key setting, because the low end of a reverb is where the mud comes from. On Fruity Reeverb 2, turn up L.CUT (1) until the vocal stops sounding thick. In a really dense mix, you can go as high as 1 kHz.
The H.CUT knob above it (2) trims the top of the reverb. Use it when the tail sounds hissy or splashy.
How do you EQ vocal reverb so the vocal stays clear?
Put an EQ before the reverb on the send and cut both ends: the low mids, where the mud lives, and the esses and breaths at the top. Only the middle of the voice rings out, so the dry vocal keeps its clear top and solid body to itself.
“In my opinion, the most important part is EQing your reverb,” Max says. Because the reverb lives on its own track, you can shape what goes into it. That’s the big win of a send. Put Fruity Parametric EQ 2 in the first slot of the reverb track, above the reverb, so it cleans the vocal on its way in.
Cut the lows and highs before the reverb
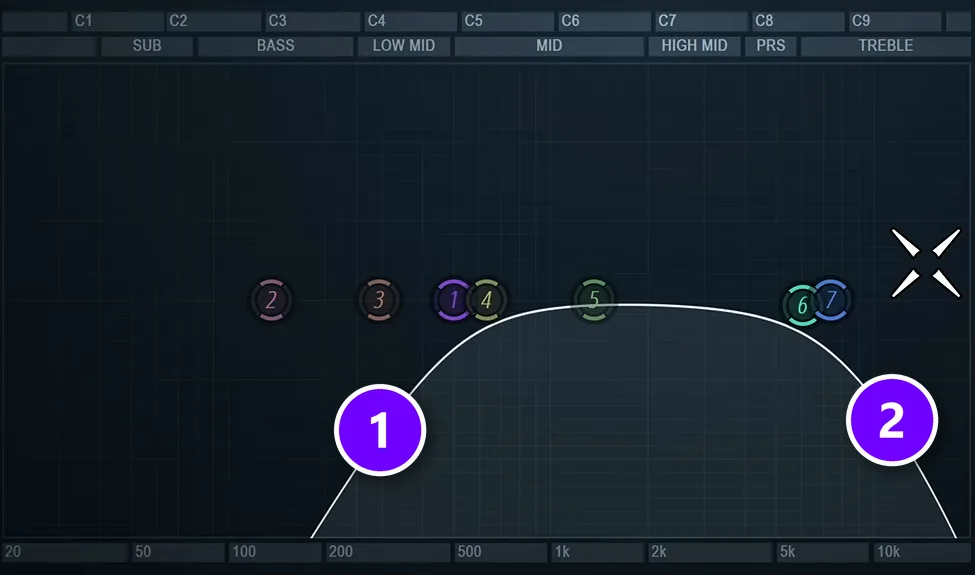
- Low cut (1): the low mids hold most of the muddiness, so cut them out. This EQ now does the reverb’s low cut job, so you can turn the reverb’s own L.CUT back down.
- High cut (2): the esses and breaths at the top don’t bring anything exciting to a reverb. They just mush up the high end. If your mix is busy or the vocal is already bright, cut them.
In the video, everything below a few hundred hertz and above about 5 kHz is gone, so only the middle of the voice feeds the reverb. If the esses still splash, de-ess the vocal itself first. Our guide to treating vocals in FL Studio covers the de-esser.
Engineers call this kind of filtering the Abbey Road trick. Soundfly’s version cuts everything below 600 Hz and above 10 kHz, or above 6 kHz for a darker tail. For vocals, it also suggests a small 1 to 4 dB dip around 2 kHz in the reverb to smooth it out.
Tame harsh peaks, then add warmth
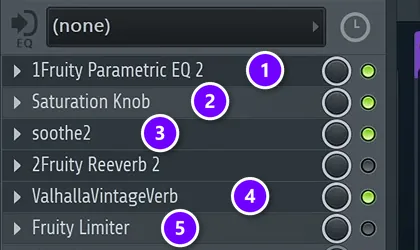
Next, listen to the signal going into the reverb for harsh, ringing peaks. You can find them by hand and pull each one down with the EQ, or put a resonance tamer like soothe2 before the reverb. Because it works on the fly, it also lets you push a bit more high end through.
A little saturation before soothe2 helps too. Softube’s free Saturation Knob adds smooth harmonics, so the reverb sounds a bit richer. Don’t overdo either one; the video only shows what’s possible.
Here’s the whole reverb track from the video, top to bottom: the EQ (1), Saturation Knob (2), soothe2 (3), the reverb (4) and the ducking compressor (5) from the next step.
How do you duck vocal reverb with sidechain compression?
Put a compressor after the reverb on the reverb track and key its sidechain input from the dry vocal. Set a ratio of 4:1 to 8:1 and lower the threshold until the reverb dips while the singer sings. It swells back up in the gaps, so you keep the depth without blurring the words.
Even after all that EQ, a reverb can still blur the vocal. It sounds rich on its own, but on good headphones or speakers it muddies the whole mix, and ducking is the fix.
Duck the reverb in FL Studio, step by step
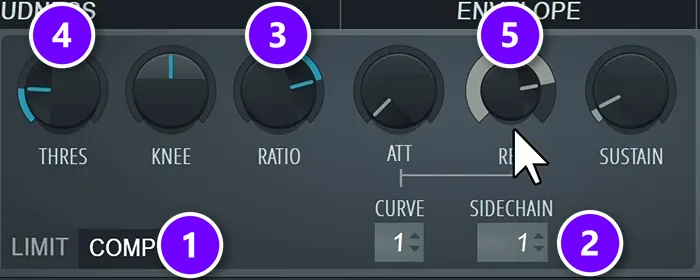
- Put Fruity Limiter in the last slot of the reverb track and switch it to COMP (1).
- Right-click the SIDECHAIN box (2) and pick your vocal track, so the dry vocal drives the compressor.
- Set RATIO (3) between 4:1 and 8:1. Anything harsher starts to sound unnatural.
- Lower THRES (4) while the song plays, until the reverb dips under each phrase.
- If you can clearly hear it pumping, back off the ratio or the threshold. If the reverb cuts in and out between words, raise REL (5) so it blends back in more slowly.
Want a starting point for the other knobs? Soundfly suggests a fairly fast attack, around 10 to 30 ms, and a release of 100 to 300 ms. Then adjust by ear.
Aim to feel it, not hear it. In Max’s words: “we just want to make it feel better, not necessarily audibly different.” If sidechaining is new to you, our guide to the 3 ways to sidechain in FL Studio shows the routing in more detail.
What about Trackspacer or a dynamic EQ?
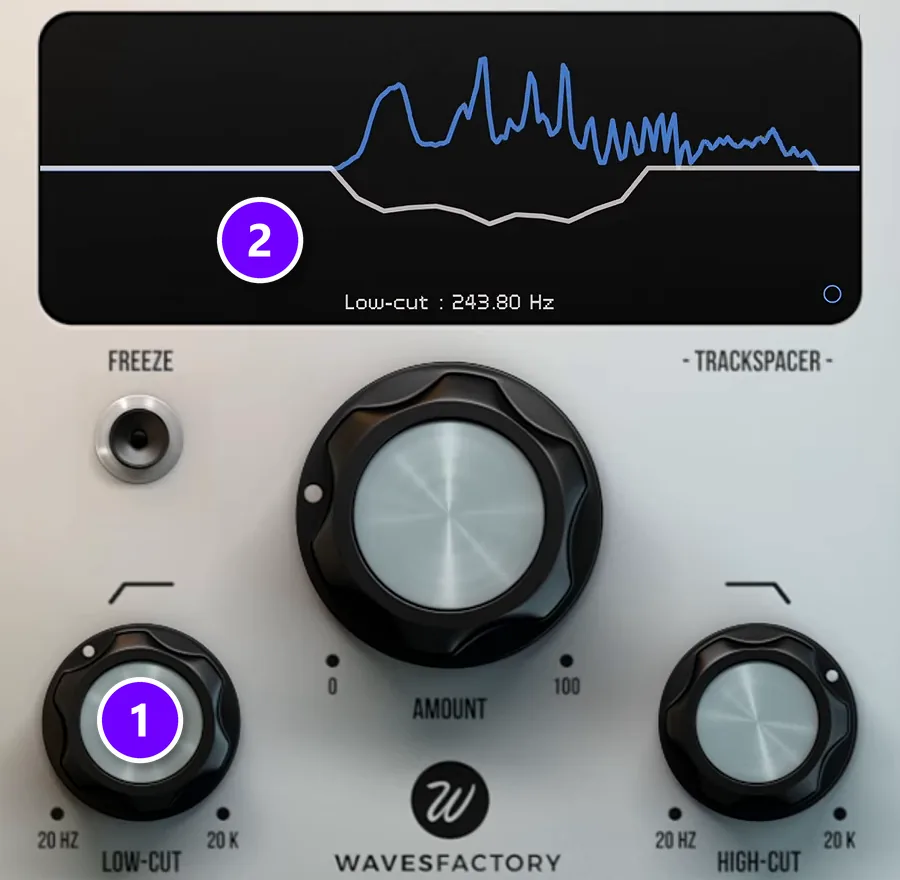
They work too, and some producers prefer them. A compressor turns down the whole reverb, while a dynamic EQ can dip only the part that clashes with the voice. The video tests Wavesfactory Trackspacer keyed from the vocal, with its LOW-CUT knob (1) set so it only pushes down the reverb’s mid-range (2).
To Max’s ears, plain compression still sounded a little better. So that’s what he sticks with.
How much reverb should you use on vocals?
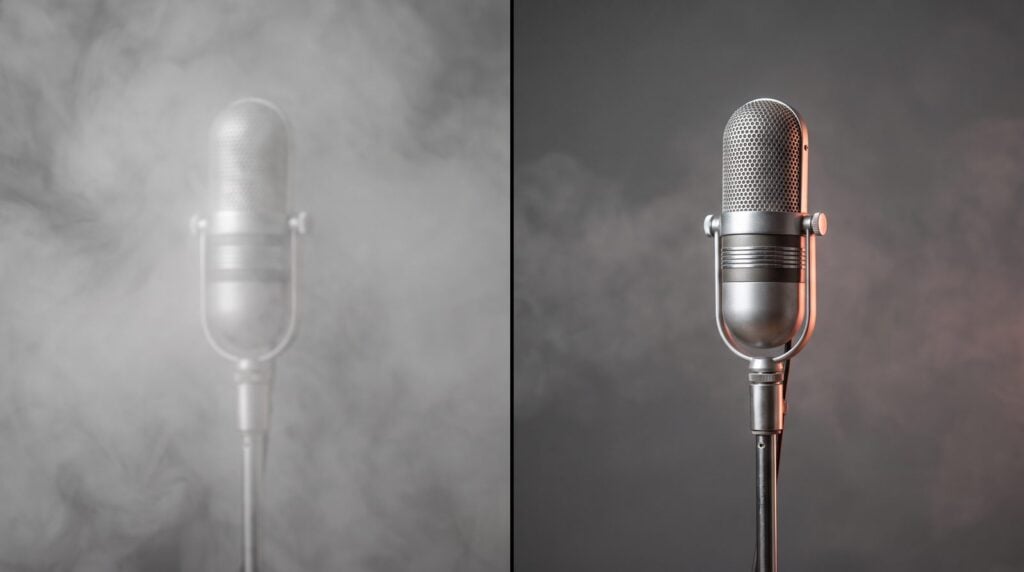
Less than you think. Turn the send up until you can hear the space, then back it off a little; if you notice the reverb as a separate effect, it’s too loud. Beginners overuse it because it hides small flaws in a performance.
The right level changes from song to song, so trust these checks more than any number:
- Mute the reverb track. If the vocal suddenly sounds flat and dry, the amount was right. If almost nothing changes, you can go higher.
- Listen to the words. If two of them smear into one, shorten the decay before you touch the level.
- Check on good headphones or speakers, where the blur is easiest to hear.
Style matters too. A rap lead usually wants less reverb and a shorter tail than a slow ballad. For the rest of a rap vocal chain, see our tips for mixing hip-hop and R&B vocals.
Which reverb is best for vocals?
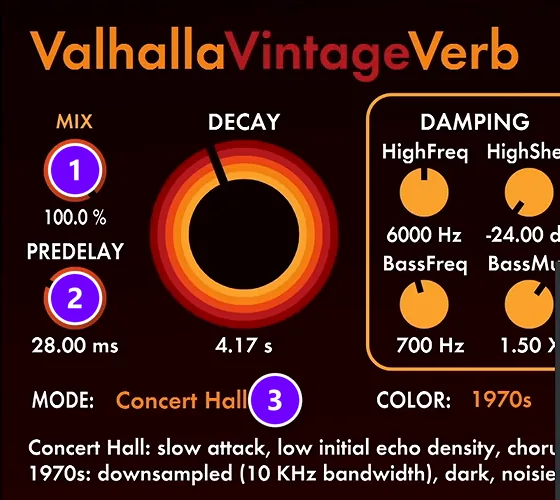
Fruity Reeverb 2, the free reverb that comes with FL Studio, can do everything in this guide, and Max’s paid pick is Valhalla VintageVerb. The settings matter more than the plugin, but the type of reverb changes the feel:
- Plate: bright and smooth, the classic sound on pop and R&B vocals.
- Hall: big and long, for slow songs and wide choruses.
- Room: short and close, for a natural vocal that stays upfront.
In the screenshot, Valhalla VintageVerb has the mix at 100% (1), the pre-delay from the calculator (2) and its Concert Hall mode (3).
If you don’t own Valhalla, try Fruity Convolver, the FL Studio reverb that uses recordings of real spaces. Load a hall or a plate, set it fully wet, and shorten the tail if it rings too long. For more choices, free and paid, see our list of the best reverb plugins.
One more trick: a tiny room with a very, very short decay doesn’t add much depth, but it can make a vocal sound wider. Add one on top of the main reverb for extra stereo width.
Add a delay on its own send
Delay is the next overlooked part of a vocal’s wet effects. Set it up just like the reverb. Use a second send, take the dry signal out so only the echo is left, and put the same kind of EQ in front of it. In the video, it’s timed to the tempo in triplets, with the echoes bouncing from left to right.
For the most control, send both the reverb track and the delay track into one more track and put the ducking compressor there, so the vocal pushes both effects down at once. The delay settings themselves are in our reverb vs delay guide.
Why does my vocal sound muddy and drowned out with reverb?
Usually the reverb is too loud, too long or too full of low end, so it blurs the words. Move it to a send, cut its lows and harsh highs, shorten the decay so it ends before the next line, add a little pre-delay, and duck it under the vocal.
Here are the usual causes, with the fix for each:
- Reverb on the vocal track itself. At full mix it washes out everything. Move it to a send.
- Too much of it. If you notice the reverb as a separate effect, it’s too loud. Pull the send back.
- A decay longer than the gaps between your lines. The words pile up on each other, so shorten it until each tail ends before the next line.
- Zero pre-delay. It sounds unnatural, because a real room never answers at the exact same moment. Start just under 50 ms.
- No low cut. The reverb fills the low mids with mud. Cut them, before or inside the reverb.
- Esses and breaths going into the reverb. They make the top end splashy. Cut the highs and de-ess the vocal.
- No ducking. The reverb fights the words instead of filling the gaps between them.
- A muddy dry vocal. Reverb spreads whatever you feed it, so mix the vocal first. The vocal in the video was already EQ’d, compressed and de-essed before any reverb went on.
What to do next
Build this send once, save it in your template, and every new vocal starts with a clean, deep reverb ready to go. Reverb comes last, though: after EQ, compression and de-essing on the vocal itself.
If your vocal isn’t there yet, start with our full guide on how to mix vocals, then come back and add the space.
DAY 5 OF THE 7-DAY MUSIC PRODUCER COURSE
Mix the whole vocal, not just the reverb, on Day 5
Day 5 of Mix Elite’s 7-Day Music Producer Course is about recording and mixing vocals: setting up your room, the best recording equipment for every budget, and the V.O.C.A.L. mixing formula. You also get 10 copy-and-paste vocal processing chains and practice acapellas, so you can try them even without a singer. It’s taught in FL Studio (the free trial works), about 45 minutes a day, and on day 7 a pro gives you feedback on your finished track. It’s $27, and you get 60 days to decide if it was worth it.
Frequently asked questions
Should vocal reverb go on a send or on the vocal track?
On a send. Reverb on the vocal’s own track washes out the words, because the dry vocal and the reverb get blended in one place. On a send, the reverb sits on its own track at 100% wet, so you can EQ and duck it separately, share it between your lead and backing vocals, and save CPU with one reverb instead of many.
What are the best pre-delay and decay settings for vocal reverb?
Start with a pre-delay just under 50 ms; at 128 BPM, a 1/64 note (about 29 ms) or a 1/32 note (about 58 ms) locks it to the beat. Time the decay to your tempo: about one beat for a fast rap verse, up to one bar for a slow sung vocal (1.8 seconds at 128 BPM). Mix Elite’s free reverb and delay calculator does the math for any BPM.
Why does my vocal sound muddy when I add reverb?
Usually too much low end and too many esses go into the reverb, the tail is too long, or the reverb is simply too loud. Cut the reverb’s low mids and harsh top with an EQ before it, shorten the decay so it ends before the next line, turn the send down, and duck the reverb with a compressor keyed from the dry vocal.
How do you duck vocal reverb?
Put a compressor after the reverb on the reverb track and set its sidechain input to the dry vocal. With a ratio of 4:1 to 8:1 and the threshold lowered until the reverb dips under each phrase, the reverb drops while the singer sings and swells back in the gaps. In FL Studio, Fruity Limiter in COMP mode does the job.
How do you EQ vocal reverb?
Put an EQ before the reverb on the send and cut both ends: the low mids, where the mud lives, and the esses and breaths at the top. The classic Abbey Road trick filters the reverb below about 600 Hz and above 6 to 10 kHz, so only the middle of the voice rings out and the dry vocal keeps its clarity.