

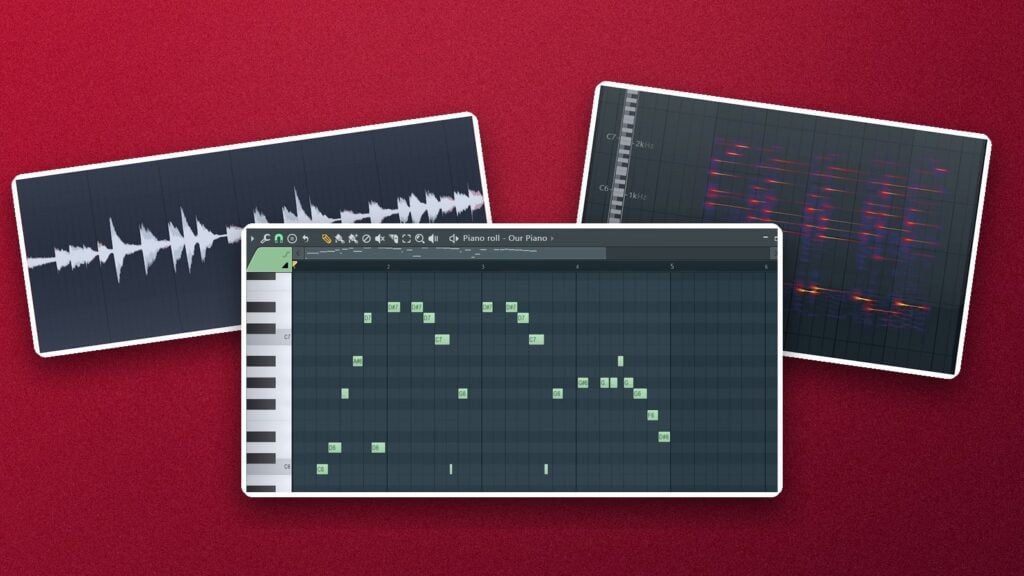
“What I cannot create, I do not understand.”
To convert an audio melody to MIDI in FL Studio, cut everything but the melody with an EQ, consolidate the clip, open it in Edison (clip menu > Edit sample), make it mono and choose Tools > Analysis > Convert to score and dump to piano roll. The notes land in the Piano roll of the selected channel, ready for any synth. Chords convert poorly, so read their notes off Wave Candy’s spectrum and type them in.
You found a sample with a melody you love, or a song with chords you want to learn. Now you want those notes in your Piano roll, where you can swap the sound, change the key or write your own part around them. Doing that by ear can eat a whole evening.
Max, the founder of Mix Elite, made a short video on this trick, and it has passed 355,000 views. It uses only FL Studio’s own tools: one pulls out a melody as MIDI, the other shows every note of a chord. Below are the exact clicks, how to fix wrong notes, how to turn humming into MIDI, and what to try when FL Studio’s tools aren’t enough.
Table of Contents
Can FL Studio convert audio to MIDI?
Yes. Edison, FL Studio’s audio editor, turns a single melody into Piano roll notes with Convert to score and dump to piano roll, and Newtone can send the notes it hears to the Piano roll too. Chords are harder, so for those you read each note off Wave Candy’s spectrum and type it in.
Audio is a recording of sound. MIDI is just instructions: which note to play, when, and for how long (our beginner guide to MIDI explains it in plain words). To go from one to the other, the software has to listen to the recording and guess the notes, so you always check the result by ear.
- Edison, FL Studio’s audio editor, has a tool called Convert to score and dump to piano roll. It’s the tool for melodies, and it comes with Producer Edition and up.
- Newtone, Image-Line’s pitch-correction editor, can send the notes it hears to the Piano roll or save them as a MIDI file. It comes with the Signature Bundle and up.
- Wave Candy, the analyzer in every edition, can’t write MIDI. But its spectrum view names any note you point at, and that’s the trick for chords below.
Not sure what you own? Image-Line’s edition comparison lists what each version includes. New to the program itself? Start with our beginner guide to FL Studio, then come back.
How do you convert an audio melody to MIDI in FL Studio?
Cut everything but the melody with an EQ, consolidate the clip with Ctrl + Alt + C, open it in Edison, make it mono, then choose Tools > Analysis > Convert to score and dump to piano roll. Delete the stray notes, and the melody is MIDI you can play on any synth.
The video starts with a sample from a Mix Elite future bass sample pack. It has chords and a melody playing together, and the goal is to pull out only the melody. Here are the four steps.
Step 1: Cut everything below the melody with an EQ
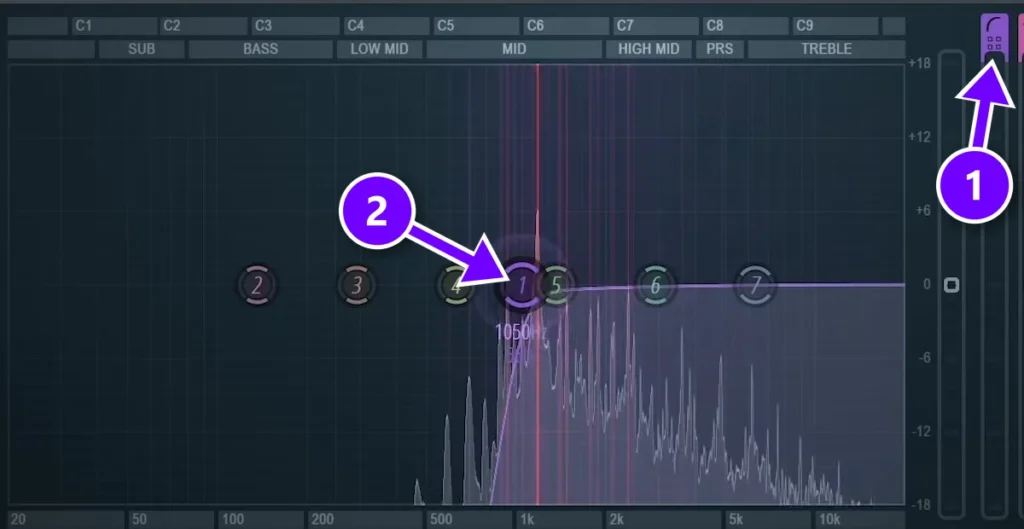
Load Fruity Parametric EQ 2 on the mixer track the sample plays through. Use band 1’s type selector (1) to make it a low cut, which FL Studio calls High Pass. Then drag its slope dots down to the steepest setting, Steep 8, which cuts 48 dB per octave. That’s the harshest option, and it’s the one the video uses.
Now drag the band itself (2) up until the chords fade and only the melody is left. In the video it ends up around 1 kHz. Your sample will need its own spot, so trust your ears over that number.
Step 2: Consolidate the clip and open it in Edison
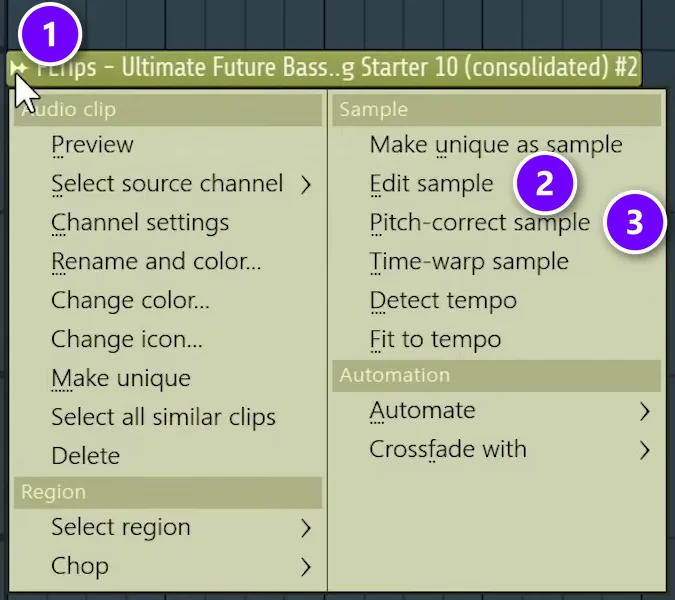
Select the sample in the Playlist (hold Ctrl and drag a box over it), then press Ctrl + Alt + C. That’s FL Studio’s Consolidate command. It turns what you hear, EQ and all, into one new audio clip and mutes the old one. In plain words, the cut is now baked into the audio.
Next, click the small icon in the top-left corner of the new clip (1) and choose Edit sample (2). That opens Edison, FL Studio’s audio editor, with the new sample loaded. The Pitch-correct sample item under it (3) opens the same clip in Newtone, which we’ll get to below.
Step 3: Make it mono, then convert to score
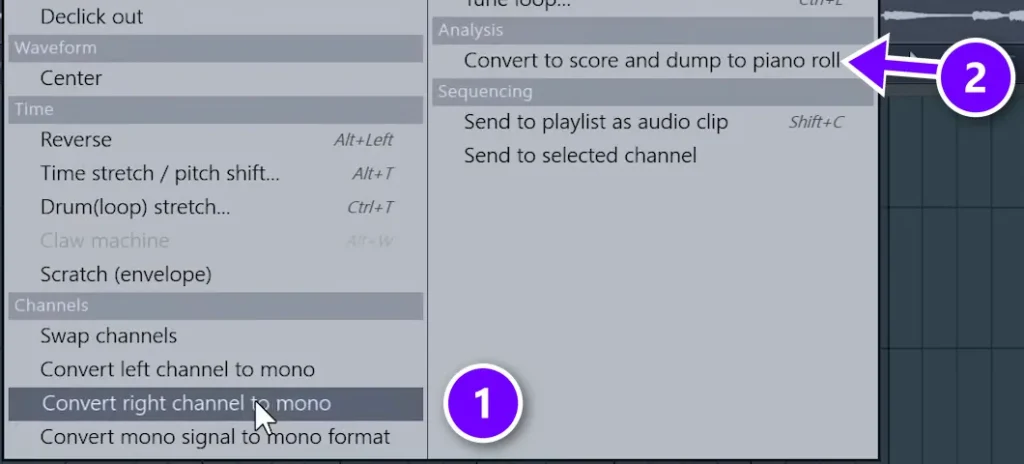
In Edison, click the wrench icon to open the Tools menu. Under Channels, pick Convert left channel to mono or Convert right channel to mono (1). Either one works. The note on screen in the video gives the reason: turning it to mono helps the algorithm find the correct notes.
Open the Tools menu again and pick Convert to score and dump to piano roll (2), under Analysis. Edison cuts the sample into slices, works out the pitch of each slice and writes matching notes into the Piano roll of the channel that’s selected in the Channel Rack.
Pick your sound first. Click the instrument you want the melody on in the Channel Rack before you convert, because Edison writes the notes to whichever channel is selected.
Step 4: Delete the notes that don’t belong
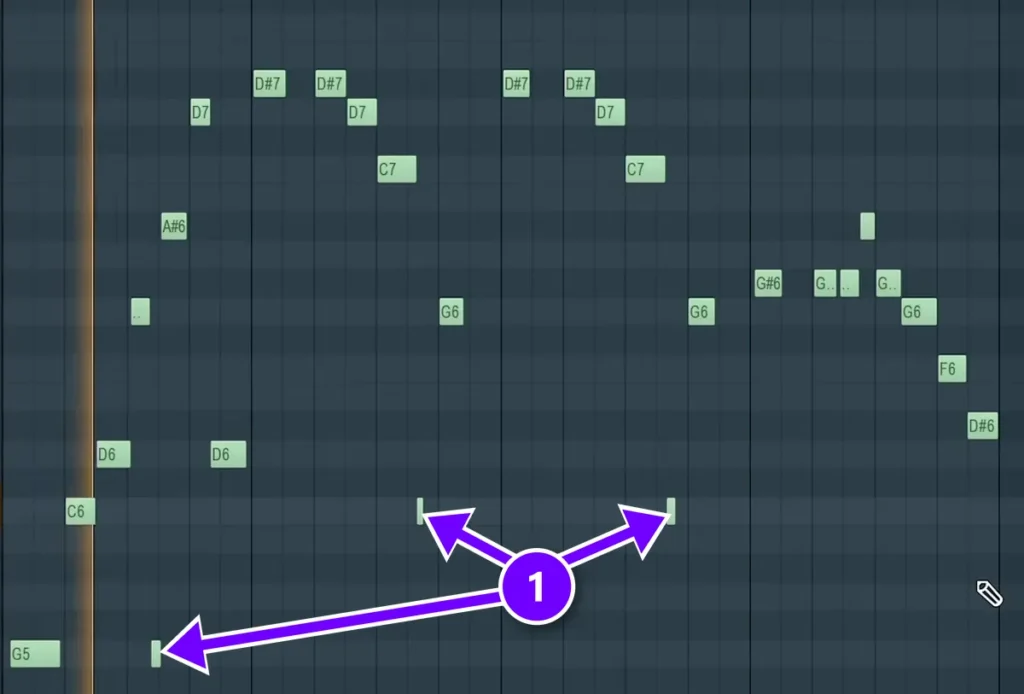
Edison’s first pass is close, not perfect. Max’s verdict when the notes appear: “It’s not perfect, but if we get rid of the weird notes that got in here…” In the Piano roll, those are the tiny slivers and stray notes that sit away from the line (1).
Right-click each one to erase it, then play the notes back. After that quick cleanup, Max is happy: “That’s incredibly perfect, so we got the melody right.”
How do you convert chords from audio to MIDI in FL Studio?
Don’t let a converter guess a chord. Keep only the chords with a high-cut EQ, pitch the sample up 24 semitones, load Wave Candy’s Spectrum at 4096 bands and point at the lowest four or five lines. Wave Candy names each note, and you type the chord into the Piano roll.
Chords are where every audio-to-MIDI tool struggles. Edison looks for one pitch in each slice, and a chord is several pitches at the same moment, so the result turns into a pile of guesses. This trick doesn’t fight that. FL Studio shows you every note of the chord, and you type the notes in yourself.
Step 1: Keep only the chords with a high cut
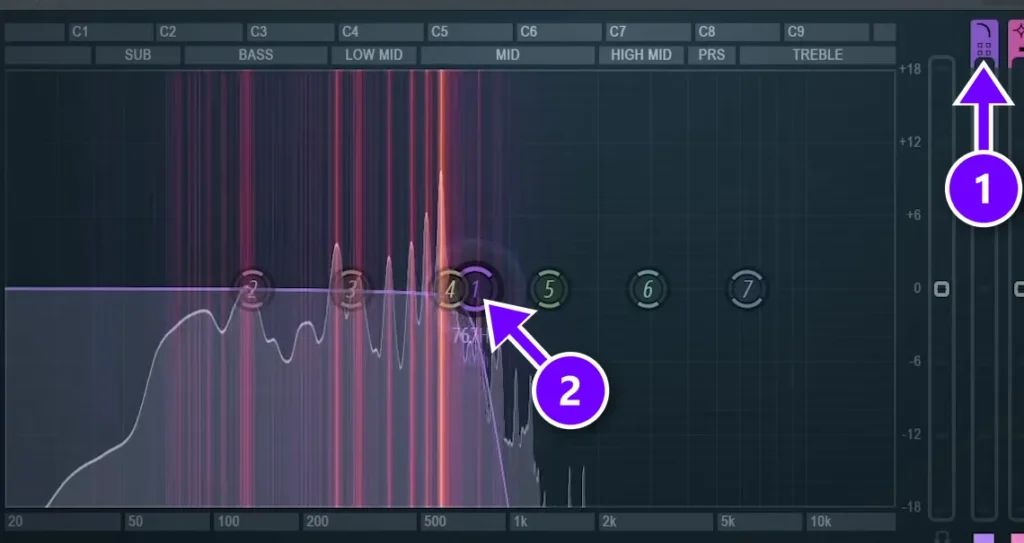
Go back to the EQ and switch band 1 from low cut to high cut (1), which FL Studio calls Low Pass. Drag the band (2) down until the melody is gone and only the chords are left. Then consolidate again with Ctrl + Alt + C.
Step 2: Shift the sample up 24 semitones
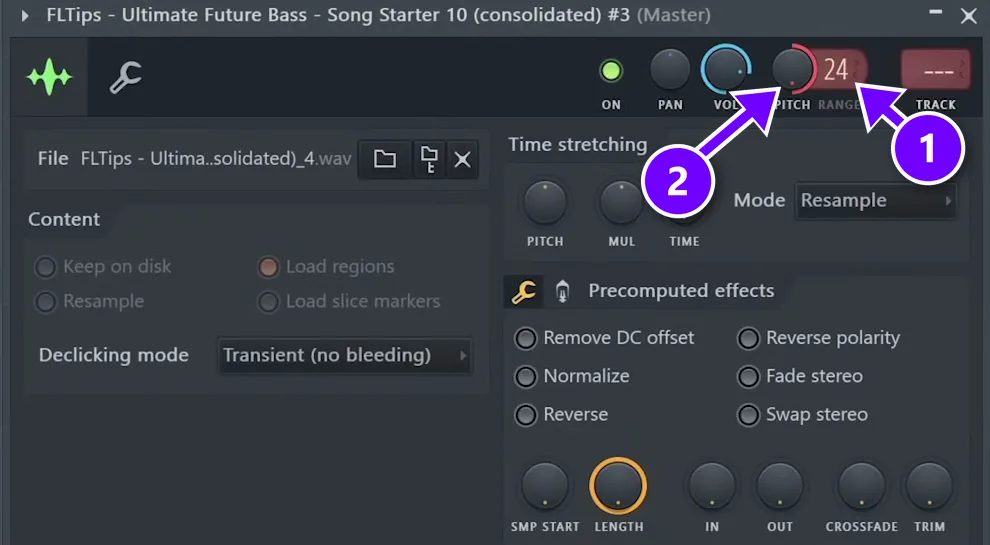
Open the new clip’s channel settings: click the clip icon and choose Channel settings. At the top, set RANGE to 24 (1) and turn the PITCH knob all the way to the right (2). The sample now plays 24 semitones higher, which is exactly two octaves.
The video doesn’t explain this step, so here’s why it helps. A note keeps its name when you move it up an octave, so a C is still a C. Low notes sit only a few Hz apart, though. Two octaves up, those gaps are four times wider, which makes each note much easier to pick out on a spectrum.
Step 3: Set Wave Candy to Spectrum at 4096 bands
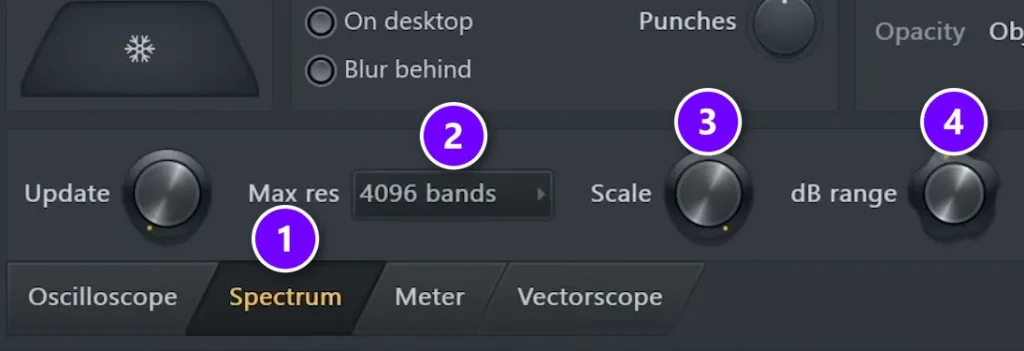
Load Wave Candy on the mixer track the chord clip plays through. It comes with every edition of FL Studio. Then change four settings:
- Open the Spectrum tab (1).
- Set Max res to 4096 bands (2).
- Turn Scale all the way up (3).
- Turn the dB range knob down (4).
Higher resolution shows finer detail but uses more CPU. Press play, and the chord shows up as a stack of bright lines. It looks pretty funny. That’s fine, because each line is a note.
Step 4: Point at the lowest lines and read the notes
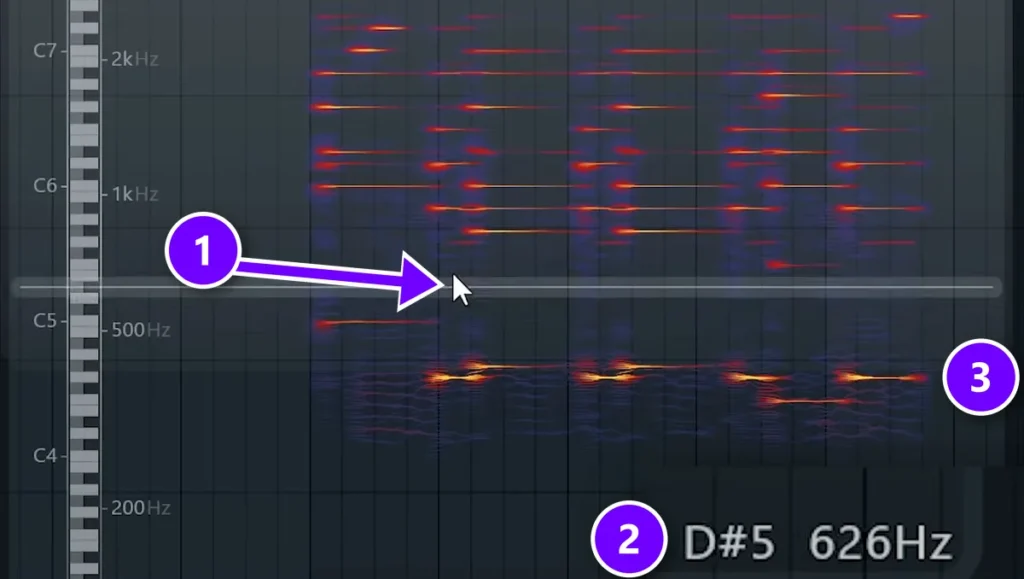
Each bright horizontal line is one note of the chord. As Max explains: “You can count four or five notes from the very bottom, aim it with your mouse, and on the right bottom corner it will tell you exactly what notes those are.”
In the screenshot, the mouse sits on one line (1), and the corner reads D#5 at 626 Hz (2). Start with the lowest lines (3) and work your way up, four or five lines in all. Write each name down as you go.
Step 5: Write the chord into the Piano roll
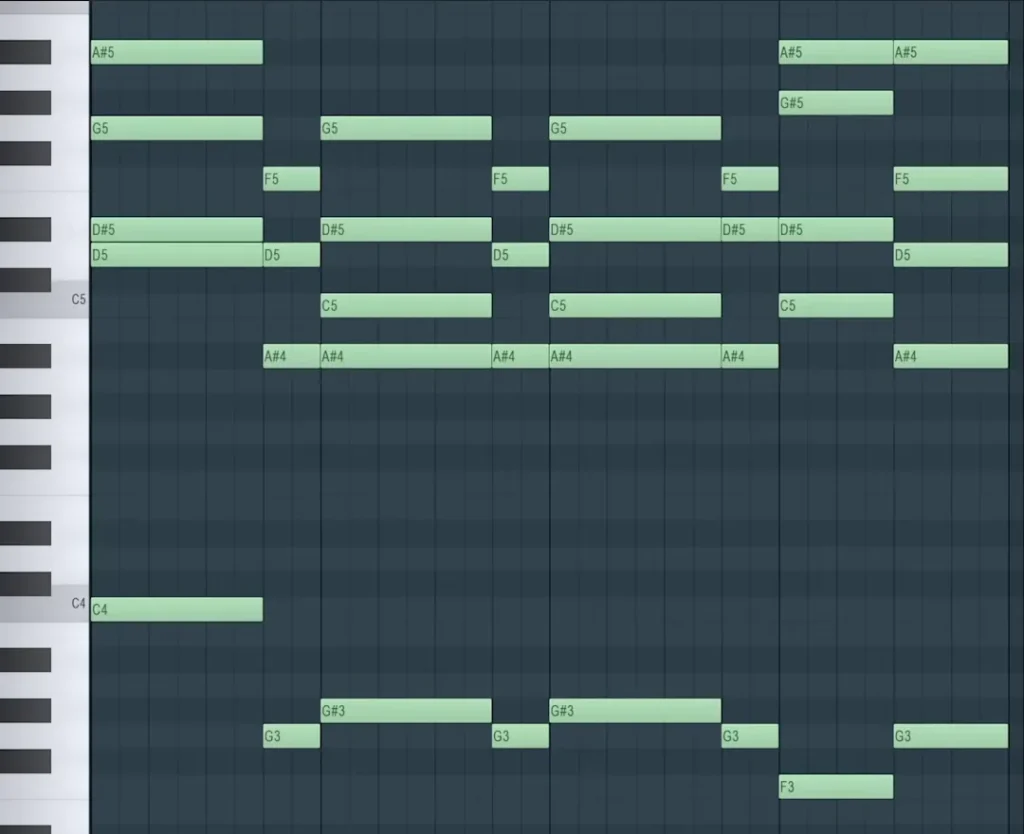
Now type the notes into the Piano roll, one chord at a time. In the screenshot, the first chord is C, D, D#, G and A#, from the bottom up. That’s a C minor 9: a C minor 7 chord (C, E-flat, G and B-flat) with a D added. Our guide to writing chords in FL Studio explains how chords like this are built.
Watch the octave. Wave Candy names the notes two octaves higher than the original, because you shifted the sample. The names are right, so write the chord where it sounds right and move it with Ctrl + Up or Ctrl + Down, one octave per press, until it sits with the original.
Finally, play your chords and your melody together. That’s how the video ends: the new MIDI melody and MIDI chords play together, and the sample is back, now as notes you can change.
How to use Newtone to convert audio to MIDI
Newtone is Image-Line’s pitch-correction and time-editing plugin. It comes with the Signature Bundle and the All Plugins Edition, or you can buy it on its own. The video doesn’t use it, but it’s the other built-in way to get MIDI out of a recording, and it lets you fix notes before they reach the Piano roll.
- Open the clip menu and choose Pitch-correct sample (number 3 in the clip menu screenshot above). Newtone opens with that sample. Inside Newtone you can also use File > Load sample (Ctrl + O).
- Play it through and fix any notes Newtone got wrong.
- Choose Edit > Send to piano roll. The notes go to the Piano roll as MIDI.
- Want a file instead? Choose File > Save as MIDI to save a .mid file.
Edison or Newtone? Edison is one click and comes with more editions. Newtone takes longer, but you see and fix each note before it becomes MIDI.
Does audio to MIDI work on a full song?
Not in one go. A full song has drums, bass, chords and vocals on top of each other, and a converter can’t tell which note belongs to which part. Split the song first, then convert one part at a time.
FL Studio 21.2 and newer can do the splitting for you, in Producer Edition and up. Open the clip menu, look under Sample and choose Extract stems from sample. FL Studio splits the clip into up to four stems (drums, bass, instruments and vocals), each on its own Playlist track under the original.
The first time, it downloads the model it needs, and FL Studio won’t respond while it works. Let it finish. Then treat the stem you want like the sample above: EQ away what you don’t need, consolidate, make it mono and convert. For a sung melody, start from the vocal stem.
How accurate is audio to MIDI in FL Studio?
Close enough to save you a lot of work, but never perfect: even the clean, single-instrument sample in the video needed a quick cleanup after the first pass. The busier the audio, the more you’ll fix.
Here’s what to look for when you play the result back:
- Tiny slivers between the real notes.
- Notes an octave too high or too low.
- One long note chopped into several short ones.
- Notes that start a little early or late.
Why does audio to MIDI give you wrong notes?
Because the converter has to guess. Every pitched sound carries overtones, extra pitches that ring above the real note, and a converter can lock onto one and write the note an octave too high. In a chord the overtones pile up, and drums, reverb and long note tails add even more wrong guesses.
So feed it one clean line: one instrument, in mono, with nothing else playing. That’s what the steps above set up, and it’s what the makers of other converters ask for too. Spotify says its Basic Pitch converter works best on one instrument at a time, and Apple says Logic Pro’s converter works best on single-note parts, because chords may be read wrong.
How do you fix wrong notes after converting audio to MIDI?
Play the MIDI against the original, then fix it in the Piano roll. Delete the tiny slivers, move notes that jumped an octave with Ctrl + Up or Down, tighten the timing with Quantize, and join chopped notes back together. A few minutes of cleanup usually does it.
These are FL Studio’s own Piano roll shortcuts for each fix:
- Delete the strays. Right-click a note to erase it, or hold Ctrl, drag a box around several and press Del.
- Fix octave jumps. Select the note and press Ctrl + Up or Ctrl + Down to move it one octave.
- Tighten the timing. Select all with Ctrl + A, then open Quantize with Alt + Q. Listen after, so the groove still feels right.
- Join chopped notes. Ctrl + L is Quick legato: it stretches each note to the start of the next one. Great on a smooth melody, wrong on a choppy one.
- Check it against the original. Unmute the original clip and play both. Wrong notes rub against it right away.
- Swap the sound. The notes live on a channel, so load any instrument there and hear the melody on a new sound.
If you know the song’s key, our guide to music scales helps you spot a note that doesn’t belong. For more time-savers, see our list of 30 FL Studio shortcuts.
How do you turn humming into MIDI?
Record one clean line, then convert it like any melody. Hum or sing one note at a time, at a steady pitch and with no reverb, then run the clip through Edison’s Convert to score and dump to piano roll. Spotify’s free Basic Pitch also takes a file or your mic, and Dubler 2 turns your voice into MIDI live.
- Record the idea. A voice memo on your phone works. So does recording straight into FL Studio, which needs Producer Edition or higher.
- Keep it clean. One note at a time, a steady pitch, no reverb or effects, and as little room noise as you can.
- Convert it. Drag the file into the Playlist, open it in Edison from the clip menu (Edit sample), make it mono and choose Convert to score and dump to piano roll, as in Step 3 above.
- Clean it and pick a synth. Fix the notes, then load any synth on that channel. A voice is never perfectly steady, so expect a few more notes to fix than with a sample.
Want to hear the synth while you hum? Dubler 2 by Vochlea is a paid plugin that turns singing, humming or beatboxing into MIDI in real time, inside any DAW, so you skip the recording step.
What’s the best audio to MIDI converter?
In FL Studio, start with Edison: it’s built into Producer Edition and up and handles single melodies well. For chords, Melodyne and Spotify’s free Basic Pitch go further, Ableton Live and Logic Pro have their own converters, and Dubler 2 works live from your voice.
FL Studio’s tools cost nothing extra once you own the right edition. If you want chords converted for you, or you only have FL Studio’s cheapest edition, these are the main options. The facts come from each maker’s own site, checked in October 2026.
Melodyne (Celemony)
Melodyne 5 is a pitch and timing editor from Celemony. Its assistant, editor and studio editions can turn audio into MIDI, and the editor and studio editions add DNA, Celemony’s tech for editing chords and other polyphonic audio (several notes at once). There’s a free 30-day trial of the studio edition.
Basic Pitch (Spotify, free)
Basic Pitch is a free, open-source converter from Spotify that runs in your browser. You upload a WAV or MP3, or record straight from your mic, and it turns that into MIDI. It handles chords and picks up pitch bends, and its makers say it works best on one instrument at a time.
Ableton Live’s Convert to MIDI
If you also own Ableton Live, it has four convert commands. Convert Harmony is built for chords on piano or guitar, Convert Melody for single lines like a sung part, and Convert Drums for beats.
Logic Pro’s Flex Pitch
In Logic Pro, double-click the audio region to open the Audio Track Editor, click the Show/Hide Flex button and choose Flex Pitch from the Flex Mode menu. Then choose Edit > Create MIDI Track from Flex Pitch Data, and a new instrument track with the notes appears below. Apple says it works best on single-note parts.
To bring a MIDI file from any of these into FL Studio, open the Piano roll and press Ctrl + M (Import MIDI file). Our MIDI guide shows the import window step by step.
Here’s a good first run. Take one short sample you own, four bars with one instrument, and do the four melody steps above. Clean up the notes, then put the melody on a new sound. Once that works, try the chord trick on the same sample.
DAY 1 OF THE 7-DAY MUSIC PRODUCER COURSE
Learn the FL Studio basics that make tricks like this easy
Day 1 of Mix Elite’s 7-Day Music Producer Course covers setup, workflow and navigation, including the top 4 features of any DAW you need to understand to find your way around, plus the ‘Producer Bible 101’ with every music production concept explained in plain English. Day 2 moves on to chords and melodies, with 4 easy ways to write melodies even if you’ve never touched a keyboard. It’s taught in FL Studio, and the free trial works. The course is $27, and you get 60 days to decide if it was worth it.
Frequently asked questions
Can FL Studio convert chords to MIDI?
Not cleanly. Edison’s Convert to score and dump to piano roll looks for one note at a time, so chords come out as a mess. The workaround: keep only the chords with a high cut, shift the sample up 24 semitones, open Wave Candy’s Spectrum at 4096 bands, then point at each line to read its note name and type the notes in. For automatic chord conversion, Melodyne editor or studio and Spotify’s free Basic Pitch handle chords.
Why does audio to MIDI give me wrong notes?
Because converters guess. Every note carries overtones, extra pitches that ring above it, so a converter can write a note an octave too high, and chords, drums and reverb add more wrong guesses. Feed it one clean line in mono, then delete the stray notes and fix octave jumps in the Piano roll.
Can I turn humming into MIDI?
Yes. Record your humming dry, one note at a time at a steady pitch, then convert it in Edison with Convert to score and dump to piano roll, or upload it to Spotify’s free Basic Pitch. To hum straight into a synth, Dubler 2 by Vochlea turns your voice into MIDI in real time inside any DAW.
What is the best free audio to MIDI converter?
If you own FL Studio Producer Edition or higher, Edison’s Convert to score and dump to piano roll costs nothing extra and works well on single melodies. Outside FL Studio, Spotify’s Basic Pitch is free and open source, runs in your browser and handles chords, though its makers say it works best on one instrument at a time.
Can I convert a whole song to MIDI in FL Studio?
Not in one go. Split the song first: in FL Studio 21.2 and newer (Producer Edition and up), open the clip menu and choose Extract stems from sample to get drums, bass, instruments and vocals on separate tracks. Then take one part, cut what you don’t need with an EQ, consolidate it, make it mono and convert it in Edison. Do one melody or chord part at a time.