

“…every object as it becomes more remote loses first those parts which are smallest.”
A low pass filter in music lets the low frequencies through and cuts the highs above a point you choose, called the cutoff. Producers use it to make a sound darker, push it behind the main parts, tame harsh top end and sweep it open in build-ups. Pull the cutoff far down and the music sounds muffled, as if it’s under water or in the next room.
Your arp, your chords and your vocal are all bright, and every one of them wants the front row. Turn one down and it vanishes. Leave it up and the mix becomes a shouting match.
There’s a quieter fix. Take away the fine, fizzy detail that makes a sound jump out, and it can sit behind the lead while you still feel it. Below is exactly how to do that in FL Studio, from a gentle cut on a Reese bass to the classic sweep into a drop, with screenshots from Mix Elite’s free 1-hour mixing course.
Table of Contents
What does a low pass filter do?
A low pass filter lets everything below one point, called the cutoff, through and turns down everything above it. Pull the cutoff down and the sound gets darker, warmer and softer, as if it moved further away or behind a wall. Push it all the way up and you hear the sound as it was.
Every sound is a blend of low, middle and high frequencies. Frequency is how low or high a sound is, measured in hertz (Hz). Low numbers are the deep stuff you feel, like the boom of a kick. High numbers are the air on a vocal and the sizzle of a hi-hat, counted in thousands of hertz (kHz).
The name trips everyone up at first, because the same filter goes by two names. In the mixing course, Max, the founder of Mix Elite, explains it: “you would choose something like high cut because we are cutting the highs. Or it’s also called low pass because we would let the lows pass.” High cut and low pass are one tool.
Three settings shape how it sounds:
- Cutoff: the frequency where the cut starts.
- Slope: how fast the highs fade above the cutoff, in decibels (dB) per octave. A gentle slope sounds natural. A steep one sounds like a wall.
- Resonance: a small boost right at the cutoff that gives a filter sweep its whistle.
What does a low pass filter sound like?
Darker, softer and further away. A gentle low pass set high only takes off some air and fizz, while a low cutoff leaves mostly the bass and the thump of the kick, so the music sounds muffled, like it’s playing in the next room or under water. Sweep the cutoff back up and the sound seems to open.
That’s also why the low pass effect works as a mix tool. Sounds lose their highs first as they move away from you, so a filtered part reads as distant even at the same volume.
What is the difference between a low pass and a high pass filter?
They’re mirror images. A high pass filter, also called a low cut, removes the lows and keeps the highs. A low pass removes the highs and keeps the lows. You’ll use high passes far more often, on almost every track that doesn’t need bass, and Mix Elite’s guide to high pass filters shows where to set one on each instrument.
A low pass looks after the top end instead. You reach for it less often, but when a sound is too bright, too close or too busy, nothing does the job as cleanly. There’s also a softer option, the high shelf, which turns the highs down by a set amount instead of removing them. Both can fix the same problem, as you’ll see below.
How do you add a low pass filter in FL Studio?
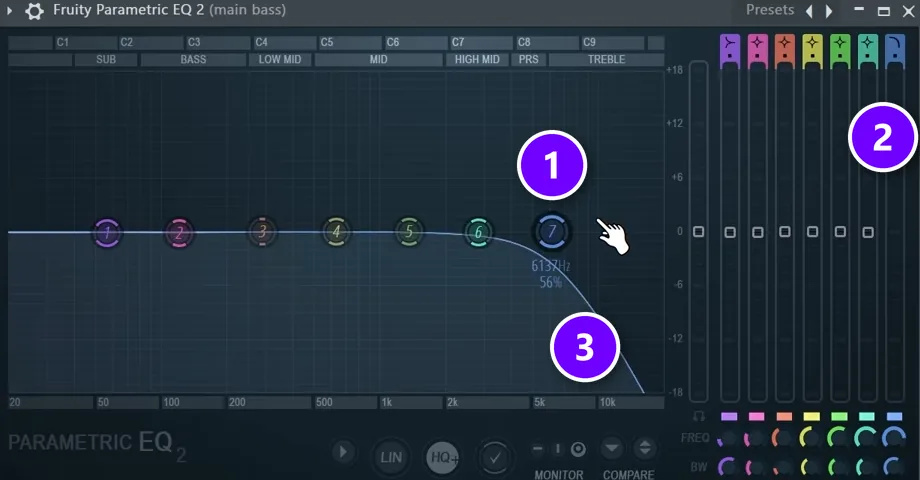
FL Studio’s own EQ, Fruity Parametric EQ 2, has a low pass built into band 7, the band on the far right. Here’s how to set it up:
- Press F9 to open the Mixer and select the mixer track your sound plays on.
- Click an empty slot in that track’s effects and load Fruity Parametric EQ 2.
- Change the shape token of band 7 (2) to the low pass shape. Hover over it and drag up or down, or right-click it and pick Low Pass from the menu.
- Drag the band itself (1) to the left to lower the cutoff. Everything to its right (3) is now being cut.
- Play the whole song while you adjust it, not just this one sound.
Prefer a single knob? The Fruity Filter plugin does the same job with a Cutoff Freq knob and a Resonance knob. Most synths have a low pass of their own too, like the filter in Serum used on the Reese basses in Mix Elite’s tutorials.
Mix Elite’s free 1-hour mixing course walks through all of this. The EQ band shapes start at 20:44, the Reese bass at 1:04:24 and the filter sweep at 1:17:28.
What should you set a low pass filter to?
Set it by ear, with the full mix playing: sweep the cutoff down until the sound loses its sparkle, then back it up a little. There’s no magic number, because it depends on the sound and on what plays around it, and a cutoff that tucks a pad in nicely would ruin a hi-hat. It’s the same rule Mix Elite teaches for low cuts: go a little too far, then back off.
- Start with the band all the way up, at the top of the range.
- Sweep the cutoff down slowly until the sound starts to lose its sparkle or turns dull.
- Back it up a little, until the sound is clear again but sits further back.
Slope: gentle for mixing, steep for effects
In Parametric EQ 2, the dots under each band’s shape token set the slope. The default is 12 dB per octave. Drag the dots down for the steep versions (24, 36 or 48 dB per octave) or up for the gentle ones, which start cutting a little earlier and ease into the cut. On a mix track, gentle usually wins. Max cuts the highs off his Reese bass very gently and saves steep slopes for moments where the cut should be obvious.
Resonance: the small peak at the cutoff
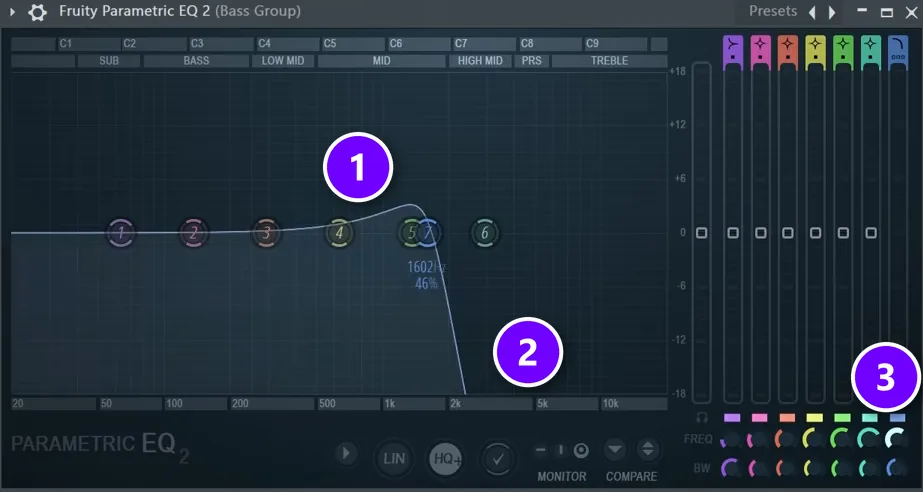
Scroll the mouse wheel over the band to change its width. On a low pass, that adds resonance, a boost that peaks and then drops away: a small bump (1) right before the slope (2). A touch of resonance makes a sweep sound alive. Too much whistles and rings, so keep it low on anything that plays all song long. The knob at the bottom (3) is band 7’s frequency, the one you’ll automate for a sweep.
When should you use a low pass filter in music?
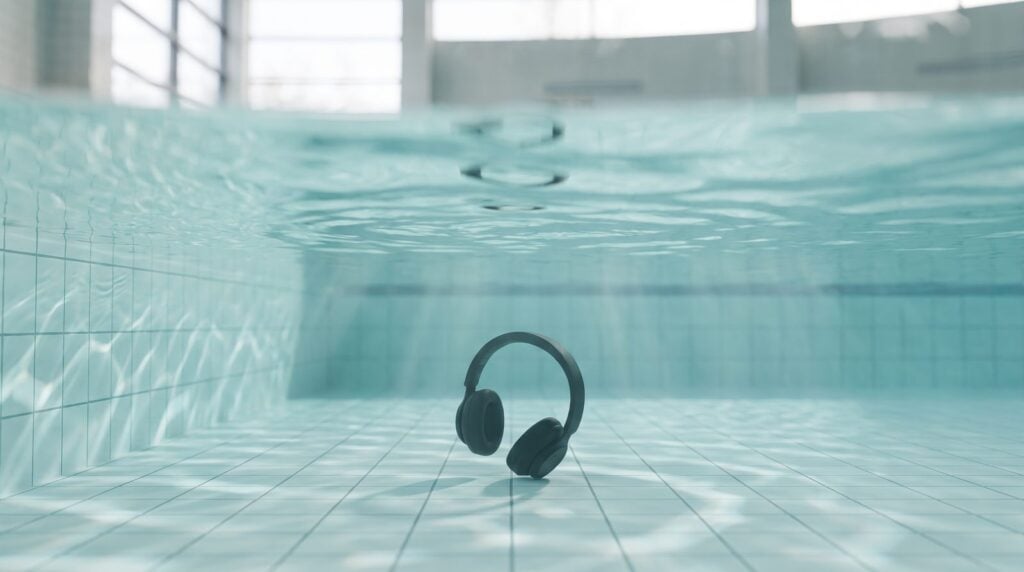
Use one when a sound is too bright, too close or too busy and you want it to step back without getting quieter. Most uses come back to one idea from Mix Elite’s mixing tricks video: “not everything can be equally audible. Your audience need something to focus on,” as Max puts it. A low pass is one of the gentlest ways to pick the winner without muting anything. These are the jobs it does best.
Push a sound behind the lead
Sounds lose their highs first as they move further away, so a low pass makes a part feel distant without making it quieter. Pads, arps, backing chords and background vocals are the usual suspects. Lower the cutoff until the part stops grabbing your attention. Then check you can still hear it when you listen for it.
It also makes room. When a bright pad and a vocal share the same top end, filtering the pad lets the vocal’s air come through, and you don’t have to boost the vocal to get there.
Darken a sound that is too bright
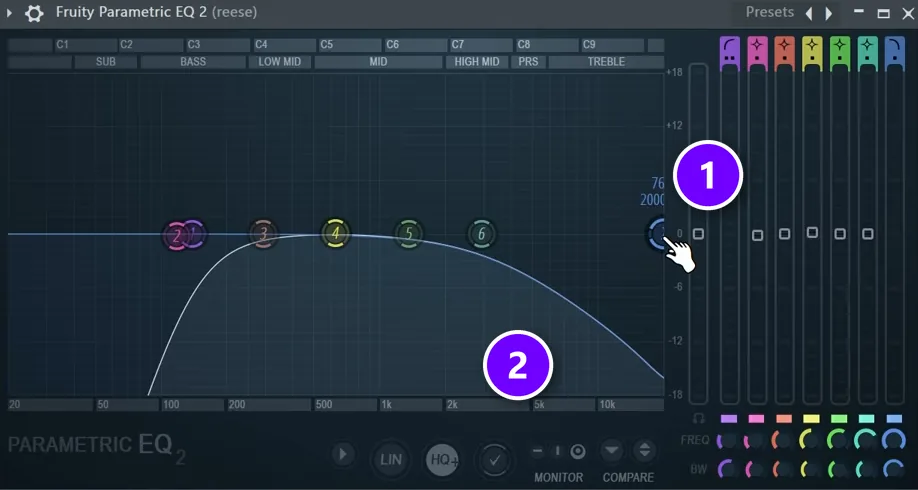
In Mix Elite’s free 1-hour mixing course, Max’s Reese bass sounded great but popped out of the mix too much. His reasoning: “since the high frequencies are defining the brightness of your instrument, we could simply attenuate them,” Max explains. He pushed band 7 to the far right (1) and set a very gentle low pass, so the top end rolls off slowly (2) instead of hitting a wall.
He also points out that a high shelf would work here. Both turn the brightness down. The low pass removes the very top completely, while the shelf only lowers it, so try both and keep whichever sounds more natural.
How do you tame a harsh synth lead without losing its energy?
Use a gentle low pass set high, and lower it only until the harshness eases while the full mix plays. Stop as soon as it stops hurting. A gentle slope rolls the fizz off slowly instead of cutting it like a wall, so the lead keeps its edge. If it starts to sound dull, switch to a high shelf, which turns the highs down without removing them.
Two more moves keep the energy. Darken the synth at the source: in Mix Elite’s Serum sound design tutorial, a sound that needs to be a little darker just gets the synth’s own filter switched on, set really soft. And if the lead only turns harsh on a few loud notes, a dynamic EQ cuts those moments and leaves the rest alone.
Then look around the lead. Filter the pads and backing synths that share its top end first. That clears room up high, so the lead needs less cutting and stays the brightest thing in the mix.
Keep a sub bass layer clean
When you layer a sine wave sub under a Reese, give each layer one job. In Mix Elite’s Reese bass tutorial, the Reese gets a low cut at about 120 Hz, and the sub gets a very harsh high cut above the point where the Reese’s cut sits, so the two layers never fight in the same range. A steep slope is right here, because you want a clean handover between the layers, not a soft blend.
Make reverb and delay sit further back
Effects are easy to over-brighten. On the Reese’s reverb, turn the low cut up and the high cut down, so the space stays without the fizz and the mud. FL Studio’s Fruity Reeverb 2 has the same control, labeled H.CUT. A darker reverb or delay tail sounds further away and stops competing with the dry sound. If you’re still choosing between the two effects, see reverb vs delay.
Clean up the very top of the master
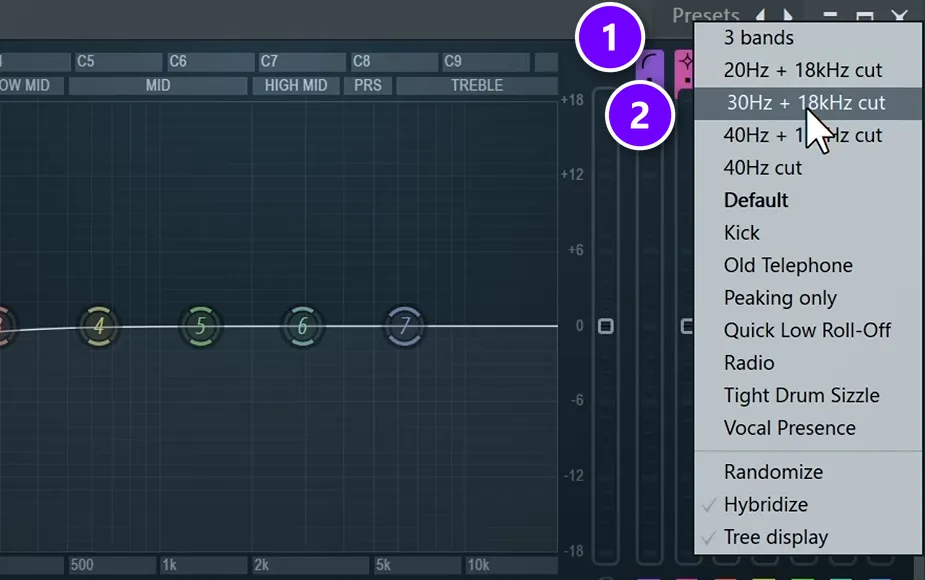
On the master, a preset in Parametric EQ 2 does the job. Open Presets (1) and pick 30Hz + 18kHz cut (2) to get a low cut at 30 Hz and a low pass at 18 kHz in one click. Max cuts everything above 18 kHz because he finds those frequencies unpleasant to the ear, and he adds that many professional engineers even cut at 16 kHz.
That’s in the mastering part of Mix Elite’s free 4.5-hour FL Studio course. Keep it that gentle. If a song needs big changes on the master, the fix belongs back in the mix.
Should you use a low pass filter, the volume fader or an EQ?
Use the volume fader when the whole sound is too loud. Use a low pass when a sound is too bright or too close but you still need its body, because it removes only the highs and pushes the part back without making it quieter. Use a high shelf or a bell cut to turn the highs down a little or tame one harsh spot.
Turning a part down makes it smaller and easier to lose. Filtering doesn’t. The part keeps its weight in the lows and mids, which is why a filtered pad can still feel full behind a vocal.
That choice gets easier once you’ve seen it made on real songs. In Mix Elite’s Full Mixing from Start to Finish course, a Trap song and a House song get mixed from scratch, vocals included, across 44 lessons you can follow in any DAW.
How do you make a low pass filter sweep in FL Studio?
Put a low pass on the part and automate its cutoff, so it starts low and rises to the very top right before the drop. You’ve heard this one a thousand times: the music starts muffled and opens up as the drop hits, and automating the high cut is one of the most common automation tricks there is. Here’s how in FL Studio:
- Put a Parametric EQ 2 on the part you want to sweep, after all its other effects. The mixing course puts it last on the bass group.
- Set band 7 to low pass, make it a bit steeper and scroll in some resonance.
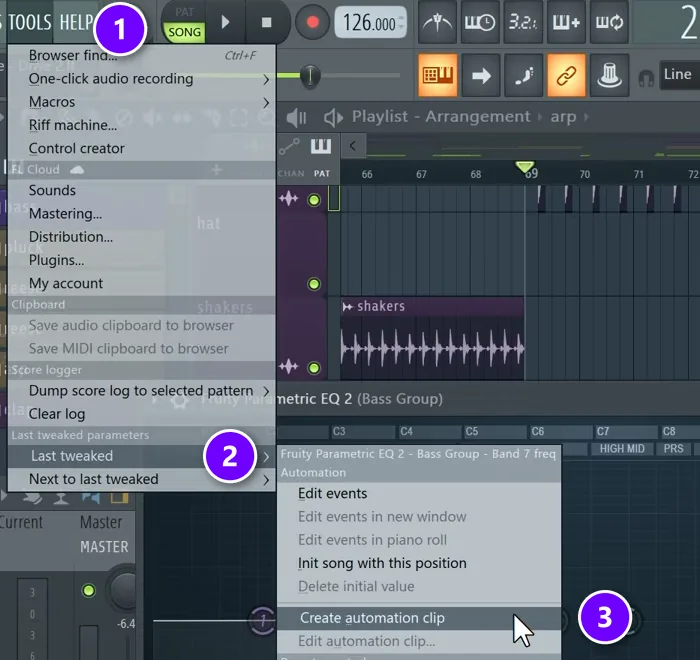
- Move band 7 once, then open Tools (1) > Last tweaked (2) > Create automation clip (3). Right-clicking band 7’s FREQ knob and choosing Create automation clip does the same thing.
- In the Playlist, start the clip low (around 20% in the course) and draw it up so it reaches the top just before the drop.
- Keep it at the very top after that, so the drop plays fully open.
Two more ways to use a filter sweep
- Chords into the drop. In Mix Elite’s future bass drop tutorial, the chords get some low pass leading into the drop, so the drop lands bigger when the filter opens.
- Hand the spotlight to a new sound. In Mix Elite’s mixing tricks video, the lead’s filter closes while the filter on an arp opens. The listener’s ear follows the new part without a gap.
How do you make a muffled underwater effect with a low pass filter?
Put a low pass on the whole beat, or on the parts you want to muffle, and pull the cutoff far down until only the low end is left. The kick and bass still thump, but the hats, the snare and the top of the vocal disappear, like music in the next room. For a transition, automate the cutoff back up as the next section starts.
- Load Parametric EQ 2 on the Master track to muffle the whole beat, or on the mixer track of one part or group.
- Set band 7 to low pass and drag it far to the left, until the music sounds like it’s behind a wall.
- Create an automation clip for band 7’s frequency (Tools > Last tweaked > Create automation clip) and draw it from low back up to the top over the last bars of the break.
- Keep it fully open everywhere else, so the rest of the song plays clear.
Keep the effect short, a few bars rather than a whole verse. The trick works because of contrast. When the filter opens, the full mix suddenly sounds bigger.
What are the most common low pass filter mistakes?
Four mistakes cause most low pass problems: setting it in solo, filtering everything, too much resonance on a filter that never moves, and a sweep that never fully opens.
- Setting it in solo. A sound can seem dull on its own and perfect in the mix. Set the cutoff with everything playing.
- Filtering everything. If every part gets a low pass, the whole song turns dull and small. Keep the lead, the vocal and the hats bright.
- Too much resonance on a filter that never moves. A sharp peak at the cutoff rings and whistles. Save big resonance for sweeps.
- A sweep that never fully opens. If the automation stops short of the top, the drop stays muffled. Check that the clip ends at the very top.
Try it tonight on one sound: pick the brightest part in your beat that isn’t the lead, load Parametric EQ 2 and pull band 7 down until the part steps back. Then hear how the lead suddenly has room.
When the top end sits right, the rest of the mix is next. Mix Elite’s guide on how to mix a song takes you through it in order, and how to use EQ in mixing covers the bells and shelves around your filters.
DAY 4 OF THE 7-DAY MUSIC PRODUCER COURSE
A filter is one move. Day 4 teaches the whole mix.
Day 4 of the 7-Day Music Producer Course is all about mixing: the simple Holy-Quad mixing formula, the “Mix Murdering” mistakes most beginners make, and the volume mistake people make in the first 5 minutes of every mix. You also get a mixing checklist and a mixing and production template. It’s taught in FL Studio, about 45 minutes a day, and on the last day a pro gives you feedback on your finished track. It’s $27, and you get 60 days to decide if it was worth it.
Frequently asked questions
What does a low pass filter do to a sound?
It makes the sound darker and softer. With the cutoff high, you mostly lose some air and fizz. With it low, the sound turns muffled, like music through a wall or under water. That’s why a low pass makes a part feel further away, and why sweeping it from low to high feels like the music is opening up.
Is a low pass filter the same as a high cut?
Yes. A low pass filter and a high cut are the same tool with two names: one says what passes (the lows), the other says what gets cut (the highs). FL Studio’s Parametric EQ 2 calls the shape Low Pass, while many other EQs label it high cut. A low cut is the opposite filter, the same thing as a high pass.
Should you use a low pass filter or just turn the volume down?
Turn the volume down when the whole sound is too loud. Use a low pass when it’s too bright, too close or too busy but you still want its body in the mix. The filter removes only the highs, so the part steps back behind the lead without getting smaller, and you don’t have to lose it to make room for the main sounds.
Should you use a low pass filter on the master?
Yes, but gently. Mix Elite’s free 4.5-hour FL Studio course loads the 30Hz + 18kHz cut preset of Parametric EQ 2 on the master, so the low pass sits at 18 kHz, and notes that many pro engineers cut at 16 kHz. Anything stronger dulls the whole song, so fix bright sounds in the mix instead.
What does LPF mean on an amp or subwoofer?
LPF stands for low pass filter. On a car amp, a home theater receiver or a subwoofer it does the same job as in a mix: it lets only the low frequencies through to the speaker built for them. The right setting depends on your speakers, so start with the setting in the maker’s manual.