
“Albums — remember those? Albums still matter.”
To make an album, finish at least 7 songs that belong together, mix and master them side by side so they sound like one record, and put them in a running order. Then add square cover art and upload everything to a distributor at least 7 days before release day.
There’s something special about pressing play on track one and letting the whole thing run from start to finish. You can learn how to make an album at home with just a laptop and a DAW, the music app you make songs in, and the hard part isn’t the gear, it’s finishing a whole batch of songs instead of one. Below are the 9 steps from the first idea to release day, with the workflow from Mix Elite’s free 4.5-hour FL Studio course, the rules streaming services use for albums and the FL Studio clicks that keep every song sounding like part of the same record.
Table of Contents
What counts as an album?
An album is any release with 7 or more tracks. Streaming services sort releases by how many tracks they have, and here’s how DistroKid, one of the biggest distributors, explains the rules most services use:
- Single: 1 to 3 tracks, each under 10 minutes.
- EP: 4 to 6 tracks (or 1 to 3 with one track of 10+ minutes), with a running time of 30 minutes or less.
- Album: 7 or more tracks, any length.
An EP, short for extended play, is the size in between. Above 7 songs there’s no rule. A tight 8-song album beats a long one full of filler, so pick quality over count. If you only have 4 to 6 songs you love, release them as an EP. That’s a great first project too.
How to make an album in 9 steps
Making an album is the normal song process done 7 or more times, plus three album jobs: making the songs sound like one record, putting them in order and releasing them together. Here are the 9 steps, and each one has its own section below.
- Decide what your album is about.
- Write more songs than you need.
- Set a schedule you can actually keep.
- Finish each song before you polish it.
- Make the songs sound cohesive.
- Mix the songs side by side.
- Master the album so every song sits at the same level.
- Put the songs in the right order.
- Make the cover art and release the album.
Step 1: Decide what your album is about
An album is more than a folder of songs. Something ties the tracks together, so they feel like they belong on the same record. That glue can be a story, a mood, a sound, or a season of your life.
Write it down in one sentence before you make anything, like “late-night drives, slow and warm” or “fast, angry trap about leaving home.” Later, when you can’t decide if a song fits, that sentence decides for you.
Pick 2 or 3 albums you love in the same style, too. You’ll use them later as references for sound, length and song order.
Step 2: Write more songs than you need
Start lots of ideas, then keep the best ones. If you want 10 songs on the album, try to finish 12 or more and cut the weakest at the end. Max, the founder of Mix Elite, says a few great sounds beat lots of okay ones, and the same goes for songs.
Keep a simple list of every idea with its tempo and key. Tempo is the speed in BPM (beats per minute), and the key is the set of notes a song uses. The songs don’t need to match, but the list helps you spot gaps. Maybe you have six fast songs and no slow one.
Step 3: Set a schedule you can actually keep
An album is a long project, so a plan matters more than motivation. Work in stages: write and arrange all the songs, then mix them all, then master them all. Doing the same job on every song in a row is faster. The songs also come out more alike.
Mix Elite’s free FL Studio course shows the full order for one song: ideas, production, arrangement, mixing, mastering and release. An album is that same order, done 7 or more times.
Be honest about time. Mixing alone takes about 5 to 10 hours on average, and longer for a complicated track. With 45 minutes a night, that’s one to two weeks of evenings per song just for the mix. Put real dates in your calendar.
How do you finish an album with only a few hours a night?
Give each evening one small job, and do the same job on every song in a row: write and arrange all the songs, then mix them all, then master them all. Start every song from your own template so setup never eats a session, and keep a list of every song and the stage it’s at.
That list saves more time than it sounds. You sit down, see that song 4 needs its second verse, and start. No night goes to deciding what to work on.
Step 4: Finish each song before you polish it
The fastest way to kill an album is polishing one song for months while the rest sit as 8-bar loops. Get every song to a rough but finished version first: a full structure, every part in place, the levels roughly right. Polish comes later.
If you get stuck on structure, borrow one. Max says: “Having a reference track is one of the most powerful strategies to level up quickly.” Drop a song you love into your project, mark where each section starts, and build your song on the same map. Our guide on how to finish a song walks through it step by step.
Mix Elite’s free FL Studio course walks through every stage of a song, from an empty project to a mastered track. Watch it once, then repeat the process for every song on your album:
Brand new to making songs? Start with our guide on how to produce music, then come back here.
If your ideas keep stalling as loops, Mix Elite’s Arrangements & Music Storytelling course is made for that step. Its 30 lessons show how to turn loops into full songs in Trap, Hip-Hop, EDM, House and Pop.
Step 5: Make the songs sound cohesive
Songs sound cohesive, like they belong on one album, when they share a small set of sounds, the same mix approach and one mastering session. Reuse the same drums, bass and key sounds, start every song from one template, and mix and master the songs side by side.
Reusing sounds isn’t cheating, either. Max says: “Some producers even reuse the same drum samples throughout the albums constantly, and it’s not a bad practice.” Pick a small set of drums, a bass and a few key sounds, and use them across the album.
FL Studio has two tools that make this easy.
Start every song from your own template
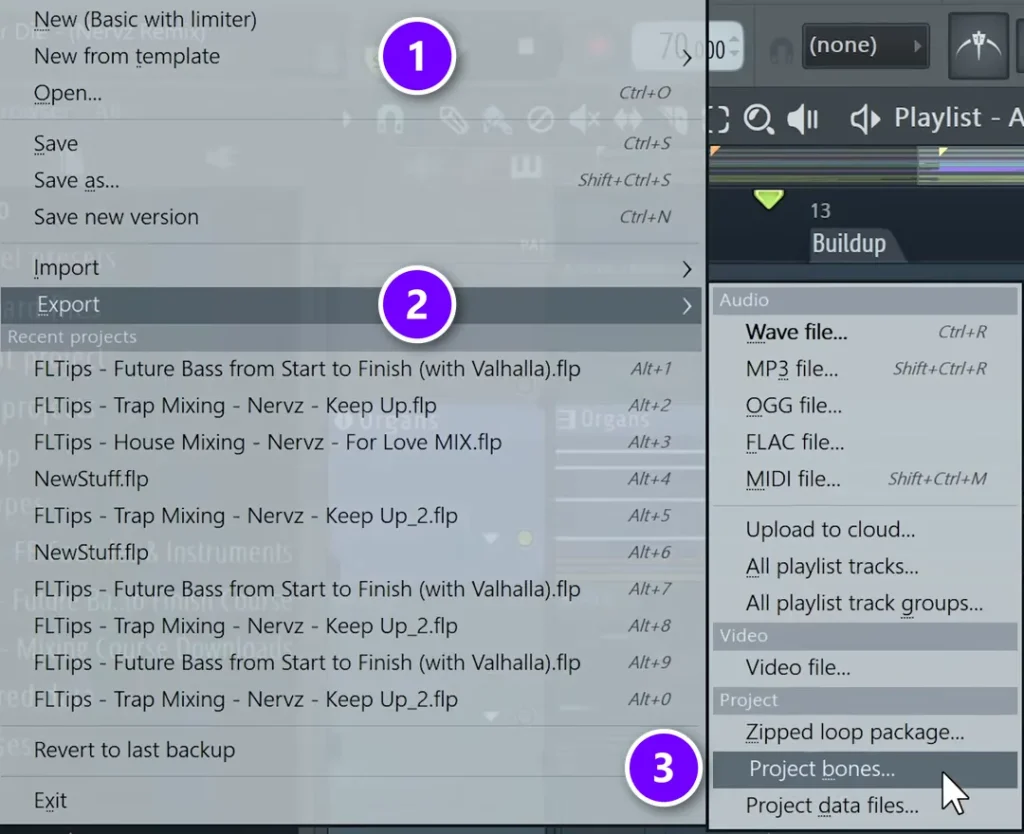
Build one project with your album’s drum kit, a few instruments and your favorite mixer effects already loaded. Click File > Save as template. From then on, every new song can start from it with File > New from template (1).
To open it automatically each time you start FL Studio, pick it under Options > General settings > Default template.
Need a drum kit to build that template around? Mix Elite’s Supreme Drums kit has 509 drum one-shots and 40 drum loops, each with its kit, all royalty-free.
Copy sounds between songs with Project bones
When a sound from one song belongs in another, you don’t have to save presets one by one. Open the finished song and click File > Export (2) > Project bones (3) in the same menu, then pick a folder. FL Studio saves every instrument and effect setting as presets, plus your notes and automation.
Load the bones into your next song
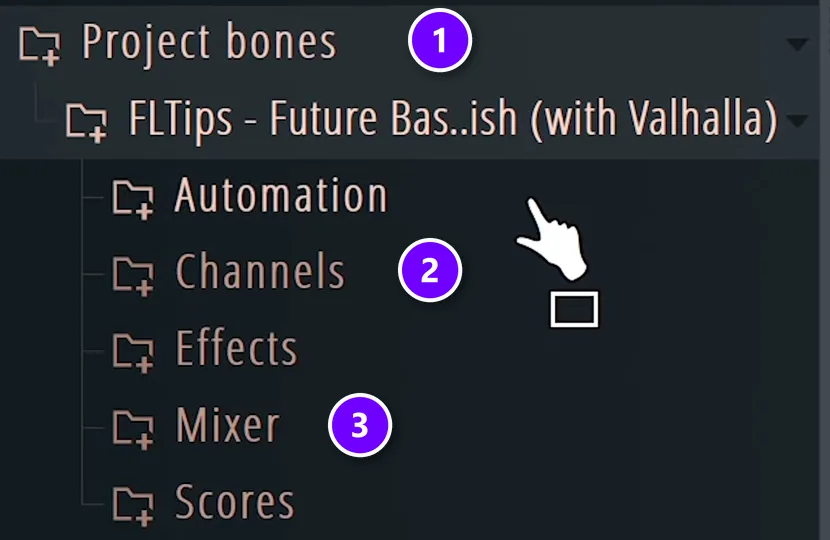
In the next song, open the Browser and find the Project bones folder (1). Inside the song’s folder, Channels (2) holds every instrument with its settings, and Mixer (3) holds the effect chain of each mixer track. Drag in what you need.
This short Mix Elite video shows the whole trick. Once you’ve used it, it’s hard to work without it.
Step 6: Mix the songs side by side
Mix each song on its own first, the normal way. One rule from Mix Elite’s free course helps a lot here: while you mix, keep the master track empty, with no limiter on it, so it can’t hide problems.
Then compare. Export a quick version of every mix and play them back to back in album order. Listen for the songs that jump out, like louder vocals, more bass or brighter hi-hats. Fix those in the mix, not later in mastering.
Check against one of your reference albums, too. If every song sits close to it, they’ll sit close to each other.
Effects can tie the songs together, too. iZotope’s guide to mixing an album suggests using the same type of reverb on every song, then adjusting the amount to fit each song’s tempo and mood, instead of pasting identical settings everywhere.
Mix on different days when you can. After a few hours on a song, your ears get used to it and stop hearing its problems. Fresh ears the next evening catch them fast.
Step 7: Master the album so every song sits at the same level
Mastering is the final polish that makes a song loud and clean. Max calls mastering “the final 5% of preparing your track for the release.” On an album, it has one extra job. It makes the songs sound like they belong together, so nobody has to touch the volume between tracks.
Mix Elite’s free course masters in a fresh, empty project, so you can drag all your final mixes into one FL Studio project and work on them side by side. Our guide on how to master a song covers the full mastering chain.
Check the loudness of every song
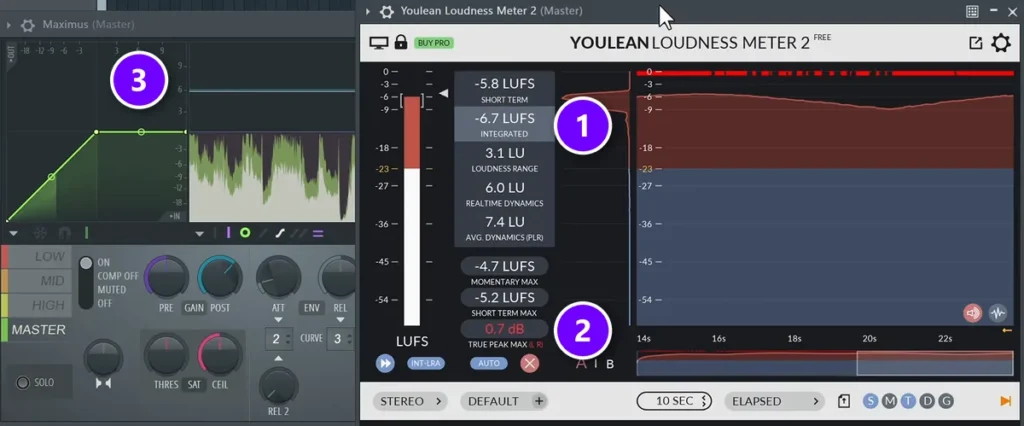
Put a loudness meter last on your master, like the free Youlean Loudness Meter that Mix Elite’s YouTube course uses. Play the loudest part of each song and read the Integrated number (1). It’s measured in LUFS, the unit for how loud music feels to your ears. Keep an eye on True Peak Max (2) as well, and make the song louder with a limiter like Maximus (3).
For the electronic track in that video, the target is about minus 8 to minus 7 LUFS. Your songs don’t need identical numbers, because a quiet ballad should stay a bit quieter. But when you play the album start to finish, no song should make you reach for the volume.
Some artists pay a pro to master, and the reason is simple: after weeks on your own songs, you’re so used to them that fresh ears make better calls. If you master yourself, take a day off before your final listen.
Export every master the same way
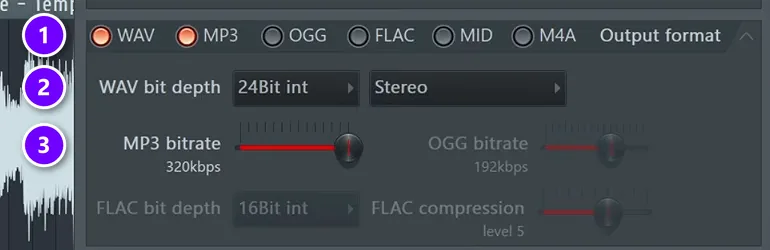
Export every master with the same settings. Tick WAV and MP3 (1), set the WAV bit depth to 24-bit (2), and push the MP3 bitrate all the way up (3). 24-bit WAV is the pick because it’s the most popular format for releasing music online. Upload the WAV files to your distributor, and keep the MP3s for sharing.
Name your files the way they’ll appear in stores, like “01 Song Title.wav”. Mixing up two masters at upload time is easy, and fixing a live release is a hassle.
Step 8: Put the songs in the right order
The order changes how the album feels. These simple rules help:
- Open strong. The first song has to grab people, so put one of your best at track 1 or 2.
- Put your singles early. People who found you through a single should hear it quickly.
- Change it up. Avoid three slow songs in a row, or three with the same tempo and feel.
- Watch the gaps. Leave a short silence between songs, or let one flow into the next. A tiny delay of about 100 milliseconds at the start of a master is fine, and so is a short fade if a song ends too suddenly.
- End on purpose. Close with something that feels like an ending: a slow song, a big finale or your most personal track.
- Test it. Listen to the whole album in order, on your phone or in the car, and move songs until nothing feels out of place.
Step 9: Make the cover art and release the album
Last step: the cover, the upload and a simple plan for release week.
Album cover art rules
Your cover shows up as a tiny square on phones, so keep it bold and simple. Here’s what DistroKid asks for, which matches what most stores want:
- A perfect square, ideally 3000 x 3000 pixels and never smaller than 1000 x 1000.
- A JPG file in RGB color, which cameras and design apps use by default.
- One image, with no website addresses, QR codes, prices, or social media logos and page names.
- No logos of streaming services, like Spotify’s.
- Nothing blurry, pixelated, rotated or low quality.
- Only images you’re allowed to use, so no unlicensed stock photos.
- A new cover for every release, because reused artwork can get rejected.
Pick a distributor and a release date
A distributor is a service that sends your music to Spotify, Apple Music, YouTube Music and the other stores, and pays your streaming money back to you. Their prices work differently. Some charge a yearly fee, some charge per release, and some take a cut of your earnings. Compare them before you upload.
Upload the album a few weeks before release day. Spotify asks for music at least 7 days ahead, so its editors have time to listen. If you pitch an unreleased song that early, Spotify also adds it to your followers’ Release Radar playlists. You can pitch one song at a time.
Want to put out singles first? DistroKid, for example, lets you release a single and include it on the album later. Use the exact same audio file and song details, so services have a better chance of keeping its play count.
Get your codes and song details right
Every song on a release gets an ISRC, a code that works like a fingerprint for one recording, and the release itself gets a UPC. You don’t have to buy them. DistroKid, for example, generates an ISRC for every song you upload, free and automatically, plus a UPC for every upload.
Type your artist name, the song titles and the credits the same way on every song. Small differences can make an album look messy in stores.
Plan your release
You don’t need a label for any of this. Labels are one route, and releasing on Spotify or YouTube by yourself is the other. A simple plan for doing it yourself:
- Before release: put out one or two singles and tell people the date.
- Release day: share the album everywhere you’re active, and ask friends to listen all the way through.
- After release: keep posting short clips, pitch songs to playlists, and play the songs live if you perform.
- Next time: write down what worked, because your second album will go faster.
For the full checklist, read our guide on how to release music.
How long does it take to make an album?
For a beginner with 45 minutes a night, plan on roughly 7 to 9 months for 10 songs, plus a few weeks for mastering, artwork and release. It depends on how fast you finish songs. Here’s the math. If each song takes 3 to 4 weeks of evenings from idea to final mix, 10 songs take 30 to 40 weeks. That’s where the 7 to 9 months come from.
Two things make it faster: working in stages (Step 3) and reusing your sounds (Step 5). Your second album will be quicker anyway. By then, finishing is a habit.
How much does it cost to make an album?
Making an album at home can cost very little, because you can do every step yourself. Here’s what you actually pay for:
- A DAW. FL Studio’s free trial has every feature but can’t reopen saved projects, so for an album you’ll want a paid edition. Those start at $99.
- Distribution. Fees and payment models vary by distributor, so compare before you upload.
- Cover art. Free if you make it yourself, or whatever a designer charges.
- Extras, only if you need them: a mic and audio interface if you sing or rap, and paid mastering if you don’t master yourself.
Studio time is optional. You can write, record, mix and master the whole album at home.
DAY 7 OF THE 7-DAY MUSIC PRODUCER COURSE
Every album starts with one finished, released song
Mix Elite’s 7-Day Music Producer Course takes you from setup to a mastered track, one step a day, and Day 7 is about releasing it: the best way to put your music on all streaming platforms for free, how to avoid platforms that take your money, and in-depth personal feedback on your track from our team. It’s taught in FL Studio (the free trial works), about 45 minutes a day. It’s $27, and you get 60 days to decide if it was worth it.
Frequently asked questions
How do you make an album sound cohesive?
Give the songs a shared sound. Reuse a small set of drums, bass and key sounds, start every song from the same template, and use the same type of reverb, adjusted for each song. Then mix and master the songs side by side, and play them back to back in album order to catch the one that sticks out.
Can I make an album by myself at home?
Yes. You need a computer, a DAW like FL Studio, headphones and time. You can write, record, mix and master every song at home, then release the album through a distributor without a label. A mic and audio interface only matter if you record vocals or real instruments.
How do I finish an album with only a few hours a night?
Give each session one small job and batch the work: write and arrange every song, then mix them all, then master them all. Start each song from your own template, keep a list of every song and its stage, and get each song to a rough but finished version before you polish anything.
How many songs are on an album?
Streaming services count any release with 7 or more tracks as an album. A release with 4 to 6 tracks and 30 minutes or less counts as an EP, and 1 to 3 short tracks count as a single. Above 7 there’s no rule, so choose your strongest songs instead of filling the album with weaker ones.
How long does it take to make an album?
It depends on your time and how fast you finish songs. As a rough example, if each song takes 3 to 4 weeks of evening sessions from idea to final mix, 10 songs take about 7 to 9 months, plus a few weeks for mastering, artwork and release. Working in stages and reusing sounds makes it faster.