
“Small rooms or dwellings discipline the mind, large ones weaken it.”
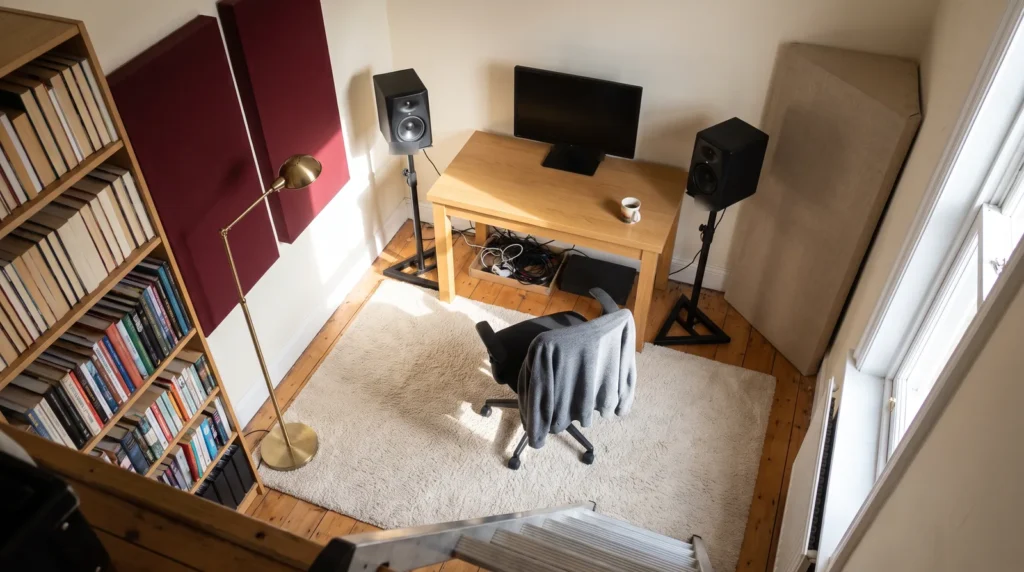
The best home studio design ideas for a small room cost little: put your desk on the short wall, centered, sit about 38% of the way into the room, and set your speakers in an equal triangle with your head. Then add soft things that soak up echo, like a rug, a full bookshelf and a few panels, use warm lamps instead of a ceiling light, and hide the cables in a tray.
Scroll through studio photos online and you’ll see glowing LED walls, giant mixing desks and rooms bigger than most apartments. Then you look at your spare room, with the laundry basket in the corner and a box of old cables by the door, and wonder where a studio would even fit.
It fits. A good home studio doesn’t need to look like a magazine. It needs to sound honest, feel good at 10 pm after a long day, and be ready the second you sit down. These 28 ideas get you there, and most of them cost nothing but a Saturday afternoon.
Table of Contents
Home studio design ideas: what matters most?
Three things matter, in this order: how the room sounds, how it feels to sit in, and how fast you can start. Sound comes from where you put things and from soft surfaces, not from pricey gear. Comfort comes from your chair and desk height. Speed comes from leaving everything plugged in.
Looks come last. The good news is that the ideas that fix the sound usually look good too, because a wall of books, a thick rug and a few fabric panels make a room quieter and cozier at the same time. Still buying gear? Start with our home studio setup guide for what to buy first, then come back here for the room around it.
Home studio layout: where should your desk and speakers go?
Put your desk against the short wall, centered between the side walls, so your speakers fire down the long side of the room. Sit about 38% of the way in from the front wall, and set the two speakers and your head in an equal triangle with the tweeters at ear height.
1. Put your desk on the short wall, centered
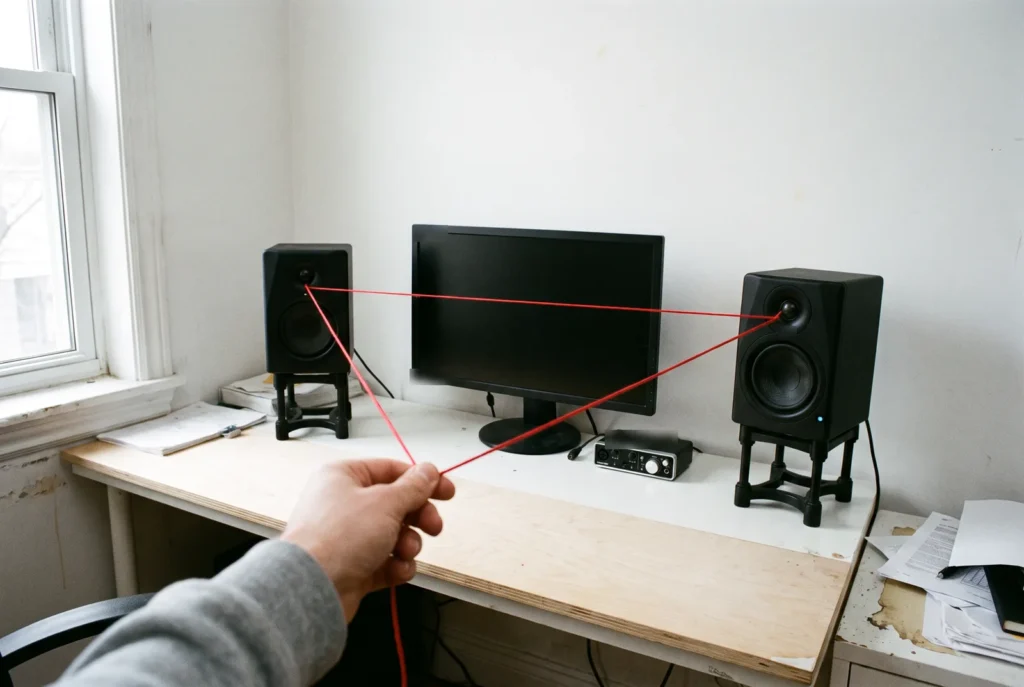
Face the short wall and the sound from your speakers gets the whole length of the room before it hits the wall behind you. Center the desk between the side walls, too. If one speaker sits next to a wall and the other sits next to an open doorway, they’ll sound different, and your mixes will lean to one side without you knowing why. Symmetry matters more than size.
Genelec, a studio speaker maker, gives the same advice in its placement guide: set up on the room’s center line and keep the same distance to the nearest side walls. Move the bed or the dresser if you have to. It’s the cheapest upgrade in this whole list.
2. Sit about 38% of the way into the room
Measure from the wall you face to the wall behind you, and put your head about 38% of that distance from the front. In a 12-foot room, that’s about 4.5 feet from the front wall. Bass bounces between those two walls and piles up in some spots, and the exact middle of the room is one of the worst places to sit. Genelec warns against the exact center too.
Skip the tape-measure math. Mix Elite’s free studio monitor placement calculator asks for your room’s length and width and shows where your chair and speakers go.
3. Make an equal triangle with your monitors
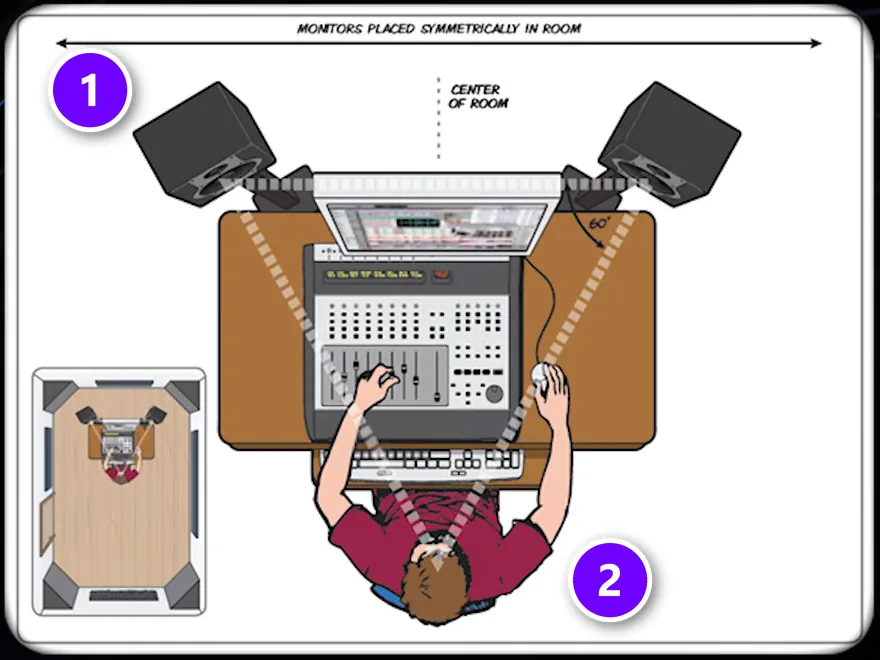
Your two speakers and your head should make a triangle with three equal sides. If the speakers are 4 feet apart, each one is 4 feet from your head. Turn each speaker in so it points at your ear, then raise it until the tweeter, the small speaker that plays the highs, sits at ear height. Genelec puts the angle between the two speakers at 60 degrees, which is exactly what an equal triangle gives you. That’s the whole trick.
In the diagram from Mix Elite’s beginner gear video, the speakers (1) and your head (2) form that triangle. The 7-Day course teaches it on Day 1 as the “Perfect Triangle” formula.
4. Lift the speakers off the desk and away from the wall
A speaker sitting flat on a desk shakes the desk, and the desk adds its own boom. Paul White’s monitor placement guide in Sound On Sound says to put speakers on solid stands, because sound bouncing off the surface in front of you colors what you hear. He also notes that the bass sounds louder when you sit close to a wall. Mix Elite’s short on studio monitors gives a simple rule of thumb: keep 15 to 30 cm, about 6 to 12 inches, between each speaker and the wall.
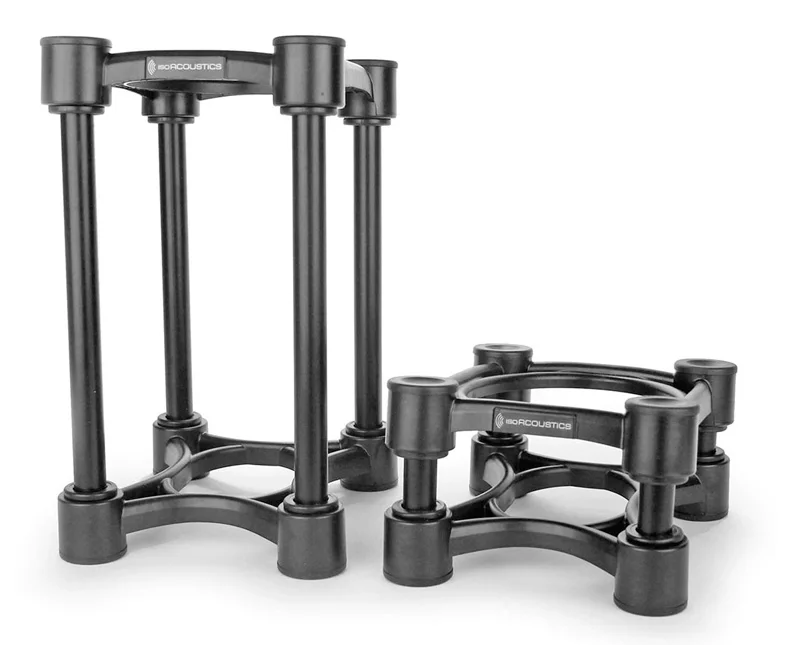
Desk stands fix the shaking and the height in one go. The IsoAcoustics ISO-130 stands, for example, lift small monitors and tilt them toward you, with 14 height and tilt settings. IsoAcoustics points out that your ears usually sit about 20 inches above the desk, so most desktop speakers need a lift. Books work in a pinch.
5. Use the corner for the desk, not the speakers
An L-shaped corner desk saves a lot of floor in a tiny room. Just keep the speakers out of the corner itself. Bass builds up in corners, so speakers tucked into one sound boomier than they really are. Put the long side of the L along the short wall, sit in the middle of it, and use the other side for a keyboard or laptop. Corners are for gear, not speakers.
Square rooms are the tricky case, because the bass problems from both pairs of walls land on the same notes. Some producers turn the whole desk to face across a corner so the speakers fire down the longest line in the room, the diagonal. Treat that as a test, not a rule. Try both spots with a song you know well and keep the one where the low end sounds more even.
6. Turn a closet into a vocal booth or a tiny studio
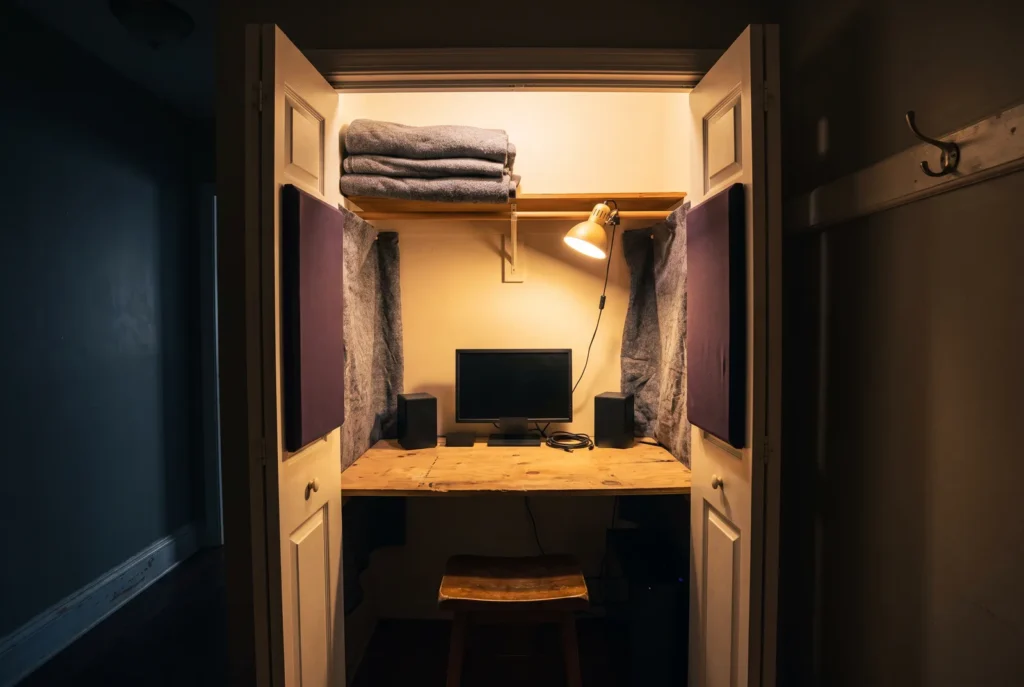
A closet full of clothes is one of the most dead-sounding spaces in a house, and dead is exactly what you want for recording a voice. The space doesn’t have to be big. It has to be quiet. Max, the founder of Mix Elite, puts it simply: “Just find any space in your house that has little to no echo.” For vocals, he adds, “it can even be your closet.”
Set the mic up so you sing into the hanging clothes, which soak up your voice instead of bouncing it back. Turn off fans and the air conditioner while you record, because the mic hears them too. An empty reach-in closet can even hold a whole mini studio: a shelf at desk height, a laptop, headphones and small speakers, with the doors closing it all away at the end of the night.
Small home studio design: bedroom studio ideas
Give the studio one wall of its own, use a narrow or fold-down desk, and hang gear on the wall instead of the floor. Pick small near-field monitors, and let the bed, rug and curtains do some of the acoustic work for free.
7. Give the studio its own wall in a shared bedroom
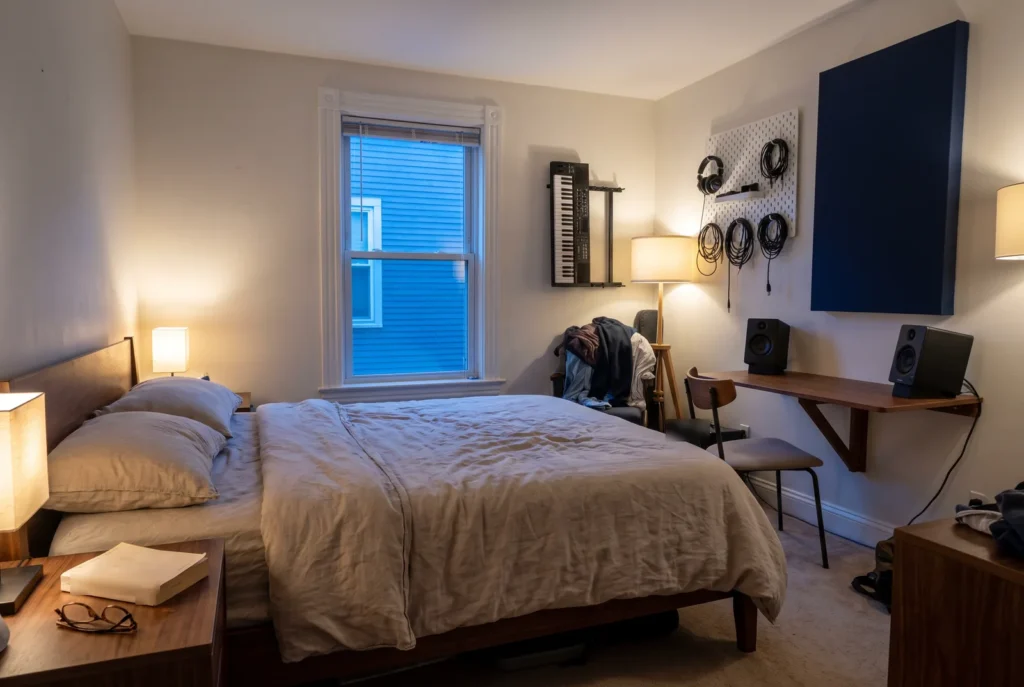
A bedroom you share can still hold a real studio. Claim one wall, ideally a short one, and keep everything for music on that side: desk, speakers, keyboard, headphones. The rest stays a bedroom, and that helps more than you’d think. The bed, the rug and the curtains all soak up echo. Soft is good.
Mix Elite’s short on untreated rooms makes the same point: it’s better to mix in a room with a lot of objects than in a completely empty one. Max goes further and calls a studio in your bedroom a good idea for exactly that reason, because all the soft, heavy stuff in it soaks up and scatters sound.
8. Choose a narrow or fold-down desk
Big studio desks with racks and side wings eat a small room alive. All you really need is a plain desk wide enough for your speaker triangle, with room for a laptop and a small keyboard. If the room has to be something else by day, a wall-mounted fold-down desk closes flat when you’re done. Small is fine. When you have the space for more, our guide to the best studio desks compares the full-size options.
9. Hang your gear on the wall
Floor space is what makes a small room feel bigger. Put headphones on a hook, guitars on wall hangers and cables on a pegboard. The IKEA SKÅDIS pegboard (22 by 22 inches, $24.99 at IKEA’s US store on October 25, 2026) takes hooks, clips and small shelves for headphones, cables and a phone.
Keep the speakers themselves off the wall, though. Pushed flat against a wall or bolted to it, they get boomy, for the same reason as idea 4.
10. Pick small near-field monitors for a small room
Big speakers in a small room just make more bass than the room can handle. Mix Elite’s short on studio monitors puts it plainly: large midfield monitors make no sense in a small untreated room, and active near-field monitors, the small kind built to sit close to you, are the right choice for most producers. For an average room, 5-inch speakers are plenty. Small room, small speakers.
Check the back panel, too. Many monitors have room or high-trim switches that tame the bass or highs for your room, and the same short says not to ignore them. Our list of the best studio monitors sorts its picks by room size and budget, including small desk pairs.
Why do mixes sound boomy at home? Acoustic ideas that look good
Mixes sound boomy at home because bass bounces between the walls and piles up, mostly in the corners. Thick panels in the corners and at the reflection points fix most of it. A rug, a full bookshelf and fabric art panels help too, and they look like normal decor.
This one-minute Mix Elite video gives three quick fixes for mixing in an untreated room: compare your mix with songs you know well, switch between speakers and headphones, and then change the room itself.
11. Hang acoustic panels as art

Panels don’t have to look like a recording studio. A fabric panel is just a frame of dense wool with cloth stretched over the front, so the cloth can be any color or a printed picture. GIK Acoustics’ Acoustic Art Panels print your own design or a picture from their collection on the front of a real absorbing panel. They start at $199 at GIK’s US store (October 25, 2026).
Building your own? Wrap the panels in a fabric that matches the room, or in one bold color, and hang them like paintings at ear height.
12. Put bass traps in the corners
Bass gathers in corners, and in a small room that’s where most of your boom comes from. Max puts it bluntly: “Your room resonates exactly in this muddy low range.” A bass trap is just a thick absorber, often standing across a corner with air behind it. Sound On Sound columnist Martin Walker says to start with traps across the front corners, then the rear ones. Corners come first for a reason.
Start with the two corners behind your speakers. Ready-made traps like GIK’s TriTrap ($299 for the standard size at GIK’s US store, October 25, 2026) stand freely and stack in a corner like a piece of furniture, with no drilling.
13. Treat the first reflection points
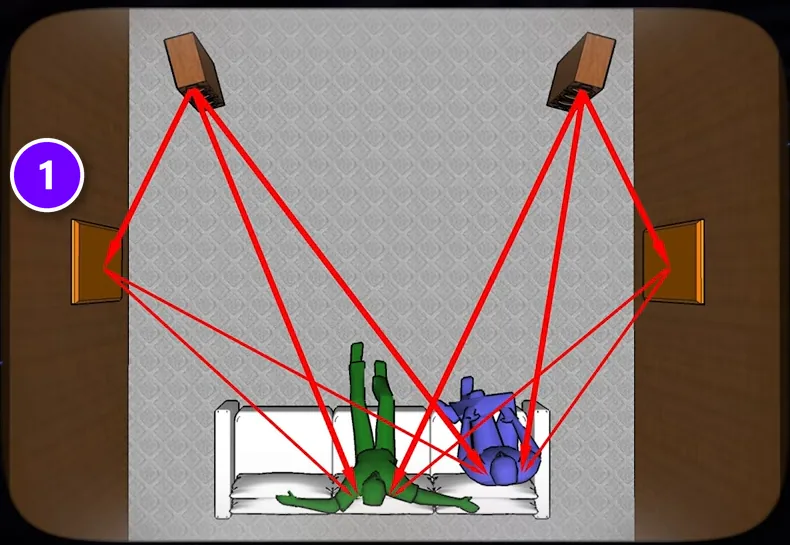
These are the spots on the side walls where sound from each speaker bounces straight to your ears. To find them, sit in your chair while a friend slides a mirror flat along the side wall at ear height. Wherever you can see a speaker in the mirror, hang a panel. Do both side walls, and the ceiling above the desk if you can reach it.
The diagram from Mix Elite’s beginner gear video shows the side-wall panel (1) catching that bounce before it reaches you.
14. Lay a thick rug between you and the speakers
Floors count too. A hard floor bounces sound up at you just like a bare wall. A thick rug covers that bounce and makes the room feel warmer at the same time. Put it where the sound travels, under your chair and the space in front of the desk, not off by the door.
15. Use a full bookshelf as a diffuser
A diffuser scatters sound in many directions instead of soaking it up, so the room sounds open instead of dead. A bookshelf packed with books of different sizes does a rough version of that job for free. As Max says, “shelves with books, some sofas, carpets, mattresses, all kinds of heavy stuff diffuse and absorb the sound a lot.”
Put the shelf on the wall behind your chair, where sound from the speakers would otherwise bounce straight back at you. Mix the sizes. Rows of identical books act more like a flat wall.
16. Leave some walls bare
More foam is not better. In Sound On Sound’s beginner guide to acoustic treatment, Jorge Castro says the typical home studio needs only 30 to 40% of its walls covered. Cover every wall and the room sounds dead and stuffy, which misleads you just as much as an echoey room does.
Thin foam squares are the usual trap. They only soak up the mids and highs, like the human voice, so a room covered in thin foam can still boom. Dense mineral wool panels and the soft furniture you already own do far more for the low end.
How do you keep sound from bleeding into other rooms at night?
Panels won’t stop sound leaking out. They only change how the room sounds inside. To keep the house asleep, seal the gaps around the door, keep bass out of the floor and walls, and do late-night work on headphones at a low volume.
17. Seal the gaps around the door
Start with the door. Sound leaks out wherever air can, and the door is almost always the weakest spot. Weatherstripping around the frame and a door sweep along the bottom close those gaps for a few dollars. A solid door blocks far more than a hollow one if you ever replace it.
None of this is real soundproofing, which takes heavy, sealed walls. It does take the edge off a kick drum before it reaches the kids’ room, though.
18. Switch to night mode: headphones and low volume
Bass travels through floors and walls much more easily than the highs do, so it’s the first thing your family hears. At night, turn the subwoofer off if you have one, put the speakers on stands instead of the floor or a hollow desk, and switch to headphones. Save the loud speaker checks for the weekend.
Low volume is kinder to your ears anyway, and headphones don’t care what your room sounds like. Our guide to studio monitors vs headphones explains when each one wins.
Home studio lighting ideas: how do you make it cozy?
Turn off the bright ceiling light and use two or three warm lamps instead, plus a soft light behind your screen. Keep the window to the side of the desk, never behind the screen, so you’re not squinting into glare.
19. Put a soft light behind your screen
A bias light is a small LED strip or lamp that lights the wall behind your screen. A bright screen against a black wall is a harsh contrast, and a soft glow behind it evens that out. Keep it dim and warm. This is mood light, not a gaming rig. Subtle wins.
20. Swap the ceiling light for warm lamps
Overhead lights are flat and harsh, and they make a room feel like an office at 10 pm. Two or three lamps at different heights, say a desk lamp and a floor lamp in a corner, feel much calmer. Pick bulbs labeled warm white, around 2700K on the box. A dimmer or a smart bulb lets you go bright for setting up and low for writing.
21. Keep the window beside you, not behind the screen
Cornell University’s ergonomics guide says you shouldn’t see any glare on your screen, and that the screen shouldn’t sit in front of, or face, a bright window. A window off to the side gives you daylight without the squint. Heavy curtains over it cut the glare by day and soften the bare glass at night.
How do you keep a home studio organized? Storage and cable ideas
Give every cable and controller a home: a slide-out tray for the MIDI keyboard, an under-desk tray for power strips and cables, and wall hooks for headphones. When nothing has to be unpacked, you start making music the minute you sit down.
22. Slide the MIDI keyboard onto a tray
A music keyboard on top of the desk pushes your computer keyboard and mouse too far away. A pull-out tray under the desktop keeps it right in front of you and slides away when you need to type. Cornell’s guide recommends an adjustable keyboard tray too, so your arms stay relaxed.
With a small 25-key keyboard you can flip it around. Keep the music keys on the desk and put the typing keyboard on the tray.
23. Hide the cables in an under-desk tray
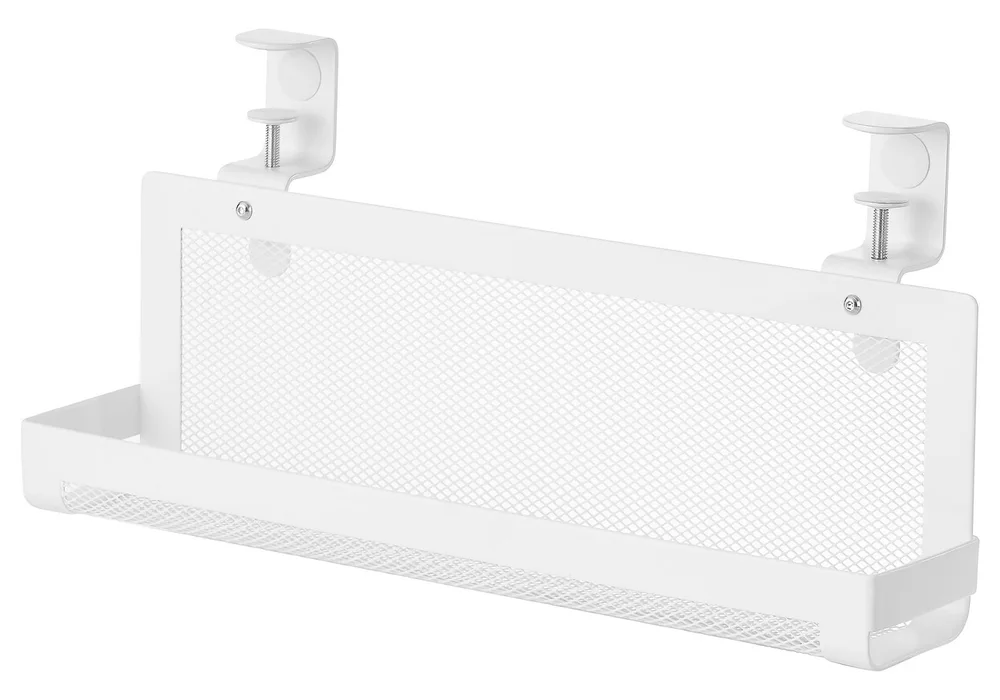
Cables on the floor look messy and catch your chair wheels. Clamp a tray under the back edge of the desk, drop the power strip in it and run every cable through it. The IKEA FÖRSÄSONG cable tray clamps to the desk edge and costs $12.99 (IKEA US, October 25, 2026). A few Velcro ties along the desk legs finish the job.
Then leave it all plugged in. If setting up takes ten minutes every night, some nights you won’t start at all.
Home studio setup ideas on a budget (under $100)
Each of these costs under $100, and one costs nothing: build DIY panels from a wooden frame, mineral wool and fabric, turn an IKEA KALLAX shelf into a gear rack or bookshelf diffuser, and lean an old mattress on the boomiest wall. Placement, the biggest upgrade of all, is free too.
24. Build your own acoustic panels
A DIY panel is a simple wooden frame, a slab of dense mineral wool and breathable fabric stretched over the front. The untreated-room video above says you can build your own panels for under $30. For bass traps, Sound On Sound’s Martin Walker suggests dense rock wool of about 60 kg/m³, far denser than foam.
Our DIY acoustic treatment guide walks through the materials, the sizes and where each panel goes, step by step.
25. Turn an IKEA KALLAX into a rack or a diffuser
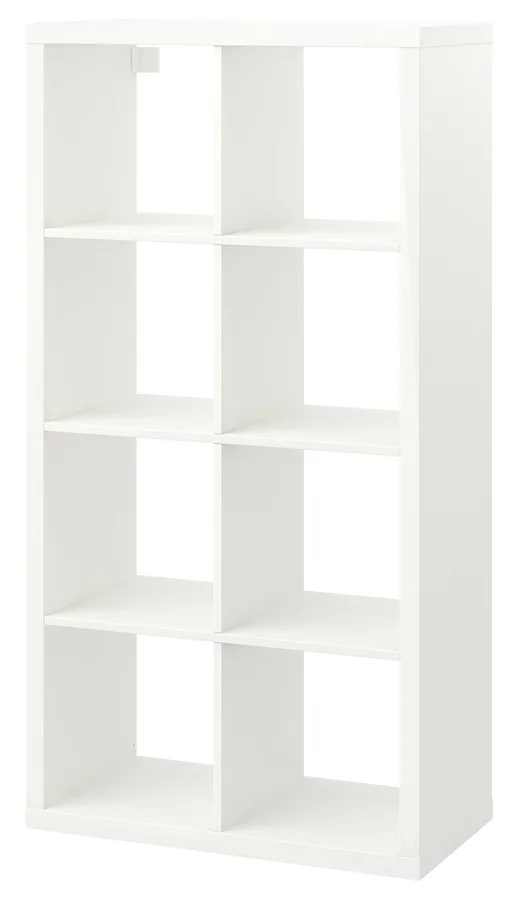
The IKEA KALLAX is a home studio classic. It’s cheap and sturdy. The 2-by-4 unit is $79.99 at IKEA’s US store (October 25, 2026). Laid on its side it stands about 30 inches tall, close to desk height, so it works as a low rack beside the desk for an interface, records and a keyboard on top.
Stood upright and packed with books and vinyl, the same shelf breaks up sound on the wall behind you like a rough diffuser.
26. Lean an old mattress on the boomiest wall
It sounds silly, and it works. An old mattress is thick, soft and free, which is exactly what a boomy room needs. Max suggests it in Mix Elite’s beginner gear video and says it makes a huge difference.
Lean it on the wall where your room booms the most while you mix, then slide it under the bed when guests come over. Not sure which wall booms? The acoustic treatment guide shows how to find your room’s boomy notes with a slow test tone in FL Studio.
How high should a studio desk and chair be?
Aim for a desk surface about 28 to 30 inches high, elbows at 90 degrees or a little more, and a screen about an arm’s length away with your eyes level with a point 2 to 3 inches below its top. That’s Cornell University’s advice for computer work, and it fits a studio desk too.
27. Set the desk, screen and keyboard to fit your body
Your hands, eyes and ears all need the right spot, and they don’t always agree. Start with the chair. Then line up the rest:
- Desk surface: about 28 to 30 inches high, per Cornell’s guide.
- Elbows: at 90 degrees or a little more when your hands are on the keys.
- Screen distance: about an arm’s length, so your fingertips almost touch it.
- Screen height: your eyes level with a point 2 to 3 inches below the top of the screen.
- Speakers: tweeters at ear height, the way idea 3 sets them.
If the screen sits too low, a riser or a stack of books fixes it in a minute. If your ears land above the speakers, a pair of stands does the same.
28. Buy the chair before the next plugin
You’ll spend a lot of evenings in this chair, so it matters more than your next plugin. Look for real lower-back support and an adjustable seat, so your feet rest flat on the floor or a footrest. Cornell’s guide suggests leaning back a little, about 100 to 110 degrees, instead of sitting bolt upright for hours.
Pick one free idea tonight: move the desk to the short wall and set up the triangle. Play a song you know well and listen to how the low end settles. Then add the rest one weekend at a time, while you spend your evenings finishing music instead of shopping for it.
DAY 1 OF THE 7-DAY MUSIC PRODUCER COURSE
Set up the room once, then finish songs in it
Day 1 of Mix Elite’s 7-Day Music Producer Course covers your whole setup: the ‘Perfect Triangle’ formula for a pro-sounding home studio on any budget, a download of the best gear for any budget, and exactly which gear and software to get (and what to skip). Then you finish one step of a real track each day, in about 45 minutes, and on Day 7 a pro gives you feedback on it. It’s $27, with 60-day refunds.
Frequently asked questions
How do I design a small home studio?
Start with placement, which is free: put the desk on the short wall, centered, sit about 38% of the way into the room and set your speakers in an equal triangle with your head. Then use soft things you own, like a rug, a full bookshelf and curtains, add bass traps in the corners and a few panels at the side-wall reflection points, and hang gear on the wall to save floor space.
Where should I put my desk in a home studio?
Against the short wall, centered between the two side walls, so your speakers fire down the long side of the room and both sides sound the same. Keep the speakers out of corners and a little away from the wall, and avoid sitting in the exact middle of the room, where bass cancels out.
Do I really need acoustic panels as a beginner?
Not right away. Placement, a rug, a full bookshelf and even an old mattress against the boomiest wall fix a lot for free, and headphones skip the room entirely. When you add panels, start with thick bass traps in the corners and panels at the first reflection points, and skip thin foam, which barely touches bass.
How can I make my home studio cozy on a budget?
Turn off the ceiling light and use two or three warm lamps, with bulbs around 2700K, plus a soft light behind your screen. Add a thick rug, fabric panels in a color you like or with a printed picture, a full bookshelf and a cable tray under the desk. Most of that also makes the room sound better.
How do I stop my studio sound from bleeding into other rooms?
Seal the gaps around the door with weatherstripping and a door sweep, keep speakers on stands instead of the floor, and turn off the subwoofer at night. Acoustic panels don’t block sound from leaving the room, so late at night, work on headphones at a low volume and save loud speaker checks for the day.