

“Have nothing in your houses that you do not know to be useful or believe to be beautiful.”
A home studio setup for beginners needs just three things: a computer, headphones with a flat sound and a DAW like FL Studio, which has a free trial. After that, add only what your way of working calls for, such as a mic if you sing or a MIDI keyboard if you play keys, and fix your room before you buy better speakers.
Search for home studio gear and you get lists of 20 interfaces, 20 monitors, a dozen synths and a photo of someone’s dream room with LED strips on every wall. It’s easy to think you need all of it before your first song is allowed to happen. You don’t. Most people start in a bedroom with what’s already on their desk, and the smartest money is often the money you wait to spend.
This page is our home studio hub. It boils the whole thing down to three questions, gives each one a short answer with a budget, and links to our full buying guide for every piece when you’re ready to pick a model.
Table of Contents
Home studio setup for beginners: the 3 questions
Every good home studio setup for beginners answers the same three questions, in this order. Answer them honestly and the shopping list writes itself.
- Are the essentials covered? A computer, headphones or monitors, and an audio interface once you need one.
- What is missing from how you actually work? A mic if you sing or rap, a MIDI keyboard if you play keys, a hardware synth if you love knobs.
- Is the room right? Where the desk and speakers go, and how to tame echo for little or no money.
Max, the founder of Mix Elite, covers the same ground in this short gear video. Below, each question gets a quick answer first, then the details, then a link to the full guide.
Question 1: Are the essentials covered?
The essentials are a computer, a pair of headphones with a flat sound and a DAW, the program you make music in. Max puts it simply: “That’s all the necessary hardware you need to make music. Believe it or not, everything else is totally optional.” That really is the whole list. An audio interface and studio monitors only join the list when you want to plug in a mic or play your music through speakers.
Do you need a new computer for music production?
Probably not. You’ll likely be fine for the coming months with the computer you have, and a laptop works as well as a desktop. FL Studio runs on Windows and Mac. If your projects crackle, try the fixes in our guide to FL Studio crackling and CPU problems before you spend money on hardware.
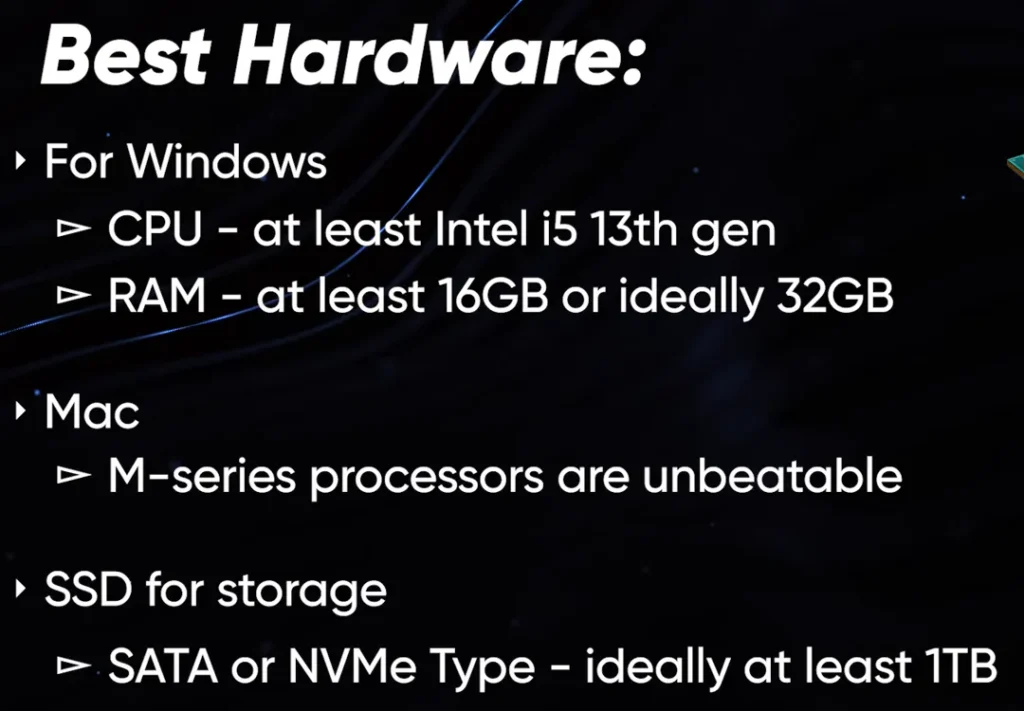
If you do upgrade, look at two numbers. Single-core speed is how fast one core of the processor runs, and you want the highest you can get. RAM is the memory that holds your sounds and instruments while you work. This slide from the video sums it up:
- Windows: at least an Intel i5 13th gen processor.
- RAM: at least 16 GB, or 32 GB if you want room to grow.
- Mac: any M-series chip, which the video calls unbeatable for music.
- Storage: an SSD, ideally 1 TB or more, so projects and instruments open in seconds instead of minutes.
What headphones should a beginner buy?
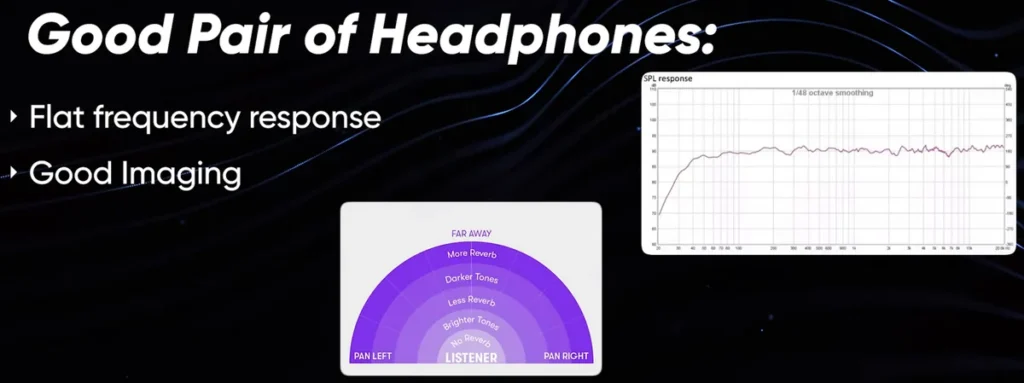
Studio headphones with a flat frequency response and good imaging. Flat means they don’t boost or cut the lows, mids or highs, so a song that sounds right in them also sounds right in a car, on a laptop and in earbuds. Imaging is how clearly you can tell where each sound sits, like a guitar on the left and cymbals on the right.
Everyday headphones often boost the bass. Skip those. That’s fun for music you already love, but it hides problems in your own songs. Pick a closed-back pair if you’ll record vocals, because it keeps the beat from leaking into the mic, while open-back pairs sound more open but let sound out.
In our headphone guide, the Sennheiser HD 280 PRO is the pick under $100 at $99.95. The closed-back Beyerdynamic DT 770 PRO ($159.99 on sale) records and mixes, and the open-back Beyerdynamic DT 990 PRO ($149.99) is the budget pick for mixing, all at the makers’ US prices on October 12, 2026. Compare all eight pairs in the best headphones for mixing and recording.
Which DAW should a beginner use?
A DAW, short for digital audio workstation, is the one program where you write, record, arrange, mix and export. Pro Tools is the standard for recording live instruments, Logic Pro is a Mac-only favorite of songwriters, and Ableton Live suits tech lovers and live shows. FL Studio is the DAW Mix Elite starts beginners on: it’s easy to start, hard to master, and popular with beginners and pros.
The FL Studio trial gives you every instrument and effect with no time limit. If you buy later, paid editions start at $99. The Producer Edition is the one Mix Elite recommends. Every DAW is built from the same parts that just look different, so switching later takes days, not months. Our guide to the best DAW for beginners compares the big four, and the beginner guide to FL Studio shows your first steps.
The trial can’t reopen saved projects, so export each song as a WAV or MP3 before you close it.
Do you need an audio interface?
Only when you want to plug something in: a microphone, a guitar or studio monitors. An audio interface is a small box, usually connected over USB, that turns the sound from a mic into data your computer can record, then turns your music back into sound for your speakers. For listening and making beats, your laptop’s headphone jack is fine. The interface can wait.
For one person, two inputs are enough. That covers a vocal and a guitar at the same time. Watch out for ultra-cheap interfaces, because they can break quickly, add latency (a delay between playing a note and hearing it) or fail to power a condenser mic, which needs 48V phantom power from the interface.
Our interface guide picks the Arturia MiniFuse 1 ($149) or the Focusrite Scarlett Solo (4th Gen) ($159.99) for one mic, and the Focusrite Scarlett 2i2 (4th Gen) ($224.99) for two, at the makers’ US prices on October 12, 2026. See all ten in audio interfaces for every budget.
How to connect your interface in FL Studio
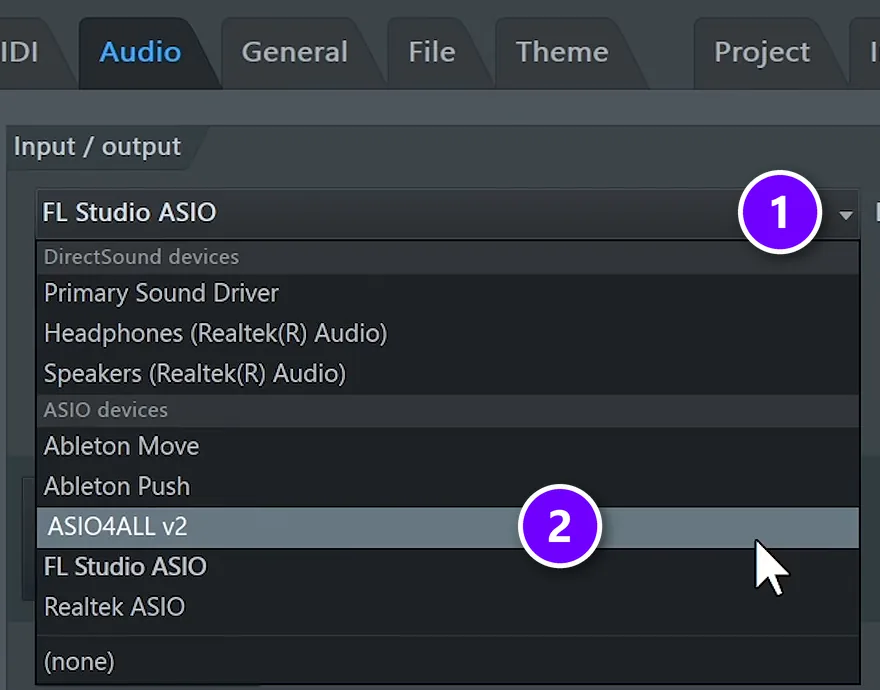
Plug the interface in, then open Options > Audio settings in FL Studio.
- Open the Device menu (1).
- Under ASIO devices (2), pick the driver that has your interface’s name in it.
ASIO is a type of driver that keeps the delay low on Windows. If your interface isn’t listed, use FL Studio ASIO, which installs with FL Studio, and get your interface’s own driver from its maker’s website. On a Mac there’s no ASIO, so just pick your interface by name in the same menu.
Should you buy studio monitors or headphones first?
Headphones first. That goes double if you make music at night, because they won’t wake anyone up, and your room doesn’t change what you hear in them. Monitors pay off once you can play them at a sensible volume in a room that’s set up for them, and from then on you check every mix on both.
When you’re ready, pick a flat-sounding pair and skip the subwoofer. The video says 5-inch monitors are perfect for an average room, and that about $300 buys an amazing-sounding pair you’ll keep for 10 years or more, because monitors don’t wear out the way headphones do.
In our monitor guide, the PreSonus Eris 3.5 2nd Gen costs $99.99 for the pair. The PreSonus Eris Studio 5 is $149.99 each, so a pair lands right on $300, and the Yamaha HS5 was $199.99 each at Guitar Center (all October 12, 2026). Read the best studio monitors for all seven picks, and studio monitors vs headphones for when each one wins.
Question 2: What’s missing from how you actually work?
Buy for the music you make, not for a photo of someone else’s studio. If you sing or rap, add a mic. If you play keys, add a MIDI keyboard. If you love turning real knobs, a hardware synth can come later, and if you build beats with a mouse, you may not need anything else at all. Start with one.
Do you need a microphone for a home studio?
Only if you record vocals or a real instrument. A condenser mic catches the most detail, which is why studios use it for vocals, but it also hears your room, so it wants a quiet space and phantom power from your interface. A dynamic mic mostly hears what’s right in front of it, so it forgives a bad room. Either way, use a stand and a pop filter, and never hold the mic in your hand while you record.
Under $200, our budget mic guide picks the Audio-Technica AT2020 condenser ($119 at Adorama on October 12, 2026). If you’d rather skip the interface, the RØDE NT-USB+ USB mic ($179 at RØDE) plugs straight into your computer. For a step up, our vocal mic guide starts with the RØDE NT1 5th Generation ($249) and the Shure SM7B ($439), at the makers’ October 2026 prices.
Compare every pick in the best budget microphones and the best microphones for singing, then follow our guide to recording vocals in FL Studio for the settings.
How do you connect a microphone and a MIDI keyboard at the same time?
Plug the microphone into your audio interface with an XLR cable and the MIDI keyboard into a USB port on your computer, and both work together. In FL Studio, choose the interface in Options > Audio settings, then open Options > MIDI settings, click your keyboard in the Input list and click Enable. Turn on phantom power if you use a condenser mic, and record it on a mono input, the setting Mix Elite’s vocal recording tutorial always picks.
Do you need a MIDI keyboard?
A MIDI keyboard is a piano-style keyboard that plays the virtual instruments inside your DAW. It makes no sound on its own. Max’s take: “Having a MIDI keyboard is cool, but definitely optional.” Your computer keyboard can tap in drums and simple melodies, so buy one when you catch yourself wanting to play chords with your fingers.
Our MIDI guide picks the Akai MPK Mini IV for most beatmakers ($99 at Sweetwater). If you make music in FL Studio, the Novation FLkey Mini 25 MK2 ($139.99) is the better value, because its pads and knobs come mapped to FL Studio. Want full-size keys? The Novation FLkey 49 MK2 is $289.99. Those prices are from October 12, 2026; see all seven in the best MIDI controllers for every budget, or start with what MIDI is if the word is new.
How do you fix MIDI keyboard latency?
Lower your audio buffer and use the right driver. The delay between pressing a key and hearing the note is at least the buffer length, so open Options > Audio settings, pick your interface’s own ASIO driver (or FL Studio ASIO if you don’t have one), and lower the buffer until the delay goes away without crackles.
Image-Line’s audio settings guide calls about 10 ms, or 441 samples, a good target on Windows. If a big project still lags, Mix Elite’s free 4.5-hour FL Studio course gives two fixes: record in a new, empty project, or turn off the effects while you record. Use wired headphones too. Bluetooth adds its own delay.
Do you need a hardware synth?
No. The video is clear that you don’t need any real instrument, or even to know how to play one, because every instrument you can think of exists as a virtual instrument. FL Studio comes with synths of its own, so you can learn sound design before you spend a cent.
A hardware synth is for people who love hands-on knobs and want time away from the screen. If that’s you, our synth guide’s best all-rounder is the Arturia MicroFreak ($399). The smallest budget is the Korg volca keys ($159.99, though KORG’s store had sold out when we checked), and the chord pick is the Korg minilogue xd ($699.99), all at the makers’ US stores on October 12, 2026. The full list is in hardware synths for beginners.
Question 3: Is the room right?
Your room changes what you hear more than most gear upgrades do. Place the desk and speakers first, which is free, then tame the echo with soft furniture or an old mattress, and buy panels last. As Max puts it, “With the monitors, however, placement matters even more than the gear itself.”
Where should your desk and studio monitors go?
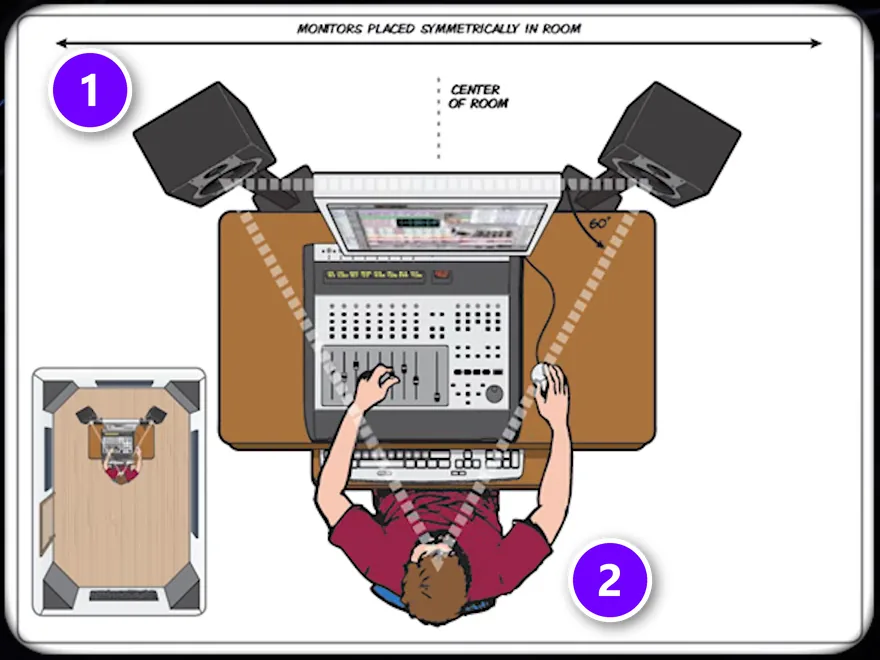
This step costs nothing. It also matters more than which speakers you buy. Here’s the method:
- Face a wall, in the middle. Put your desk against one wall and sit centered between the two side walls, so the room is the same on your left and right.
- Sit 38% of the way into the room. Measure from the wall you face to the wall behind you, and put your head about 38% of that distance from the front. Bass bounces between those two walls and piles up in some spots, and the exact middle of the room is one of the worst.
- Make a triangle with three equal sides. The two speakers and your head are its corners, so each speaker is as far from your head as the speakers are from each other.
- Put the tweeters at ear height. The tweeter is the small speaker that plays the highs. Raise the monitors on stands or pads until the tweeters line up with your ears when you sit.
- Turn them in toward you. Angle each speaker so it points at your ear, and keep both the same distance from the side walls.
In the diagram from the video, the speakers (1) and your head (2) form exactly that triangle. Genelec, a studio monitor maker, gives the same advice in its placement guide: sit on the room’s center line, aim both speakers at you at 60 degrees apart, and stay out of the exact middle of the room. So pick a desk wide enough for that triangle.
To skip the math, use our free studio monitor placement calculator. Measure your room, type in the length and width, and it shows where your chair and speakers go.
How do you treat a home studio on a budget?
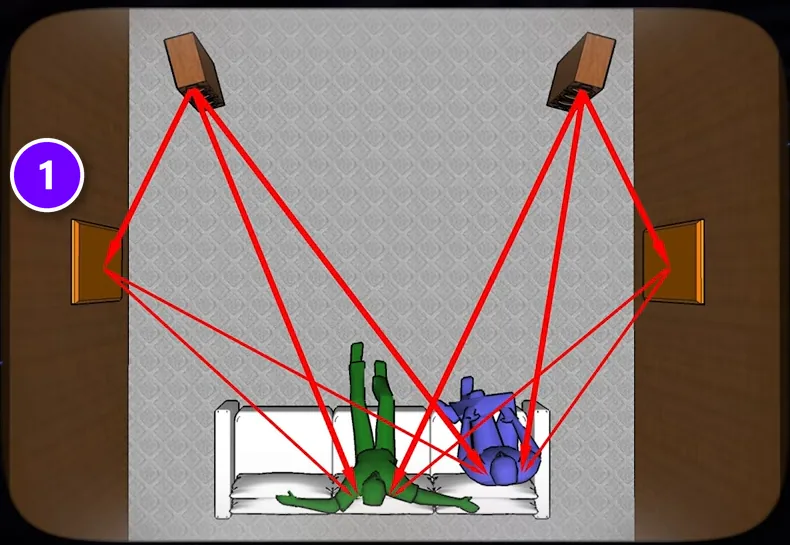
Start with what you already own. Shelves of books, sofas, carpets and mattresses all absorb and scatter sound, which is why a bedroom makes a good home studio. Acoustic treatment just means adding soft or dense things that soak up or scatter the echoes bouncing off bare walls, and you don’t need an expert to do it.
Cheap acoustic foam helps a little, but it only tames the mids and highs, like the human voice. The real trouble is bass, which builds up in a small room and can make you think your music sounds bad when it doesn’t. Bass needs very dense material, like mineral wool panels. Or try Max’s budget trick: “Even getting an old mattress and putting it against the wall will make a huge difference.”
If you add panels, put them where they do the most work:
- The side walls, at the first reflection points (1). These are the spots where sound from each speaker bounces straight to your ears. Sit in your chair while a friend slides a mirror along the wall, and wherever you can see a speaker in the mirror, hang a panel.
- The corners. Bass gathers there, so thick panels or bass traps help most in a boomy room.
- The wall behind you. A panel or two there stops sound from bouncing back at you.
You can build panels yourself from a simple wooden frame, dense mineral wool and a thin fabric that air can pass through. Our DIY acoustic treatment guide shows how, step by step.
Is acoustic treatment the same as soundproofing?
No. Treatment makes your room sound better from the inside. Soundproofing stops sound from getting in or out, and it’s much harder, because it takes heavy, sealed walls instead of panels. Foam won’t keep the neighbors happy, but sealing the gaps around your door and keeping the volume sensible go a long way. Keep your listening level a little lower than you’d like, too, because long sessions at high volume can damage your hearing.
Which room makes the best home studio?
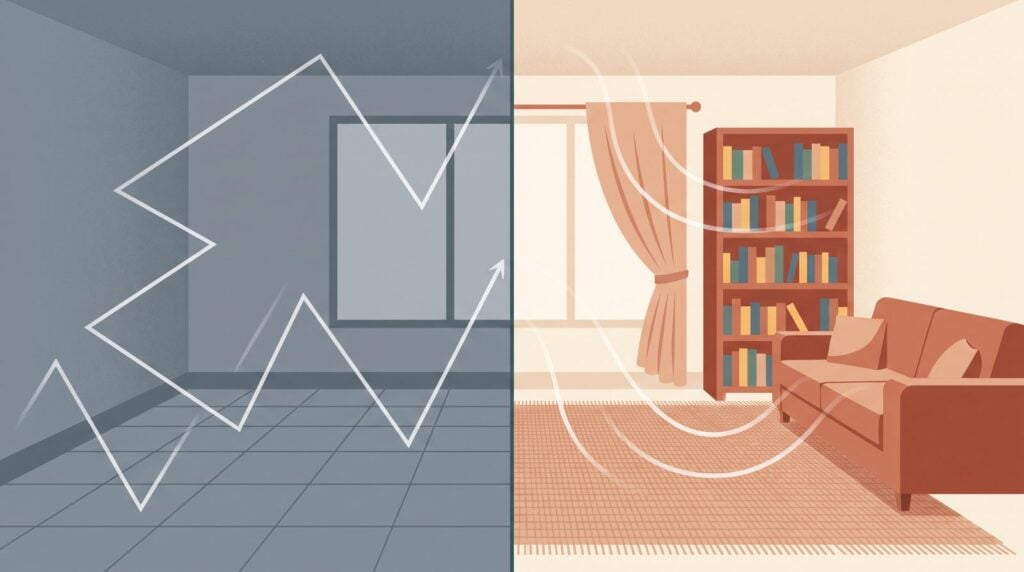
Any quiet room works. A lived-in bedroom often beats an empty one, because soft furniture breaks up echoes. Skip rooms with bare walls, tile floors and big windows. They bounce sound everywhere.
Clear the space so it’s for music, not storage, and get a chair that supports your back. You’ll spend a lot of evenings in it.
How do you set up a home studio in a small bedroom?
Put your desk against one wall, centered between the side walls, and sit about 38% of the way into the room. Work mostly on headphones, keep monitors small (5-inch is plenty), and use the soft things you already own, plus an old mattress or a few dense panels at the reflection points, before you spend money on treatment.
Starter home studio setups by budget
Here’s what the three questions add up to at three budgets. Every piece comes from our gear guides, at the prices they list: the makers’ US stores on October 12, 2026, unless a store is named. Cables, a mic stand and a pop filter come on top.
$0 extra: the laptop and headphones you already own
- Your current computer. Check it against the specs above.
- Any wired headphones you own. Avoid Bluetooth, which adds its own delay.
- The FL Studio trial. Every instrument and effect, with no time limit.
That’s enough to make full songs. When you can spend a little, the first upgrade is a studio pair like the Sennheiser HD 280 PRO ($99.95).
About $300: headphones plus the one thing your music needs
Pick the kit that matches your answer to question 2. Each one keeps the same studio headphones.
- Beat kit, $239.94: Sennheiser HD 280 PRO ($99.95) and Novation FLkey Mini 25 MK2 ($139.99), whose pads and knobs come mapped to FL Studio.
- Vocal kit, $278.95: Sennheiser HD 280 PRO ($99.95) and RØDE NT-USB+ ($179). The USB mic plugs straight into your computer, so you don’t need an interface yet.
- Grow-later vocal kit, $367.95: Sennheiser HD 280 PRO ($99.95), Arturia MiniFuse 1 ($149) and Audio-Technica AT2020 ($119 at Adorama). It costs more, but you can swap mics later, and the same interface will run your studio monitors.
About $800: the full starter studio
This covers all three questions: recording, speakers and a keyboard.
- Focusrite Scarlett 2i2 (4th Gen), $224.99: two mic inputs, and it runs the monitors.
- PreSonus Eris Studio 5, $299.98 a pair: 5-inch monitors at $149.99 each.
- Sennheiser HD 280 PRO, $99.95: closed-back, for recording and late nights.
- Audio-Technica AT2020, $119 at Adorama: a condenser mic for vocals.
- Arturia MicroLab mk3, $99: 25 simple keys, if you play.
That’s $842.92 with the keyboard, or $743.92 without it. Then put your effort into placement and a few soft things on the walls. Those cost nothing, and they decide how honest your new monitors sound.
What order should you buy home studio gear in?
If you’re building over time, this order puts your money where it makes the biggest difference:
- Start: the computer you have, a pair of flat studio headphones and the FL Studio trial.
- Your workflow piece: a mic and an interface (or a USB mic) if you sing or rap, or a MIDI keyboard if you play.
- Speakers: a pair of 5-inch monitors, two balanced cables, and stands or pads to get the tweeters to ear height.
- The room: placement first, then soft furniture, then panels at the reflection points and in the corners.
- Extras: a hardware synth, a better mic or more panels, once you know what you’re missing.
Your first songs won’t be held back by your gear. They’ll be held back by not knowing what to do next, so spend most of your energy on finishing songs. Mix Elite’s guide on how to produce music walks through a full track, from the first idea to the export.
THE 7-DAY MUSIC PRODUCER COURSE
Set up your home studio the right way, on any budget
Day 1 of the 7-Day course covers your whole setup: the “Perfect Triangle” formula for a pro-sounding home studio on any budget, a download of the best gear for any budget, and exactly which gear and software to get (and what to skip). Then you finish one step of a real track each day, in about 45 minutes, and on Day 7 a pro gives you feedback on it. It’s $27, with 60-day refunds.
Frequently asked questions
What do I need for a home studio as a beginner?
A computer, a pair of headphones with a flat frequency response and a DAW such as FL Studio, which has a free trial with no time limit. Add an audio interface when you want to plug in a mic or studio monitors, a mic if you sing or rap, and a MIDI keyboard if you play keys. Everything else can wait.
How much does it cost to set up a home studio?
From $0 extra, if you use the laptop and wired headphones you own with the FL Studio trial. About $300 buys studio headphones plus a MIDI keyboard or a USB mic. About $750 to $850 buys a full starter studio: a 2-input audio interface, a pair of 5-inch monitors, headphones, a condenser mic and a small keyboard, at makers’ and US store prices checked on October 12, 2026.
Do I need an audio interface, or can I use my laptop’s headphone jack?
For listening and making beats, the laptop’s headphone jack is fine. You need an audio interface to plug in a studio microphone or a guitar, power a condenser mic, connect studio monitors, or get the lowest delay while you record. A 2-input interface covers one person recording a vocal and a guitar at the same time.
Should I buy studio monitors or headphones if I make music at night?
Headphones. They’re the only gear besides a computer you really need, they don’t disturb anyone, and they don’t depend on your room. Monitors only sound accurate once they’re placed well and the room is treated, so they make a better second step. Most producers end up checking their songs on both.
How do I fix MIDI keyboard latency?
Open Options > Audio settings in FL Studio, choose your audio interface’s own ASIO driver, or FL Studio ASIO if you don’t have an interface, and lower the buffer length until the delay is gone without crackles or pops. Use wired headphones, and if a big project still lags, record in a new, empty project.