

“The pause is an exceedingly important feature in any kind of story, and a frequently recurring feature, too.”
To make a future bass drop, write a chord progression at about 150 BPM and stack it on several synth layers: a stereo supersaw, an ultra-wide bright layer, a mono layer and a vocal chop. Add layered drums, leads and a low sine sub, make the chords pump around every kick and snare, then darken and narrow the build so the drop lands wide and bright.
You know the moment. The build pulls back, the room holds its breath for half a beat, and then the chords slam in, huge and wide, swelling and ducking with the drums. So you open FL Studio, load one synth, play your chords, and your drop sounds like a phone ringtone.
That gap isn’t talent, and it isn’t a secret plugin. It’s layers. In the video Headbanging Future Bass Drop in 10 minutes, Max, the founder of Mix Elite, builds the whole drop from stacked sounds that each do one small job. This guide follows it step by step, with the exact settings and real screenshots.
Table of Contents
What makes a future bass drop?
A future bass drop is the big payoff of a future bass track. Bright, wide chords pump in time with the drums, a catchy lead rides on top, and vocal chops add a human, emotional color.
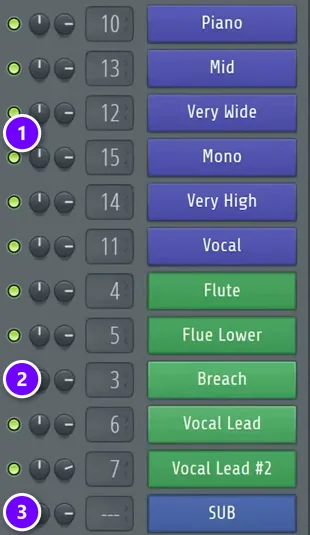
The finished Channel rack from the video shows the whole recipe: six chord channels (1), five lead channels (2) and one sub (3).
Max sums it up in one line: “We’ll need practically three elements that will be layered chords, layered leads, and powerful hard hitting drums.” Under those he adds a sub bass, a pumping volume shape and a build-up that sets the drop up.
How to make a future bass drop, step by step
Write a chord progression at 150 BPM, then layer the chords, program layered drums, stack the leads with matching glide, add a sine sub, make the chords pump around every kick and snare, and darken the build so the drop hits. Each step below has the exact settings and a screenshot. Tap a step to jump to it.
Step 1: Start with a chord progression at 150 BPM
Don’t start from a blank page. The video drags a MIDI song starter, a ready-made loop with chords and a melody, into the Playlist and raises the tempo to 150 BPM. Future bass usually sits somewhere between about 140 and 160 BPM, and the beat often feels half-time. That’s why it sounds heavy, not rushed.
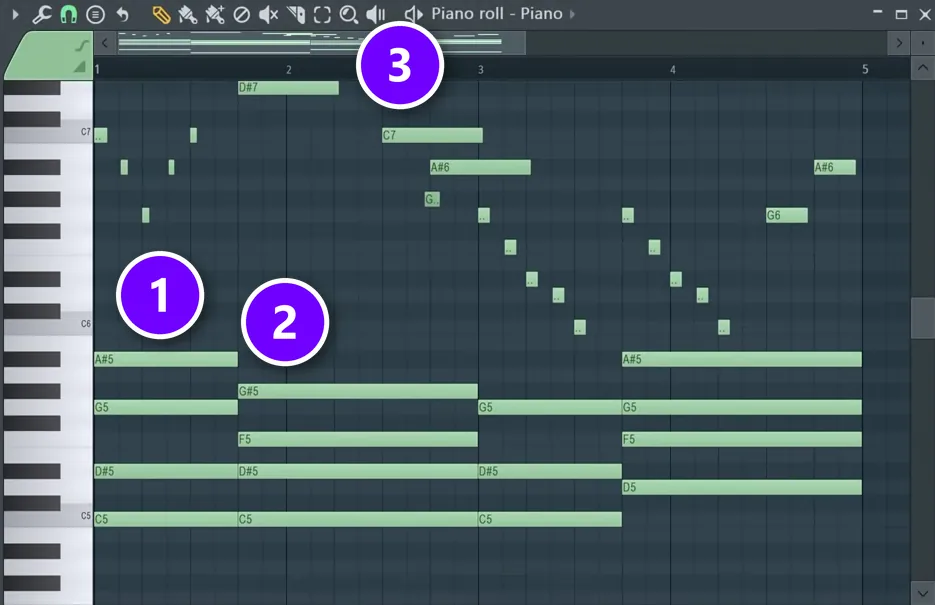
Now open the loop in the Piano roll and look at the chords. The first one (1) stacks C, E♭, G and B♭, which is C minor 7. A seventh chord is a normal three-note chord with one extra note on top. That extra note gives future bass its warm, slightly sad color. The rest of the loop is F minor 7, C minor and G minor 7, all packed inside one octave.
Two more details are worth stealing. The second chord starts on beat 4 of the first bar (2), a beat before the bar line, so the loop leans forward. And the short notes on top (3) are the melody, which the leads play later. FL Studio names black keys as sharps, so the D#5 and A#5 you see are the same keys as E♭ and B♭.
Step 2: Layer your future bass chords (the supersaw sound)
How do you layer synths for a big, full future bass sound?
Give every layer its own job. Over a plain piano, stack five layers that play the same chords but cover different ranges and widths: a stereo supersaw for the mids, an ultra-wide bright layer for the highs, a mono layer for power, a layer with movement and a vocal chop to fill the gaps.
Why layers? One synth can’t fill every frequency and the whole stereo field at once. Each layer below does one of those jobs, and together they fill the spectrum.
Most of them are supersaws. A supersaw is a saw wave copied several times, with each copy tuned a tiny bit off, so the copies drift apart and sound thick and shimmering. In Serum, the synth used in the video, the UNISON box sets how many copies an oscillator plays.
The video loads ready-made presets to stay short. To build it yourself, copy the chord pattern into each new channel and delete the melody notes, so every layer only plays chords. When the layers are done, choose PATTERNS > Split by channel so each one gets its own clip in the Playlist.
Layer 1: a stereo mid layer
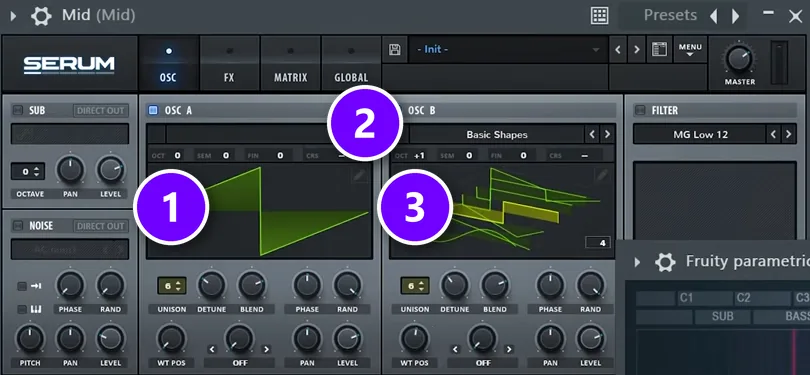
The first Serum layer covers the mids and upper mids, without much treble. OSC A plays a saw with UNISON set to 6 (1). OSC B is pitched one octave up with +1 (2) and plays its own 6 unison voices (3). That’s the classic supersaw stack.
Layer 2: an ultra-wide high layer
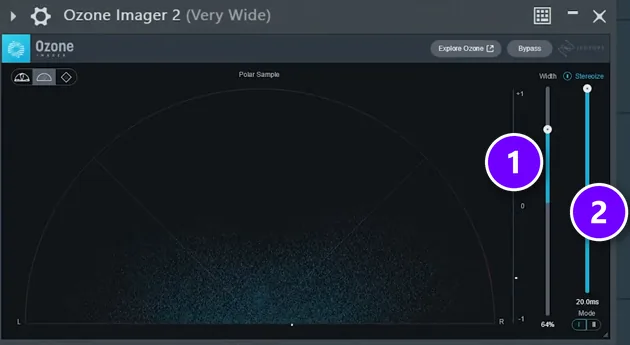
The second layer is bright and very wide. It’s one saw with 10 unison voices plus Serum’s noise oscillator, with fewer mids and more highs than layer 1. To push it all the way out to the sides, add iZotope’s free Ozone Imager with Width at 64% (1) and Stereoize turned on (2). Put on headphones and you’ll hear it out at the sides, not in the middle.
Layer 3: a mono layer for power
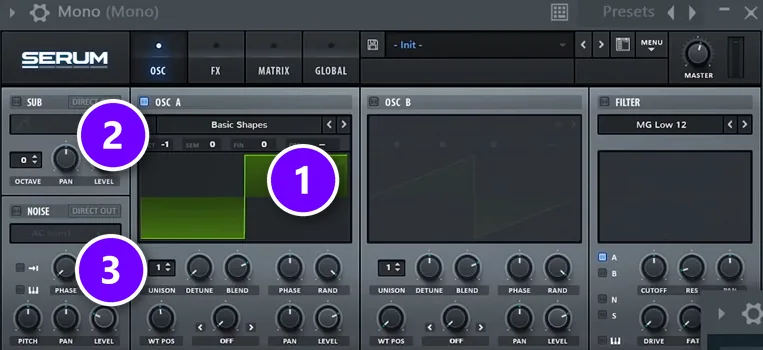
The third patch is the simplest one. OSC A plays a square wave from Basic Shapes (1), one octave down (2), with UNISON on 1 (3), so there’s no stereo spread at all. Switch it off and on to compare, and you’ll hear what Max means when he says: “As you can hear, mono adds a lot of the power.”
That’s the balance to aim for. The wide layers make the drop feel big, and the mono layer gives it a solid center. Our guide to mono vs stereo mixing explains why that center matters.
Layer 4: a full layer with movement
With three layers in, the chords are big but a bit still. At this point the track still sounds pretty boring, so add an exciting layer: a full, wide Serum patch with movement built in. Any patch that moves on its own will do, like one with a rhythmic pulse or a slow filter sweep.
Layer 5: a vocal chop
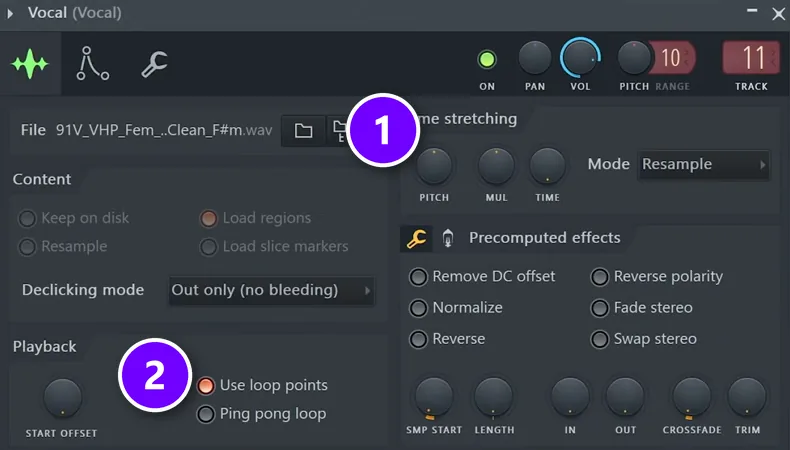
The last chord layer is a voice. Load a vocal shot, one sung note, into FL Studio’s Sampler (1). It’s the trick from Mix Elite’s Skrillex Vocal Chords Tutorial: the Sampler pitches that one note up and down, so it can sing whole chords. Turn on Use loop points (2) so the vocal holds for as long as each chord lasts, then give it the same chord MIDI.
The vocal sits mostly in the mids and fills the gaps between the synths. That human sound is a big part of why future bass feels emotional. Step 4 uses vocals for the leads too.
Step 3: Program hard-hitting future bass drums
What drum samples work best for a future bass drop?
Any clean future bass drum pack works. What matters is the layering: a punchy kick and snare loop at your tempo, a bright sweep or glassy hit on the snare, a short perc with reverb, then a groovy top loop and a ride cymbal on every beat.
In the video, the beat comes from loops and one-shots in a future bass sample pack, added one layer at a time:
- Kick and snare loop. A 150 BPM loop with just the kick and snare is the backbone.
- Enhancer. A sweep or glassy hit layered with the snare makes it brighter and longer.
- Perc. A short percussion hit that plays with the snare, with some reverb on it.
- Top loop and ride. A groovy top loop fills in the busy part, and a ride cymbal on every beat keeps the rhythm steady.
Four layers, four jobs. One more trick makes the snare hit wider.
Move the perc 64 ms off the snare
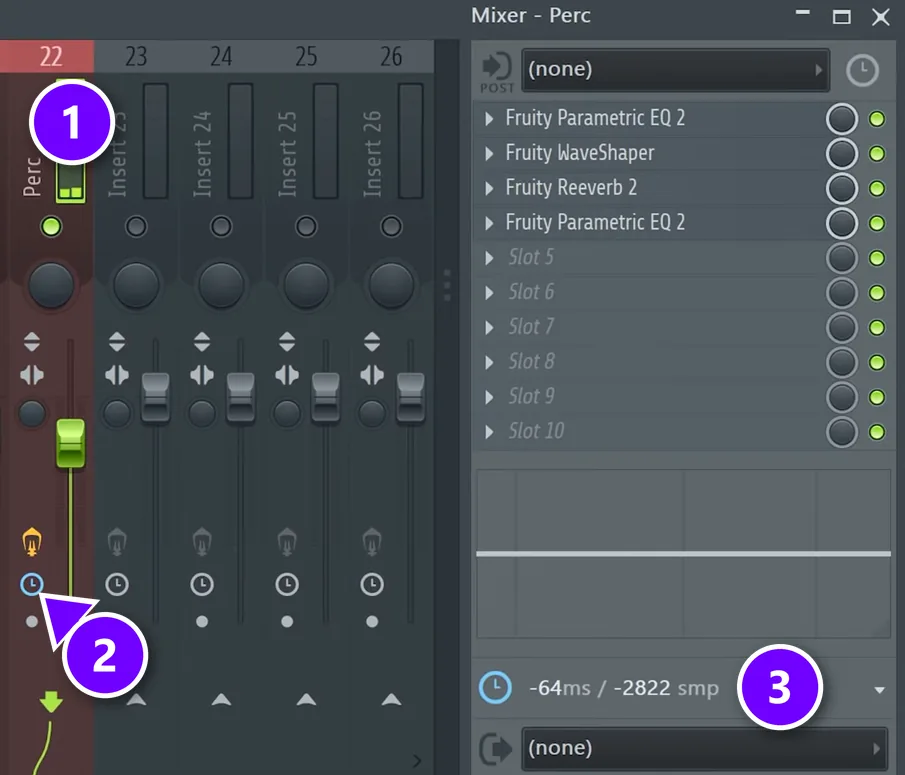
With reverb on, the perc got lost under the snare. So move it in time instead of turning it up. Select the Perc mixer track (1), left-click the small time icon under it (2) and choose Set in ms. The video tries about 60 ms, then 100 ms, and settles on 64 (3). Now the two hits land a hair apart and sound like one bigger snare.
Pro tip: Image-Line’s manual says a positive value delays the selected track, and a negative value like -64 delays all the other tracks instead, so the perc lands slightly ahead. Both split the hits apart, so try each one and keep the version you like.
Step 4: Layer the leads and match their glide
The leads play the melody on top. Copy the top line of the song starter into a new Serum channel and tweak the notes so they sound less robotic. Then stack lead layers, the same way as the chords:
- A harsh, full lead in stereo that plays the main melody.
- The same lead an octave lower, to fill out the spectrum.
- A layer that sits in the mids and is closer to mono, less bright than the first.
- A vocal lead: a vocal sample playing the melody, with formant shifting and distortion.
- A plucky vocal lead with its top end cut, so the highs stay clear for the bright synth leads.
The two vocal leads are there because the synth leads still lacked power. Formant shifting changes the character of a voice without changing its pitch, so it can sound smaller, bigger or less human.
With this many layers, one detail matters more than any preset. Max’s rule: “make sure that in your portamento settings every single layer has the exact same settings”. Portamento, or glide, is the slide from one note to the next. If one layer glides slower than the others, the lead smears.
Give every lead the same Mono, Legato and Porta
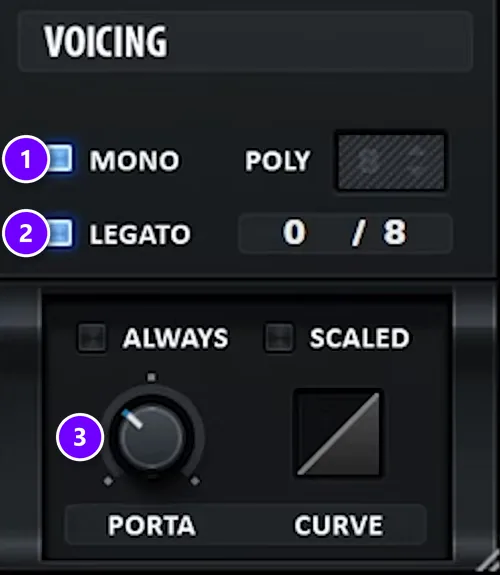
In Serum’s VOICING panel, tick MONO (1) and LEGATO (2), then set the PORTA knob (3) to the same spot on every lead. For the vocal leads in the Sampler, open the wrench tab and tick Mono and Porta under Polyphony. Then split the leads by channel, just like the chords.
Step 5: Make a sub bass in Serum
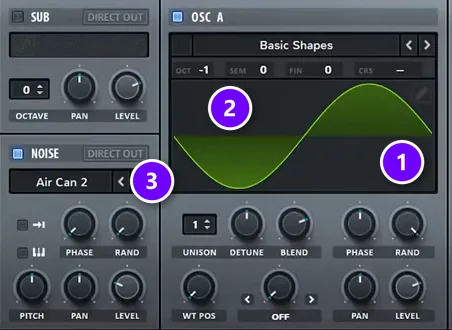
The sub is quick to make yourself. In a new Serum, set OSC A to the sine in Analog > Basic Shapes (1) and drop it an octave with OCT -1 (2). Then switch on the NOISE oscillator and pick Air Can 2 (3).
On the FX tab, turn on Distortion and pick Asym, Max’s favorite type, with Drive around 40%. For the notes, copy the chord MIDI, keep one note per chord and move it really low. Short and simple.
Then try the video’s first bonus trick: double the sub with a brass ensemble playing the same notes.
How do you stop the sub bass and chords from sounding muddy?
Give the low end to as few sounds as possible. Keep the sub simple, one low note per chord, and put a low cut around 100 Hz on every chord layer, so only the kick and the sub play in the subs. Then make the sub duck when the kick hits.
That rule comes from Mix Elite’s video on mixing mistakes every beginner makes: pick one main sound for the subs and low-cut every other one at 100 Hz. If a layer has no useful bass at all, push its low cut up to 250 Hz. Then nothing muddy is left below 200 Hz.
Step 6: Make the chords pump (the sidechain volume shape)
How do you make chords pump in time with the kick?
Make the chord volume duck on every kick and snare, then swell back up before the next hit. A sidechain compressor triggered by the kick does it for you. The video draws the shape by hand instead: route the chords and leads to one Mixer track, load Fruity Balance and automate its Volume.
Drawing it by hand takes longer, but you decide exactly how deep and how long each dip is. Here’s the setup:
- Select every chord and lead track in the Mixer. Right-click the small arrow at the bottom of an empty track and choose Route to this track only, then name that track Sidechain.
- Load Fruity Balance on the Sidechain track. It’s a tiny FL Studio plugin with two knobs, Balance and Volume.
- Right-click the Volume knob and choose Create automation clip.
- Draw the shape: the volume drops to zero on each kick and snare and curves back up before the next hit.
What the pumping shape looks like
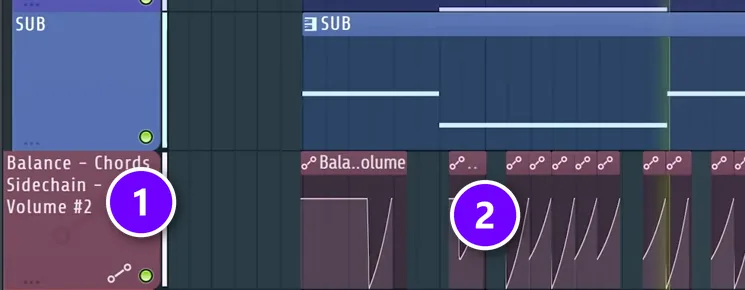
This is the automation lane from the video (1). Each small clip (2) drops the chords to silence on a drum hit and curves them back up, so they swell between hits and get out of the way on them. Prefer a compressor? Our guide to the 3 ways to sidechain in FL Studio shows that method and two others.
Make the chords follow the melody with LFO Tool
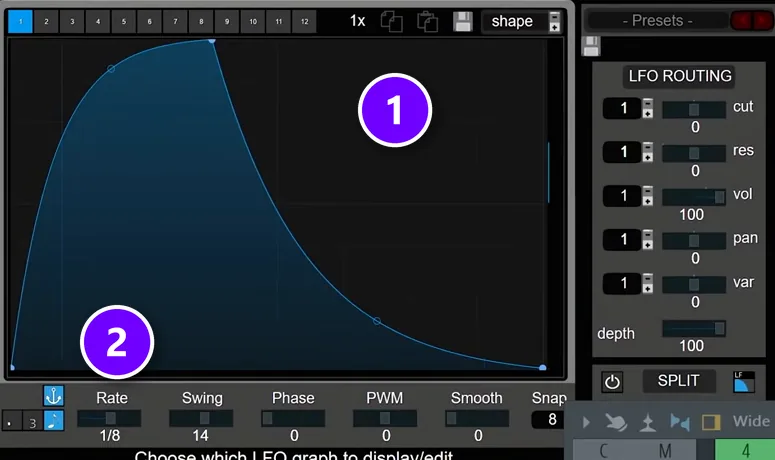
The fourth bonus trick goes one step further: shape the chord volume to match the rhythm of the melody. Load Xfer’s LFO Tool on the chords, draw a shape that jumps up and fades away (1), set the Rate to 1/8 (2) and route it to volume. Then automate the Rate during the drop and switch the chords off completely where they aren’t needed.
Pro tip: no LFO Tool? Draw the same jump-and-fade shape in your Fruity Balance automation. It takes longer to draw, but it costs nothing.
Step 7: Build up into the drop so it hits harder
A drop only feels big if the moment before it feels small. The last tricks in the video all play with that contrast:
- Darken the chords. Put a low-pass filter on the chords as they lead into the drop. It cuts the highs, so the drop sounds even brighter when the filter opens.
- Go mono for one bar. In the bar before the drop, take everything to mono. Then put it back in stereo right on the drop, together with the crash and the full leads.
- Don’t start everything on beat 1. Layer a crash on the chords, but let it and the flute leads come in a little late. Delaying something keeps the drop opening up after it lands.
- Write your own fills. A short drum fill right before the drop pulls the listener in. Mix Elite has a video on a hidden FL Studio feature that writes drum fills for you.
Automate the filter and the volume
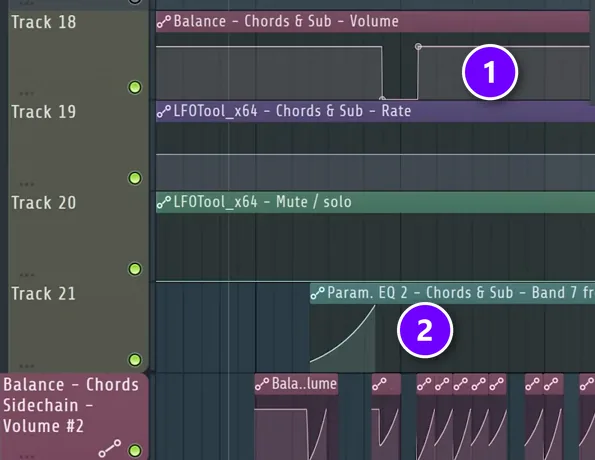
These are the automation lanes on the chord bus. The short dip in the Balance volume (1) switches the chords off for a moment. The rising curve on band 7 of Fruity Parametric EQ 2 (2) is the low-pass filter opening up. To make your own, right-click the control you want to move, such as an EQ band’s frequency knob, and choose Create automation clip.
Let the crash land late, then go wide
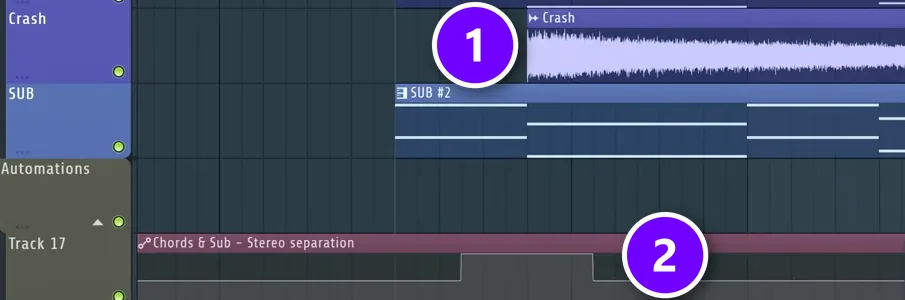
In the Playlist, the crash (1) starts after the chords and sub instead of on the first beat. Below it is the stereo separation automation for the chord bus (2). In FL Studio’s Mixer, turning that knob right sums the sound to mono and turning it left widens it. So the raised step is the mono moment, and then everything opens back up. Max admits it’s a subtle move, but he keeps it.
For where the build and the drop sit in a whole song, see our guide to EDM song structure.
Why does my future bass drop feel weak?
Usually because the drop has nothing to push against. If the build is as bright, wide and busy as the drop, the drop can’t feel bigger. Darken and narrow the build, make the chords duck around the drums, and give the drop a mono layer and stacked leads so its center has weight.
Check these six things:
- The build is as big as the drop. Low-pass the chords leading in and take everything to mono for the last bar, then open both on the drop (step 7).
- Everything starts on beat 1. Let the crash and one lead layer come in a little late, so the drop keeps opening up after it lands.
- The chords never move. Without the pump, they never get out of the drums’ way. Duck them on every kick and snare (step 6).
- The center is thin. Wide layers sound big but light on their own. A mono layer under them gives the drop its power (step 2).
- The lead is too thin. Stack it in octaves and add a vocal lead, as the video does when its synth leads still lack power (step 4).
- The low end is crowded. If the sub and chords blur together, low-cut the chords and let the sub duck under the kick (step 5).
Do you need Serum to make future bass?
No. Every idea here works in any synth: stack layers by range and width, use unison for the supersaw, keep one layer mono and shape the volume. Serum just makes it quick, and it’s what the video uses.
If you want it, Serum 2 costs $249 on Xfer Records’ site (checked October 2026). There’s a demo limited to 15 minutes, and Serum 1 owners upgrade for free. Ozone Imager is free from iZotope, and LFO Tool costs $49.95. For more choices, see our list of the best synth plugins.
Where to start tonight
Start small. Load one progression at 150 BPM and build three layers: the mid supersaw, the wide one and the mono one. Route them to a Sidechain track and draw the pump with Fruity Balance. Do just that tonight, and you’ll hear the future bass sound before you touch the drums or the leads.
For more genres, start from our guide on how to produce house music, the hub for all our house and EDM guides. And when you want a full song, intro to outro, Mix Elite’s start-to-finish Future Bass & Remixes course, with vocal chops, advanced layering and all project files, is part of Mix Elite Academy.
DAY 2 OF THE 7-DAY MUSIC PRODUCER COURSE
Write the chords your drop is built on
Day 2 of Mix Elite’s 7-Day Music Producer Course covers the music theory behind fresh-sounding harmonies, a 3-step formula for writing chord progressions, and where to find pro-quality instruments, paid and free. You also download 30+ chord progressions and 20+ free plugins and tools. It’s taught in FL Studio, the course is $27, and you’re covered by a 60-day money-back guarantee.
Frequently asked questions
How do you layer synths for a future bass drop?
Stack several synths that play the same chords but each cover a different range and width: a stereo supersaw for the mids, an ultra-wide bright layer, a mono layer for power, a layer with movement and a vocal chop. Copy the chord MIDI into each one and delete the melody notes, so every layer plays only the chords.
Why does my future bass drop sound weak?
Most weak drops have no contrast: the build is as bright and wide as the drop, so nothing opens up when it lands. Low-pass the chords and go mono for the last bar of the build, make the chords pump around every kick and snare, and add a mono layer so the center has weight.
How do you make future bass chords pump with the kick?
Duck the chord volume on every kick and snare, then let it swell back up between hits. A sidechain compressor triggered by the kick does it, or you can draw the shape yourself: route the chords and leads to one Mixer track, load Fruity Balance and automate its Volume. Xfer’s LFO Tool does the same and can follow the melody’s rhythm too.
How do you stop the sub bass and chords from sounding muddy?
Let only the kick and the sub play in the subs. Keep the sub to one low note per chord, put a low cut around 100 Hz on every chord layer, and push it up to 250 Hz on layers with no useful bass. Then make the sub duck when the kick hits.
What BPM is future bass?
The drop in this guide runs at 150 BPM. Most future bass sits somewhere between about 140 and 160 BPM, and the drums usually feel half-time, with the snare landing once per bar instead of twice. That’s why the genre can run at a fast tempo and still sound slow, heavy and easy to nod along to.