
“Creativity is just connecting things.”
In FL Studio, you build short loops as patterns in the Channel Rack and Piano roll, then arrange them in the Playlist, the main timeline where pattern, audio and automation clips play from left to right as your song. Every copy of a pattern plays the same notes, so use Make unique to change just one. Set PAT/SONG to SONG to hear the Playlist.
You built a beat you like in the Channel Rack. Then you open the Playlist, and it all gets confusing fast. You press play and hear the same bar over and over. You change one kick, and every copy of the beat changes with it. Or you paint the loop in, and it lands half a beat late.
None of that is your fault. Nobody showed you how the two windows work together. This guide does, with real screenshots from Mix Elite’s free 4.5-hour FL Studio course, taught by Max, the founder of Mix Elite. New to the program? Start with our beginner guide to FL Studio.
Table of Contents
What is a pattern in FL Studio?
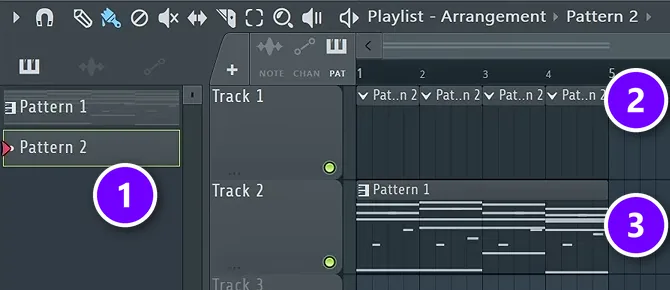
A pattern is a short, reusable block of music, like a drum beat, a chord loop or a bassline, that you build in the Channel Rack and Piano roll. You place copies of it in the Playlist to build your song, and every copy plays the same notes.
The Day 3 project in the course has two of them. Pattern 2 holds the drums and sits four times on Track 1 (2), and Pattern 1 holds the chords on Track 2 (3). The picker panel on the left lists every pattern in the project (1).
Max puts it simply in Day 1 of the free course: “Patterns are like building blocks of your music. A pattern can have drums, melodies, basslines or any combination of sounds, and you can use the same pattern as many times in your song as you want.”
Under the hood, a pattern stores the steps, notes and automation for every channel in your project. All patterns share the same instruments, so one pattern can play your kick and piano while the next plays only the hi-hats. Image-Line explains this in its Channel Rack manual. By default, a pattern ends at the last bar that has something in it.
How the Channel Rack and Piano roll fill a pattern
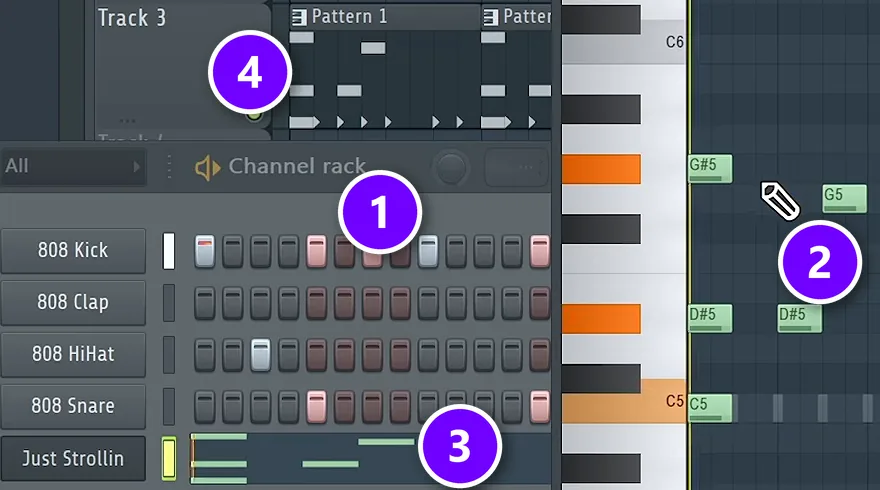
You never write music straight into the Playlist. You write it inside a pattern, using two windows, and both of them show the pattern you’re working on.
The Channel Rack’s step sequencer (1) gives every sound a row of buttons. Left-click a step to add a hit, right-click to remove it, and press Space to play. It’s the fastest way to program drums.
For anything with pitch, right-click the channel’s name and choose Piano roll. There you draw notes higher or lower, in time (2). Whatever you write shows up as a mini preview in that channel’s row (3), and the pattern’s clip in the Playlist updates at the same moment (4). Both windows appear at 14:09 in the video, and Max calls the Channel Rack a great place to brainstorm.
Pattern vs Playlist: what’s the difference?
The pattern is what plays; the Playlist is when it plays. A pattern is a loop that holds notes and drum hits, and the Playlist is the song’s timeline, where you lay copies of your patterns, audio clips and automation clips from left to right. Sketch ideas in patterns, then arrange the full song in the Playlist.
Max describes the Playlist like this: “The main place of your project is the playlist. This is where we put all the pieces together in time.” Each pattern you place there becomes a clip, a colored box you can move, copy, cut and stack. Press play in song mode, and FL Studio plays them in order.
Here’s the part that trips people up. Every clip of a pattern is that same pattern. Change one note inside it, and every copy in the song changes too. That’s handy when you fix a wrong chord once and it’s fixed everywhere, and annoying when you only wanted the last chorus to be different. The fix is called Make unique.
The Playlist also holds two kinds of clips that aren’t patterns. Audio clips are recordings and samples, like a vocal or a crash cymbal. Automation clips are lines that move a knob over time. Image-Line’s Playlist manual confirms that any clip type can sit on any track.
How to create and manage patterns
Three spots handle almost all pattern work: the pattern selector in the toolbar, the Patterns menu right next to it, and the menu on each clip.
Pick or add a pattern with the pattern selector
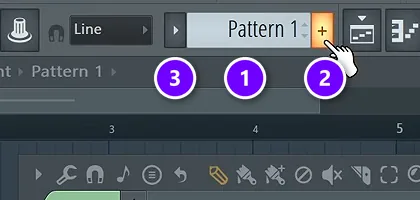
The pattern selector (1) shows the pattern you’re working on, and the Channel Rack always shows that pattern’s steps. Click it to pick another pattern, or scroll the mouse wheel over it.
To start a fresh idea, click the plus next to the pattern name (2) or press F4. FL Studio jumps to the next empty pattern and asks you to name it. In Day 3, the drums start this way, in their own short pattern instead of inside the long chord pattern. The small arrow on the left (3) opens the Patterns menu.
The picker panel on the left side of the Playlist lists the same patterns (Alt + P shows or hides it). Image-Line recommends it over the selector, because you can drag any pattern from it straight onto a track.
Clone, rename and color a pattern
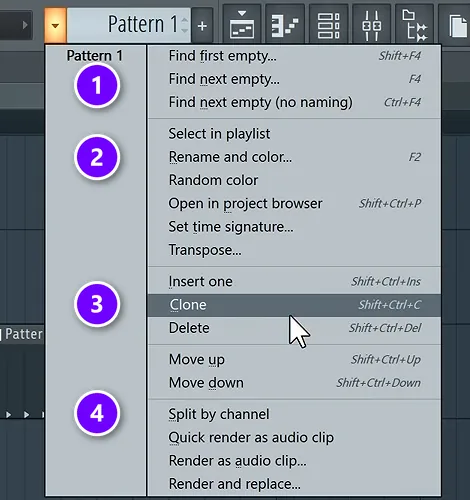
Open the Patterns menu from that small arrow. These are the four options you’ll use most:
- Find next empty (1), or F4: a new, empty pattern.
- Rename and color (2), or F2: name the pattern and pick its color. Press F2 again to cycle through colors.
- Clone (3): a copy of the pattern, placed right after it in the list, ready to change without touching the original.
- Split by channel (4): one new pattern for every sound in the selected pattern, each named after its channel. You’ll use it when you arrange.
Name and color things as you go. In the course project, drums are red and instruments are green, and the Day 3 homework asks you to color-code too, because it makes a busy project far less overwhelming.
Why does editing one pattern change every copy?
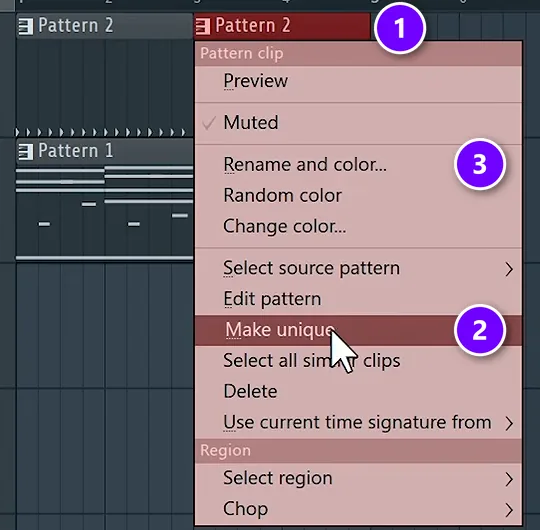
Because every copy in the Playlist is the same pattern. All of its clips share one set of notes, so an edit inside any copy shows up in all of them. To change just one copy, open that clip’s menu and choose Make unique, which turns it into a new pattern you can edit on its own.
Here’s how. Click the small icon at the top-left of the clip, next to its name (1), and pick Make unique (2). FL Studio clones that one clip into a new pattern with its own number, Pattern 3 in the course project. In Day 3, that’s how the last copy of the drum loop gets a few extra kicks while the other copies stay the same.
Image-Line’s Playlist manual describes it the same way: by default, every copy of a clip shares the same data, and Make unique clones the clip so edits to the new one don’t touch the others. Two shortcuts help. Hold Shift + V while you click and drag a clip to make a unique copy in one move. And Select all similar clips, in the same menu, highlights every copy of a pattern so you can see where it plays.
That menu can also rename and recolor the pattern (3). Clone in the Patterns menu gets you to a similar place from the other side: it copies the pattern, and you place the copy yourself.
How to place patterns in the FL Studio Playlist
Once a pattern exists, putting it in the song takes a few clicks:
- Pick the pattern in the pattern selector or the picker panel.
- Click in the Playlist with the Draw tool (the pencil, P) to drop one copy. Click again for another.
- Hold and drag with the Paint tool (the brush, B) to paint copies one after another.
- Right-click a clip to delete it.
- Select some clips and press Ctrl + B to copy them right after the selection.
To change a pattern from the Playlist, double-click its clip, and FL Studio opens it so you can edit its steps or notes. In Day 3, the chord pattern sits once on Track 2 and the drum pattern four times on Track 1, so whatever goes into the drum pattern plays along with the chords.
Zoom fast: keep your hands on Ctrl, Alt and the scroll wheel the whole time, the way Max does in the course, so you can zoom in and out in a second (Ctrl + scroll zooms the timeline). To choose where playback starts, just click the timeline.
Keep snap on
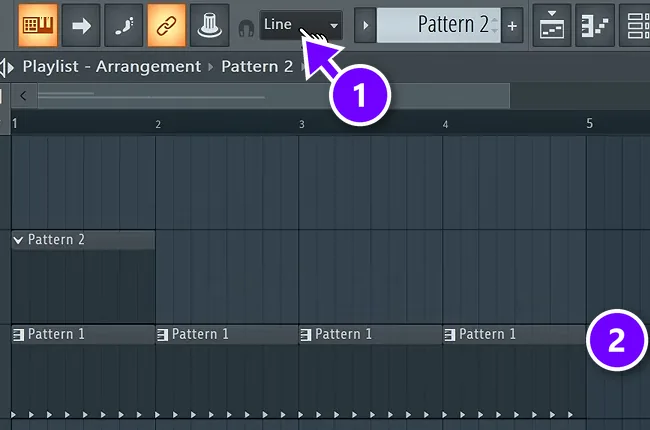
Snap decides where clips land. In the course project, the main snap box in the toolbar (1) is set to Line, so every clip sticks to the nearest grid line, right on the bar or beat (2). Leave it there. The Playlist also has its own snap menu (the magnet icon), and when it’s set to Main, it follows this box.
The warning from Day 1 of the course: set snap to none and nothing sticks to the grid anymore, which can make your rhythms sound off. Need one clip slightly off the grid on purpose? Hold Alt while you drag it, and snap turns off for that move only.
Pattern mode vs song mode in FL Studio
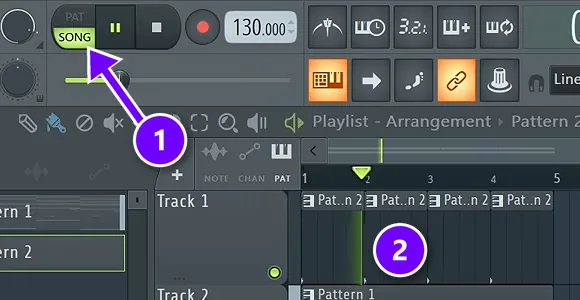
If you press Space and only hear one loop, look at the PAT/SONG switch next to the play button (1). PAT plays only the selected pattern, over and over. SONG plays the Playlist from left to right, so you hear every clip in order (2). Press L to flip between them.
Here’s a simple habit. Use PAT while you write a pattern and SONG while you arrange. In Day 3, the switch goes to SONG right after the new drum pattern lands next to the chords, so both patterns play at the same time.
How do I keep my FL Studio Playlist organized?
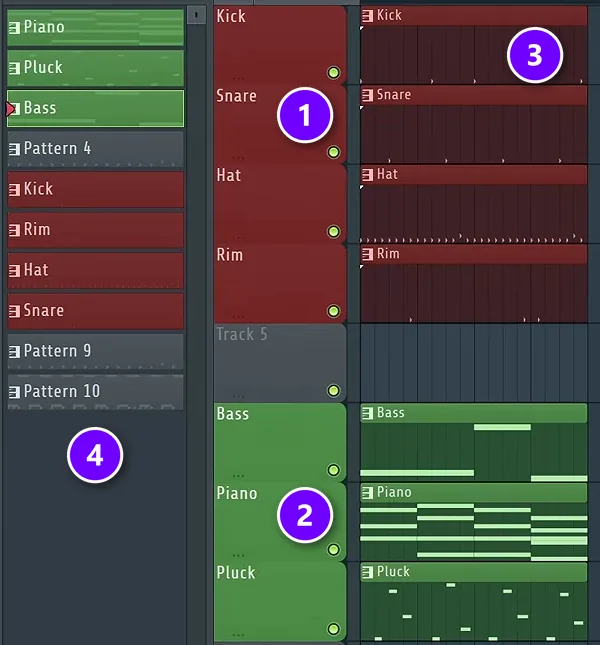
Give every sound its own track, then name and color each track so drums and instruments stand apart at a glance. Use Auto name clips so the clips match their track, keep similar sounds next to each other with the drums together, and add a marker where each section starts.
The Day 3 layout puts one sound on each track: drums named and colored red (1), instruments green (2). Right-click a track’s name and choose Rename, color and icon, then right-click again and pick Auto name clips, so every clip on that track takes the track’s name and color (3). The picker panel shows the same names and colors (4), which makes a big project easy to read at a glance.
To move a track up or down, hover over its name and hold Shift while you turn the mouse wheel. Markers do the same job for time. They label each section, so you never have to hunt for the chorus. Adding them is covered further down.
Should each instrument have its own Playlist track?
Yes: one sound per track lets you see, mute and move each part on its own, which makes arranging much easier. Where a track sits doesn’t change the sound in FL Studio: Playlist tracks aren’t tied to Mixer tracks, so each channel’s Mixer setting in the Channel Rack decides where its sound goes. Track order is just for you.
Image-Line’s Playlist manual puts it plainly: any clip type can sit on any track, and a single pattern clip can play every instrument in the Channel Rack. That’s why the course splits the loop by channel before arranging. With every sound in its own pattern and track, you can bring each one in and out whenever you like.
Prefer the way other DAWs work, with one instrument locked to one track? Current versions of FL Studio have Track mode. Drop an instrument or a sample on a track’s header, or right-click the header and open Track mode, and FL Studio links that channel, Playlist track and Mixer track, so a name or color change carries through all three.
How to slice, mute and move clips
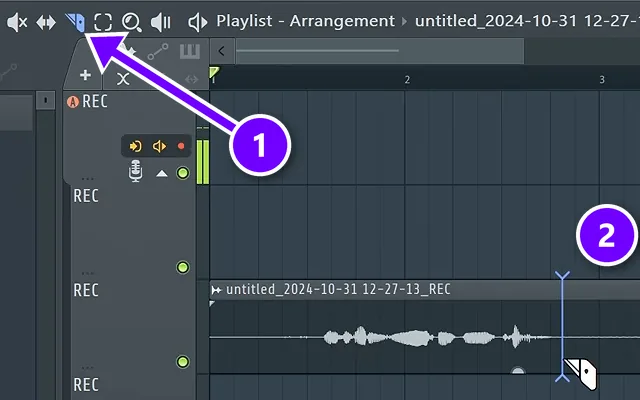
The Playlist toolbar holds the tools for editing clips, and most of them have a one-letter shortcut:
- Draw (P): click to add the selected clip.
- Paint (B): drag to paint many copies.
- Delete (D): click or drag over clips to delete them.
- Mute (T): click a clip to silence it without removing it.
- Slip (S): slide the sound inside a shortened clip without moving the clip itself.
- Slice (C): click and drag through a clip to cut it in two.
- Select (E): drag a box around clips to move or copy them together.
In Day 5, the Slice tool (1) cleans up a vocal take: cut where a long silent gap starts (2) and delete the gap, so the recording doesn’t add extra noise. Then drag the corner of each piece to fade its edges, which stops clicks.
How to add audio clips to the Playlist
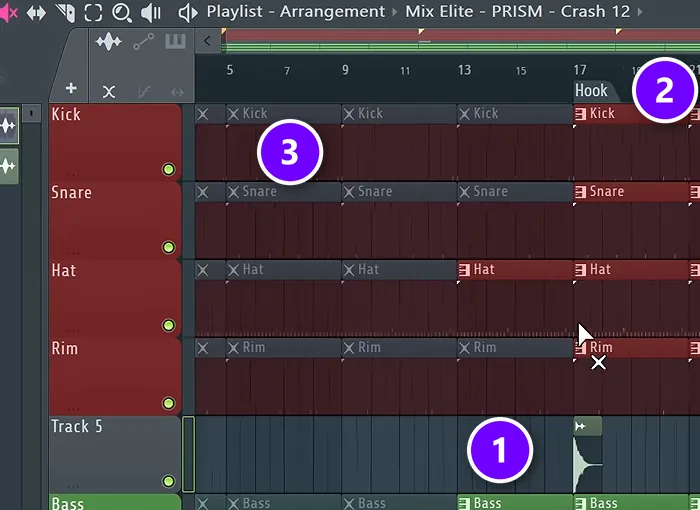
Not everything has to live in a pattern. Drag a sample from the Browser straight into the Playlist, and it becomes an audio clip (1). In Day 3, a crash cymbal goes right where the hook starts (2). See the clips marked with an X (3)? Those are muted, which is part of the arrangement method further down.
Two things to know. A dropped sample often comes in too loud, so double-click the clip to open its sampler and turn its volume down. And if your Channel Rack suddenly looks empty after you add audio, its filter has switched to Audio. Set it back to All to see every channel again.
To fade a clip in or out, drag the small handles at its top corners. The course fades in a sweep this way, so it comes in smoothly instead of starting with a jump. Recordings land in the Playlist as audio clips too, which is how the vocals get recorded on Day 5.
How to use automation clips in the Playlist
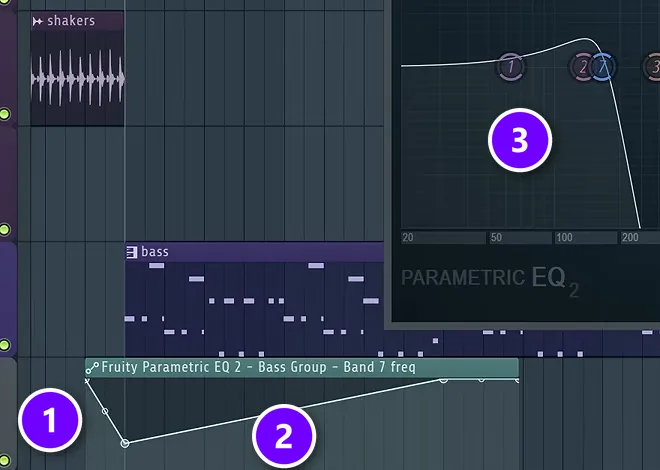
An automation clip moves a knob for you over time: a filter that opens before the drop, a volume fade, a reverb that swells. To make one, right-click almost any knob in FL Studio and choose Create automation clip. The clip shows up in the Playlist on its own track (1).
Right-click inside the clip to add points, then drag them up or down to shape the line (2). In Day 4, the course automates the high cut of a Parametric EQ 2 on the bass group (3). It starts low, around 20%, and opens all the way just before the drop, so the bass builds and then hits.
One FL Studio quirk to watch: the knob can jump to the clip’s first value before the clip even starts, so you may hear the effect too early. The quick fix is to stretch the automation clip back to the start of the song and shape the line only where you want the change.
How to add markers in the FL Studio Playlist
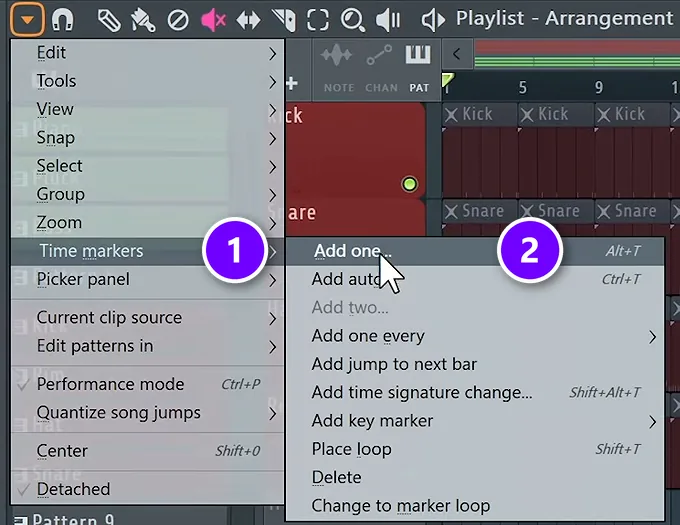
Markers are labels on the Playlist timeline, like Intro, Hook or Verse. They don’t change the sound. They show you where each section starts. Open the Playlist’s options menu (the small arrow in its top-left corner), go to Time markers (1) and choose Add one (2), or press Alt + T. Type a name, then drag the marker to the bar where the section begins.
The course adds one every 16 bars in Day 3: Intro, Hook, Verse, Hook, then Outro. Right-click any marker to add another one or delete it. Newer versions of FL Studio call the menu item Add time marker; the course video uses FL Studio 2024.
How do I turn a loop into a full song in the FL Studio Playlist?
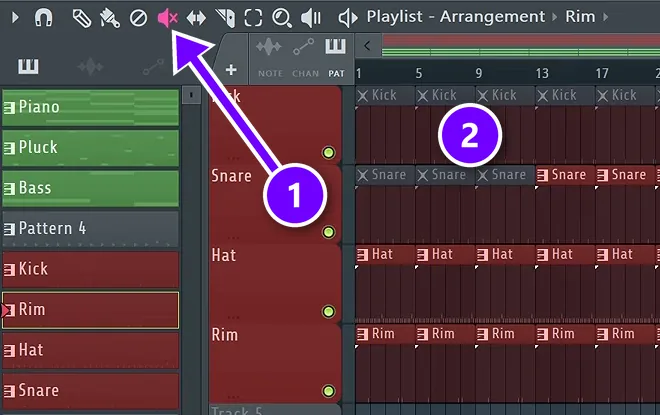
Split the loop so every sound has its own track, copy it out to about 2 minutes, and mute everything. Then mark a section every 16 bars (intro, hook, verse, hook, outro) and unmute parts back in: the core sound first, something new every 4 to 8 bars, and every part for the hook.
That’s the Day 3 method from Mix Elite’s free course, step by step below. Our guide on how to arrange loops into a full song goes deeper, including how to copy the section map of a song you love.
- Move 1Split by channel
- Move 2Name and color
- Move 3Copy to 2 minutes
- Move 4Mute it all
- Move 5Add markers
- Move 6Unmute parts in
- Move 7Add transitions
- Split by channel. Select the loop’s pattern, open the Patterns menu and choose Split by channel, so every sound gets its own pattern and its own track.
- Name and color the tracks: drums red, instruments green.
- Copy it to about 2 minutes. Select everything and press Ctrl + B until the loop runs about 2 minutes.
- Mute it all with the Mute tool (1). The clips stay in place but go silent (2).
- Add markers every 16 bars: Intro, Hook, Verse, Hook, Outro.
- Unmute parts back in. Start the intro with the core sound (the course uses the piano), add something every 4 to 8 bars, tease one drum sound just before the hook, bring everything in for the hook, and keep only a few parts for the outro.
- Add transitions: drag a crash or a sweep onto the bar where a section starts.
Why add parts slowly instead of starting with everything? Max explains: “We want our arrangement to work as if we were taking someone by hand experiencing our song… We’d like to introduce the mood first and then go slowly.” He calls this additive arrangement: you start from silence and add parts as you listen, instead of cutting parts away from a full loop. He also says around 2 minutes is a good length for a beat like this, and for trap he sets the tempo to 140 BPM, since trap usually sits around 140.
Want a longer song? Add a second verse after the last hook and move the outro after it. And because you build the layout by ear instead of copying another track, Max says the result ends up unique to you, which helps you find your own style.
Once the sections are in place, the next job is keeping them interesting. Our song arrangement guide covers the 4-to-8-bar rule, building tension before the drop, and making a repeated chorus feel new.
How do I make smooth transitions between the verse and chorus?
Tease the change, then mark it. Bring in one drum sound just before the chorus, put a crash on its first beat, and lead in with a sweep, a filter that opens up, or a reverb wash that cuts off the moment the chorus hits. In FL Studio, each of these is a clip in the Playlist.
The course calls the chorus the hook, and these moves work between any two sections, including a build and a drop:
- Tease it. Unmute one drum sound, like a hat, rim or snare, a few bars before the hook instead of bringing everything in at once (Day 3).
- Crash on the first beat. Drag a crash from the Browser onto the bar where the hook starts, then turn it down in its sampler (Day 3).
- Sweep in. Drop a sweep sample at the change and drag its fade-in handle, so it swells in smoothly instead of starting with a jump.
- Open a filter. Automate a high cut on the bass from about 20% to fully open, finishing just before the drop (Day 4).
- Wash it out. Put a reverb with a long decay on one part, like the clap, and automate its wet level up to about 70% during the build, then off when the drop hits (Day 4).
- Change the last bar. Use Make unique on the last drum clip before the change and add a few hits, like the extra kicks in Day 3.
Chops use the same tools. The Slice tool (C) cuts the last bar of a clip into pieces, and the Mute tool (T) silences one, so you can break up the rhythm right before the new section starts.
Common FL Studio Playlist problems and quick fixes
- You hear only one loop. The switch is on PAT. Click SONG or press L.
- You edited one copy, and every copy changed. That’s how patterns work. Use Make unique on the clip before you edit it.
- Clips land a little early or late. Snap is set to none. Set the snap box back to Line.
- Your Channel Rack looks empty after you added a sample. Its filter switched to Audio. Set it back to All.
- A part never plays. Its clips may be muted. Muted clips look faded and carry an X. Click them with the Mute tool, or right-click the track’s name and choose Unmute all clips.
Then practice. Repeat the moves until you don’t have to think about them. Our FL Studio shortcuts list and FL Studio tips for beginners cover the keys that make the Playlist fast, and our FL Studio tricks post shows a few hidden moves, like merging several pattern clips into one.
DAY 1 OF THE 7-DAY MUSIC PRODUCER COURSE
Get the FL Studio basics down, then build a full song
Day 1 of Mix Elite’s 7-Day Music Producer Course covers setup, workflow and navigation, including the top 4 features of any DAW you need to understand to find your way around. Day 3 adds drums and one simple tactic to help you arrange songs and turn ideas into full songs. It’s taught in FL Studio, and the free trial works. The course is $27, and you get 60 days to decide if it was worth it.
Frequently asked questions
What is the difference between a pattern and the Playlist in FL Studio?
A pattern is a loop: the drum steps and notes you write in the Channel Rack and Piano roll. The Playlist is the timeline where you place copies of your patterns, plus audio and automation clips, to decide when each part plays. You build ideas in patterns and arrange the song in the Playlist.
Why does changing one pattern change every copy in FL Studio?
Every copy of a pattern in the Playlist shares the same notes, so an edit to one is an edit to all. To change only one copy, click the icon at the top-left of that clip and choose Make unique, or hold Shift + V and drag the clip. FL Studio turns it into a new pattern you can edit on its own.
How do I turn a loop into a full song in FL Studio?
Split the loop by channel so each sound gets its own track, copy everything out to about 2 minutes and mute it all. Add markers every 16 bars for the intro, hook, verse, hook and outro, then unmute parts back in, with something new every 4 to 8 bars and everything for the hook. That’s the Day 3 method in Mix Elite’s free FL Studio course.
Should each instrument be on its own track in the FL Studio Playlist?
Yes. It keeps the project easy to read and lets you mute and move each part on its own. Track order doesn’t change the sound, because Playlist tracks aren’t tied to Mixer tracks; the Channel Rack decides where each sound goes. If you want one instrument locked to one track and one Mixer track, use Track mode.
Why is my FL Studio Playlist not playing?
Most of the time the PAT/SONG switch next to the play button is set to PAT, which plays only the selected pattern. Switch it to SONG or press L. If it’s still silent, check that there are clips on the Playlist, that they aren’t muted (muted clips look faded), and that the track’s green mute switch is lit.