
“I’ll paint it big and they will be surprised into taking time to look at it.”
A snare usually sounds flat because its attack is buried, nothing bright sits on top, reverb smears the hit, or it’s simply too quiet. The fix in FL Studio: pull the attack forward with Fruity Limiter, add a wide clap layer that only covers the highs, give the reverb about 50 ms of pre-delay, then turn the snare up more than feels safe.
You found a snare that sounded great on its own. Then you dropped it into your beat, and it turned into a polite little tap hiding behind the 808 and the chords. Pushing the fader up made it louder, but somehow not better.
That’s frustrating, because the snare is the hit people nod their heads to. If you’ve been asking “why does my snare sound flat?”, you’re not alone: Mix Elite’s video on this exact problem has more than 170,000 views. There’s no single magic plugin: a punchy snare comes from a few small moves made in the right order. Below is each one, with the exact FL Studio settings Max, the founder of Mix Elite, uses in the video.
Table of Contents
Why does my snare sound flat?
A snare usually sounds flat because its attack is buried under its own body, nothing bright sits on top, reverb smears the hit, or it’s simply too quiet. A long tail and a pitch that clashes with your key make it worse. Most beats have two or three of these at once.
Here’s what each one means:
- The attack is buried. The transient is the click in the first few milliseconds of a hit. If the body and the tail are as loud as that click, the snare sounds soft.
- Nothing bright sits on top. A snare that’s all body gets lost under hats, synths and vocals.
- Reverb smears the hit. Reverb that starts at the same moment as the snare blurs the crack.
- It’s too quiet. Beginners very often mix their snare far too low.
- The tail rings too long. A long tail makes the hit feel loose instead of tight.
- It’s out of tune. Snares have a pitch, and one that clashes with your key never quite sits.
The fix below covers all six. If your snare also sounds stiff because every hit plays at exactly the same strength, that’s a groove problem rather than a mix problem, and small velocity changes fix it. Here’s how to humanize MIDI drums in FL Studio.
Why does my snare sound good alone but disappear in the beat?
Because the 808, the chords and the synths fill the same frequencies and cover it, which is called frequency masking. In solo, nothing competes. Make the attack louder than the body, add a bright clap layer, duck the music for a split second on each hit with sidechain, and turn the snare up more than feels safe.
Steps 1, 2, 5 and 7 below do exactly that. Judge the snare with the full beat playing, never in solo, because solo is where every snare sounds fine.
Why does my snare sound thin even when I turn it up?
Because the fader makes the whole hit louder but can’t add what’s missing. A thin snare lacks body in the low mids, where snares and claps get their punch. Check that no low cut or shelf is eating that range, pick or layer a sample with a fuller body, and let a clap layer carry the brightness.
Turning up a thin snare only gives you a louder thin snare. The EQ ranges and the sample checks further down show where the body lives and how to choose a snare that has it.
How do you make a weak snare punchy, step by step?
Bring the attack forward, add a bright layer for what the snare is missing, clear room for it in the beat, keep the reverb off the hit, and turn it up. In FL Studio that takes seven moves, in this order:
- Bring out the attack with Fruity Limiter.
- Layer a clap that only covers the highs.
- Spread the clap wide.
- Delay the clap by 8 ms.
- Sidechain the beat to the snare.
- Give the reverb about 50 ms of pre-delay.
- Turn the snare up.
The video works on a 140 BPM beat in FL Studio. The beat is trap, but the same moves work for hip-hop, future bass and other genres too.
Then come three small fixes: shorten the tail, tune it to your key and EQ it so it fits. Watch the whole thing first, then work through the steps with your own beat open.
Step 1: Bring out the attack with Fruity Limiter
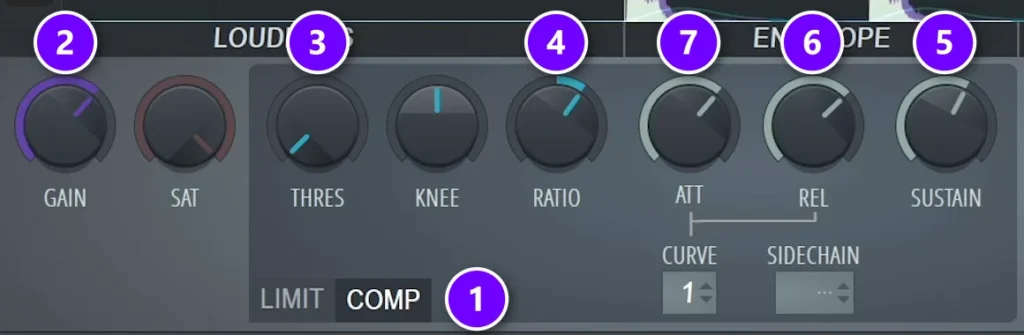
Make the click at the start of the hit louder than the body, and the snare pops. Fruity Limiter can do this in its compressor mode. It’s a stock plugin, so you already have it. Load it on the snare’s mixer track and follow this order:
- Click COMP (1) to switch it to compressor mode.
- Turn GAIN (2) up about 6 dB. Turn THRES (3) all the way down and RATIO (4) all the way up.
- Set SUSTAIN (5) a little past the middle and turn REL (6) all the way down.
- Play the beat and raise REL until you can’t hear the snare at all. The compressor is now squashing the whole hit.
- Slowly raise ATT (7) until the click at the start comes back. That’s the transient slipping through before the compressor grabs the rest.
- Turn RATIO down until you like the amount, then set GAIN so the snare is as loud as it was before.
Matching the volume matters, because louder always sounds better at first. Bypass the plugin and compare at the same level. The processed snare should jump forward, and this technique makes it cut through everything in the mix.
Or use a transient shaper
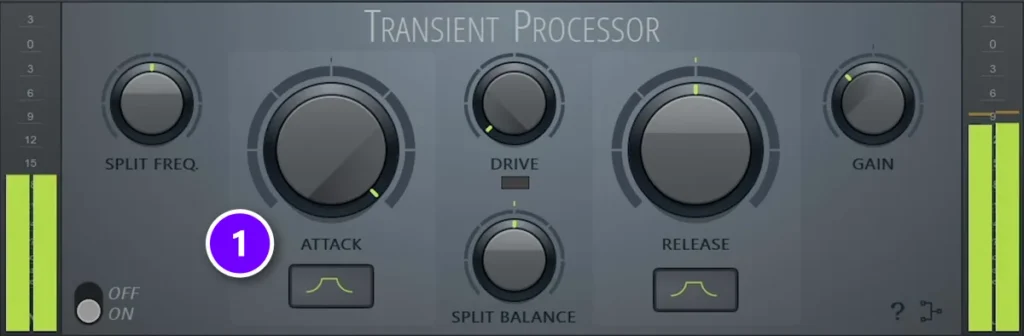
A transient shaper does the same job with fewer knobs. FL Studio’s own Transient Processor isn’t part of every edition (in the video it even opens as a trial version), which is why the limiter trick comes first. With it, you just turn ATTACK (1) all the way up and get pretty much the same result.
Transient shapers work on every drum, and even on the whole drum bus. Want a free one? Couture by Auburn Sounds has a free version.
Step 2: Layer a clap that only covers the highs
Layering means playing a second sample at the same time as the snare. The rule: pick a layer that adds what the snare is missing, never a random second snare. Two samples fighting over the same frequencies just make mud.
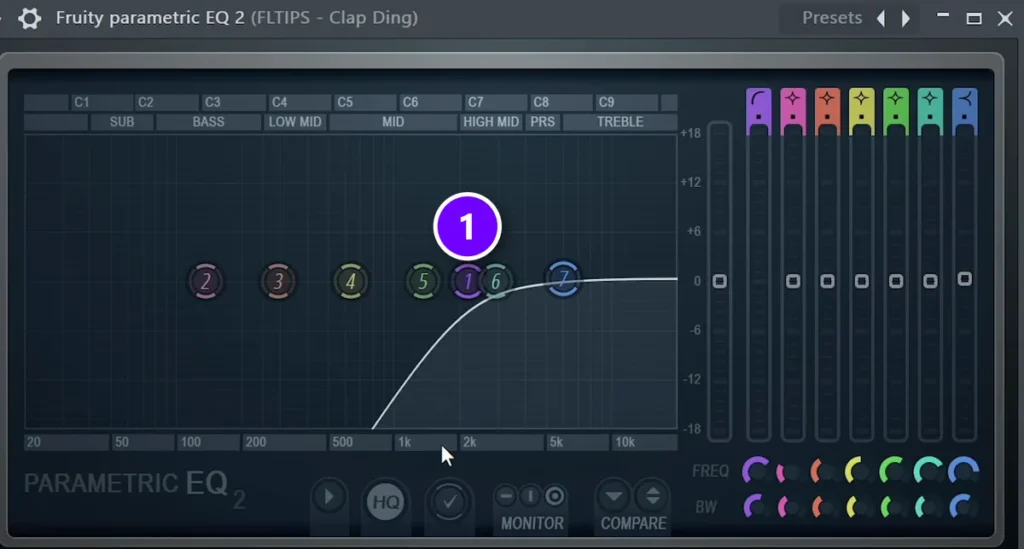
The snare in the video already has a strong low-mid body, so the layer is a clap, a brighter, more mid-high sound. The clap has some low mids of its own, though, so cut them off with Fruity Parametric EQ 2 on the clap’s mixer track:
- Switch band 1 to a high pass filter. That’s a low cut: it removes everything below the frequency you set.
- Drag band 1 (1) up to about 2 kHz, so only the clap’s bright top is left.
- Play the two together, then bypass the EQ to compare. Without the cut, the two bodies stack up and the snare gets muddy instead of bigger.
Pro tip: the higher a layer sits in the frequency spectrum, the more layers you can stack without making the mix hard to manage. Low layers are the ones that fight. So whenever you layer a sound, try a high pass on the layer and listen to whether the two sit together better.
Want a bigger clap to begin with? Building one from three samples is covered in how to make hard-hitting drums in FL Studio.
Step 3: Spread the clap wide
A weak snare usually lacks presence, and one easy way to make a sound more present is to make it wider in stereo. Because the clap now only holds high frequencies, it can go fully wide without blurring your low end. Keep the main snare in the center. Only the bright layer goes wide.
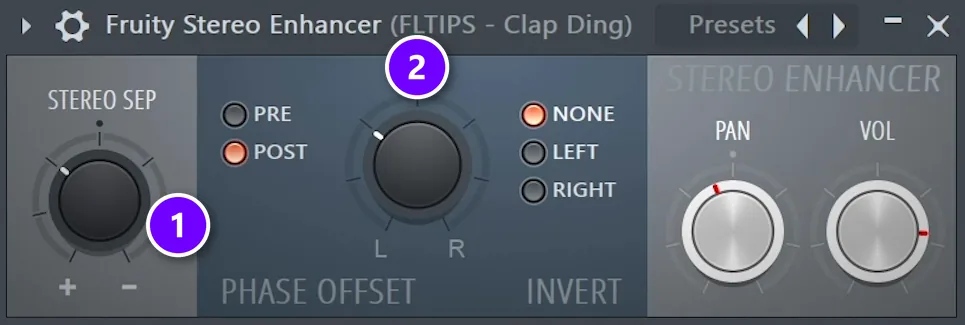
Open Fruity Stereo Enhancer on the clap’s track, load one of its presets and soften it a little. In the video’s settings, STEREO SEP (1) is turned toward the + side, which widens the sound. PHASE OFFSET (2) is turned a little to the left, which delays one side by a hair and makes it sound even wider.
Step 4: Delay the clap by 8 ms
This is the move people skip. In Max’s words: “That’s something people really, really underestimate: pre-delaying stuff, and especially snares.” In FL Studio you do it right in the mixer:
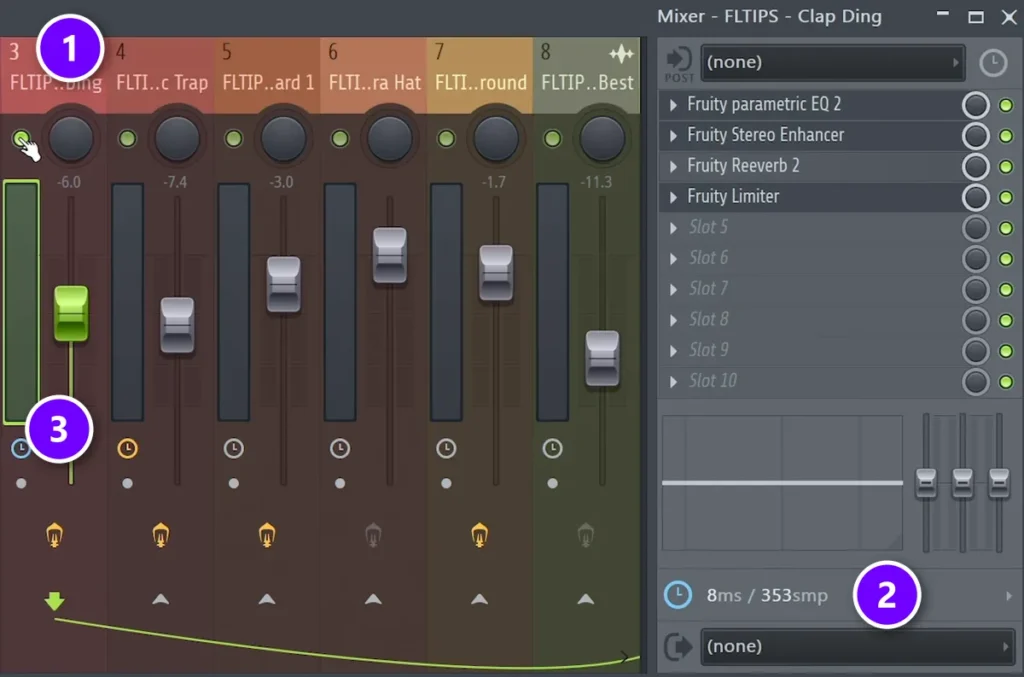
- Select the clap’s mixer track (1).
- Click the clock icon at the bottom of the right-hand panel, type 8 in the Delay (ms) box and press Enter. It now reads 8ms / 353smp (2), and the small clock on the track turns blue (3).
A positive number delays that track, so the clap now lands 8 ms after the snare’s attack. That’s far too short to hear as two hits. The snare’s crack comes first, and the wide layer blooms right behind it. Max says these three moves together (a high layer, stereo width and pre-delay) make a snare go five levels up.
Step 5: Sidechain the beat to the snare
Sidechaining means one sound turns other sounds down while it plays. Most producers only do it with the kick and the bass. The video also adds hard, short sidechaining from the snare to every instrumental part of the track. The music ducks for a split second on each hit, so the snare pops out much more.
In the project, the music runs through a mixer track named Sidechain with Fruity Limiter on it. Here’s how to set that up:
- Route your instrument tracks (everything except the drums) to one empty mixer track. Drag over them to select them, then hold Ctrl and left-click the arrow at the bottom of the empty track.
- Select the snare’s mixer track. Then right-click the arrow at the bottom of the new track and choose Sidechain to this track.
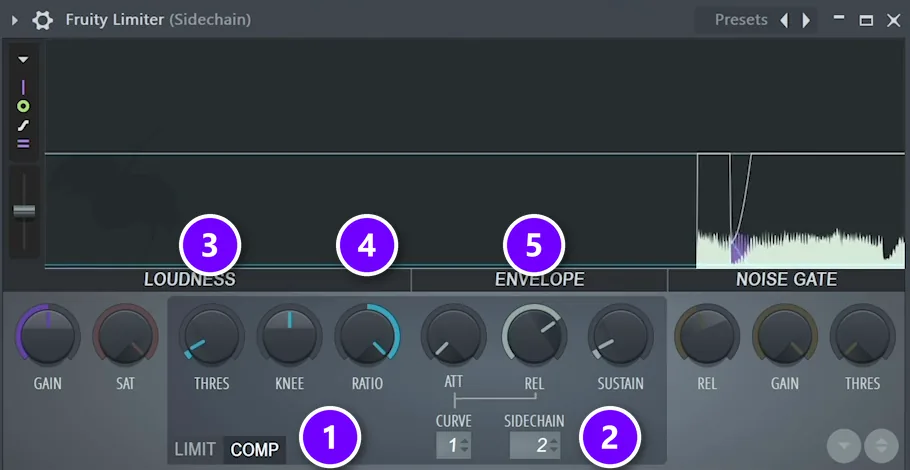
- Load Fruity Limiter on the new track, click COMP (1) and set SIDECHAIN (2) to the snare’s input number.
- Pull THRES (3) down and push RATIO (4) up for a hard duck. Keep REL (5) short so the music jumps straight back.
How do you add reverb to a snare without losing the punch?
Give the reverb pre-delay, so the hit plays dry and the space starts right after it. Start around 80 ms and come down until you can’t hear where the reverb starts, about 50 ms in the video. Keep the tail shorter than the gap to the next snare, and cut the reverb’s lows up to 700-800 Hz.
A dry snare can sound small, so it needs some reverb. The catch is that reverb smears a sharp hit. As Max puts it: “Reverb by definition blurs, and we want our drums to be crystal sharp, at least in the exact moment that they play.”
The fix is pre-delay. That’s the short gap between the hit and the moment the reverb starts. Every reverb has a control for it, and it matters most for reverb on drums.
Step 6: Set the reverb’s pre-delay to about 50 ms
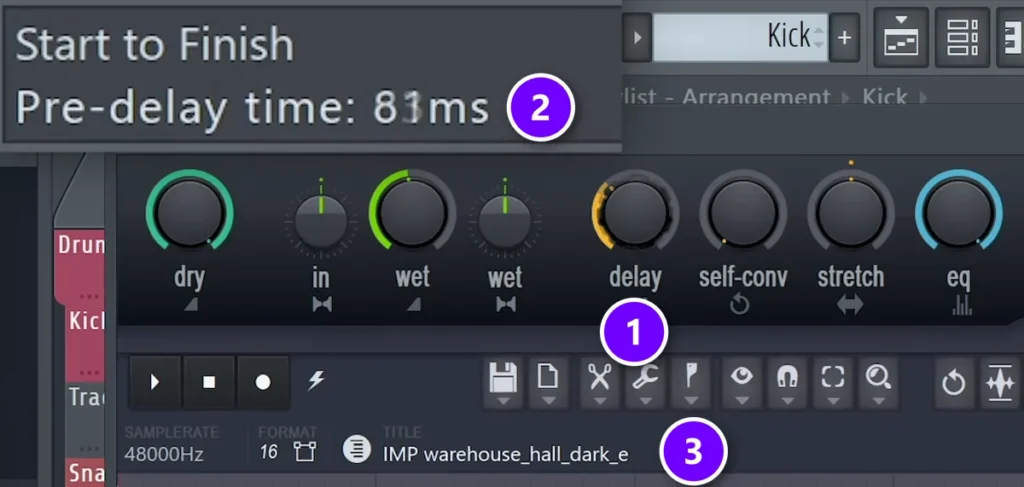
- Load a reverb on the snare’s mixer track. The video uses Fruity Convolver with an impulse called warehouse_hall_dark_e (3).
- Turn the delay knob (1) up to about 80 ms. The hint bar at the top left shows the exact time as you turn it (2).
- Bring it back down until you can’t hear where the reverb starts. The video lands around 50 ms.
Now the reverb comes in after the transient is gone. The crack stays dry and sharp, and the space follows right behind it. It’s a subtle move. But if every drum in a track has reverb with no pre-delay, the whole kit loses its sharpness.
Two more reverb rules come from Mix Elite’s beginner mixing mistakes video. Set the decay so the tail fades before the next snare hit, which in that example is about half a second to almost a second. And raise the reverb’s low cut to at least 700-800 Hz so it doesn’t add mud.
Want it even cleaner? You can also duck the reverb under each hit with Fruity Peak Controller, a slower trick from Mix Elite’s 5 processing tricks video. It suits future bass, house and other electronic styles best. For most beats, pre-delay is enough.
How loud should the snare be in the mix?
Louder than feels safe. In trap, hip-hop and future bass, the snare sits up front with the kick; in the video its fader ends up around -3.9 dB with the clap layer below it. Turn your speakers down low: if you can’t hear every hit over the 808 and the melody, it’s too quiet.
Max calls volume the most important trick of all: “The secret of great sounding snares is the volume.” When beginners send him tracks for feedback, the snare is very often way quieter than it should be.
Step 7: Turn the snare up
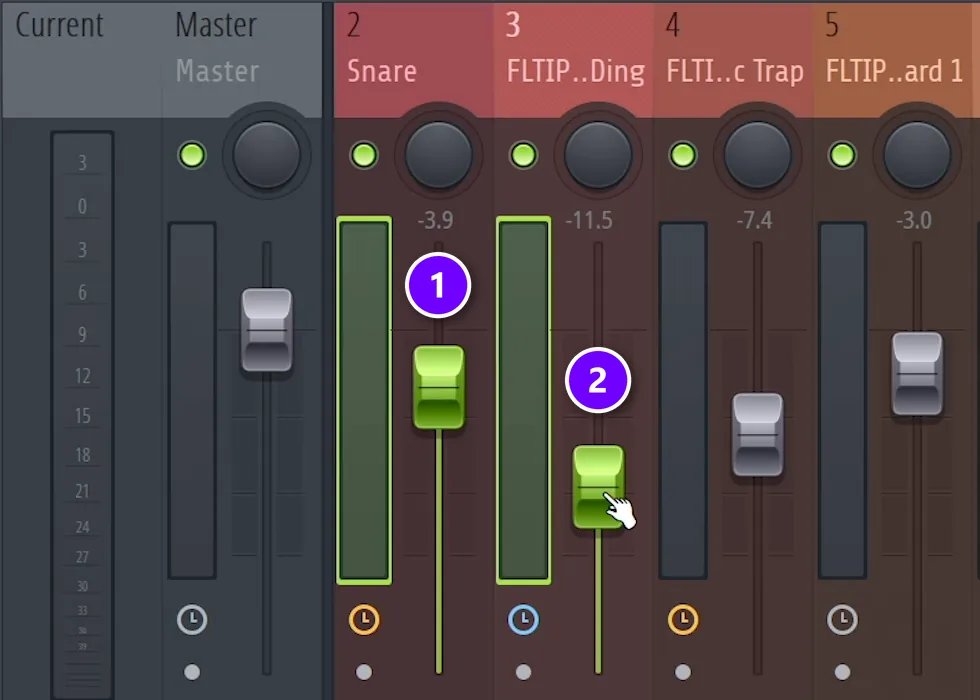
The snare is one of the first and main elements of the beat. In the loud version in the video, the snare’s fader sits at -3.9 dB (1) with the clap layer (2) tucked in below it, and even that is a little too loud. Still, don’t be afraid of turning the volume up more than you want to.
Fader numbers depend on your samples, so always do the low-volume check by ear. To balance every other track around it, see how to mix a song.
Shorten and tune the snare
Three small fixes come at the end. The first two only take a minute.
Shorten a long snare sample
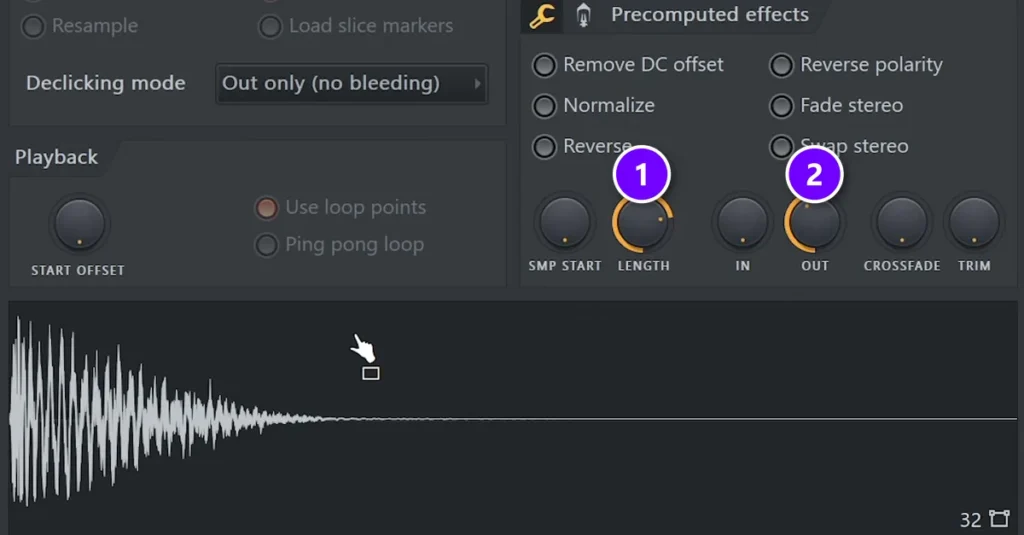
A long tail makes a snare loose. The rule is simple: the longer the sample, the less tight it sounds. Click the snare’s name in the Channel Rack to open its channel settings, then:
- Under Precomputed effects, turn LENGTH (1) down to cut off the end of the sample.
- Turn OUT (2) up a little. It adds a short fade-out, so the cut doesn’t click.
Stop when the tail dies just before the next hit. The snare sounds more precise right away.
Find your snare’s pitch
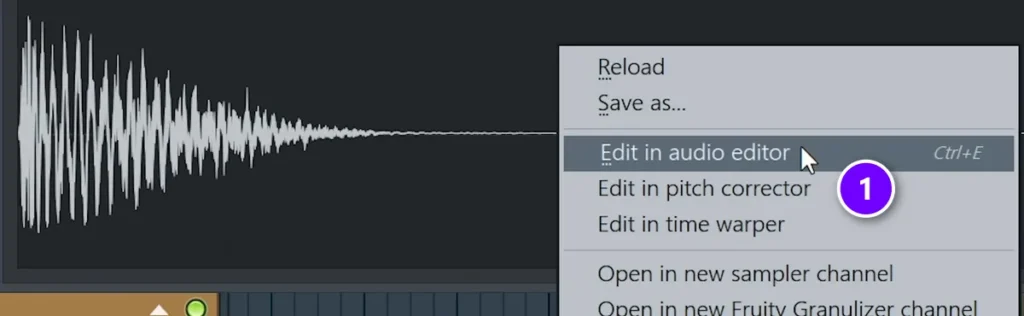
Most snares are tuned to a note, even when you can’t hear it. Very short sounds like claps are the exception. An acoustic snare like the one in the video definitely has a pitch. To find it:
- Right-click the waveform in the snare’s channel settings.
- Choose Edit in pitch corrector (1). This opens Newtone, which shows the note the sample plays.
The video’s snare reads B-flat.
Tune the snare to your song’s key
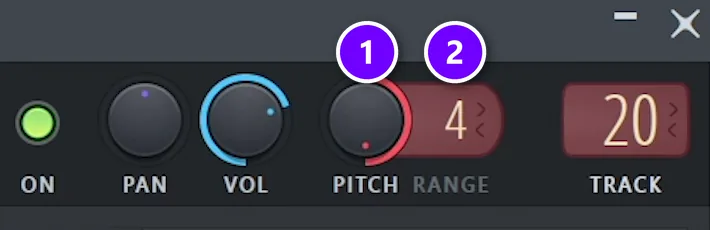
Next, move the snare to a note that fits your song. The video raises it by 4 semitones to match the track. A semitone is one key on the piano, black keys included.
- Set RANGE (2) at the top of the channel settings to the number of semitones you need. In the video, it’s 4.
- Turn PITCH (1) all the way to the right to go up, or all the way to the left to go down.
Pitching it up also made the snare sound tighter. This step matters most in genres with tonal snares, like future bass and dubstep.
How do you EQ a snare so it hits harder?
Cut before you boost. Clear the rumble below 100 Hz, take a little out of the boxy 400-800 Hz range, and lift the crack around 2-5 kHz only if the snare still can’t cut through. Keep the body around 150-250 Hz, because that’s where a snare’s punch lives.
EQ comes last for a reason. Once the snare is punchy, wide, tuned and loud enough, it usually needs only small cuts. Honestly, the only way to learn EQ properly is to do it a lot, because mixing is design, and what sounds right depends on your taste.
The two EQ moves in the video
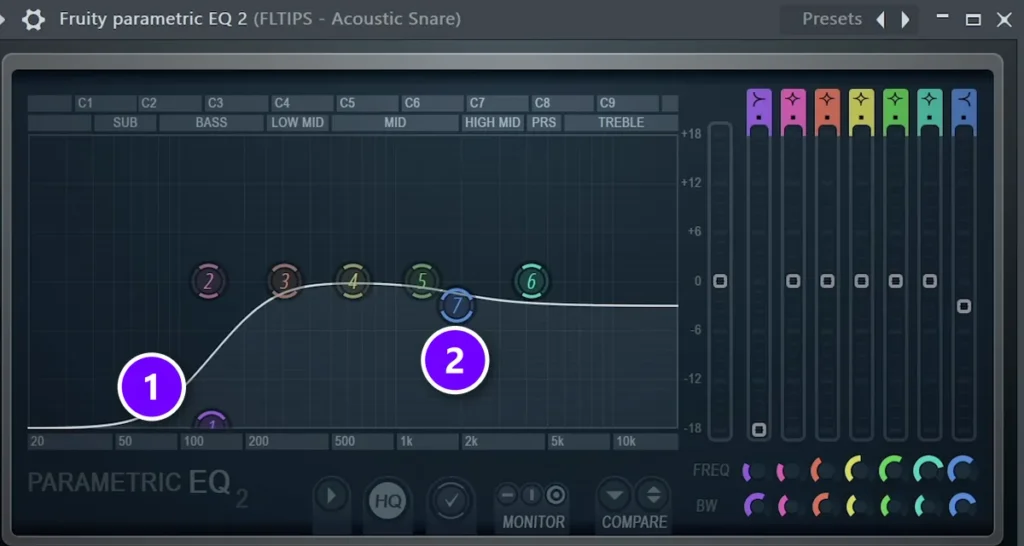
On this beat, the video makes two moves with Fruity Parametric EQ 2 on the acoustic snare. They take down some boxiness and some of the highs, so it fits the track:
- Band 1 (1): a low shelf at about 142 Hz, pulled all the way down to clear the boom from the bottom.
- Band 7 (2): a high shelf at about 1.9 kHz, lowered a few dB to soften the top.
Where a snare lives in the frequency range
Your snare will need different numbers, so it helps to know where a snare lives. These are rough ranges, not rules:
- Below 100 Hz: rumble the snare doesn’t need.
- 150-250 Hz: the body. Mix Elite’s free 1-hour mixing course points out that snares and claps get their punch in the low mids.
- 400-800 Hz: boxiness, the cardboard sound. A small cut here often cleans it up.
- 2-5 kHz: the crack that cuts through the mix.
- 6-10 kHz: sizzle from the snare wires. A little goes a long way.
To find a problem spot, boost a narrow band a lot and sweep it until the ugly sound jumps out. Then cut there instead of boosting.
Should you compress a snare?
Usually not on its own. A snare is mostly transient, so a compressor on it alone mostly turns the whole hit down, and setting the right volume works better. Compress all the drums together on a bus instead, at about 2:1 with 3 to 4 dB of reduction, and use the Step 1 limiter trick for punch.
Most snare guides start with a compressor, but Mix Elite’s free 1-hour mixing course is more careful. It explains that kicks, claps, snares and hats are all very transient-driven. A compressor on just one of them mostly turns the whole hit down, so it’s usually better to set the right volume instead.
Compress the drum bus in FL Studio
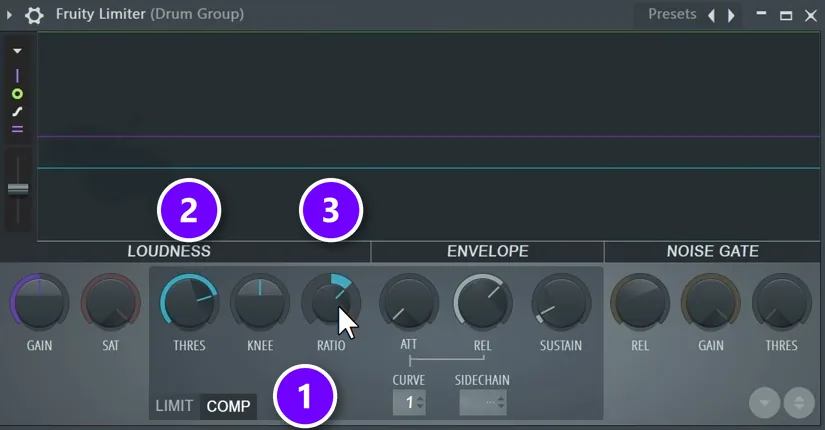
What gets compressed is the whole drum group. Every drum goes to one drum bus, with Fruity Limiter in compressor mode on it:
- Click COMP (1). Also raise the limiter’s ceiling, so only the compressor touches the drums.
- Take THRES (2) down a little and set RATIO (3) to about 3:1.
- If it’s pulling down about 6 dB, that’s too much. Drop the ratio to 2:1, so it only takes off 3 to 4 dB.
- Make up the lost level by turning the gain up about 3 dB.
The change is subtle, but the loud kick and snare move closer to the hats, and the kit sounds more controlled. For the full drum bus chain, see how to mix drums.
Watch out: if a compressor on a single snare makes it duller, its attack is too fast and it’s eating the click. Slow the attack down, or go back to the limiter trick in Step 1, which is built to keep that click.
What effects give a snare more snap and body?
For snap, a transient shaper or the Fruity Limiter attack trick, plus a bright clap layer. For body, a sample with a full low mid, where snares get their punch. For size, a short reverb with pre-delay. A little EQ then shapes the rest.
Each one is a step above:
- A transient shaper or Fruity Limiter in COMP mode (Step 1) makes the click louder than the body.
- A bright layer (Steps 2 to 4): a clap with everything below about 2 kHz cut, spread wide and delayed 8 ms.
- Sidechain from the snare (Step 5) ducks the music for a split second on every hit.
- Reverb with about 50 ms of pre-delay (Step 6), a tail that ends before the next hit and its lows cut up to 700-800 Hz.
- EQ that keeps the 150-250 Hz body, trims boxiness at 400-800 Hz and lifts 2-5 kHz for crack.
How to pick a snare sample that won’t sound flat
Mixing helps a lot, but it can’t save every sample. Mix Elite’s trap drums tutorial sums up the difference. Claps are higher and more focused, so they sound brighter. Snares are a bit punchier. So pick the snare for punch and let a clap layer bring the brightness, just like Step 2. A good snare sample passes three quick checks:
- It has a clear click at the start when you play it alone.
- Its body sounds full, not papery or thin.
- Its tail dies out before the next hit, or you can shorten it.
Mixing a real, miked snare from a band recording instead? Gates, room mics and bleed come into play, and that’s covered in how to mix punchy drums for rock and metal. Still building your first beat? Start with how to make a beat from scratch, then come back here when the snare needs work.
Tonight, try Step 1 and Step 7 on the beat you’re working on. The limiter trick takes a minute, and the volume step is the most important one, so start there.
DAY 4 OF THE 7-DAY MUSIC PRODUCER COURSE
Get your whole mix to punch like this snare
Day 4 of Mix Elite’s 7-Day Music Producer Course is all about mixing: the Holy Quad, Mix Elite’s simple mixing formula, the ‘Mix Murdering’ mistakes most beginners make, and the volume mistake you make in the first 5 minutes of every mix. You also download a Mixing Checklist and a Premium Mixing & Production Template. It’s taught in FL Studio, the course is $27, and you’re covered by a 60-day money-back guarantee.
Frequently asked questions
Why does my snare sound flat and lifeless?
Usually its attack is buried under its own body, nothing bright sits on top, reverb smears the hit, or it’s simply too quiet. A long tail and a pitch that clashes with your key make it worse. Bring the attack forward with a transient shaper or Fruity Limiter, add a bright clap layer, give the reverb pre-delay and turn the snare up.
Why does my snare sound good alone but disappear in the beat?
Other parts, like the 808, the chords and the synths, fill the same frequencies and cover it. In solo nothing competes, which is why it sounded fine. Make the attack louder than the body, add a bright clap layer, sidechain the music so it ducks for a split second on each hit, and turn the snare up.
How do I EQ and compress a snare so it hits harder?
EQ by cutting first: clear the rumble below 100 Hz and a little of the boxy 400-800 Hz range, and lift 2-5 kHz only if it can’t cut through. For punch, use Fruity Limiter in COMP mode with the attack raised until the click slips through. Compress the whole drum bus gently, about 2:1 with 3 to 4 dB of reduction, rather than the snare alone.
What effects give a snare more snap and body?
A transient shaper, or the Fruity Limiter attack trick, gives snap. A bright clap layer with its lows cut below about 2 kHz adds crack and width. The body comes from the low mids, around 150-250 Hz, so pick a sample with a full body. A short reverb with about 50 ms of pre-delay adds size without smearing the hit.
Why does my snare sound thin even when I turn it up?
The fader makes the whole hit louder but can’t add what’s missing. A thin snare lacks body in the low mids, where snares and claps get their punch. Check that no low cut or shelf is eating that range, pick or layer a sample with a fuller body, and let a clap layer carry the brightness.