To make chords in FL Studio, open the Piano Roll, pick a scale so FL highlights the notes that fit, and place one root note in each bar. Then stack two more notes on top of each root by skipping every other highlighted row. That’s a full chord, and you don’t need any music theory to build it.
Below is how to make chords in FL Studio step by step, from the first note to a progression that sounds emotional, taken from two Mix Elite videos. You’ll also get Max’s Alt+K trick, which snaps random notes into a scale in one click, and FL Studio’s own chord tools.
Table of Contents
What a chord is (the only theory you need)

A chord is three or more notes played at the same time. The note it’s built on is called the root. Go two notes up the scale from the root and you get the third, and two more notes up is the fifth. Root, third and fifth make the most basic chord, called a triad.
The third does the most work. It decides whether a chord is major, which sounds bright and happy, or minor, which sounds darker and more emotional. Remember that. One of the best moves in this guide is changing a single third.
Two more words you’ll see: a semitone is the very next key on the piano, black or white, and an octave is the same note 12 semitones higher or lower. If you want the theory behind all of this, our basic music theory guide for producers covers it.
Steps 1 to 8 come from the Mix Elite video below. It starts with the plainest piano sound it can find, to show the method doesn’t depend on a fancy sound.
Step 1: Pick a scale so FL Studio shows the right notes
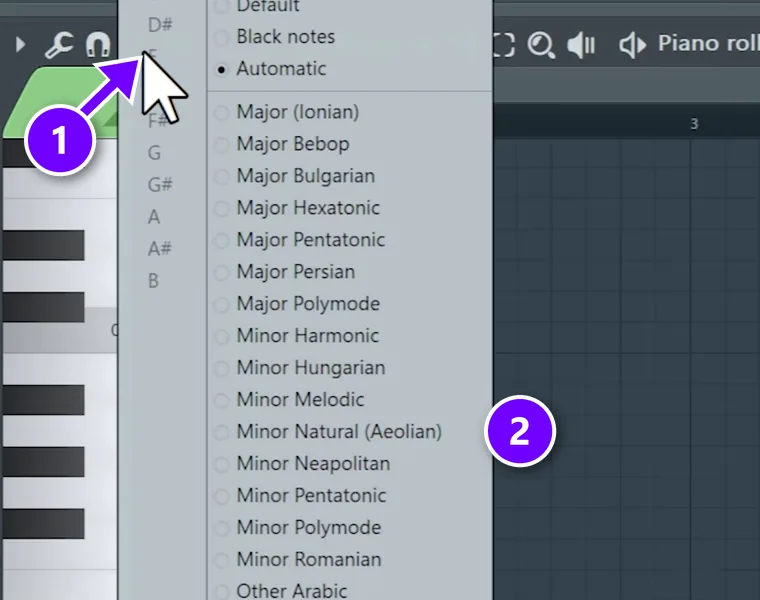
Load a piano, like FL Keys, which comes with FL Studio, and open its Piano Roll: right-click the channel and choose Piano roll. A scale is a set of notes that sound good together, and FL Studio can show you which ones they are.
Right-click the note icon in the Piano Roll toolbar (1). Pick the root note on the left, C in the video, and Minor Natural (Aeolian) on the right (2). The notes of that scale now light up in the grid. For now, only use the highlighted rows.
Minor scales sound darker and more emotional, and major scales sound brighter. If scales are new to you, here’s a beginner’s guide to music scales.
Step 2: Place one root note in each bar
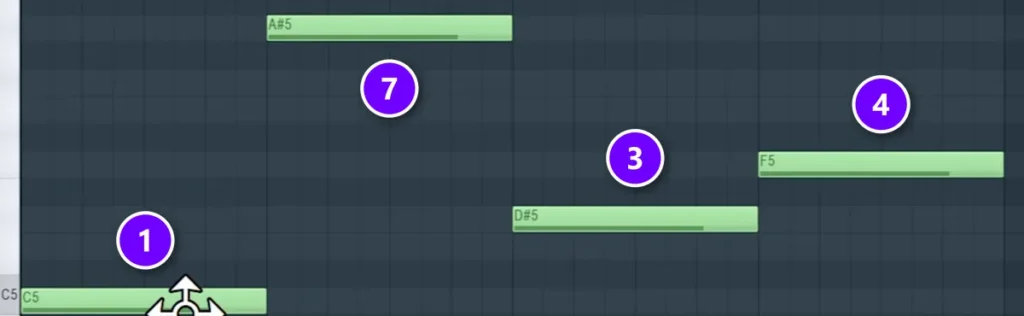
Now pick your progression: three or four notes, one per bar. These are the root notes your chords will grow from. Count up the highlighted rows from C. The video uses steps 1, 7, 3 and 4 of the scale, numbered that way in the screenshot, which gives C, B flat, E flat and F. FL Studio names them C5, A#5, D#5 and F5.
Don’t stress about picking the perfect notes. The video calls the progression the least important part. Pros working with top artists don’t find better progressions than you, it says. They just know what to do with them.
Step 3: Stack two notes on each root
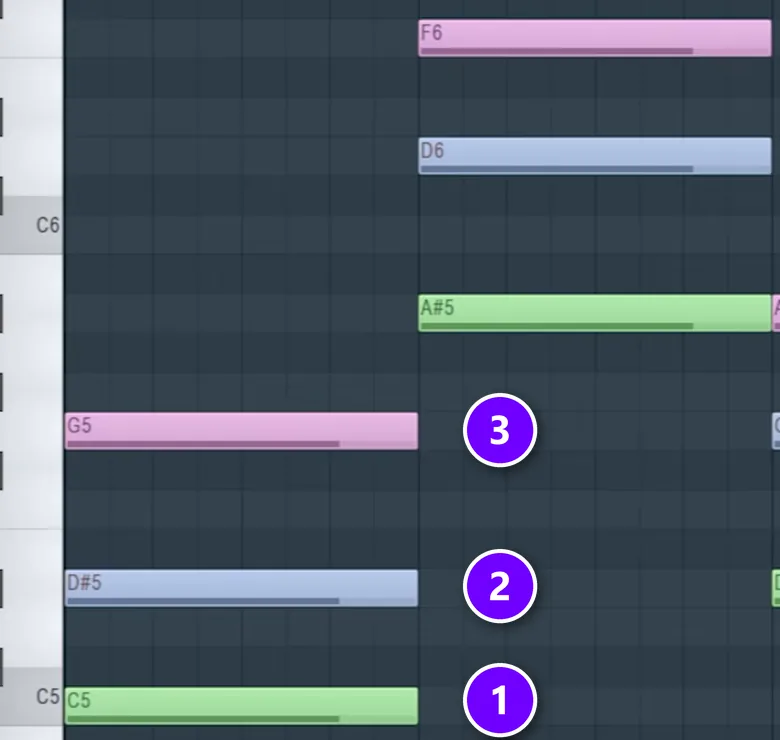
From each root (1), skip one highlighted row and place a note. That’s the third (2). Skip one more row and place another, the fifth (3). Do the same in every bar. Now each bar holds a three-note chord.
Give each layer its own note color as you go, so you can find all the roots or all the thirds later. Click the color square in the top-left corner of the Piano Roll and pick a new color before you draw the next layer. Shift+C then selects every note of the same color.
It may sound plain, or even bad, at this point. That’s normal.
Step 4: Add 7ths and 9ths, then mute them
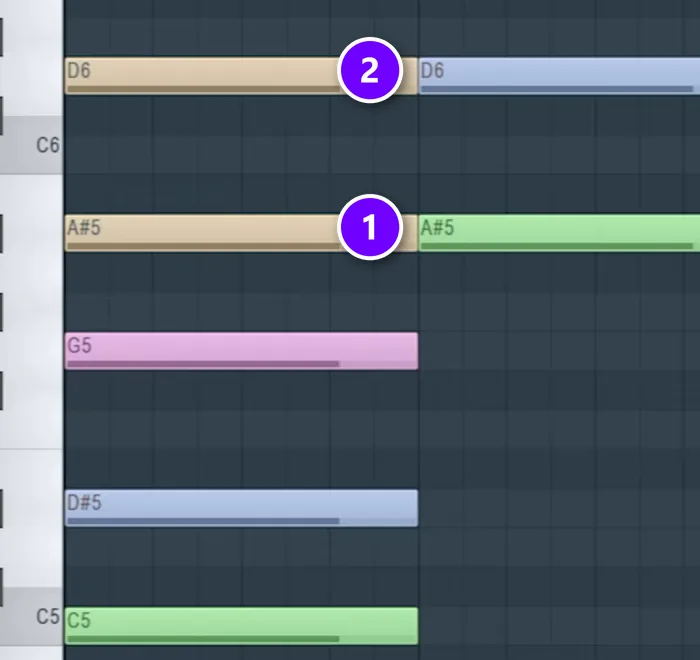
Keep stacking the same way: skip one row and add a note, then skip one and add another. These are the 7th (1) and the 9th (2), extra notes that make chords sound richer and more emotional.
All at once, they sound messy. Select them and press Alt+M to mute them for now, and you’ll bring them back one at a time in step 5.
Step 5: Voice the chords so they flow
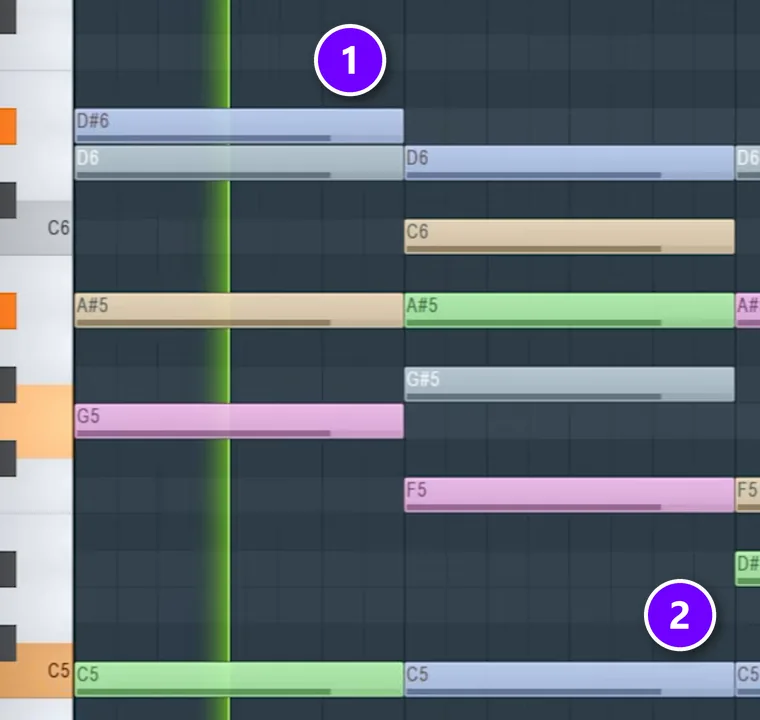
Voicing is how the notes of a chord are stacked. Right now every chord jumps up and down the keyboard, and you want small steps instead. Max put it simply in an older video: “the secret to great sounding chord is that the voicing is proper.”
So bring the notes closer together. Select notes that sit too high and press Ctrl+Down Arrow to move them down an octave, or Ctrl+Up Arrow to move them up. Then make the third the highest note of every chord (1). That makes the next tricks easy, because you’ll always know where the third is.
Now unmute the 7ths and 9ths one at a time (select a note and press Alt+Shift+M) and keep only the ones that sound good. As the video says, not every one will sound great, so you just need to listen.
For a bass, select the root notes (Shift+C helps if you colored them), hold Shift and drag them two octaves down, for example from C5 to C3. Holding Shift drags a copy, so the chords keep their roots. That’s your bass. You can also add a pedal note (2), one note like the root that keeps playing under the whole progression. Our tips for better basslines in FL Studio help with the low end.
Step 6: Pick a softer piano sound
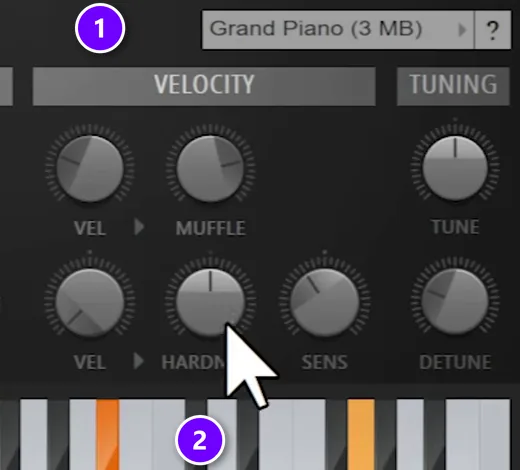
The sound changes how the same chords feel. In FL Keys, choose the Grand Piano preset (1). Then, whatever instrument you use, turn the hardness down a little, here with the HARDNESS knob (2). Softer notes make the same chords sound way more emotional. Try a few and compare.
Step 7: Make the chords sound played, not programmed
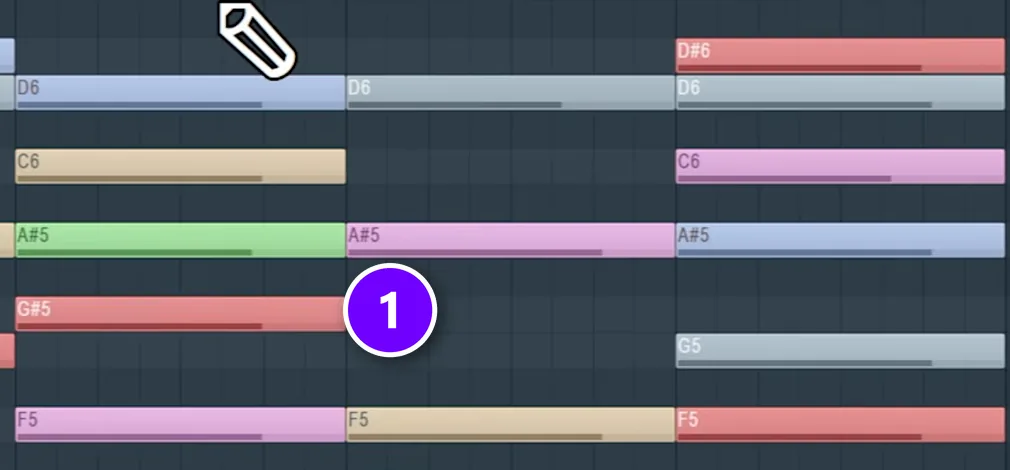
If your sound isn’t very realistic, perfectly even notes sound robotic. Press Shift+R a couple of times to select notes at random (1). Then hold Alt and scroll down to lower their velocity, which is how hard each note is played. Repeat that a few times.
Do the same with timing. Select random notes again and nudge them a pixel or two off the grid with Alt and the arrow keys. With a very realistic piano you can skip this, and the video does.
Then shift the timing of whole chords. Select the second chord and drag it half a beat earlier, so it lands just before the bar line, then do the same with the fourth. It’s a small move, but it stops every chord from landing right on beat one.
Step 8: Change the key and make one chord major
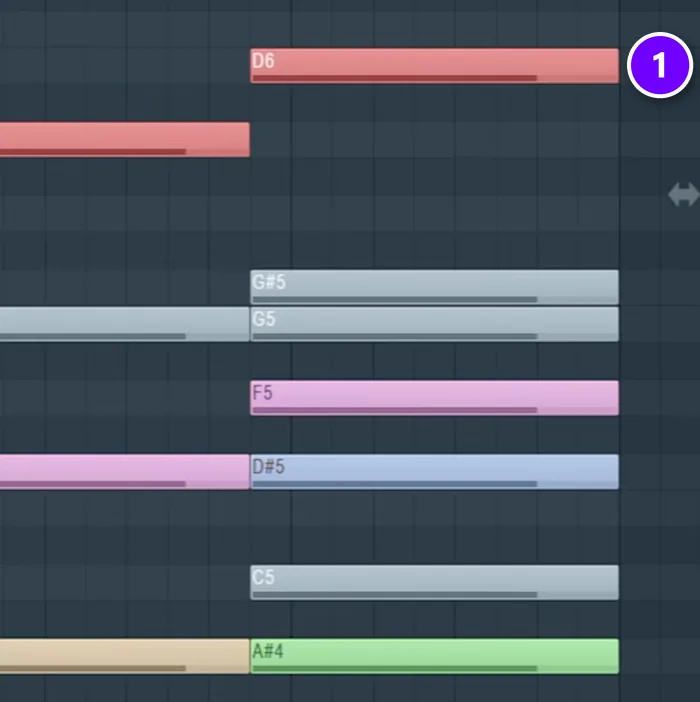
If it still sounds generic, it may be the key. Press Ctrl+A to select everything, then press Shift+Down Arrow to move it all down. The video moves it down seven semitones, from C to F. Listen to the difference.
Then comes the move the video calls the top 1%: make one chord major. Find a chord’s third, which is now its top note, and raise it by one semitone (1). It usually works best on the last chord of the progression, but test it on any of them.
From there, the video adds a soft vocal layer, an arpeggio, which plays a chord’s notes one after another, and a melody that moves in sixths, pairs of notes six scale steps apart. That’s how four plain notes turn into a full, emotional progression.
Max’s no-theory trick: fix any chord with Alt+K
Max shows a faster route in an older video. You stack notes by counting piano keys, without caring about the scale, and let FL Studio fix the notes afterward.
It starts with a bass line, one note per bar. Max calls that “the hardest part of the whole concept.” He picked his notes because they simply work. In theory terms they’re 6, 4, 1 and 3, but you don’t need to know that. Then:
- Copy the bass line 12 semitones up, one octave.
- Copy that new line 7 semitones up.
- Add a note 3 or 4 semitones below that one, in the middle. Max says it doesn’t really matter which.
- For a bigger sound, copy the bass line two octaves up.
- Optional: add a 7th, 2 semitones below that top note.
- Or add a 9th, 2 semitones above it.
Snap it into a scale with Alt+K
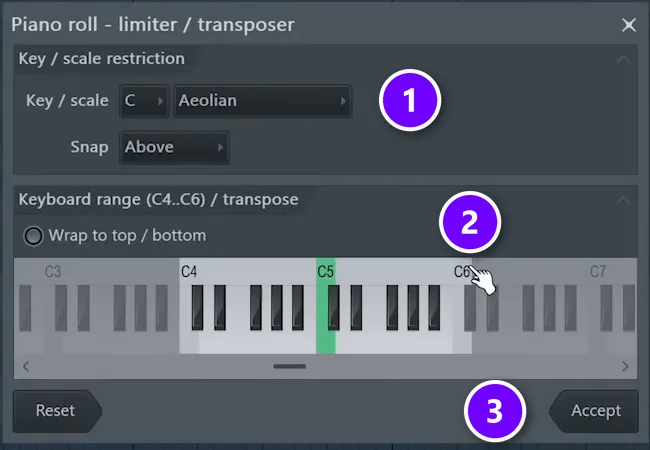
At this point it sounds pretty bad. That’s expected. Press Alt+K to open the Limit tool, set the key and pick a scale (1). Max suggests Major or Aeolian if you’re just starting out. FL Studio moves every note into that scale, and the random notes turn into real chords.
Then fix the voicing in the same window. Instead of moving notes with Ctrl and the arrow keys, drag the range on the keyboard ruler (2), and FL moves notes by octaves to fit inside it. In Max’s words, “with this trick you can simply do it with one slide.” Click Accept (3) when it sounds right.
The same tool can change the scale of something you’ve already written. Check the key you started in, choose a different scale, try the snap modes, and transpose if you like. Aeolian is another name for natural minor, and musical modes explained covers the other options in that list.
Can FL Studio make chords for you?
Yes, in two ways. The Stamp tool in the Piano Roll toolbar places a whole chord with one click. Choose a chord type from the Stamp menu, then click where the chord should go, and it follows your snap and scale settings.
In FL Studio 24.1 and later, every edition also has a Chord Progression Tool. Open Tools, then Generate chord progression (Alt+P), and it writes a 4-chord progression for you. Click Generate for a new one, move the Conventional to Adventurous slider for plainer or jazzier chords, then click Accept to add it to your pattern.
Both are handy for ideas. But a generated progression still needs the work from steps 5 to 8: the voicing, the sound, the timing and one major chord. That’s the part that makes chords sound finished.
THE 7-DAY MUSIC PRODUCER COURSE
Write chord progressions that work, with 30+ to start from
Day 2 of the 7-Day course covers chords and melodies: the 3-step chord progression formula, four easy ways to write melodies even if you’ve never touched a keyboard, and a download of 30+ chord progressions. Then you turn your chords into a finished song over the next five days, in about 45 minutes a day. It’s $27, with a 60-day money-back guarantee.
Frequently asked questions
How do you make chords in FL Studio without music theory?
Right-click the note icon in the Piano Roll toolbar and pick a scale, so FL Studio highlights the notes that fit. Place one root note per bar, then stack two more notes on each one by skipping every other highlighted row. Or write any notes you like and press Alt+K to snap them into a scale with the Limit tool.
What is the fastest way to add chords in FL Studio?
Use the Stamp tool in the Piano Roll toolbar: pick a chord type and click to place the whole chord at once. In FL Studio 24.1 and later, Tools, Generate chord progression (Alt+P) writes a 4-chord progression for you in every edition. Click Accept to add it to your pattern.
How do you make a chord major or minor in FL Studio?
Move its third, the middle note of a basic three-note chord. Raise the third by one semitone and a minor chord becomes major. Lower it by one semitone and a major chord becomes minor. In the Piano Roll, just drag that note up or down by one key.
How do you make guitar chords in FL Studio?
Write the chord in the Piano Roll and load a guitar sound. Then select the chord and open the Strum tool (Alt+S). It shifts the timing and velocity of each note in the chord, so it sounds like strings being strummed instead of every note hitting at the same moment.
Should you write the chords or the melody first?
There’s no rule, but without music theory, chords first is usually easier. Once the chords are down, a melody can use notes from the chord in each bar, and those notes will fit. Writing a melody first and then finding chords that fit under it is harder if you don’t know theory.