The most common beginner mixing mistakes are a limiter left on the master, a “smiley face” mix with big lows and highs but weak mids, a muddy low end, and reverb with the wrong settings. Most of them have nothing to do with talent. They’re settings and habits you can fix tonight, once you know about them.
Max put this list together after going through hundreds of projects one-on-one with Mix Elite Academy members, where the same few mistakes kept coming up again and again. Here are all ten in the order he covers them in the video, each with the exact fix in FL Studio.
Table of Contents
Mistake 1: Leaving a limiter on your master
Max calls this the mistake of mistakes. Fix it before anything else. The master is the mixer track that every sound flows into, and FL Studio puts a limiter on it by default. A limiter turns the whole song down whenever something gets too loud. If your kick is a little hot, every kick hit drags the volume of the entire song down with it.
Max jokes that the FL developers must have put it there as a bad prank. In Max’s words, the “limiter humiliates your mix.”
The fix is a hard clipper. Max points out that a hard clipper doesn’t touch your dynamics and keeps everything punchy. It just chops off the very tips of the waveform, so you can hear roughly how the song will sound once it’s mastered and loud.
In newer FL Studio: turn the Emphasizer up to 100
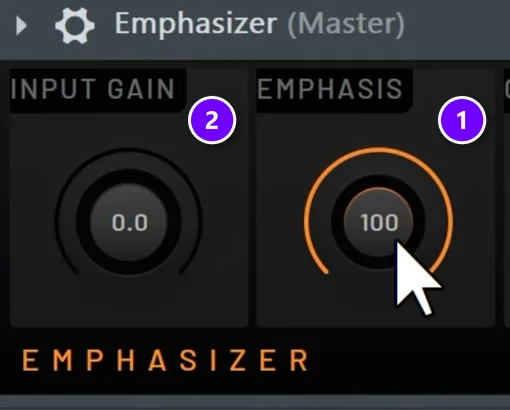
Newer versions of FL Studio put the Emphasizer on the master instead of a limiter. Max sets it like this:
- Turn EMPHASIS up to 100 (1 in the screenshot). At 0 it behaves like a normal limiter, and the default of 50 still does some of that ducking.
- If you hear heavy crunch, your mix is hitting it too hard. Turn INPUT GAIN down (2) to feed it less volume.
In older FL Studio: turn the Fruity Limiter into a clipper
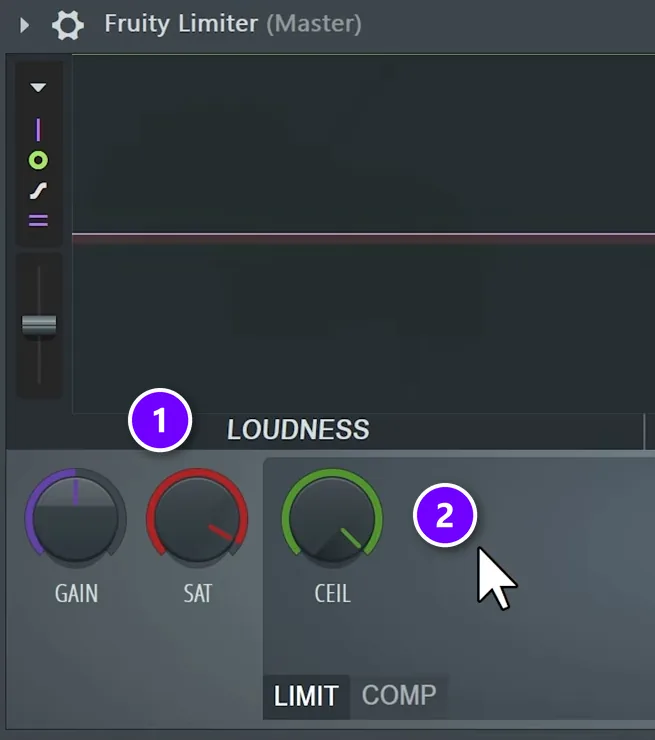
On older versions, open the Fruity Limiter on the master:
- Turn SAT (saturation) a little to the left (1). The further left it goes, the more it saturates the peaks.
- Push CEIL (the ceiling) almost all the way up (2). The limiter stops ducking the song, and the saturation catches the peaks instead.
Whichever version you use, switch the clipper off before you export the final mix for mastering. That way whoever masters the song has all of its dynamics to work with.
Mistake 2: Mixing a smiley face
A smiley-face mix has lots of low end, lots of high end and not much in the middle. Draw that on an EQ (a tool that turns frequency ranges up or down) and the curve looks like a smile. Max says he made this one for years himself.
It’s easy to see why. Thick lows and bright highs are the exciting frequencies. But as Max puts it, “the mid-range is the area with power, the character, and everything that actually moves you.”
If you can’t hear the balance yet, measure it. A plugin like Tonal Balance Control shows whether your track is balanced. Max’s free option is a noise file he calls perfectly balanced noise: load it into a free analyzer like SPAN and compare the shape of your track with it. Noise makes a handy reference for balance, which is the same idea behind mixing with pink noise.
Fix the balance in the mix, not on the master. Ideally it’s already there because of how you produced and mixed each sound.
Soloing makes it worse. A sound on its own always seems better with more lows and more highs. But stack 30 sounds that each have a heavy low end and a bright top, and you get a mix with a giant hole in the middle. Mix each sound while the rest of the song plays, and keep your ears on the mids.
Mistake 3: Letting two sounds fight in the sub
The next three mistakes are all about the low end, and Max treats them as the serious ones. A mix that’s a little off in the mids can still work. The low end is different. Mistreat it, he says, and there’s not even a chance of a pro-sounding mix.
The sub is the deepest part of the low end, the rumble you feel more than hear. Only one sound should own it at a time. In practice that’s your kick and one sub bass, such as an 808 or a bass synth, taking turns (Mistake 4 shows how).
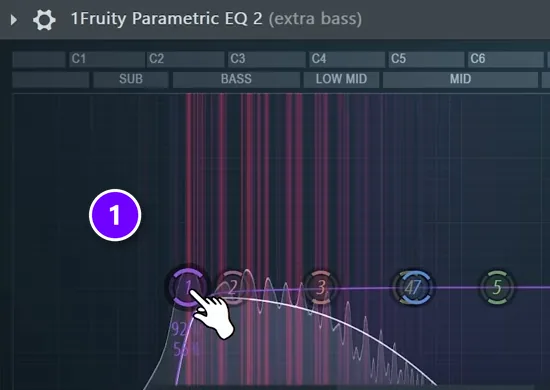
If more sounds are playing down there, pick the main one. On every other low sound, add a low cut at 100 Hz. A low cut, also called a high-pass filter, removes everything below the frequency you set. In the screenshot, Max drags band 1 of Fruity Parametric EQ 2 on his extra bass track to about 100 Hz (1).
Mistake 4: Not ducking the bass under the kick
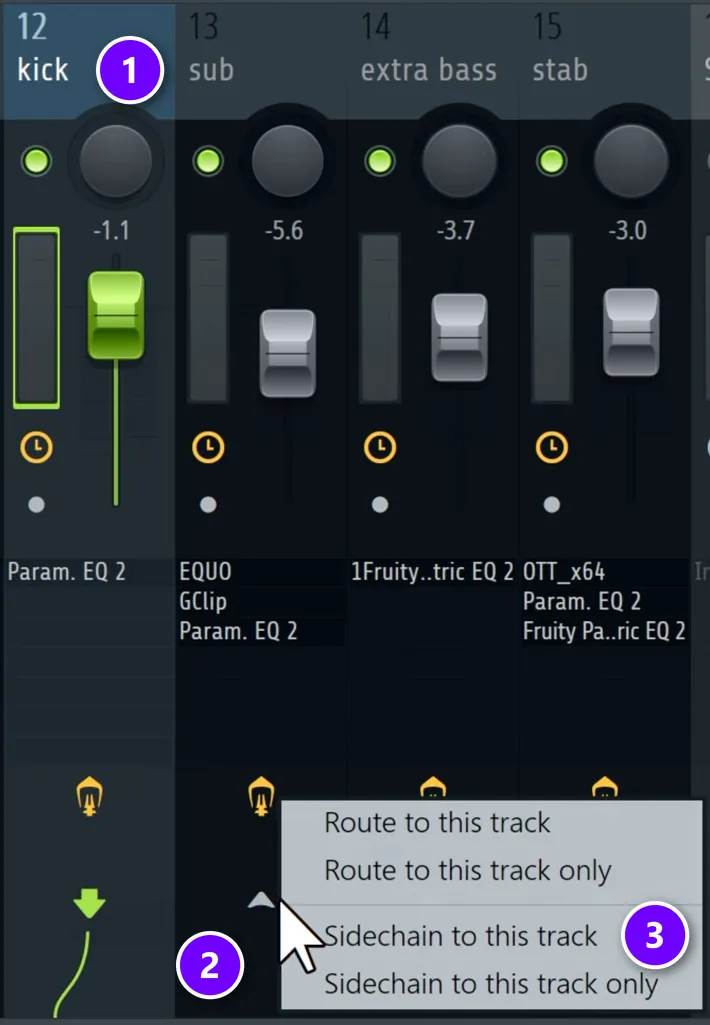
Your kick and your sub bass both live in the low end, so when they hit together they blur into one muddy thump. The fix is to make the bass duck, meaning it gets quieter for a split second every time the kick hits. This is called sidechaining, and Max says you can set it up in 5 seconds:
- Click the kick track in the Mixer (1 in the screenshot).
- Right-click the small arrow at the bottom of your main sub track, the 808 or bass synth (2).
- Choose Sidechain to this track (3).
Add the Multiband Sidechain preset
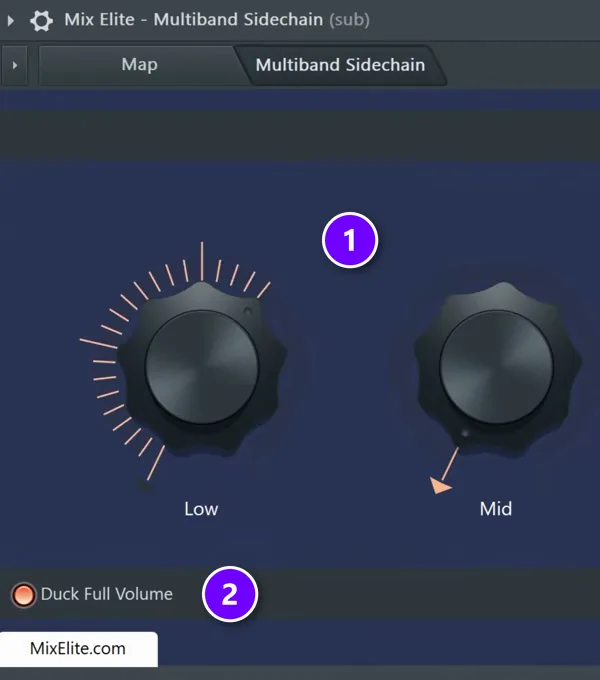
Now the sub track needs something that does the ducking. Max drags the Multiband Sidechain preset from Mix Elite’s free Patcher preset pack onto it:
- Turn up Low (1).
- Click Duck Full Volume (2).
Now the sub ducks every time the kick hits. For extra room, save the preset and drag it onto your other low sounds too. On higher sounds like a lead, it’s optional, for a little extra punch. No preset? Here are three other ways to sidechain in FL Studio.
Mistake 5: Leaving mud under 250 Hz
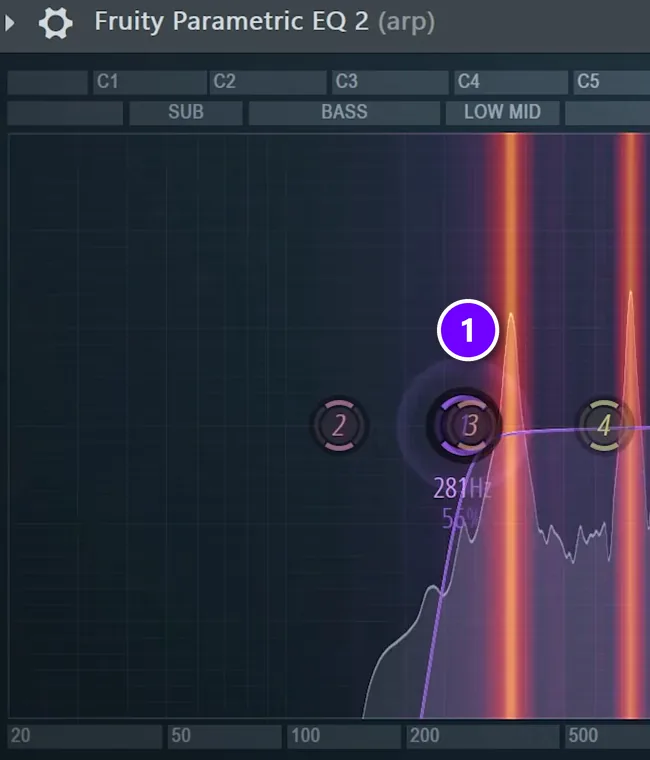
According to Max, this one makes the biggest difference in the low end. For clear mixes, he treats everything under 250 Hz as off-limits unless a sound has earned its place there.
Go through your sounds one by one and listen to their low end. If a sound has full, warm content between about 100 and 250 Hz, keep it. If it’s just mud or noise down there, push its low cut up from 100 Hz to about 250 Hz, so nothing below roughly 200 Hz is left. In the screenshot, the low cut on an arp sits at 281 Hz (1).
Max doesn’t budge on this one: “Whenever someone is telling me they don’t cut under 200, it tells me that they have never tried playing their track in a night club and stood there watching with the crowd confused.”
Mistake 6: Guessing your reverb settings
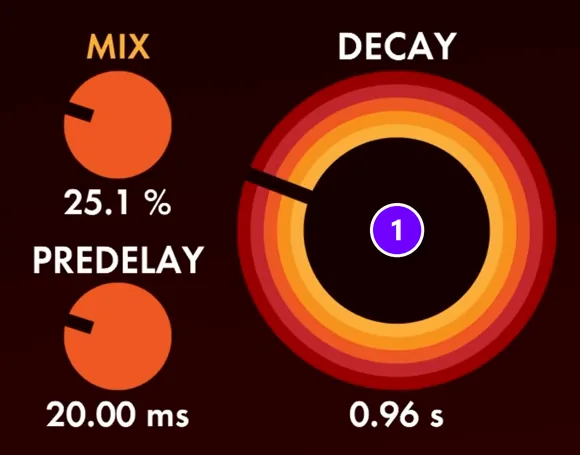
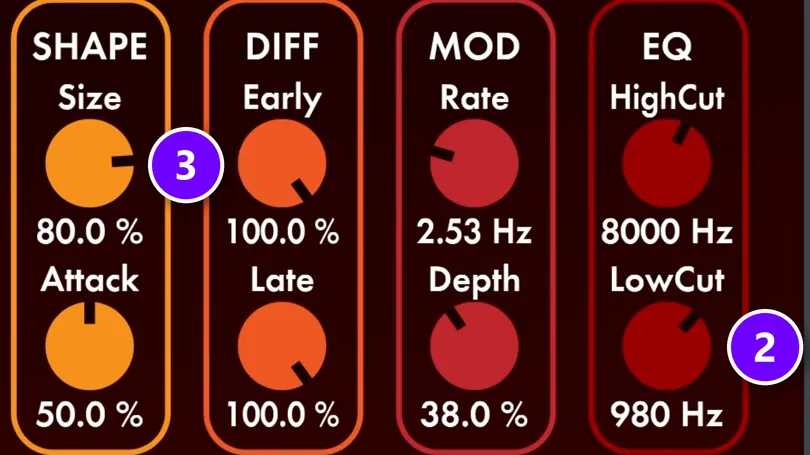
Reverb, the echo of a room, blurs small mistakes and makes sounds exciting. Without it, things can sound dry. With the wrong settings, though, it makes a track sound worse. Max sets three things on every reverb, whether it’s FL Studio’s Fruity Reeverb 2 or a plugin like Valhalla:
- Decay is the length of the reverb (1 in the screenshots, DEC on Fruity Reeverb 2), and Max never guesses it. On a snare, make the tail fade out before the next snare hit, which in his example lands between about half a second and one second. On a melodic sound like an arp, keep it to one bar at most, so one chord’s echo doesn’t smear into the next.
- Low cut (2, L.CUT on Fruity Reeverb 2). Always raise it to at least 700 to 800 Hz, so the reverb adds no mud to your low end.
- Size (3). A big size with a slightly longer decay pushes a sound back and adds depth. The smallest size with the smallest decay adds width without blurring anything.
In the video, Max shapes a sound’s width first with a small reverb, then adds a second reverb with a huge size. On vocals he also sidechains the reverb to the vocal, so the echo ducks while the singer sings and opens up in the gaps. Not sure if a sound needs reverb or an echo effect? Here’s how reverb vs delay compare.
Mistake 7: Blaming the mix for a musical problem
Max ranks this above every setting so far. Often you don’t need to worry about the mix at all for a song to sound pro. One wrong note, a weak chord progression or a cheesy melody, and no amount of sidechaining or reverb will fix it. People blame the mix. Often, the real problem is the notes.
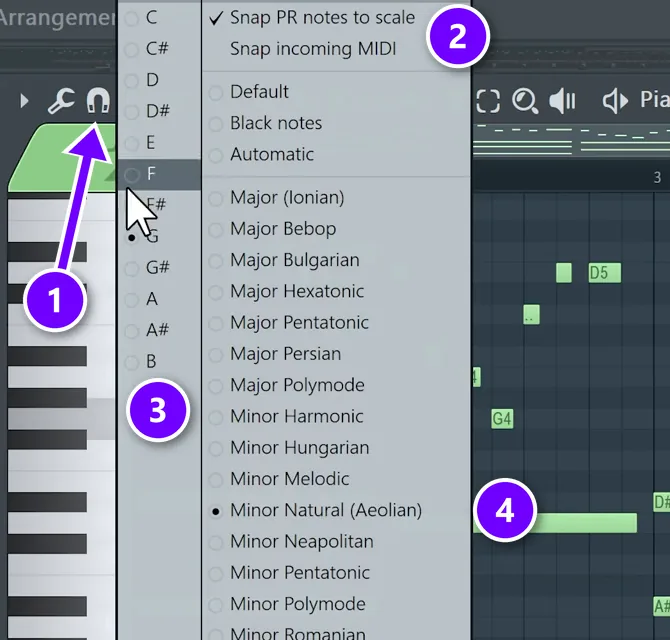
So check three things first: the bass plays the right notes, the chords aren’t so dense that they muddy the low end, and everything sits in the right scale. FL Studio’s Piano Roll can keep you in key:
- Right-click the magnet (snap) button at the top left of the Piano Roll (1 in the screenshot).
- Make sure Snap PR notes to scale is ticked (2).
- Pick your root note (3), the note the song is built around.
- Pick your scale (4). Max uses Minor Natural in the video. Then write your progression.
Don’t stack dozens of instruments and layers, either. Your ear doesn’t hear absolute levels. It hears the relationships between sounds. Max compares a mix to a photo: if everything is in focus, nothing is the subject. He calls the arrangement of your instruments 90% of the mix, so when a mix feels cluttered or small, the fix is often in the music, not the plugins.
Mistake 8: Starting every track from scratch
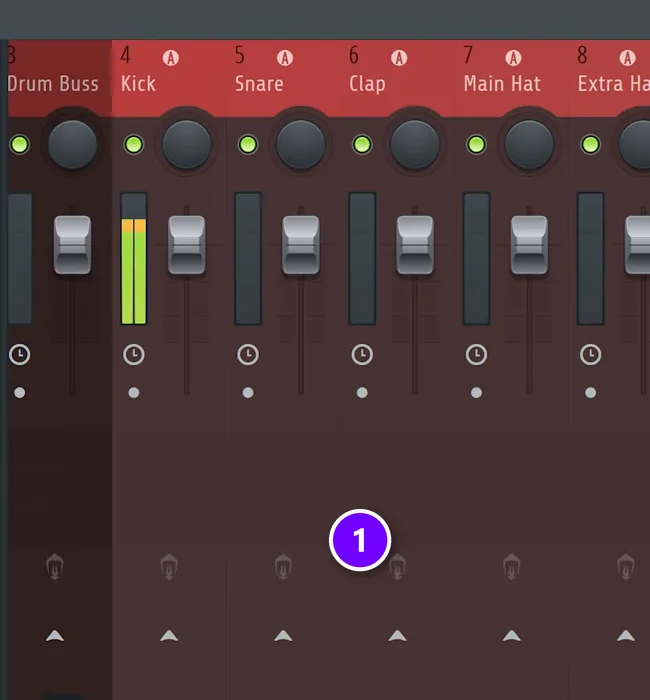
Your ideas can only move as fast as your hands can work the DAW (your music software). That’s why pros start from a template. Max’s free starting template comes with linked and colored groups, so even random samples you drag in land on their own colored mixer tracks right away (1).
This matters most in FL Studio, which doesn’t do that setup work for you. Skip it and the project gets messier, and harder to work on, with every minute.
Reuse your own work, too. If you made drums you love and mixed them well, why build them again for every song? Pros often reuse whole projects, swapping the instruments, harmonies and melodies while the drums and background effects stay the same. As Max puts it, you’re not Taylor Swift yet, so nobody will care that you reused your drums. Your goal is to finish music.
Mistake 9: Trying to be original before you can remake a song
Max sees ego as a huge mistake for beginner and intermediate producers: trying to be artistic all the way, every time. If you want to improve fast, take a song you really like and remake it slowly. Get as close as you can, then pick another track and do it again.
He has noticed a pattern in the producers he talks to. The better they are, the more often they remake tracks. Ego only slows you down.
Mistake 10: Giving up too early
Max saves the worst one for last and calls it the number one mistake: giving up too early. Most of the mistakes above are settings and habits you can fix once you know about them. No setting fixes quitting.
Finish the song anyway. The mix doesn’t have to be perfect yet. Take what you learned into the next one, and the one after that.
Six more beginner mixing mistakes to check
Mix Elite’s older guides covered a few more traps that are still worth a quick look before you call a mix done:
- Mixing too loud. Loud playback makes the bass and highs seem bigger than they are, and it tires your ears fast. Mix at a moderate level, take short breaks and check the mix quietly too.
- Never comparing to a reference. Play a finished song in your style next to your mix now and then. Problems you’d stopped hearing jump out right away.
- Adding plugins without a reason. Every EQ, compressor or effect needs a job. Squashing every track with compression makes a mix flat and lifeless, and boosting EQ everywhere mostly makes things louder, so cut first and boost only when you need to.
- Choosing the wrong sound and hoping the mix fixes it. A kick that’s wrong for the song stays wrong after an hour of EQ. Swap the sample instead.
- Letting channels hit the red. If a mixer meter keeps peaking, turn that sound down instead of turning everything else up.
- Skipping other speakers and mono. Check your mix on your phone, in the car and on earbuds. Many phones and club systems play in mono, where very wide stereo effects can cancel out and disappear.
If you only fix one thing tonight, take the limiter off your master, then work through the low end. After that, learn to balance the levels in your mix. Max calls volume leveling the most important step of mixing, because it comes before you put on any EQ, reverb or compressor.
THE 7-DAY MUSIC PRODUCER COURSE
Day 4: stop making the “Mix Murdering” mistakes
Day 4 of the 7-Day course is all about mixing: the “Mix Murdering” mistakes most beginners make, the simple “Holy-Quad” mixing formula, and the volume mistake people make in the first five minutes of every mix. You also get a mixing checklist and a mixing and production template. It’s taught in FL Studio (the free trial works), about 45 minutes a day, and on day 7 a pro gives you feedback on your finished track. It’s $27, and you get 60 days to decide if it was worth it.
Frequently asked questions
What is the biggest mixing mistake beginners make?
In Max’s video, the first thing to fix is the limiter FL Studio puts on the master, because it turns the whole song down every time the kick gets loud. The mistakes that hurt mixes most sit in the low end: too many sounds in the sub, no sidechain and mud under 250 Hz. But Max calls giving up too early the worst mistake of all.
Should I put a limiter on the master while mixing?
Max says no. A limiter ducks the whole song whenever something gets loud. Use a hard clipper instead: in newer FL Studio, set the Emphasizer’s Emphasis knob to 100, and if you hear heavy crunch, turn its input gain down. Switch the clipper off before you export the final mix for mastering.
Why does my mix sound muddy?
Usually it’s the low end: more than one sound in the sub, a bass that doesn’t duck under the kick, too much content under 250 Hz, or reverb without a low cut. Sometimes it’s the music itself, like chords that are too dense or wrong bass notes. Check the notes before you reach for more plugins.
What are the most common EQ mistakes?
The big three are a smiley-face curve with too much low end and high end but weak mids, EQ choices made with a sound in solo, and leaving low end in sounds that don’t need it. Make EQ decisions with the whole song playing, cut before you boost, and low-cut the sounds that don’t need a low end.
Should I mix with tracks soloed?
Only to find a problem. A soloed sound almost always seems better with more lows and highs, and if every track gets that treatment, the full mix ends up with a hole in the middle. Make your EQ and level decisions while the whole song plays, and listen closely to the mids.