FL Studio has become one of the most prominent DAWs amongst songwriters and producers over the past decade, as music-makers started unraveling the magic within. The FL Studio tips that help beginners most aren’t fancy tricks, though. They’re the small habits that stop you from losing ideas and wasting nights: knowing what every button does, getting back a melody you forgot to record, opening windows with one key, and backing up your projects properly.
Here are the ten we show beginners first, with the exact clicks for each. The video below runs through all of them in about six minutes, so watch it once and keep this page open while you practice.
Table of Contents
1. Turn on the hint bar
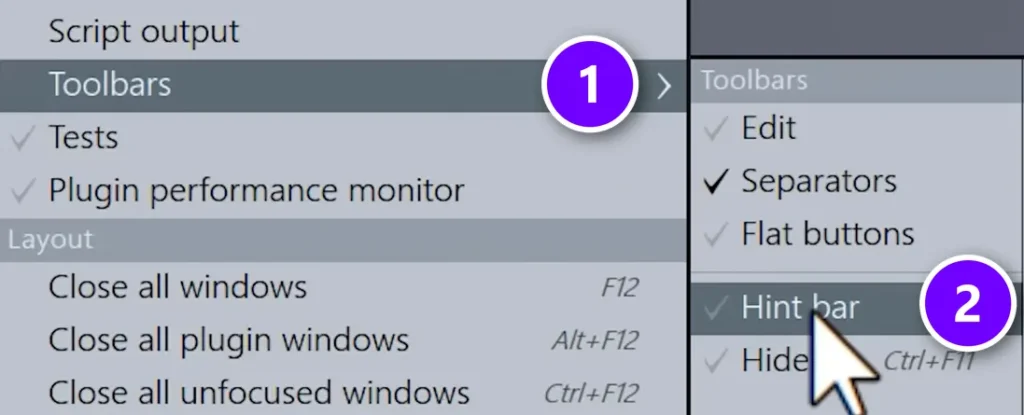
FL Studio has hundreds of buttons, and nobody remembers them all. The hint bar fixes that. Open the View menu, go to Toolbars (1) and switch on Hint bar (2). You get a bigger version of the little hint panel at the top left, and it describes whatever your mouse is hovering over.
Hover over a knob you don’t understand and read the panel before you touch it. It often shows the keyboard shortcut for that control too, which is the easiest way to learn shortcuts without memorizing a list. You can drag the panel anywhere on your screen.
2. Get back a melody you forgot to record
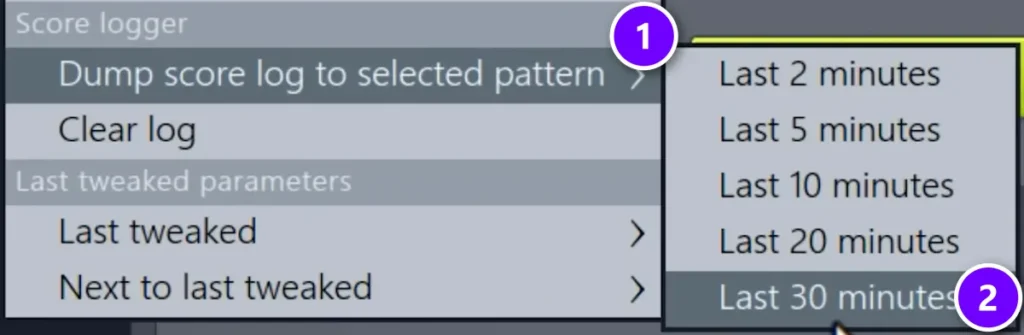
You’re noodling on your MIDI keyboard, you play the best melody of your life, and recording was off. It isn’t lost. FL Studio quietly keeps a log of every note you’ve played in the last 30 minutes, even when you weren’t recording.
Select an empty pattern, then go to Tools > Dump score log to selected pattern (1). Choose how far back to go, from the last 2 minutes up to the last 30 (2), and the notes land in the pattern, ready to edit in the Piano Roll.
3. Group your channels so the Channel Rack stays clean
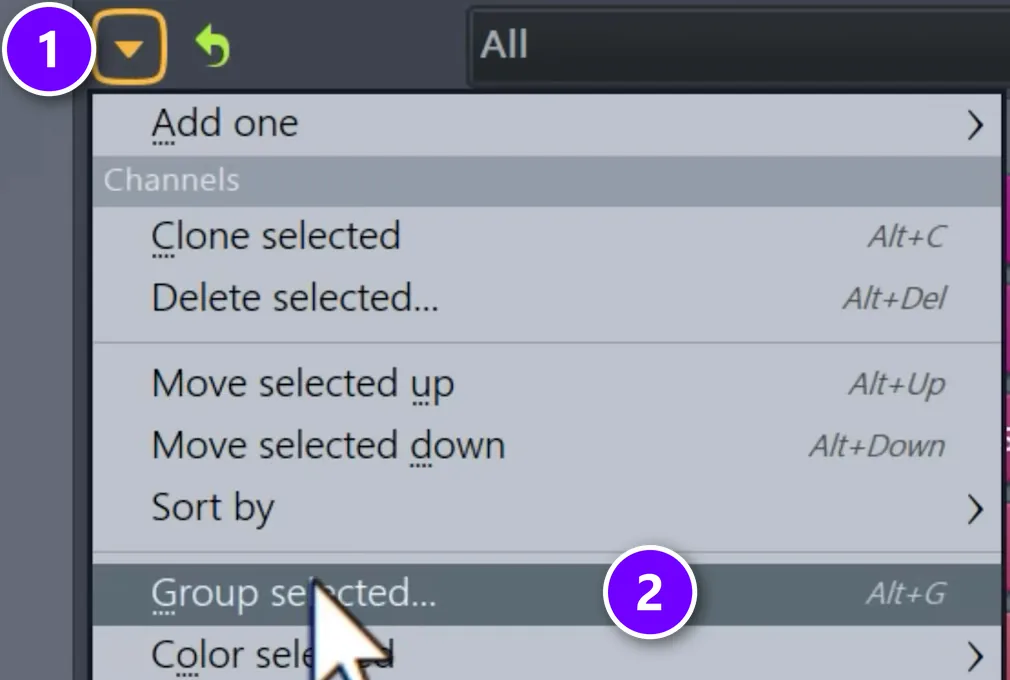
A beat gets messy fast once you have twenty sounds in the Channel Rack. Select all your drums, click the small arrow at the top left of the Channel Rack (1) and choose Group selected (2), or press Alt + G. Give the group a name like “Drums” and you can show just those channels whenever you need them.
4. Open every window with one key
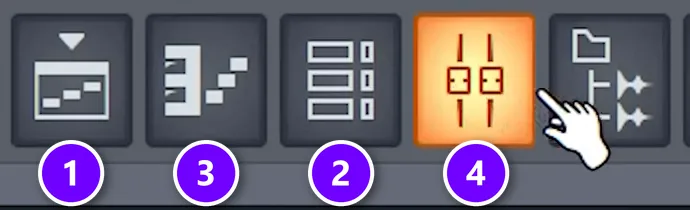
Clicking through menus to find windows slows you down more than you think. These four keys open and close the windows you’ll use all day, and each window also has its own button in the toolbar at the top:
- F5: Playlist (1), where you arrange the song
- F6: Channel Rack (2), where your sounds and patterns live
- F7: Piano Roll (3), where you write notes
- F9: Mixer (4), where you balance and shape each sound
A few more are worth learning in your first week. F8 opens the Plugin Picker, with every instrument and effect you have. Alt + F8 shows or hides the Browser, F12 closes every open window when the screen gets cluttered, and Tab cycles through the windows you have open.
Get these into your fingers early. In his free FL Studio course, Max (the founder of Mix Elite) puts it this way: “Believe it or not, I’ve been making music for a very long time before I even started to look into the mixer, so get used to opening and closing the different windows.”
If you want more after these, our list of FL Studio shortcuts covers the rest.
5. Make stiff MIDI sound like a person played it
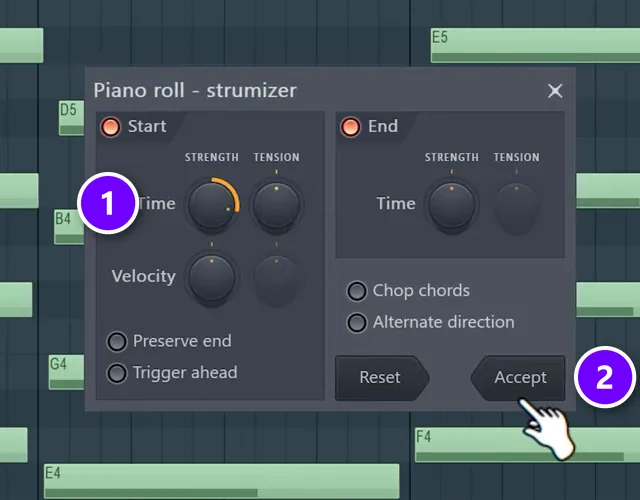
A melody where every note lands perfectly on the grid sounds robotic, because real players are never that exact. In the Piano Roll, hold Alt while you drag a note and it moves freely instead of snapping, so you can push a few notes slightly early or late.
To do a whole phrase at once, select the notes and press Alt + S to open the Strumizer. Turn the Time knob (1) until the notes stop sounding stamped out, then click Accept (2).
6. Randomize the velocity
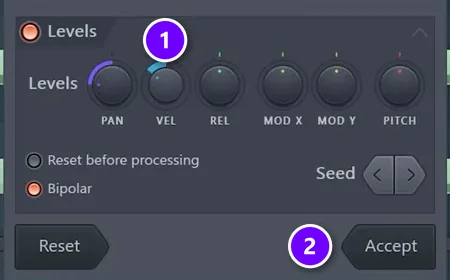
Timing is half of it. The other half is how hard each note is hit. Select your notes and press Alt + R to open the Randomizer. Turn up the VEL knob (1) to randomize the velocity, then click Accept (2). Some notes come out a little softer, some a little harder, and the part suddenly breathes.
7. Use the EQ that’s already built into every mixer track
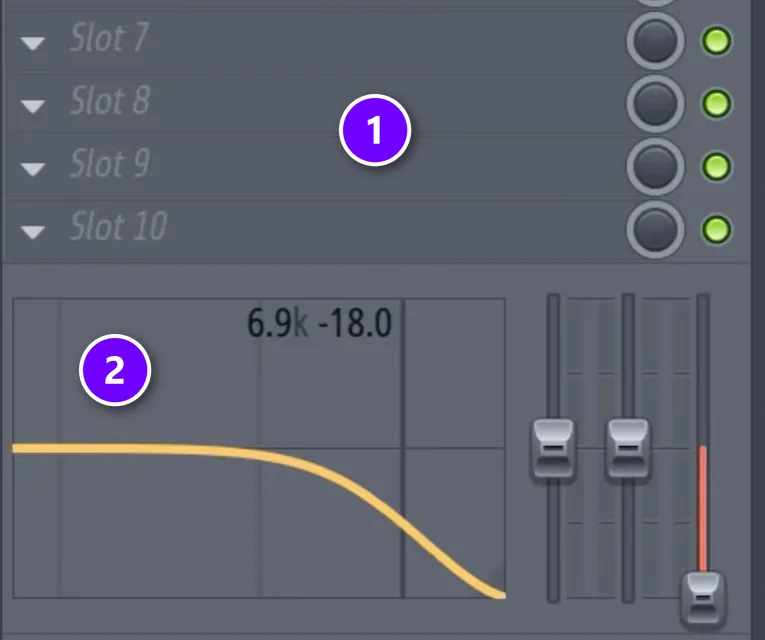
For a small tone change you don’t need to load Fruity Parametric EQ 2 into one of the track’s effect slots (1). Every mixer track already has a simple EQ built in, right below those slots (2). The video uses it to roll off the high end of a piano so it sounds older for a lo-fi beat: the readout shows the top band at 6.9 kHz, pulled down 18 dB.
It’s one less plugin running, so it also saves a little CPU. If your projects already stutter, read our guide to fixing FL Studio crackling and CPU problems.
8. Route every channel to the mixer in one go
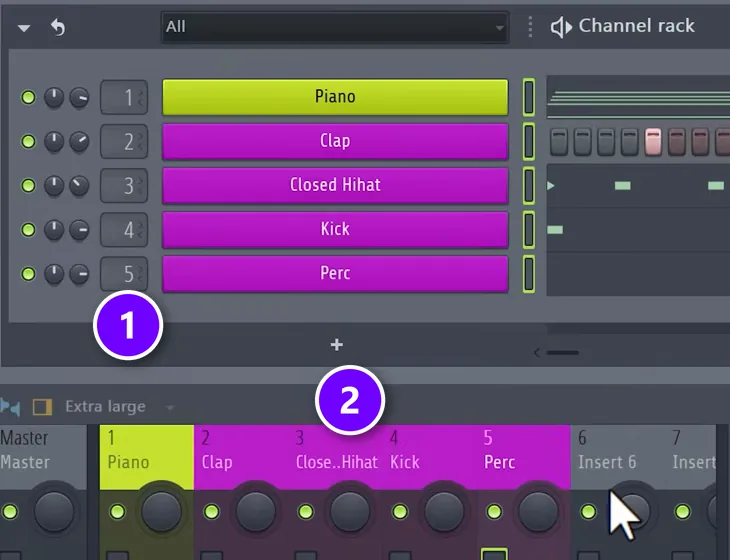
Sending sounds to mixer tracks one by one, then naming and coloring each track, eats a lot of time. Instead, select all the channels in the Channel Rack and press Ctrl + L. Each one gets its own mixer track, and the number box next to each channel shows which one (1). The names and colors come along to the mixer automatically (2).
9. Back up projects as a zip with every sample inside
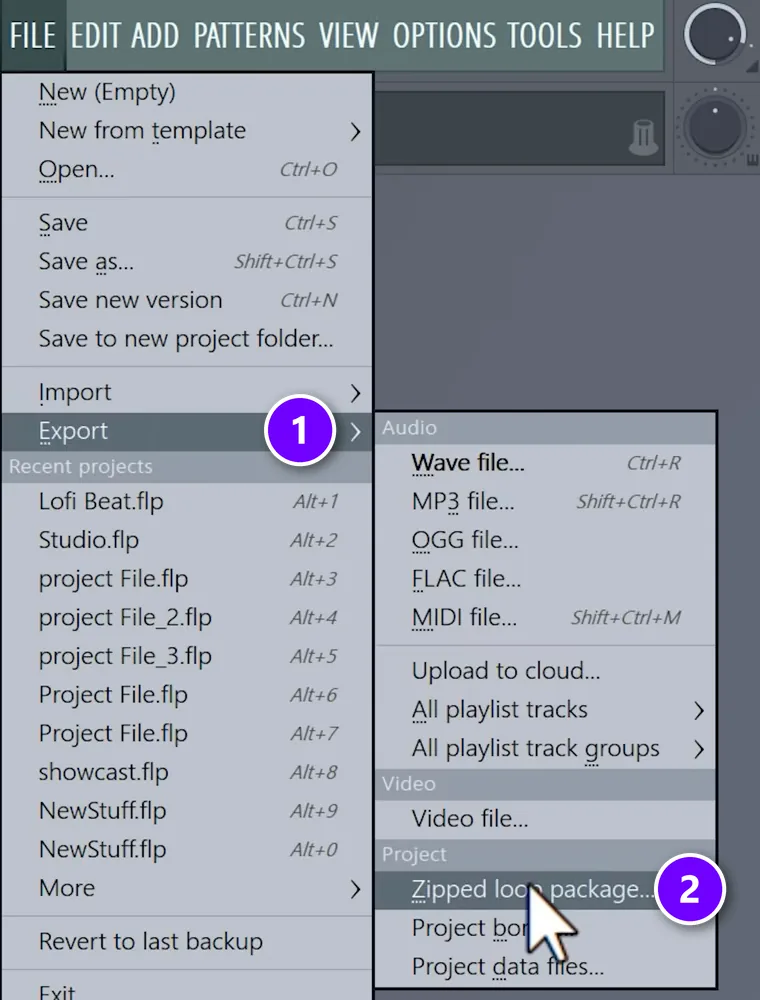
Saving the project file isn’t a real backup, because the samples live somewhere else on your drive. Go to File > Export (1) > Zipped loop package (2) and FL Studio packs the project and every sample it uses into one zip file.
Keep those zips on an external drive. If your computer dies, you open the zip on the next one and every sound is still there.
Press Ctrl + N often, too. That’s File > Save new version, which saves a numbered copy of the project (MyBeat_2, MyBeat_3 and so on). If an edit goes wrong, the last good version is still there.
10. Share projects with friends who don’t own your plugins
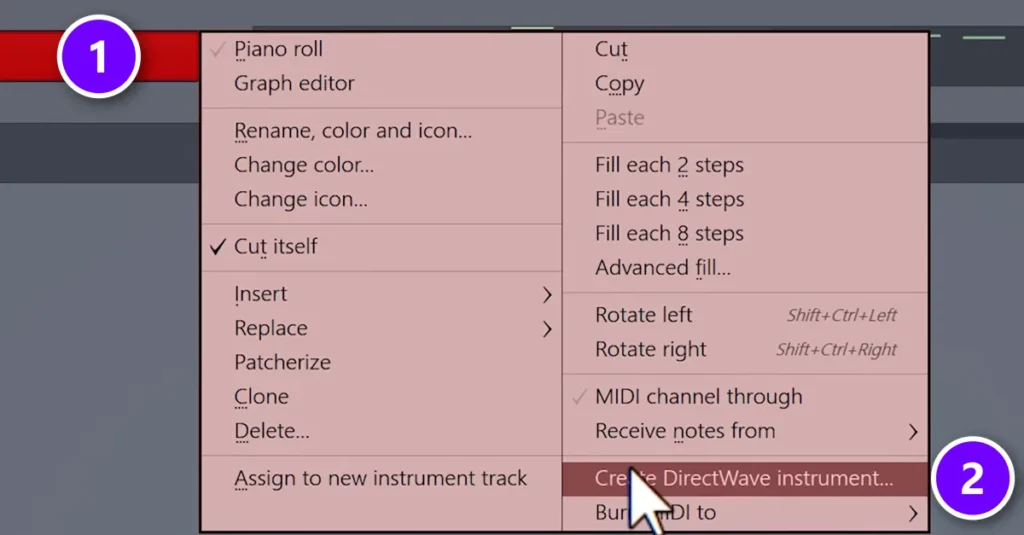
You send a project to a friend, and it opens with silence because they don’t have the synth you used (Serum, in the video). FL Studio has a fix. It can turn that synth part into a sampled instrument that plays anywhere. Right-click the synth’s channel in the Channel Rack (1), choose Create DirectWave instrument (2) and save the file in your project folder. DirectWave is the sampler that comes with FL Studio.
A few settings keep the file small without wrecking the sound:
- Key range: only sample the notes you actually use. If the melody sits between C3 and C4, there’s no reason to sample the whole keyboard.
- Velocity layers: if your preset sounds the same no matter how hard you hit the keys, one layer is enough. A real piano needs more.
- Keys per zone: set it to 7 and DirectWave samples every seventh note and pitches the rest. Smaller file, slightly less accurate.
Click Start, let it finish, and your friend can open the project and even change the notes as if they owned the synth.
7 workflow habits that save hours

The ten tips above cover the basics. These seven habits make every session faster once you start writing full songs, and most of them take a single key.
Play notes on your computer keyboard
No MIDI keyboard? Press Ctrl + T and your computer keyboard plays notes like a piano. In his free course, Max right-clicks the typing keyboard button in the toolbar and sets it to his song’s root note and scale. After that, every key he hits plays a note that fits.
Light up your scale in the Piano Roll
You can stay in key without knowing any theory. In the Piano Roll menu, choose View > Helpers > Scale highlighting and pick a root note and a scale, such as C minor. The rows of that scale get highlighted, and the Snap to scale button in the Piano Roll toolbar keeps every new note on them. Wrong notes get hard to hit.
See your chords while you write a melody
Press Alt + V in the Piano Roll to turn on ghost channels. The notes from your other channels in the pattern show up in grey behind the one you’re editing, so you can see which melody notes sit on your chords. Double-right-click a ghost note to jump to its channel.
Duplicate with Ctrl + B
Stop copying and pasting. Select notes in the Piano Roll, or clips in the Playlist, and press Ctrl + B. FL Studio places a copy right after your selection, perfectly in time, and each press adds another one.
Know pattern mode from song mode
If you press Play and hear only one loop, look at the PAT and SONG switch next to the Play button. PAT plays the pattern you have selected, and SONG plays the whole Playlist. Press L to flip between them.
Save what you’ll use again
Wrote a chord progression you love? In the Piano Roll menu, choose File > Save score as, then load it into any project later with File > Open score. Effect chains work the same way: right-click a mixer track and choose File > Save mixer track state to keep every plugin and setting on it.
Start every beat from a template
Max’s take on why setup matters: “Very often your creative mind is limited by how fast your hands can actually control your DAW.” His answer is the one pro artists use: a starting template. Set up one project the way you always begin, with your go-to drums, a few sounds you trust, and every channel routed and colored. Then choose File > Save as template, and open it from File > New from template instead of starting empty.
Bonus: fix a project that won’t open
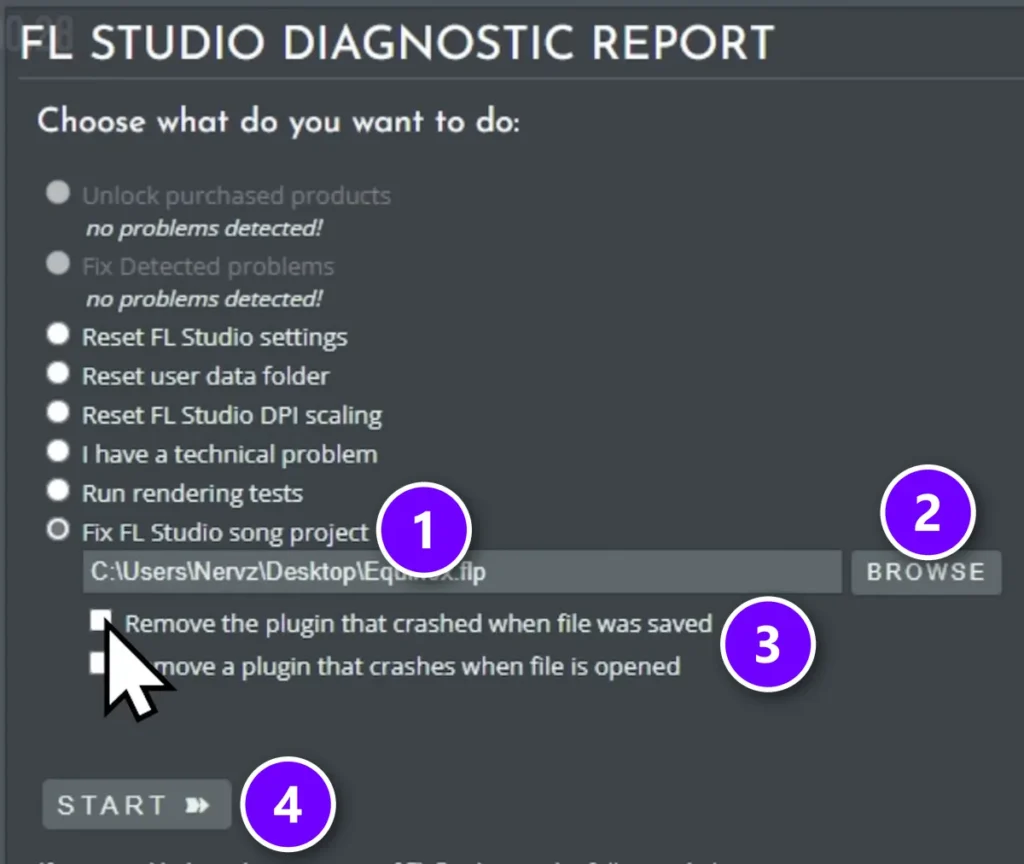
If a project crashes FL Studio as it loads, a plugin inside it is often the cause. Don’t delete the file. Go to Help > Diagnostics, choose Fix FL Studio song project (1) and click Browse (2) to pick the file. Tick what to remove (3): the plugin that crashed when the project was saved, or one that crashes it on opening. Then press Start (4), without ever opening the project.
Learn it before you need it. Max’s verdict on this tool: “This saved my life so many times.”
Bonus: find the key of any sample
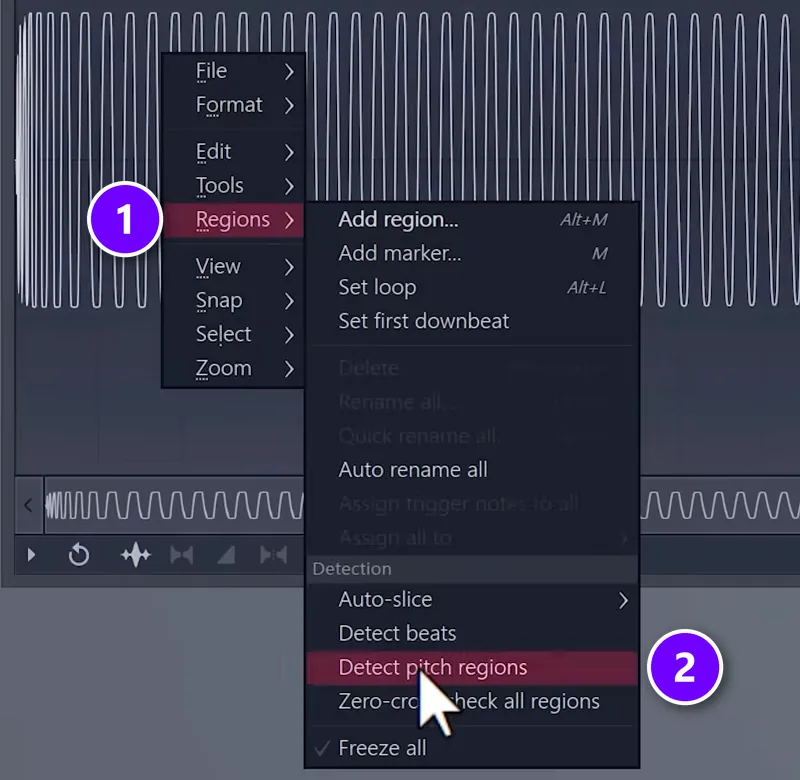
Some sample packs don’t put the key in the file names, which makes it hard to build chords around them. Edison can find it for you. Right-click the sample, choose Edit in audio editor to open it in Edison, then right-click the waveform and pick Regions (1) > Detect pitch regions (2). Edison marks the pitch right on the waveform. If you’re still adding packs to FL Studio, here’s how to install sample packs so they show up in your Browser.
Which tips to learn first
Don’t try to learn all of this tonight. Switch on the hint bar and learn the four window keys first, because you’ll use them every single session. Make Ctrl + N and the zip backup a habit the first time you finish something you like. Save the DirectWave and pitch tricks for the day you actually need them. If you’ve only just installed FL Studio, our beginner’s guide to FL Studio shows you around first.
Tips make you faster, but they don’t tell you what to do in what order. That’s the part that gets most beginners stuck with a folder full of 8-bar loops and no finished song. If that’s you, read how to finish a song next.
THE 7-DAY MUSIC PRODUCER COURSE
Want the other 1,000 tips, and a song finished in a week?
The 7-Day course takes you from setup to a finished track in FL Studio, one step a day, and a pro gives you feedback on your song at the end. It comes with a searchable vault of 1,000+ FL Studio tips and tricks videos. It’s $27, and you get 60 days to decide if it was worth it.
Frequently asked questions
Is FL Studio good for beginners?
Yes. Its pattern-based layout lets you build a beat from a few sounds and turn it into a song step by step, and the free trial includes every instrument, effect and feature with no time limit. The one catch with the trial is that you can’t reopen saved projects until you buy an edition.
What FL Studio shortcuts should beginners learn first?
Start with F5 (Playlist), F6 (Channel Rack), F7 (Piano Roll) and F9 (Mixer), because you’ll open those windows every session. After that, Ctrl + L routes selected channels to mixer tracks, Alt + G groups channels, and in the Piano Roll Alt + S opens the Strumizer and Alt + R opens the Randomizer.
How do I recover a melody I played but didn’t record in FL Studio?
Select an empty pattern and go to Tools > Dump score log to selected pattern. FL Studio keeps a rolling log of everything you played in the last 30 minutes, even with recording off, and you can choose to dump the last 2, 5, 10, 20 or 30 minutes into the pattern.
How do I back up an FL Studio project with all its samples?
Use File > Export > Zipped loop package. It saves the project together with every sample it uses in one zip file, so you can open it on another computer with nothing missing. Keep the zips on an external drive or in cloud storage.