


“The fundamental problem of communication is that of reproducing at one point either exactly or approximately a message selected at another point.”
Dithering adds a very quiet random noise to your audio right before its bit depth is lowered, for example from FL Studio’s 32-bit mix to a 16-bit WAV or an MP3. The noise hides tiny rounding errors so quiet parts stay smooth, and you use it once, on the final export of a mastered song.
“What is dithering?” is a fair question, because it sounds like something only mastering engineers need to worry about, and the export window doesn’t help with its long list of options. But it decides how the quietest moments of your song survive the trip from FL Studio to a file people can play. Below you’ll learn what bit depth is, the rounding problem dither fixes, when to use it and when to skip it, why it won’t fix a harsh export, and the exact FL Studio export settings that Max, the founder of Mix Elite, uses for a mastered track.
Table of Contents
What is dithering?
Dithering is the process of adding a small, random noise to digital audio right before its bit depth goes down. That noise is called dither. Adding noise on purpose sounds odd, but it solves a real problem.
When audio drops to fewer bits, every tiny piece of it has to be rounded to a value the smaller file can store. Those rounding errors follow the music, and in very quiet passages they turn into a harsh, grainy distortion. Dither shakes up the rounding so the errors stop lining up with the music. What’s left is a soft, steady hiss, far quieter than anything in your song.
Think of a black-and-white photo that can only show a few shades of gray. A smooth sky turns into stripes. Sprinkle a fine grain over it and the stripes vanish, and your eye sees a smooth sky again. Dither does the same job for your ears.
What is bit depth?
Digital audio is a long row of samples, tiny snapshots of the sound’s level taken thousands of times a second. Bit depth decides how many different levels each snapshot can use. More bits means more steps, so the file follows the real sound more closely.
Here are the three you’ll see most:
- 16-bit integer: 65,536 steps per sample. You’ll see it on CDs and in many final song files.
- 24-bit integer: about 16.8 million steps per sample. You’ll see it in recording, and in final WAVs for release.
- 32-bit float: a huge range that can go past 0 dB. You’ll see it in FL Studio’s mixer, and in mix exports for mastering.
Each extra bit adds about 6 dB of dynamic range, the space between the loudest sound a file can hold and its noise floor. That gives a 16-bit file roughly 96 dB and a 24-bit file roughly 144 dB. Image-Line’s manual calls 32-bit floating point the native format of FL Studio’s mix engine, so nothing gets rounded while you work. The rounding only happens when you export to a smaller format.
Don’t mix up bit depth with sample rate. Sample rate, like 44.1 kHz, is how many snapshots you take each second. Dithering is only about bit depth.
What is quantization distortion?
Quantization is the rounding step. When FL Studio turns its 32-bit mix into a 16-bit file, every sample gets rounded to the nearest of those 65,536 steps. The small gap between the real level and the rounded one is the quantization error.
In loud parts, the error is tiny next to the music. You’d never notice it. In very quiet parts, like a long fade-out, a reverb tail or a soft piano intro, the music is only a few steps tall. Now the error follows the waveform and turns into a buzzy, gritty distortion, and the last part of a fade can sound grainy or simply cut off into silence.
What does dithering do?
Dithering randomizes the rounding. Before the conversion, a very quiet noise is mixed in, so each sample lands a little above or below where it would have landed. Image-Line’s manual says it simply: dithering “randomizes the value of the least significant bit when making bit-depth conversions (32 to 16 for example).”
The result is a trade. You swap distortion that follows the music for a smooth hiss that doesn’t change with it, and our ears are good at ignoring a steady hiss. Quiet details survive too. The noise lets sounds smaller than one step still come through on average.
Mix Elite’s free 4.5-hour FL Studio course explains it the same way. Max says: “Dithering adds inaudible noise to your file that helps with some quantization algorithms.” FL Studio’s own dither is shaped, which means it moves most of the hiss above 10 kHz, where our ears are less sensitive.
Can you hear dithering?

Almost never. Image-Line’s manual says both the rounding noise without dither and the hiss with dither are only audible in very, very quiet parts of a recording, and only with the volume turned up very loud. At 24-bit, the steps are so fine that the difference is far too quiet to hear in normal listening.
So don’t expect a big before-and-after moment. Dither is a safety step. It costs nothing, takes one click, and keeps the quietest moments of your song clean.
Is dithering necessary?
Only when a finished song drops to a lower bit depth, and most of all when it becomes a 16-bit WAV or an MP3, where rounding can make quiet fades sound grainy. At 24-bit, the rounding noise is far too quiet to hear. A 32-bit float file needs no dither at all.
That’s why producers keep it for the very last export, not for every bounce. Streaming is the usual case where you can relax. Spotify’s audio file guide asks for a 24-bit file when your master was made at 24-bit, and it tells you not to make a 16-bit version yourself, because Spotify does its own conversions. So upload the 24-bit master as it is. FL Studio only applies its dither to 16-bit WAV and MP3 files anyway, and our guide to mastering for streaming covers the rest of what Spotify asks for.
When should you dither?
Dither once, at the very end, when a finished song goes down in bit depth. Image-Line’s rule is short: dither “should only be applied once to 16 Bit audio file during the final render (if at all).” In practice, that means:
- Exporting your mastered song as a 16-bit WAV, the CD format.
- Exporting your mastered song as an MP3. FL Studio’s manual lists MP3 among the files its dithering works on.
- Any other moment when a finished master gets converted to a lower bit depth as the very last step.
Make it the last thing that touches the audio. A limiter, fade or volume change after the dither step means the audio gets rounded again, and you’d have to dither again.
When should you not dither?
- Your mix export for mastering. Export it as 32-bit float, so nothing gets rounded at all.
- Stems, loops and bounces you’ll keep working on in FL Studio.
- Any 32-bit float file. There’s no rounding to hide, so FL Studio grays the option out.
- A second time. Dither added twice is just more noise.
Why your mix export should be 32-bit float
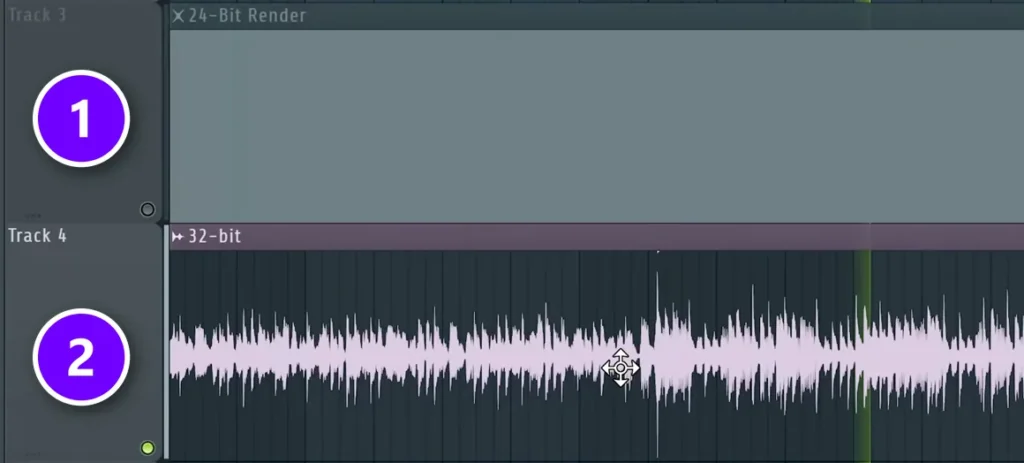
In Mix Elite’s bit depth video, a mix is pushed far past 0 dB with a stack of Fruity Balance plugins on the Master track, then rendered twice. The 24-bit render (1) comes out as a flat block, because every peak above 0 dB was cut off for good. The 32-bit float render (2) looks just as loud, but once its level comes back down, every peak is still there.
The video’s on-screen rule: “Always use 32-bit when rendering MIX for Mastering!” The same video points out that FL Studio already works in 32-bit inside, so a 32-bit float export keeps exactly what you heard. It also can’t clip, which is why the next note says: “Don’t worry about your headroom before mastering. Since you will be bouncing your tracks to 32-bit WAV anyway.” Our guide on how to mix a song walks through that mix export step by step.
The finished master is a different job. As the video puts it, different rules apply when you export an already mastered track. That’s where 24-bit or 16-bit files, and dithering, come in.
How do you dither when exporting to 16-bit?
Set the export’s bit depth to 16 and switch on its dither option. Or use the dither in your mastering plugin, such as the dither panel in iZotope Ozone, and leave the export’s dither off. Either way, it happens once, as the very last step, after every fade and volume change.
In FL Studio, that means choosing 16Bit int as the WAV bit depth and ticking Dithering in the render window. The full export is below. Only go down to 16-bit when you really need it, such as a CD master. For streaming, the 24-bit file is the one to keep.
How to turn on dithering in FL Studio
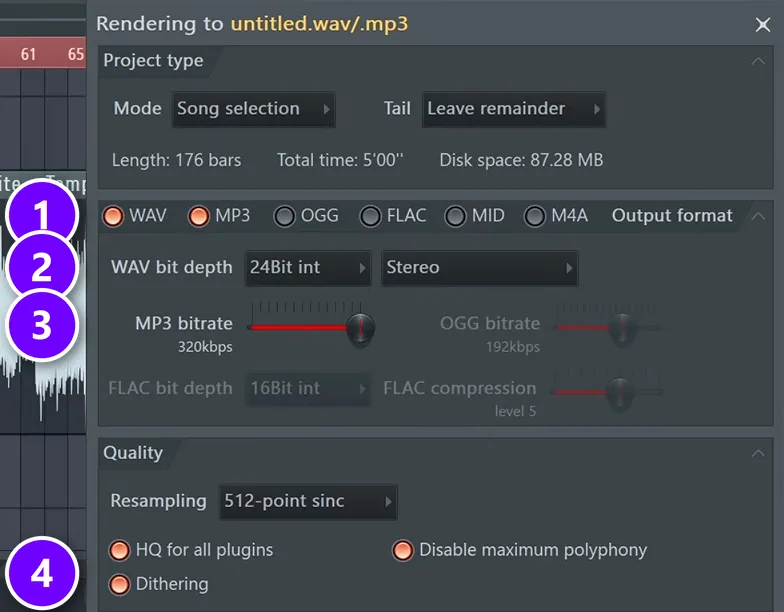
Here’s the final export for a mastered song, from the mastering day of Mix Elite’s free 4.5-hour FL Studio course and the channel’s FL Studio mastering tutorial. Do this only after your master is done.
- Press Ctrl + R (Cmd + R on a Mac), or go to File > Export > Wave file, to open the render window.
- Under Output format, tick WAV and MP3 (1). FL Studio renders both files in one go.
- Set WAV bit depth to 24Bit int (2). Choose 16Bit int if you need a CD file.
- Push the MP3 bitrate all the way up to 320kbps (3).
- Under Quality, tick Dithering (4). The course also keeps Resampling on 512-point sinc and HQ for all plugins on.
- Check that Enable master effects is on, so your mastering chain ends up in the file, then press Start.
Max picks 24-bit because it’s “the most popular one when it comes to releasing music online.” When he reaches the Dithering box, he keeps it simple: “You don’t have to worry about this. Just let’s turn it on.”
Tidy both ends of the song before you export. The course notes that some producers leave about 100 milliseconds before the first sound, and if the track stops too abruptly, it adds a short fade-out to the audio clip. That fade is exactly the kind of quiet passage dither protects.
Should dithering be on or off in FL Studio?
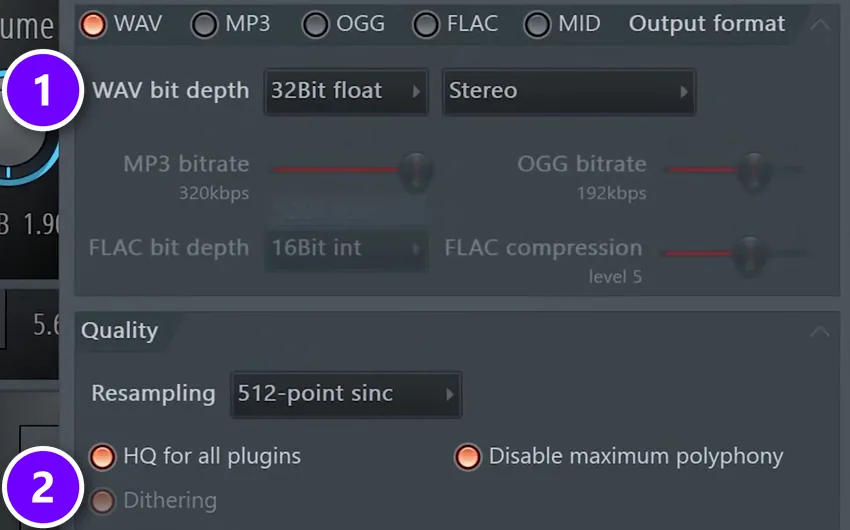
On for your final export, and that’s the only place you need it. Image-Line’s manual says FL Studio applies its dithering to 16-bit WAV and MP3 files. When you pick 32Bit float (1) for a mix export, the Dithering box (2) turns gray, because there’s nothing to round.
| What you export | Format | Dithering |
|---|---|---|
| Mix to send for mastering | WAV, 32Bit float | Off (FL Studio grays it out) |
| Stems or loops you’ll keep editing | WAV, 32Bit float | Off |
| Final master for release | WAV, 24Bit int | Leave it on; FL Studio only uses it on 16-bit and MP3 |
| Final master for CD | WAV, 16Bit int | On |
| Final master to share | MP3, 320kbps | On |
Will dithering fix a harsh-sounding export?
No. Dither only hides tiny rounding errors in the quietest parts of a song, so it can’t fix harshness or distortion. A harsh export usually means clipping. Turning a WAV into an MP3 can push peaks above 0 dB between the samples, which is why Mix Elite’s mastering tutorial sets the limiter’s ceiling to -1 dB for any song that will become an MP3.
Check these three things before you blame the export settings:
- Peaks that only appear after conversion. A master can look fine in FL Studio and still hard clip once it becomes an MP3, so it distorts on a phone or in the car. Watch the true peak reading, which counts the peaks between samples, and keep it under 0 dB.
- A limiter pushed too hard. Turn its gain up until you hear distortion, then take it back down by 1 or 2 dB, the way the mastering tutorial does.
- A mix that clipped on its way out. Render the mix as 32-bit float, which can’t clip, and master from that file.
What are the types of dither?
The three you’ll meet most are triangular (TPDF), noise-shaped and POW-r dither. Triangular is the safe, standard choice and all a 24-bit file needs, while noise shaping helps most on 16-bit files. FL Studio doesn’t ask you to choose, because its built-in dither is already noise-shaped.
Triangular (TPDF) dither
TPDF stands for triangular probability density function, a fancy name for how the random values are spread out. It’s the standard plain dither. It removes the rounding distortion and leaves an even hiss across all frequencies. Rectangular (RPDF) dither adds a little less noise, but that noise can pump with the music, which is why triangular dither became the usual choice.
Noise-shaped dither
Noise shaping moves most of the dither hiss to frequencies where your ears are less sensitive, mostly the very top end. The total noise doesn’t shrink. It just sits where you notice it least. FL Studio’s built-in dither is this kind, so there’s nothing extra to set.
POW-r 1, 2 and 3
POW-r is a family of dither settings you’ll find in Logic Pro, Pro Tools and other DAWs. Type 1 is plain dither without noise shaping, and types 2 and 3 add more and more shaping. Which type you choose matters far less than dithering once, at the very end.
Dithering mistakes to avoid
Don’t dither the mix you send to mastering. Export it as 32-bit float and let dither happen once, on the final master. A dithered 16-bit mix has already been rounded down, and mastering then adds a second layer of dither on top.
- Dithering twice. Many mastering plugins have their own dither switch. If it’s on there, turn it off in FL Studio’s render window, or the other way around.
- Processing after dither. Any limiter, fade or volume change after it brings the rounding errors back.
- Expecting dither to make a master louder or clearer. It only handles the quietest rounding errors. Loudness comes from your master, and our guide to LUFS vs RMS shows how loud it should be.
- Using it to stop clipping. Dither won’t fix a master that clips. Your limiter’s ceiling does that, as explained in compression vs clipping vs limiting.
If your song is already mastered, export it once with the settings above and you’re done. If it isn’t, start with our step-by-step guide to mastering in FL Studio, then come back for the export.
DAY 6 OF THE 7-DAY MUSIC PRODUCER COURSE
Master and export your song the right way
Day 6 of the 7-Day course covers mastering and getting your song ready for release: a 3-step mastering chain that makes your song loud, clear and punchy everywhere, the inter-sample clipping mistake that ruins your sound without you knowing (and an easy way to always avoid it), and the best export settings for streaming platforms. You also get a final mix to practice mastering on and a mastering chain preset pack. It’s $27, and you have 60 days to decide if it was worth it.
Frequently asked questions
Should I turn dithering on in FL Studio?
Yes, for the final export of a mastered song. Open the render window with Ctrl + R and tick Dithering under Quality. FL Studio only applies it to 16-bit WAV and MP3 files, and it grays the box out for 32-bit float exports. Keep your mix exports for mastering in 32-bit float, without dither.
What does dithering do to audio?
It adds a very quiet random noise right before the bit depth is lowered. That noise breaks up the rounding errors the conversion causes, so quiet parts like fade-outs and reverb tails stay smooth instead of gritty. You trade a tiny, steady hiss, which ears easily ignore, for distortion that follows the music.
Is dithering necessary?
Only when a finished song drops to a lower bit depth, mainly a 16-bit WAV or an MP3, where rounding can make quiet fades grainy. At 24-bit, the rounding noise is far too quiet to hear, and a 32-bit float file needs none. For Spotify, upload your 24-bit master as it is: Spotify asks you not to make a 16-bit version yourself.
Will turning on dithering fix a harsh export?
No. Dither only hides tiny rounding errors in the quietest parts of a song. Harshness after exporting usually comes from clipping, often when a WAV becomes an MP3 and its peaks go over 0 dB. Set your limiter’s ceiling to -1 dB for any song that will become an MP3, and don’t push the limiter into audible distortion.
When should dither be applied?
As the very last step, when a finished master gets converted to a lower bit depth. Nothing should change the audio after it: no limiter, no fade and no volume change. Image-Line’s manual says dither should only be applied once, during the final render.