


Here’s how to master a song. Export your finished mix as one stereo file and run it through five steps: cut the lows you don’t need, make the bass mono, shave off stray peaks with a clipper, even out each frequency range with a multiband compressor, and raise the volume with a true peak limiter. Then compare it with a released song and export it.
The steps work in FL Studio, Ableton Live, Logic Pro, Reaper or any other DAW. Only the plugin names change. Below is Max’s chain from his loudness video, with his starting settings.
Table of Contents
What is mastering, and do you need it?
Mastering is the last step before you release a song. You work on the finished mix as one stereo file, not on single tracks, and make small changes so it sounds clear, loud and balanced on every speaker, from cheap earbuds to a club system. Mixing balances the tracks. Mastering polishes the result.
Do you need it? If the song is going on Spotify, YouTube or Apple Music, or to a label or a playlist, yes. Without it, a song usually sounds smaller and less finished than the songs it plays next to. For a rough idea you only send to a friend, you can skip it.
Before you start: get your mix ready
Max is blunt about where a good master comes from: “your master will suck and not be crispy, not because of what you do on the master mainly, but what you do while mixing.” So fix these four things in the mix first. He says they give you about 80% of a clean mix:
- Delete parts that fight for the same space. A pile of melodies on top of a sub bass can’t all be loud at once.
- Sidechain to make room. Sidechain means one sound briefly turns another one down. Use it for kick and bass, and for whatever matters most in your mix.
- Clip the peaks on single tracks and groups. Clipping chops the tops off the sharpest peaks.
- Keep everything below 100 Hz in mono. The lowest notes should come from the middle.
Then export the mix with nothing on the master channel. Max renders it as a 32-bit float file, a format that doesn’t clip even if a peak goes over 0 dB, and opens it in a new, empty project. Last, pick a reference track: a released song in your genre that sounds the way you want yours to sound.
How to master a song in 5 steps
Max shows all five steps on a house track in the video below. He says the chain applies to every genre, from EDM to trap and hip-hop. Here’s the whole chain at a glance:
| Step | What it does | What to use | Max’s starting point |
|---|---|---|---|
| 1. Low cut | Removes rumble under your lowest note | Any EQ with a low cut | Just under the lowest note, never below 30 Hz |
| 2. Mono bass | Keeps the low end in the middle | A mid/side EQ | No side signal under about 120 Hz |
| 3. Clipper | Chops off short, sharp peaks | Any clipper | Push until the drums change, then back off 10% |
| 4. Multiband compression | Evens out the lows, mids and highs | A multiband compressor | Pre gain up 7 to 10 dB, then make up the loss |
| 5. True peak limiter | Makes it loud under a ceiling | Any limiter with true peak | Ceiling at -0.3 dB, gain up until it distorts |
Step 1: Cut the lows you don’t need
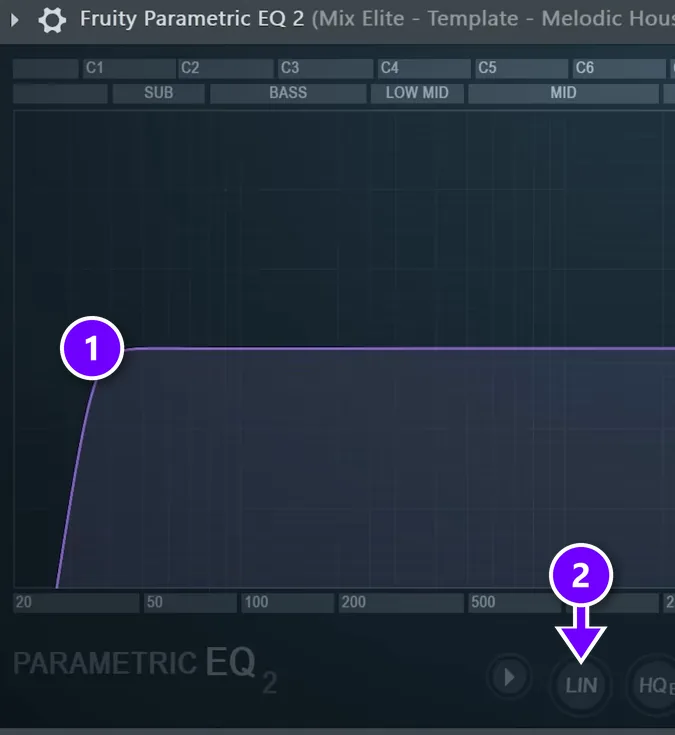
Low frequencies carry the most energy, so useless rumble eats room your kick and bass could use. Put an EQ first on the master and add a low cut, also called a high-pass filter, which removes everything below the frequency you pick. Max sets it just under the lowest note your song plays, and never lower than 30 Hz. His track is in E, at about 41 Hz, so he cuts just below that.
In this frame, the low cut (1) sits at 35 Hz in FL Studio’s Parametric EQ 2. Leave linear phase (2) and oversampling off on this EQ. Max saves both for the final limiter. If the low end turns boomy after the cut, try a gentle low shelf instead.
Step 2: Make the bass mono
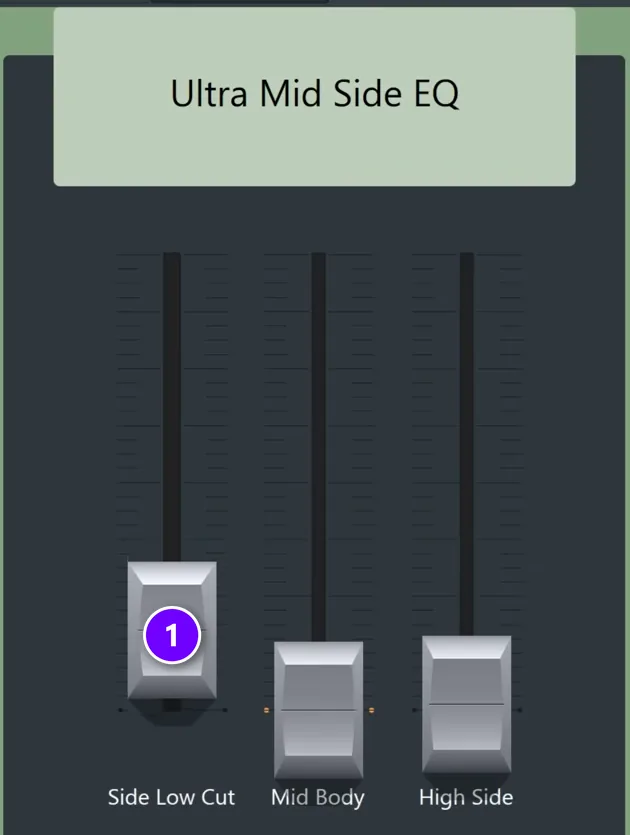
Stereo means your left and right speakers play slightly different sound. That difference is called the side signal, and it’s what makes a song feel wide. Wide bass is a problem. When the left and right versions of a low note work against each other, they cancel out, so the bass can vanish on a mono speaker or in parts of a club.
So take the lows out of the side signal with a mid/side EQ, an EQ that treats the middle and the sides separately. Max uses a free mid/side preset for Patcher and raises its Side Low Cut (1) until everything under about 120 Hz is mono. Any EQ that can work on the side signal alone does the same job.
Step 3: Shave off stray peaks with a clipper
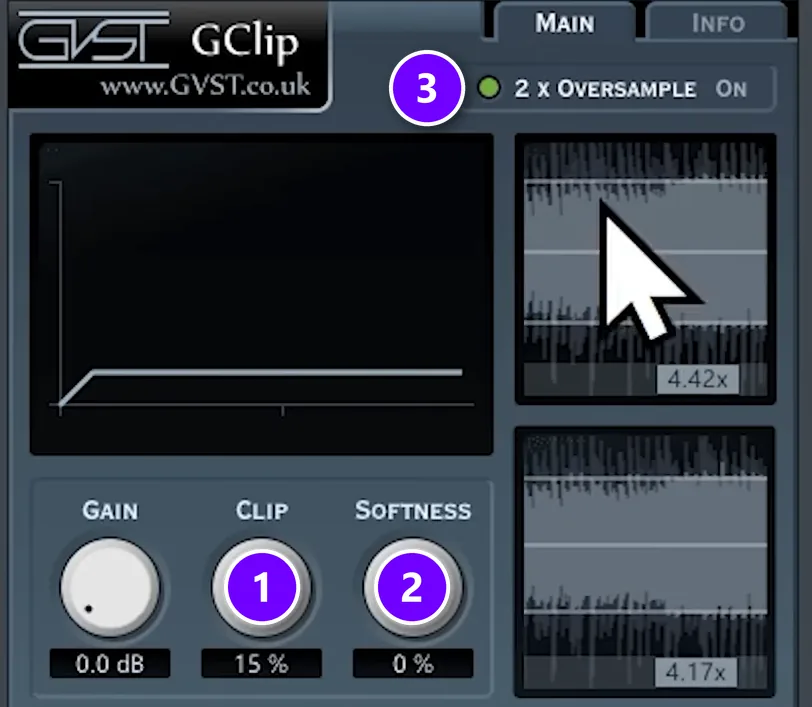
Zoom in on the waveform of a mix and you’ll see small, sharp peaks sticking out above the rest. You barely hear them. They do push your limiter around later. A clipper simply chops the tops off.
Max uses a small free plugin called GClip, right after the EQ. Turn the Clip knob (1) until you can just hear the knock of your drums change, then back it off 10%. Keep Softness (2) at 0% and switch oversampling (3) on.
Why clip before the limiter? A limiter tries to be smart. When a big snare hit comes, it softens the hit to squeeze it under the ceiling. A clipper doesn’t think, it just cuts. In Max’s words, “clipper is dumb, and that’s why we love it.” Here’s more on compression vs clipping vs limiting.
Step 4: Even out each band with multiband compression
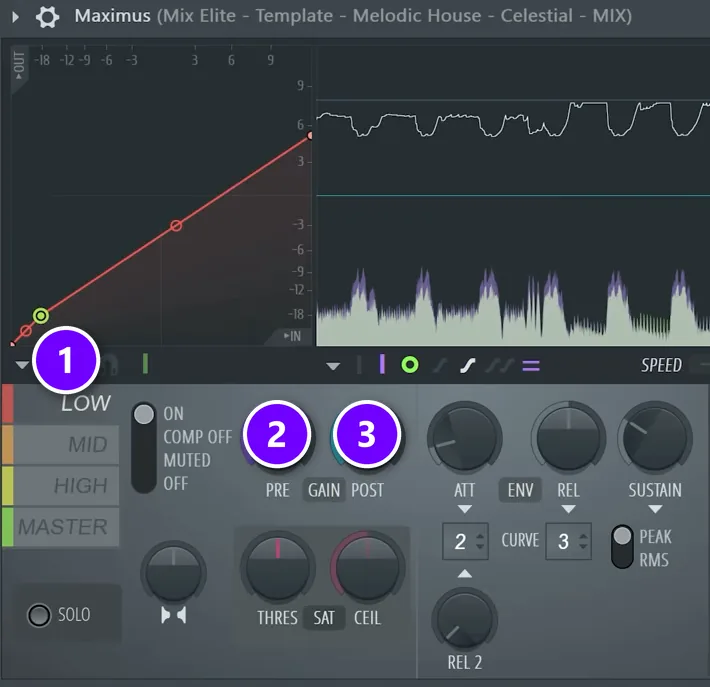
A normal compressor turns the whole song down every time the kick hits. A multiband compressor splits the song into bands, usually lows, mids and highs, and compresses each one on its own. That shrinks the gap between the loud and quiet parts without the kick dragging everything else down.
Max uses Maximus, and says FabFilter Pro-MB works too. He selects a band (1) and turns its pre gain (2) up by 7 to 10 dB, so the compressor has more to work with. He compresses until the band drops a few dB, from about +8 to +5 dB in his example, then turns the post gain (3) up by those 3 dB. Then he repeats it for the mids and highs.
Step 5: Make it loud with a true peak limiter
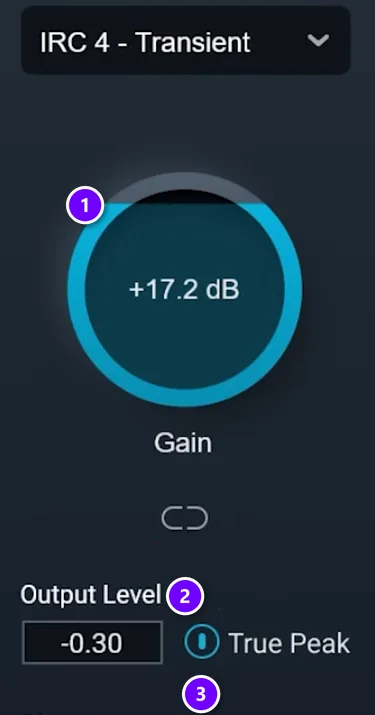
The limiter goes last. It holds the audio under a ceiling while you turn the volume up, so the loud parts stay put and the quiet parts come up. Set two things before you touch the gain. Turn on true peak (3), which also catches peaks that form between the digital samples during playback, and set the output level, your ceiling, to -0.3 dB (2).
Now raise the gain (1) until you hear distortion, then back off a little. Max uses the Maximizer in iZotope Ozone, but any limiter with a true peak mode works. Our guide to true peak meters explains those in-between peaks.
How loud is loud enough? Max’s rule: “we always master our tracks as loud as possible without it starting to sound worse.” For electronic music he aims for at least -8 to -6 integrated LUFS, a measure of how loud the whole song feels. Spotify’s -14 LUFS is the level it plays songs at, not a target you must hit, as our page on LUFS vs RMS explains.
Two extras from Max’s chain: if peaks still stick out after the multiband step, add a second clipper there. And right before the limiter he adds a stereo imager, keeping the lows fully mono and the mids and highs a little wider.
Mastering in FL Studio? Our guide on how to master in FL Studio walks through a full chain with stock plugins only, with a screenshot for every setting and the export window.
In what order do mastering plugins go?
Order matters, because each plugin works on what the one before it hands over. This is Max’s order, and it works in any DAW:
- EQ with a low cut
- Mid/side EQ to make the bass mono
- Clipper
- Multiband compressor
- A second clipper, only if peaks still stick out
- Stereo imager (optional)
- True peak limiter, always last
Anything after the limiter can push peaks back over your ceiling. The only thing that goes after it is a loudness meter, which changes nothing. Max puts the free Youlean Loudness Meter at the very end, so it reads what listeners will get.
How to check your master before you release it
Your ears are easy to fool. Max says it himself in the video: louder simply sounds better to our ears. So when you play your master next to your reference track, turn the louder one down until both play at the same level. Then judge the tone, the punch and the width.
Play it on everything you can find: your phone, earbuds, the car, a laptop. Switch to mono once and check that the bass and vocal are still there. If something sounds wrong almost everywhere, fix it in the mix.
For the final export, Max saves a 24-bit WAV with dithering on, plus a 320 kbps MP3. Upload the WAV to your distributor and keep the MP3 for sharing. Dithering adds a tiny bit of noise that hides rough edges when the bit depth goes down, as our guide on what dithering is explains.
Check how it sounds as AAC or MP3
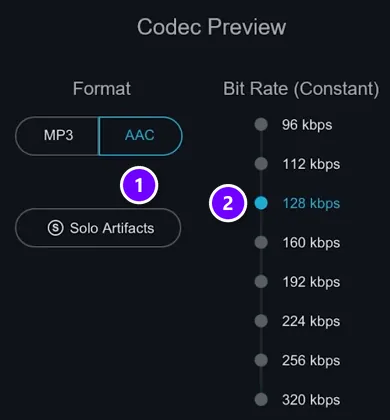
Most people will hear your song as a compressed file like AAC or MP3, not as your WAV. Converting can create new peaks, and true peak mode doesn’t stop that. So Max previews the conversion in Ozone’s codec preview. He picks AAC (1), one of the formats Spotify streams in, and a bit rate (2), then watches the peak meter. His master clipped right away, even with true peak on.
That’s why Spotify asks for a lower ceiling on loud songs. Its advice: if your master is louder than -14 integrated LUFS, keep the true peak below -2 dB. At -2 dB, Max’s master still had about half a dB of room at AAC 128 kbps. No codec preview? Export an MP3 and check it with a true peak meter.
Can you master your own music?
Yes. With these five steps and a good reference track, you can master your own songs at home. A mastering engineer adds trained ears, a treated room and a fresh listen, which helps most when you can’t tell what’s wrong anymore. Some ask for stems, separate files for the drums, bass and vocals, so they can fix things inside the mix. Automatic AI mastering gives you a quick polished version, but it can’t fix the mix either.
One thing to skip: pushing a raw mix into a single limiter and cranking the gain. Max calls that a cardinal sin in EDM. It flattens the punch and adds distortion.
THE 7-DAY MUSIC PRODUCER COURSE
Practice mastering on a real mix
On Day 6, the 7-Day course teaches a 3-step mastering chain that makes a song loud, clear and punchy everywhere, the inter-sample clipping mistake and an easy way to always avoid it, and the best export settings for streaming. You get a final mix to practice on and a mastering chain preset pack. The whole course is $27, and you have 60 days to decide if it was worth it.
Frequently asked questions
What is the difference between mixing and mastering?
Mixing balances the single tracks of a song: the levels, EQ, compression, panning and effects on each sound. Mastering comes after that and works on the finished mix as one stereo file. It makes small changes to the whole song so it sounds clean, loud and consistent on every speaker and next to other released songs.
Do I need to master my music before releasing it?
If you’re releasing on Spotify, YouTube or Apple Music, or sending a song to labels or playlists, yes. A master makes your song as loud and clean as the music it plays next to. For a rough idea you only share with a friend for feedback, you can skip it and spend the time on the mix instead.
Can mastering fix a bad mix?
No. Mastering polishes a mix, but it can’t pull apart sounds that clash inside it. In his mastering tutorial, Max says 95% of the work is already done when mixing. If your master sounds harsh, muddy or small, go back to the mix: delete parts that fight, sidechain, clip the peaks and keep the lows mono. Then master it again.
Is mastering just making a song louder?
No, although loudness is part of it. Max wants a master that’s “not just louder, it’s crispier, punchier, and glued together.” The low cut, mono bass, clipper and multiband steps clean up and shape the song first, so the limiter at the end can make it loud without making it worse.
Can you master a song for free?
Yes. Most DAWs come with an EQ, a compressor and a limiter, and free plugins cover the rest. Max’s chain uses the free GClip clipper and the free Youlean Loudness Meter, and FL Studio’s stock Maximus handles the multiband step. A paid limiter adds extras like a codec preview, but it isn’t required.