

“If he were to play each note at exactly the same volume, he’d sound like a bad drum machine beat.”
To program virtual drums that sound like a real drummer, place a kick, a snare and hi-hats on a 16-step grid, then vary how hard each hit lands, add soft ghost notes and a little swing, and only write what two hands and two feet could play. Virtual drums are simply drum sounds played by software, from single samples to full virtual drummer plugins.
You can hear the beat in your head. Then you open your DAW, stare at an empty grid, and nothing you click sounds like the records you love. That’s rarely your ear. It’s usually a handful of rules about where each drum goes, plus a few small moves that make a programmed part feel like someone played it. You’ll learn both here, in FL Studio, with real screenshots from Mix Elite’s videos. The same steps work in any DAW.
Table of Contents
What are virtual drums?
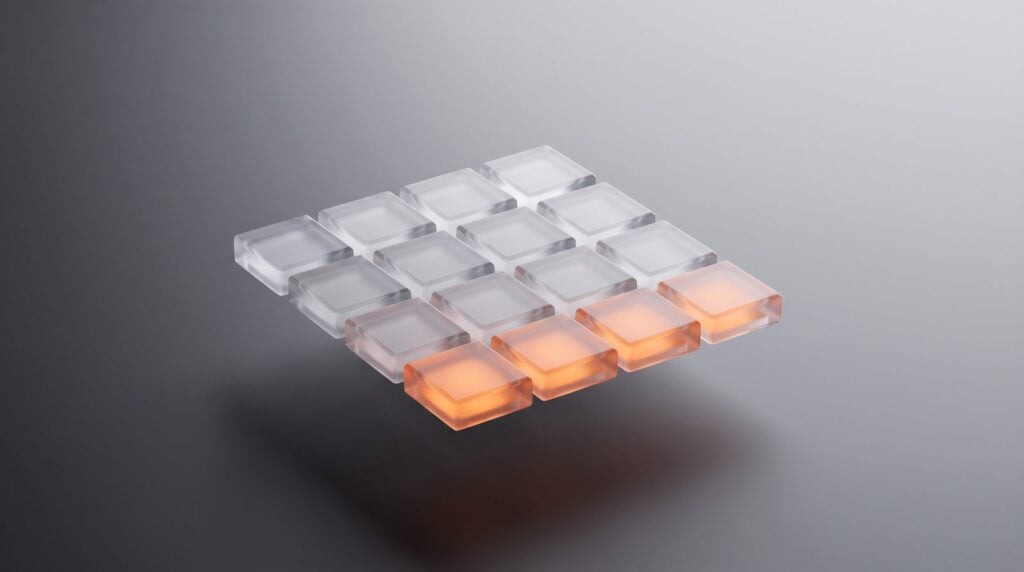
Virtual drums are drums that live inside your computer. Each hit is a short recording of a real drum, called a sample, or a sound made by a synth, and the software plays it whenever you tell it to. When producers talk about virtual drums, they mean one of three things:
- One-shot samples. Single hits, like one kick or one snare, that you load into your DAW and place on a grid. FL Studio’s Channel Rack works this way.
- Drum machine plugins. A set of pads with one sound on each, like FL Studio’s FPC, Ableton Live’s Drum Rack or Logic Pro’s Drum Machine Designer.
- Virtual drummer instruments. Big libraries of real acoustic kits recorded with many microphones, such as Superior Drummer 3, EZdrummer 3 and Addictive Drums 2.
You’ll also see the words used for free browser drum kits you play with your computer keyboard, and for electronic drum kits you hit with sticks. This guide is about programming. That means telling the software which drum to play, when to play it and how hard. Those instructions are called MIDI notes, and you write them the same way for all three kinds of drums.
What do you need to program drums?
Less than you think. Here’s the full list:
- A DAW, the app you make music in. Mix Elite teaches in FL Studio. Its free trial gives you every feature with no time limit, but it can’t reopen saved projects.
- Drum sounds. FL Studio comes with a folder of stock drums called Packs, which is plenty to start. When you want more, the best drum VST plugins guide covers free and paid kits.
- Headphones or speakers you know well, so you can hear how hard each drum hits.
- A MIDI keyboard or pad controller is optional. You can click every note in with the mouse or tap rhythms on your computer keyboard.
Drum programming basics: bars, beats and steps
Every drum grid works the same way. Music is counted in bars, and most songs have four beats in each bar. A step sequencer splits every beat into four steps, so one bar has 16 steps. As Max, the founder of Mix Elite, explains in Mix Elite’s free 4.5-hour FL Studio course, there are four beats in a bar and four steps in a beat. In FL Studio’s Channel Rack the steps come in colored groups of four, so each group is one beat.
A few more words come up all the time:
- Tempo (BPM) is how fast the beat plays, in beats per minute. Most styles sit somewhere between 90 and 160 BPM, and trap works well at 140.
- Velocity is how hard a note is hit. A real drummer never hits twice in exactly the same way.
- Quantize means snapping notes onto the grid so they land perfectly in time.
- Pattern is FL Studio’s word for a short loop of notes, usually one or two bars, that you repeat to build a song.
Then there are the three drums that carry almost every beat. The kick is the low thump, the snare or clap is the crack, and the hi-hats are the ticking that fills the space in between. Max always puts a kick on beat 1, and he’s clear about why: “You want to show people where’s the start of the beat. That’s why I’ll put the kick, which is like the fundamental of your drums, on the starting beat.”
How to program drums in FL Studio, step by step
Let’s build a simple house groove the way Mix Elite’s free FL Studio course does, right in the Channel Rack’s step sequencer. Left-click a step to add a hit, right-click to delete it, and press Space to play.
Step 1: Load your drum sounds
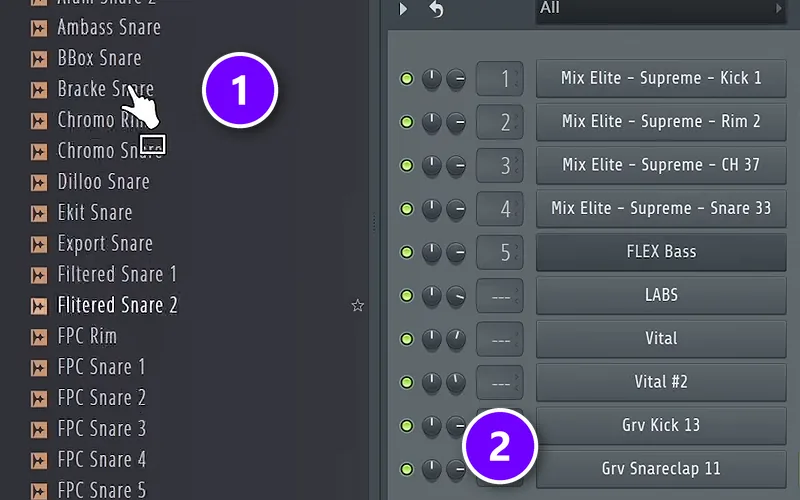
Open the Browser on the left, go to Packs and then Drums, and drag a kick, a clap and a hi-hat onto the Channel Rack (1). Each sample becomes its own channel with its own row of 16 steps (2). Don’t like a sound? Select it in the Browser and press Shift + Up or Down while the beat plays, and FL Studio swaps it for the next sample in the folder.
Step 2: Put the kick on every beat
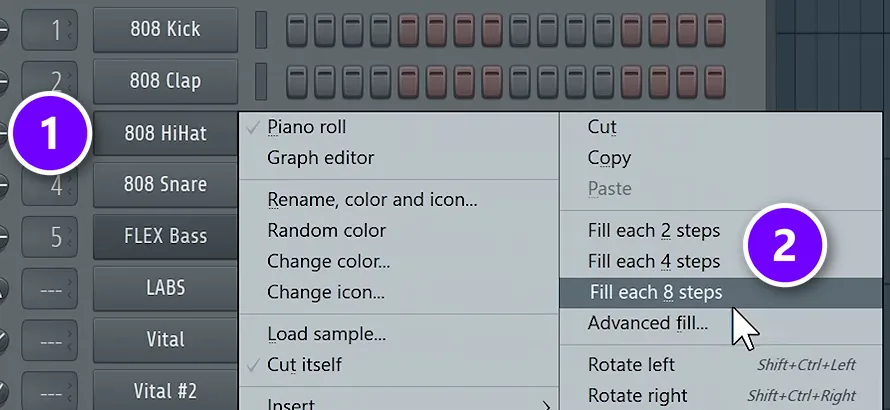
Right-click a channel’s name (1) and look at the Fill options (2). Fill each 4 steps on the kick puts a hit on steps 1, 5, 9 and 13, which is every beat. Producers call this four on the floor. Fill each 2 steps gives you steady hi-hats in one click.
Step 3: Add the clap and the hi-hats
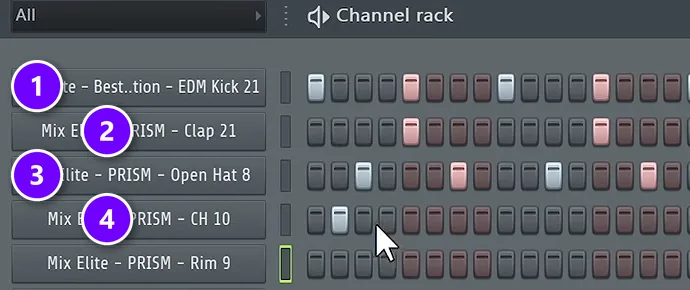
Put the clap on beats 2 and 4, which are steps 5 and 13. That’s the backbeat, the snap you’d clap along to. Then add an open hi-hat on every off-beat, the step halfway between two kicks. In this house beat the kick (1) hits every beat, the clap (2) lands on 2 and 4, the open hat (3) sits on the off-beats, and a short closed hat (4) adds a bit of movement.
Step 4: Make it two bars and change one thing
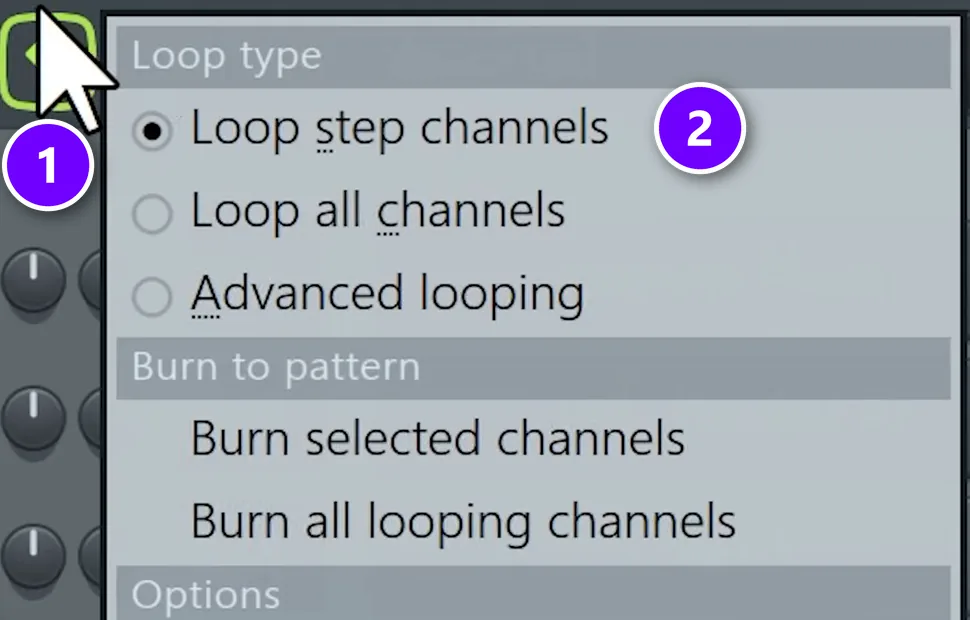
One bar repeated forever gets boring fast. Make every drum pattern at least two bars long and change something in the second bar, like an extra kick near the end. FL Studio has a shortcut for this. Turn on the loop button at the top left of the Channel Rack (1), with its Loop type set to Loop step channels (2). Now, when you add a kick in bar 2, every shorter row keeps repeating on its own as gray ghost steps. When you’re happy, Burn to pattern turns those ghost steps into real ones.
Step 5: Swap in better sounds
With the pattern done, try different samples. This is where most beginners win the fastest. “Trust me when I say this, but there are many tracks with as simple drum pattern like this one, but just use amazing sounds,” Max says. For choosing drums that hit, layering claps and cleaning them up with EQ, read Mix Elite’s guide to hard-hitting drums in FL Studio.
If you want more sounds to try, Mix Elite’s Supreme Drums sample pack has 509 drum one-shots and 40 drum loops, each with its kit. They’re royalty-free WAV files, so they drag into the Channel Rack like any other sample.
Step 6: Add swing and a little velocity
Last, take the robot out. Turn up the swing knob at the top of the Channel Rack, which delays every second step a tiny bit. House drums love swing, and around 40% is a good place to start. Then make every other hi-hat a little softer. Those two moves are the start of humanizing. The hi-hat fix below shows the clicks, and the guide on how to humanize MIDI drums covers the rest, from timing nudges to groove templates.
Three drum patterns to program first
Each grid below is one bar of 16 steps, grouped into four beats. A filled square is a hit. Program all three and you’ll know the backbone of most house, pop, rock and trap beats.
- House: kick on steps 1, 5, 9 and 13, clap on 5 and 13, open hat on 3, 7, 11 and 15.
- Pop and rock: kick on 1 and 9 (beats 1 and 3), snare on 5 and 13 (beats 2 and 4), closed hat on every other step.
- Trap: hat on every other step, snare on step 9 (beat 3), and a kick on step 1 plus one more where it feels good. Make it two bars and add hi-hat rolls, as in Mix Elite’s first-beat walkthrough.
How to program drums with FPC, FL Studio’s drum machine
The Channel Rack is perfect for simple patterns. When you want a whole kit in one window, use FPC, FL Studio’s drum machine plugin. It has 32 pads in two banks of 16, and each pad plays its own sound. Add it from the + button at the bottom of the Channel Rack.
Clear the default kit
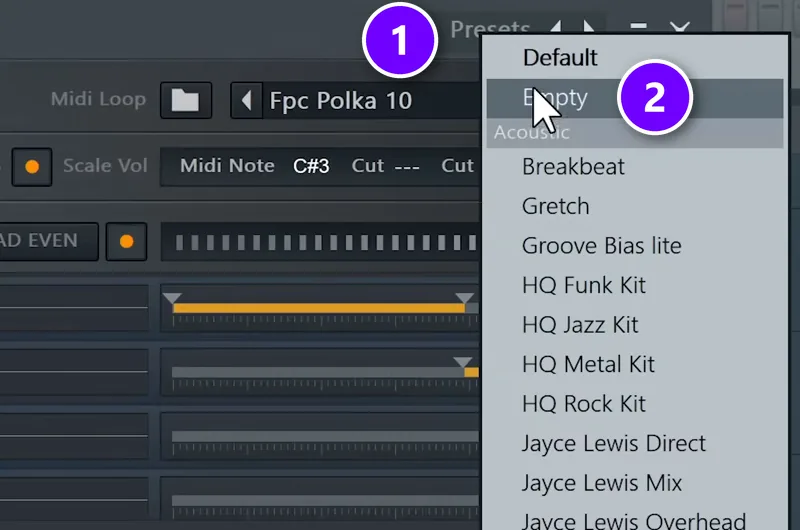
FPC opens with a stock acoustic kit. To build your own, open Presets at the top right (1) and pick Empty (2). That’s exactly how the fills video below starts, so every pad is free for your sounds.
Drag your samples onto the pads
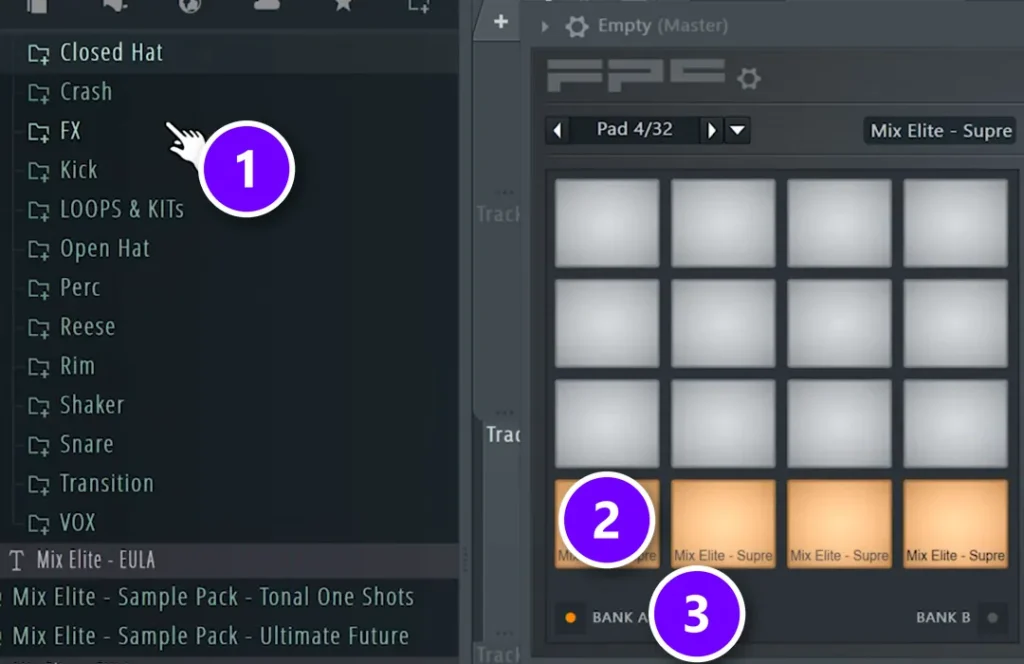
Drag samples from the Browser straight onto the pads (1). A loaded pad changes color (2), and the Bank A and Bank B buttons switch between the two sets of 16 pads (3). Click any pad to hear it.
Draw the beat in FPC’s Piano Roll
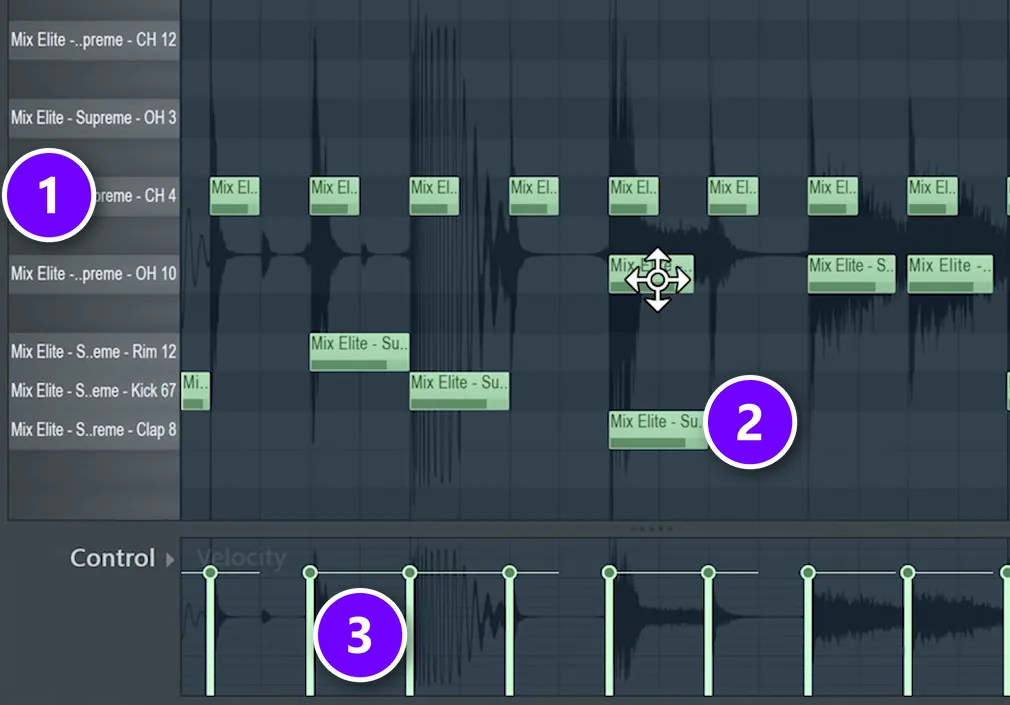
Open FPC’s Piano Roll. Every pad gets its own row, labeled with its sample name (1), so you draw a kick on the kick row and a clap on the clap row (2). The bars at the bottom are velocity (3): drag one down to make that hit softer. The gray waveform behind the notes is a drum loop dragged into the Piano Roll as a guide, which is a handy way to see exactly where each hit of a groove you like lands.
Each pad also has its own Output setting. Later, when you mix, you can send the kick and the snare to separate mixer tracks and treat them on their own.
How to program drum fills
A fill is a short burst of drums that leads into the next part of the song, like a drummer rolling around the toms before the chorus. Put a small one at the end of every 4 or 8 bars and a bigger one right before a new section. The easy version: copy your beat into the last bar, drop a few hats, and add snare or tom hits on the last 4 to 8 steps.
How to make random drum fills with FPC
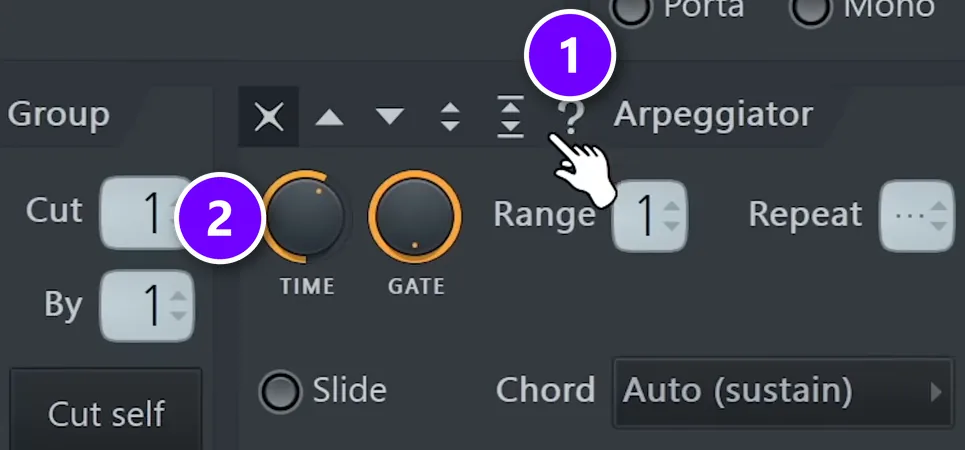
The video below builds fills that never sound the same twice. Load short tom hits into FPC, open the channel’s Miscellaneous functions tab, and set the Arpeggiator to random with the question-mark button (1). In the Piano Roll, hold one long note for every pad, so the arpeggiator plays them in a random order. The Time knob (2) sets the speed, and automating it makes the fill jump between speeds. Record a few takes, keep the best ones as samples, and end each fill on a snare hit so it lands clearly.
Why do my programmed drums sound stiff and robotic?
Programmed drums sound robotic when every hit lands at the same strength, exactly on the grid, in the same bar over and over. Real drummers never play like that. Vary the velocity, add a little swing, nudge a few hits off the grid and change something every few bars, and the same pattern starts to feel played.
- Every hit at the same velocity. Lower some hits, starting with every other hi-hat (the fix is just below).
- Everything dead on the grid. Add swing, or hold Alt while you drag a note in the Piano Roll to move it a hair off the grid.
- One bar on repeat. Make the pattern two bars, change something in the second, and add a fill every 4 or 8 bars.
- Parts nobody could play. Stick to two hands and two feet, as in the drummer rules below.
How do you fix machine-gun hi-hats?
Hi-hats sound like a machine gun when every hit has the same velocity. Lower the velocity of every other hat so the pattern goes loud, soft, loud, soft, then add a little swing. It doesn’t have to be exact: small, uneven differences are what make it sound played.
Max shows it in Mix Elite’s free FL Studio course: “I would put down the velocity of every other one. It doesn’t have to be perfect. Even if it’s not perfect, it’s better because it’s more human.”
In FL Studio, open the hi-hat’s graph editor in the Channel Rack, pick the Velocity tab and drag every other step down a little. In the Piano Roll, drag the velocity bars at the bottom instead, or hold Alt and turn the mouse wheel over a note to change just that one.
How do you make virtual drums sound like a real drummer?
Program only what one person with two hands and two feet could play, vary how hard every hit lands, add soft ghost notes on the snare, and leave small timing wobbles instead of snapping everything to the grid. A sampled acoustic kit, recorded at many strengths, does the rest.
Electronic beats can sit perfectly on the grid. Acoustic drums can’t, because a person plays them. If you make rock, pop or anything with a live feel, program the way a drummer would play:
- Two hands, two feet. A drummer can hit four things at once at most. If your part needs a third hand, nobody could play it, and listeners hear that.
- One hi-hat at a time. A hi-hat is either open or closed, never both, so don’t stack an open and a closed hat on the same step.
- Hats or ride, not both. In most grooves the drummer keeps time on either the hi-hat or the ride cymbal.
- Crash on the one. A crash usually lands on the first beat of a new section, often together with a kick.
- Ghost notes. Very soft snare hits between the main beats add groove without getting in the way.
- No two hits the same. Even a steady hi-hat goes loud, soft, loud, soft.
A quick test: play the beat and air-drum along. If you run out of arms, simplify. For acoustic kits, a virtual drummer instrument helps a lot, because every drum was recorded at many strengths, from a whisper to a full hit.
Stuck on a rock groove? Pull up a song you like in the same style and listen only to the drums. Count where the snare and the hi-hats land, then copy that layout onto your grid with your own sounds.
Can you play the drums in instead of clicking them?
Yes, and it often feels more natural. Mix Elite’s free FL Studio course shows how to tap a rhythm in on your computer keyboard: click the record button, choose to record notes and automation, press play and tap along. A MIDI keyboard or pad controller works the same way. Afterwards, open the Piano Roll and fix only the hits that landed far off the grid. The small wobbles you leave in are what make it sound played.
What is advanced drum programming?
Advanced drum programming is the detail work that makes a simple beat feel alive: hi-hat rolls, pitch changes, ghost notes, swing that differs per drum, timing a hair off the grid, and fills that lead into the next section. It’s less about new sounds and more about where, how hard and how often each hit plays.
- Hi-hat rolls. Open the hat’s graph editor in the Channel Rack and use its repeat (Rep) setting, which retriggers a step into a quick roll. Mix Elite’s free course follows one simple framework: change something every four beats, and don’t cram the hats with too many rolls.
- Pitch on the rolls. In the same graph editor, change the pitch of the roll’s notes so the roll rises or falls instead of repeating one note.
- Swing per drum. FL Studio’s global swing can be scaled for each channel, so the hats can swing while the kick stays straight.
- Random fills. Let FPC’s arpeggiator play your toms in a random order, as shown in the fills section above.
How to turn your drum pattern into a full song
A two-bar pattern is only the start. Place it in the Playlist and repeat it for the whole song. Then make versions for the other parts: click a pattern clip in the Playlist and choose Make unique to get a copy you can change without touching the original. A simple plan is lighter drums in the verse, the full beat in the hook, and a break where the drums drop out.
The guide on how to structure a beat shows how long each section should be. For the whole process from chords to export, start with how to make beats.
Want a guided path from here? Mix Elite’s FL Studio Beginner Accelerator starts from zero and walks you through one full song, vocals included, in 52 lessons with 16 quizzes. It’s also part of Mix Elite Academy.
What are the best virtual drum plugins for beginners?
Start with the drums already in your DAW: in FL Studio, that’s FPC and the Channel Rack, which cover hip-hop, trap, house and pop. For real-sounding acoustic drums, try a free kit like MT Power Drum Kit 2 or SSD 5.5 Free first, and move up to EZdrummer 3 or Superior Drummer 3 when you want more. Here’s where each one fits:
- MT Power Drum Kit 2 is a free acoustic kit, a good first test.
- SSD 5.5 Free is a free version of Steven Slate Drums that never expires, with the Deluxe 2 kit and three kit presets.
- BFD Player is free from the makers of BFD and comes with 340 grooves played by drummers.
- EZdrummer 3 from Toontrack is built for songwriters and comes with a library of ready-made grooves.
- Superior Drummer 3 is Toontrack’s deep option, with detailed control over every drum and microphone.
- Addictive Drums 2 from XLN Audio offers ready-made kits for many styles.
For a full comparison by price and genre, see the best drum VST plugins guide.
Drum programming mistakes beginners make
- One-bar loops. Make every pattern at least two bars and change something in the second.
- Too many hits. Especially in trap, drums are there to keep the rhythm going, not to be the highlight. Leave space.
- Layering kicks. Don’t stack two kicks. Layer claps, open hats or percussion instead.
- Weak samples. No pattern can fix a dull kick, so swap the sound first.
- Snap turned off. Leave the grid’s snap on while you program, or rhythms drift out of time.
- Mixing too early. Get the pattern right first. When you’re ready, the drum mixing guide walks you through levels, EQ and compression.
DAY 3 OF THE 7-DAY MUSIC PRODUCER COURSE
Program your drums, then turn them into a full song
Day 3 of the 7-Day course is about drums and arranging: how to choose sounds that work, how to build drum patterns fast even if you have no feel for rhythm, and one simple tactic for turning an idea into a full song. You get the 2025 Producer Toolkit sound pack to work with. It’s taught in FL Studio (the free trial works), about 45 minutes a day, and on day 7 a pro gives you personal feedback on your finished track. It’s $27, with 60 days to decide if it was worth it.
Frequently asked questions
Why do my programmed drums sound robotic?
Usually because every hit has the same velocity, every note sits exactly on the grid and the same bar repeats. Lower some hits, starting with every other hi-hat, add a little swing, nudge a few notes off the grid and change something every two to four bars. Small, uneven changes are what make drums sound played.
How do I stop hi-hats sounding like a machine gun?
Vary their velocity. Lower every other hat so the pattern goes loud, soft, loud, soft, and don’t make it perfectly even. In FL Studio, use the Velocity tab in the Channel Rack’s graph editor or the velocity bars in the Piano Roll. A little swing and a few hats slightly off the grid help too.
Which virtual drum plugin is best for a beginner?
Start with the drums already in your DAW, like FPC and the Channel Rack in FL Studio. For a free acoustic kit, MT Power Drum Kit 2 and SSD 5.5 Free are good first picks, and EZdrummer 3 is the easy paid step up for songwriters. The Mix Elite guide to the best drum VST plugins compares more by genre.
Can programmed drums sound like a real drummer?
Yes. Use a sampled acoustic kit, vary the velocity of every hit, add soft ghost notes on the snare, and only write parts a person with two hands and two feet could play. Small timing changes help too. Playing the part in on pads and fixing only the worst hits gives the most natural result.
What is advanced drum programming?
It’s the detail work on top of a basic beat: hi-hat rolls and pitch changes, ghost notes, swing that differs per drum, timing a hair off the grid and fills that lead into new sections. In FL Studio, the Channel Rack’s graph editor makes rolls with its repeat setting, and FPC’s arpeggiator can play random fills.