


FL Studio crackling almost always means the audio buffer ran out. Your computer couldn’t finish the next slice of sound in time, so you hear a click, pop or stutter, which Image-Line calls a buffer underrun. The quickest fix is in Options > Audio settings: pick an ASIO driver and raise the buffer length until the crackling stops.
If that’s not enough, lower the load on your computer. Turn on Smart disable, close plugin windows and freeze your heaviest plugin to audio. Below are all 11 fixes from Max’s video, with the exact clicks and a screenshot for each, plus what to check when FL Studio crackles while the CPU meter looks low.
Table of Contents
Why is FL Studio crackling?
When you press play, FL Studio doesn’t make sound one moment at a time. It builds the audio ahead in small chunks and keeps each one in a buffer, a short waiting room for sound, before it goes to your speakers. The buffer length sets how big each chunk is.
If your computer can’t fill the next chunk before the current one finishes, there’s a gap. That gap is the crackle. Image-Line’s manual names two main causes. Either the CPU is simply overloaded, or a system problem stops it from running at full speed. The first shows up on FL Studio’s CPU meter. The second can happen even when the meter looks low.
Here’s the good news. Crackles in live playback don’t end up in your exported song, because exporting takes as long as it needs, so there are no gaps. If you hear glitches in an export, a plugin is misbehaving, not your buffer.
How to read the CPU meter in FL Studio
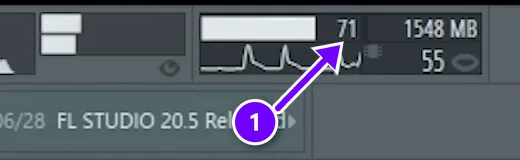
The CPU meter sits in the CPU & Memory panel at the top of FL Studio. The number next to the bar (1) is the CPU load. Beside it is the memory FL Studio is using, in MB, and under it is the number of voices playing.
That CPU load isn’t the same number you see in Windows Task Manager. It shows how much of each buffer’s time FL Studio needed to fill it. At 20%, it made the audio in a fifth of the time it had. At 90%, it only just made it. Near 100%, you’ll hear crackles.
Double-click the panel to open the Plugin performance monitor, which shows the plugins using the most CPU. The Audio settings page also has an Underruns counter that adds up every dropout. A few underruns while a project loads are normal. Only the ones you hear during playback matter.
How to fix FL Studio crackling, step by step
Work down this list in order. The first two matter most, and each one after that frees up a bit more of your computer’s power:
- Choose an ASIO audio driver.
- Raise the buffer length.
- Set Priority to Highest and turn on multithreading.
- Lower the Timebase (PPQ).
- Turn on Smart disable for all plugins.
- Delete unused channels and audio clips.
- Close all plugin windows.
- Find the heaviest plugin and consolidate it.
- Mix with stock plugins.
- Render finished tracks to audio.
- Put your computer on high performance.
Before any of that, update FL Studio. Max opens his video with this tip, because a big CPU improvement arrived in FL Studio 20.0.4, and Image-Line says more improvements have come since.
Max recorded this video in FL Studio 20, so a few windows look a little different today. The setting names are the same, and the names below match Image-Line’s current manual. If the Channel Rack, Playlist and Mixer are new to you, our beginner’s guide to FL Studio explains them first.
Fix 1: Choose an ASIO audio driver
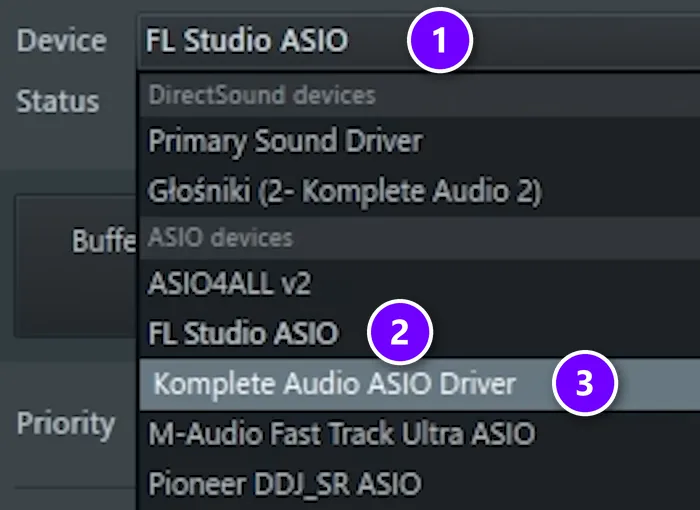
Open Options > Audio settings, or press F10, and click the Device menu (1). Under ASIO devices, pick FL Studio ASIO (2). If you have an audio interface, pick its own ASIO driver instead, like the Komplete Audio driver in Max’s list (3).
ASIO is a kind of audio driver made for music software, and it handles small buffers far better than the basic Windows drivers. Image-Line also recommends getting the newest driver from your interface’s maker and plugging the interface straight into your computer, never through a USB hub. If you’re still choosing gear, our home studio setup guide covers what you actually need.
Macs don’t use ASIO. Choose your interface as the input and output device instead. If the crackling won’t go away, especially while recording, Image-Line suggests combining your devices into an aggregate device in Audio MIDI Setup.
Fix 2: Raise the buffer length
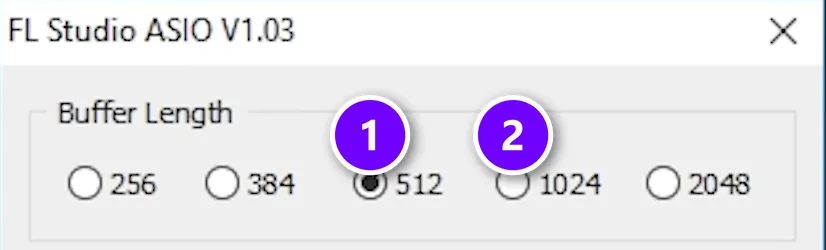
Max’s rule: “The most important thing in saving CPU is actually the buffer length.” A longer buffer gives your computer more time to fill each chunk, so it crackles less. The price is latency, a small delay between pressing a key and hearing the sound.
On Windows, click Show ASIO panel under the buffer readout. In Max’s FL Studio ASIO panel the buffer is set to 512 samples (1). If FL Studio crackles, step up to the next size (2) and play the song again. Max’s advice is to keep it as short as your computer allows and to raise it as soon as the CPU starts to struggle.
How long should it be? Image-Line’s own numbers are a good guide:
- Windows PCs and Intel Macs: never below 10 ms, which is 441 samples. Image-Line recommends 10 to 40 ms and suggests adding about 5 ms at a time.
- Apple Silicon Macs (M1, M2 and newer): start at 128 samples and only go up to 192, 256, 512 or 1024 if it still crackles. On these Macs, longer isn’t always better.
- Over 40 ms (1764 samples): playing live gets hard, and it rarely lowers the CPU load any further.
A simple habit helps. Keep the buffer short while you record or play a MIDI keyboard, so there’s no delay, and make it longer while you mix, when the project is heavier.
Next to the buffer you’ll also find Triple buffer. It can hide crackles when the CPU is close to 100%, but it doubles the delay. Max suggests trying these extra buttons to see if things get better. Image-Line adds one rule: if a setting doesn’t help, switch it off again.
Fix 3: Set Priority to Highest and turn on multithreading
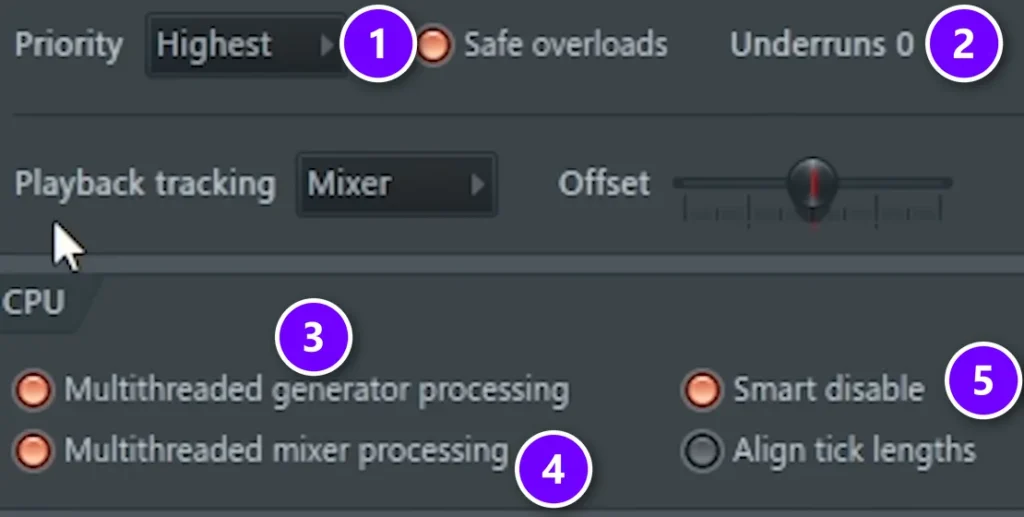
Stay in Audio settings. Set Priority to Highest (1), which gives the audio more of your CPU’s attention. The Underruns counter (2) shows how many dropouts happened so far, so you can watch it while you test each fix.
In the CPU section, two boxes matter most, Max says: Multithreaded generator processing (3) and Multithreaded mixer processing (4). They spread your instruments and effects across all of your CPU’s cores instead of piling everything onto one. Leave Smart disable (5) ticked too. Fix 5 explains why.
Below that is Resampling quality. Leave it at 24-point sinc or lower. Max says you probably won’t hear a difference anyway, and Image-Line recommends going no higher than 24-point sinc.
Image-Line’s checklist goes one step further and turns off Safe overloads. That gives the audio even more priority, though the screen can freeze for a moment during a heavy spike.
Fix 4: Lower the Timebase (PPQ)
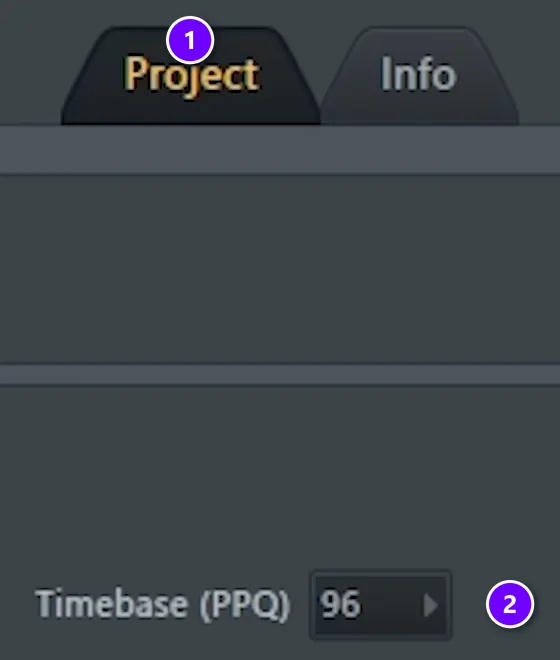
PPQ, short for pulses per quarter note, sets how finely FL Studio slices time for notes, clips and automation. Higher numbers mean finer timing and more CPU. Open Options > Project general settings, check that you’re on the Project tab (1), and find Timebase (PPQ) (2). The default is 96.
Max calls this the second most important setting and drops heavy projects to 24. The only downside he mentions is that you can’t zoom in as far. Image-Line’s current advice is gentler: settings above 192 hit the CPU hard, and 96 suits most projects.
So check yours first. If it’s above 96, bring it down to 96. Try 24 only on a heavy project that still crackles, and save a copy first. Lowering the PPQ can move notes and clips that sit between the new grid lines.
Fix 5: Turn on Smart disable for all plugins
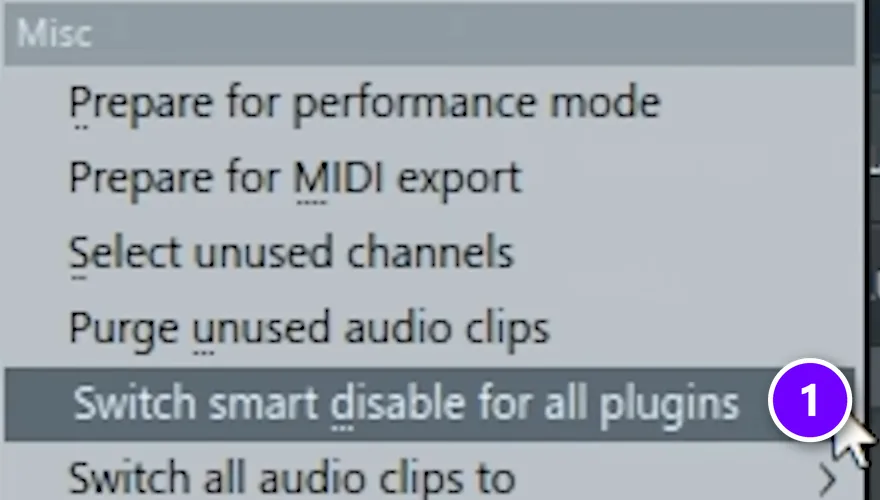
Smart disable switches off any plugin that isn’t making sound at that moment, so it stops using CPU. Tick Smart disable in Audio settings, box 5 in the Fix 3 screenshot. Then open Tools > Macros and click Switch smart disable for all plugins (1).
You need both. The Audio settings box only works for plugins that already have Smart disable switched on, and the macro switches it on for every plugin in your project.
Max’s one warning is about effects with long tails. A reverb, for example, can cut off a few seconds after the sound stops. Your export is safe, though, because Smart disable only works during live playback. If a plugin misbehaves, turn Smart disable off for just that one in its plugin menu.
Fix 6: Delete unused channels and audio clips
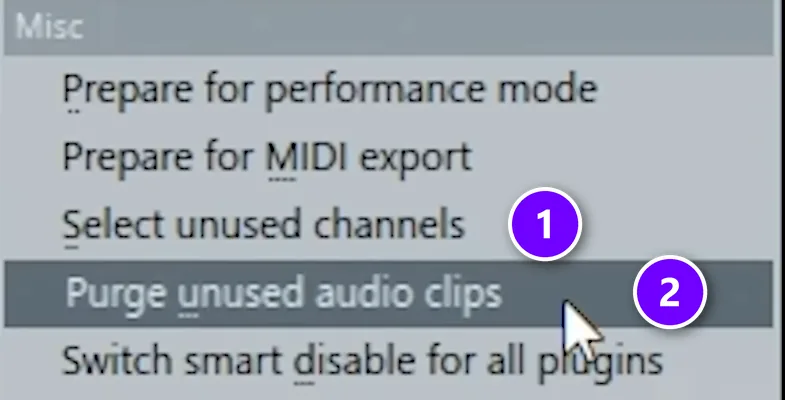
Big projects collect channels and samples you no longer use. Max finds this trick handy late in a project, when you can’t tell anymore what’s still in use. Open Tools > Macros and click Select unused channels (1). FL Studio selects every channel that has no notes in any pattern.
Delete the channels, then purge the clips
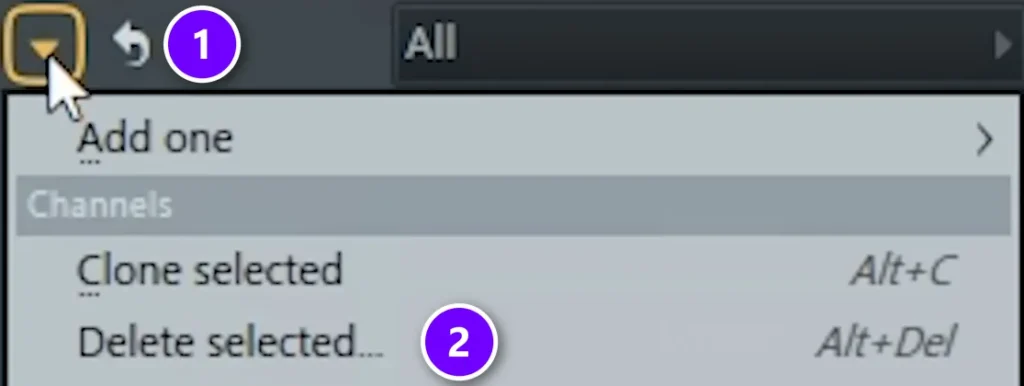
Click the small arrow at the top left of the Channel Rack (1) and choose Delete selected (2), or press Alt+Del. Look over what’s selected first, so you don’t delete a channel you still need.
Then do the same for samples. They sit in your computer’s memory, so clearing out unused ones helps too. Go back to Tools > Macros and click Purge unused audio clips, marked (2) in the first screenshot. FL Studio removes every audio clip that isn’t used anywhere in the project.
Fix 7: Close all plugin windows
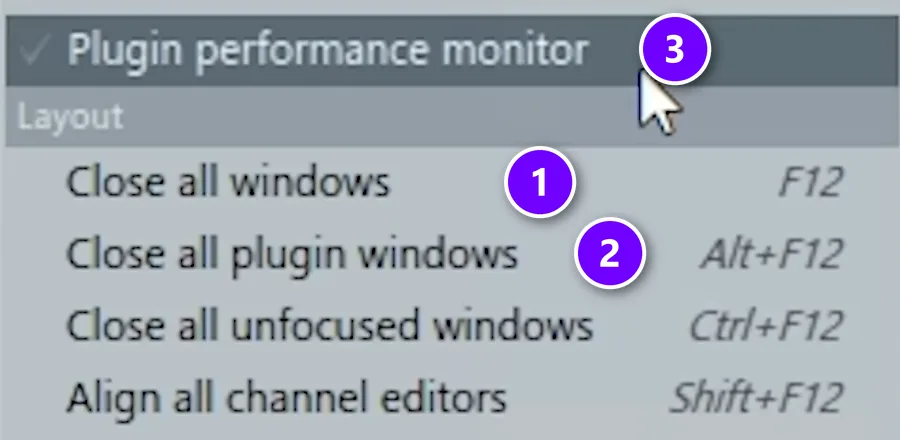
Every open plugin window keeps using power, even when it’s hidden behind other windows. Max calls this one a trick he learned really late: “It will close up every plugin here and I promise it will increase the performance.”
Press F12, which is View > Close all windows (1). Or press Alt+F12 for Close all plugin windows (2), which leaves your other windows open. Either way, only the windows close. Every effect keeps working exactly as before.
The same View menu opens the Plugin performance monitor (3), which you’ll need in the next fix. For more time-savers like F12, see our list of FL Studio shortcuts.
Fix 8: Find the heaviest plugin and consolidate it
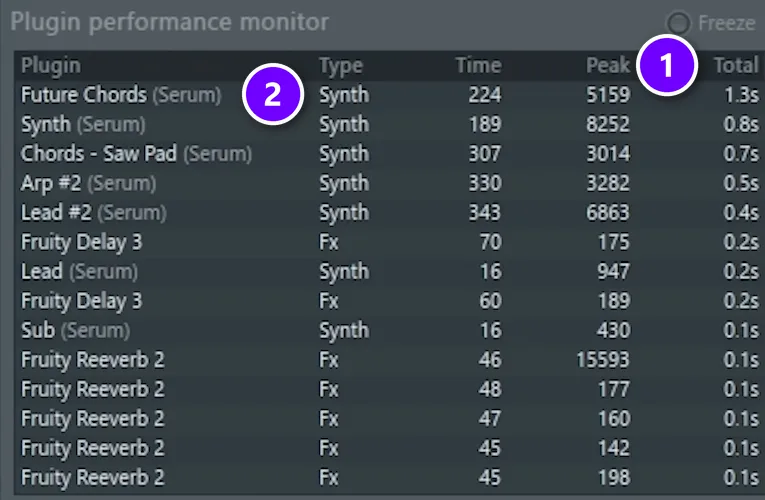
Open View > Plugin performance monitor, or double-click the CPU panel, and play the busiest part of your song. Click Total (1) to sort the list, so the plugin that used the most CPU jumps to the top (2). In Max’s project, that’s a Serum synth called Future Chords.
Consolidate the pattern to audio
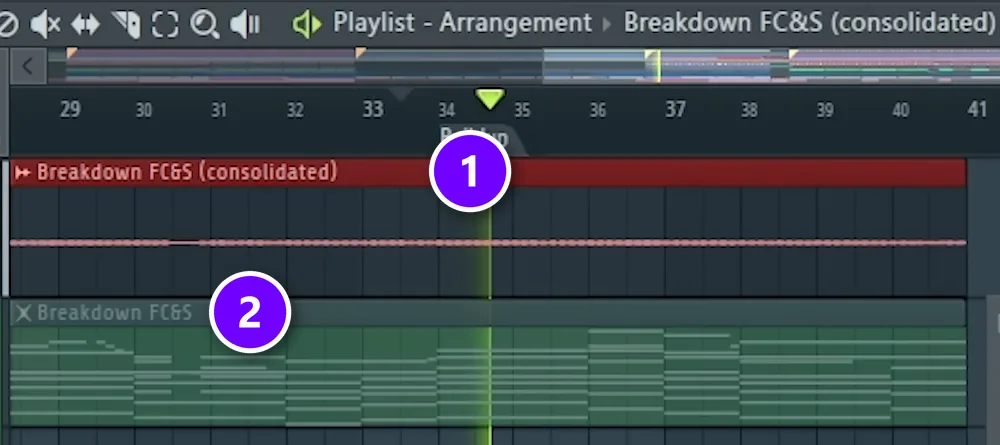
Consolidating turns a pattern into an audio clip, a recording of what that plugin plays. Playing audio costs far less CPU than running a big synth live. Select the track in the Playlist and press Ctrl+Alt+C, or right-click the track’s name and choose to consolidate it.
FL Studio adds the new audio clip (1) and mutes the original pattern (2), so nothing is lost. In Max’s video, the crackles stop as soon as the consolidated version plays. Need to change the part later? Unmute the pattern, edit it and consolidate again.
Fix 9: Mix with stock plugins
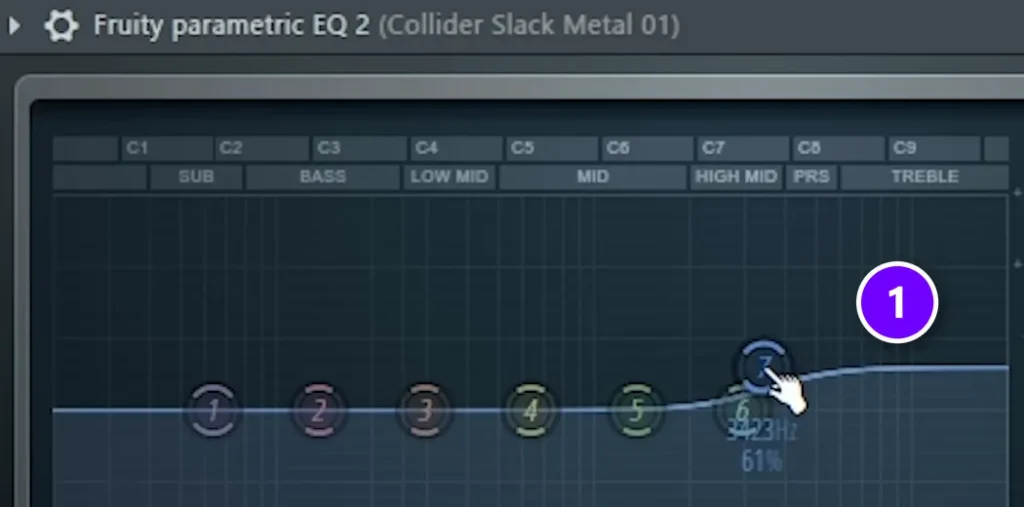
Third-party plugins are often heavier than FL Studio’s own. The template in Max’s video is mixed and mastered with stock plugins only. As Max puts it, “There’s no need to use super fancy equalizers when you just need to boost the highs by 3 dB.” A simple high boost (1) in Fruity parametric EQ 2 does that job.
Keep your expensive plugins for the jobs only they can do. Max’s example is mid-side EQ, where you treat the middle and the sides of a stereo sound separately. He also admits stock instruments won’t always cut it, but stock effects can carry a whole mix.
Fix 10: Render finished tracks to audio
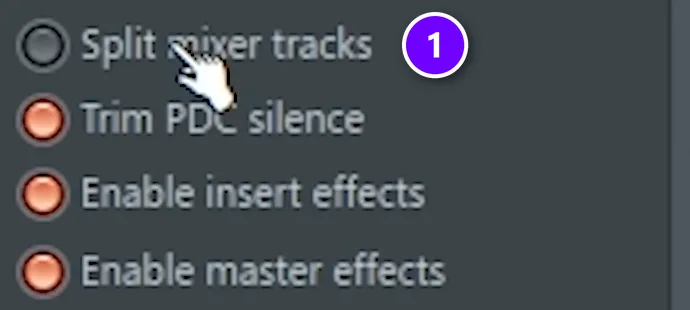
When a song is mixed but you still want small changes, turn every mixer track into an audio file. Go to File > Export > Wave file, make a new folder and save, then switch on Split mixer tracks (1) before you start the export.
FL Studio writes one file per mixer track. Drag them all into a new project, and you have the whole song as audio, which barely touches the CPU. Name your mixer tracks before you export, as Max stresses, or you’ll get a folder of files with generic names.
Fix 11: Put your computer on high performance
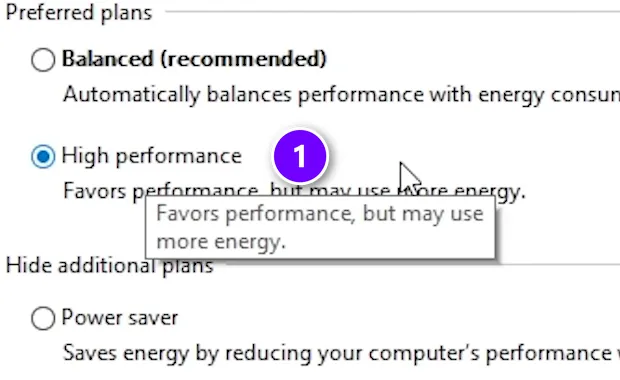
Many computers slow the CPU down to save power, and those speed changes can cause crackles. On Windows, Max presses Start, types power and opens the power settings, then Additional power settings, and picks High performance (1). You’ll find the same page under Control Panel > Hardware and Sound > Power Options.
Set the processor state to 100%
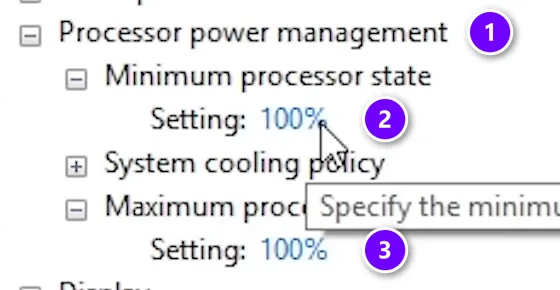
Max goes one step further. Click Change plan settings > Change advanced power settings, open Processor power management (1), and set both Minimum processor state (2) and Maximum processor state (3) to 100%.
On a laptop, Image-Line suggests 99% instead. That keeps the CPU out of turbo mode, which can overheat it and cause the very glitches you’re trying to stop. Keep laptops plugged in, too. FL Studio has a matching switch called Force high performance power plan in Options > General settings.
On a Mac, Image-Line’s tips are to stop the computer from sleeping, turn off Power Nap, keep laptops plugged in, and run plugins that support Apple Silicon natively rather than through Rosetta 2.
FL Studio crackling with low CPU usage? Check these
Sometimes FL Studio crackles even though the CPU meter looks low. Image-Line calls these system issues, and it’s usually one of these seven things:
- Mismatched sample rates. Set FL Studio, your computer and your interface to the same rate, 44,100 or 48,000 Hz. Rates like 96 or 192 kHz need far more CPU.
- A USB hub. Plug your audio interface straight into the computer.
- An old driver. Get the newest one from your interface’s maker.
- Programs in the background. Close browsers, video calls and downloads while you work. Scheduled backups and updates can cause random crackles too.
- 32-bit plugins. FL Studio has to bridge them, which costs extra CPU for each one. Install the 64-bit versions, as our guide on adding VSTs to FL Studio shows.
- One overloaded core. When lots of mixer tracks send into each other, FL Studio can’t split the work, so one core maxes out while the meter looks fine. Give your heaviest plugins their own mixer tracks without shared sends.
- Autosave during playback. In Options > File settings, avoid the Frequently and Very frequently autosave options, which can save while the song plays.
Fix these, then play your heaviest project with the Underruns counter in view. If it stays still, you’re done.
THE 7-DAY MUSIC PRODUCER COURSE
Get your setup right from the start
Day 1 of the 7-Day course covers setup and workflow: the ‘Perfect Triangle’ formula for a home studio on any budget, which hardware and software you actually need, and the four DAW features to learn first so FL Studio stops feeling confusing. It’s taught in FL Studio, and the free trial works. Each day takes about 45 minutes, and on Day 7 a pro gives you feedback on your finished track. It’s $27, with a 60-day money-back guarantee.
Frequently asked questions
Why is my FL Studio crackling?
Almost always because the audio buffer runs out: your computer can’t make the next chunk of sound in time. The usual fixes are an ASIO driver, a longer buffer length, Smart disable and fewer heavy plugins. If the CPU meter is low, check for a USB hub, mismatched sample rates or programs running in the background.
What buffer size should I use in FL Studio?
On Windows and Intel Macs, Image-Line says never go below 10 ms (441 samples) and recommends 10 to 40 ms. On Apple Silicon Macs, start at 128 samples and only go up if it crackles. Use a short buffer while you record and a longer one while you mix.
Does FL Studio crackling end up in the exported song?
No. Crackles from buffer underruns only happen during live playback. Exporting takes as long as it needs, so the file has no gaps. If you hear glitches in an exported song, a plugin is misbehaving, so bypass your plugins one at a time to find it.
How do I give FL Studio more CPU?
There’s no slider for it. The closest thing is Priority in Audio settings, set to Highest. Beyond that, make FL Studio need less: turn on both multithreading options and Smart disable, close plugin windows, consolidate heavy synths to audio, and put your computer on its high performance power plan.